2020 Hyundai Sonata power window
[x] Cancel search: power windowPage 187 of 537

05
5-57
Power Windows
The ignition switch must be in the
ON position to be able to raise or
lower the windows. Each door has a
Power Window switch to control that
door’s window. The driver has a Power
Window Lock switch which can block
the operation of passenger windows.
The power windows will operate for
approximately 30 seconds after the
ignition switch is placed in the ACC or
LOCK/OFF position. However, if the front
doors are opened, the Power Windows
will not operate even within the 30
second period.
WARNING
To avoid serious injury or death, do not
extend your head, arms or body outside
the windows while driving.
Information
• In cold and wet climates, power
windows may not work properly due to
freezing conditions.
• While driving with the rear windows
down or with the sunroof (if equipped)
opened (or partially opened), your
vehicle may demonstrate a wind
buffeting or pulsation noise. This
noise is normal and can be reduced
or eliminated by taking the following
actions. If the noise occurs with one
or both of the rear windows down,
partially lower both front windows
approximately one inch. If you
experience the noise with the sunroof
open, slightly close the sunroof.
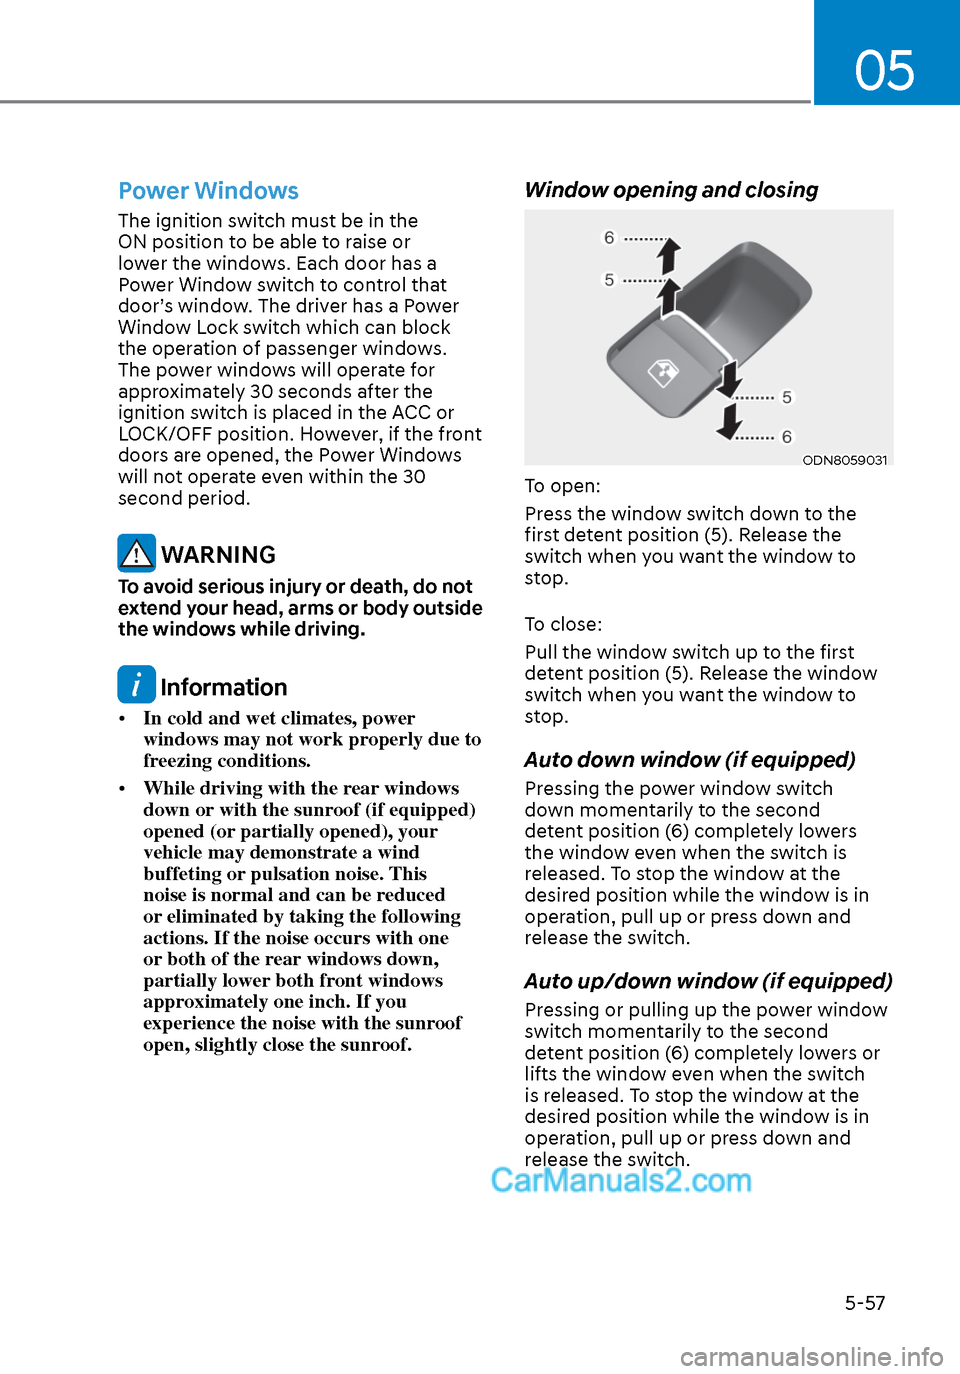
Window opening and closing
ODN8059031ODN8059031
To open:
Press the window switch down to the
first detent position (5). Release the
switch when you want the window to
stop.
To close:
Pull the window switch up to the first
detent position (5). Release the window
switch when you want the window to
stop.
Auto down window (if equipped)
Pressing the power window switch
down momentarily to the second
detent position (6) completely lowers
the window even when the switch is
released. To stop the window at the
desired position while the window is in
operation, pull up or press down and
release the switch.
Auto up/down window (if equipped)
Pressing or pulling up the power window
switch momentarily to the second
detent position (6) completely lowers or
lifts the window even when the switch
is released. To stop the window at the
desired position while the window is in
operation, pull up or press down and
release the switch.
Page 188 of 537

Convenient Features5-58
To reset the power windows
If the power windows do not operate
normally, the automatic power window
system must be reset as follows:
1. Place the ignition switch to the ON position.
2. Close the window and continue pulling up on the power window
switch for at least one second.
If the power windows do not operate
properly after resetting, have the system
checked by an authorized HYUNDAI
dealer.
WARNING
The automatic reverse feature doesn’t
activate while resetting the power
window system. Make sure body parts
or other objects are safely out of the
way before closing the windows to
avoid injuries or vehicle damage.
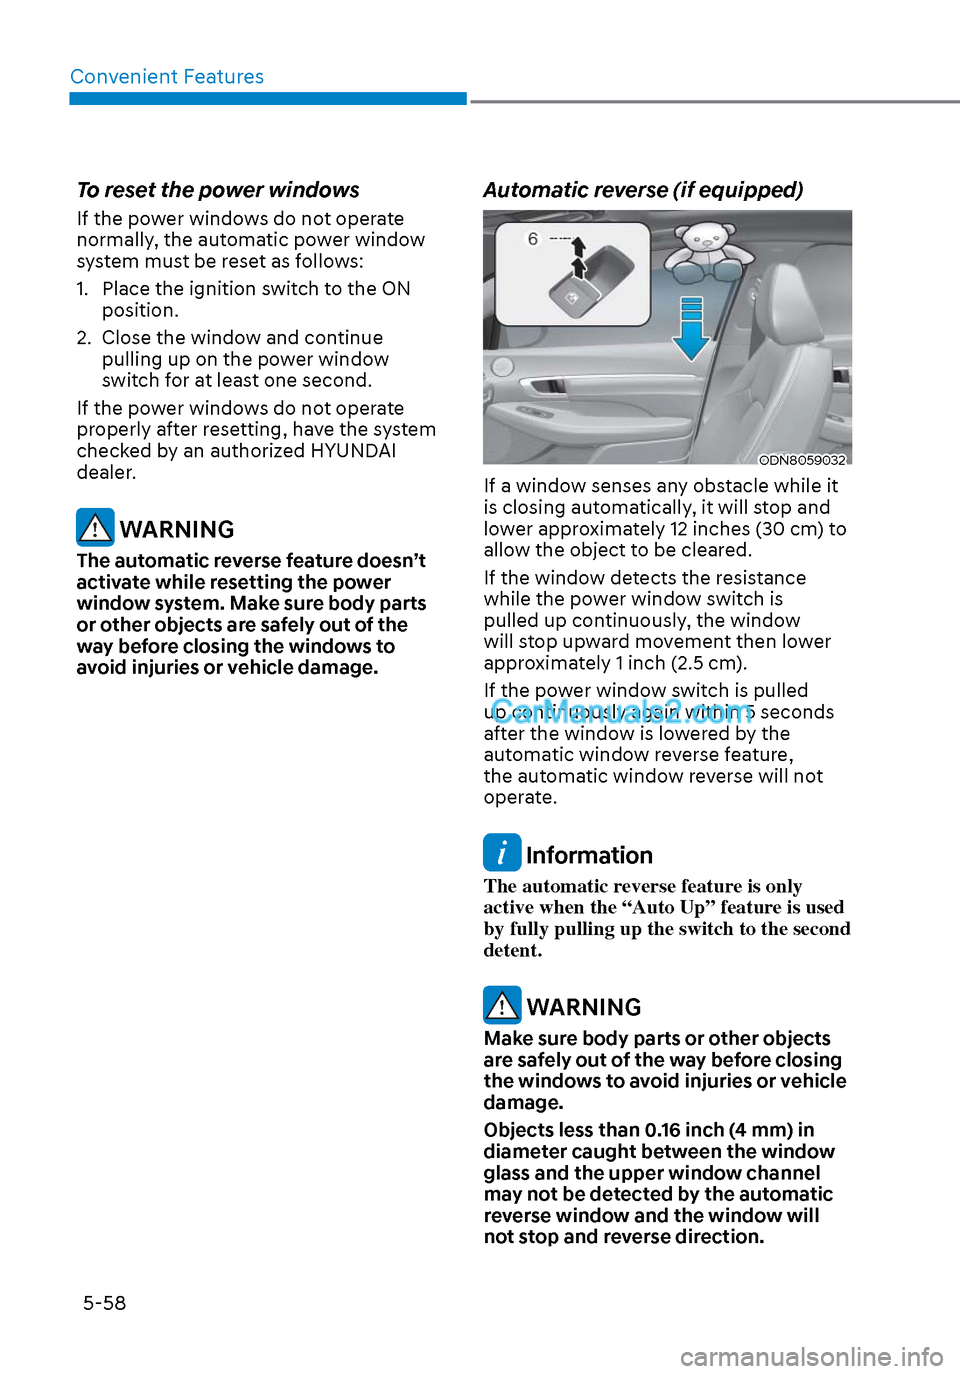
Automatic reverse (if equipped)
ODN8059032ODN8059032
If a window senses any obstacle while it
is closing automatically, it will stop and
lower approximately 12 inches (30 cm) to
allow the object to be cleared.
If the window detects the resistance
while the power window switch is
pulled up continuously, the window
will stop upward movement then lower
approximately 1 inch (2.5 cm).
If the power window switch is pulled
up continuously again within 5 seconds
after the window is lowered by the
automatic window reverse feature,
the automatic window reverse will not
operate.
Information
The automatic reverse feature is only
active when the “Auto Up” feature is used
by fully pulling up the switch to the second
detent.
WARNING
Make sure body parts or other objects
are safely out of the way before closing
the windows to avoid injuries or vehicle
damage.
Objects less than 0.16 inch (4 mm) in
diameter caught between the window
glass and the upper window channel
may not be detected by the automatic
reverse window and the window will
not stop and reverse direction.
Page 189 of 537

05
5-59
NOTICE
Do not install any accessories on the
windows. The automatic reverse
feature may not operate.
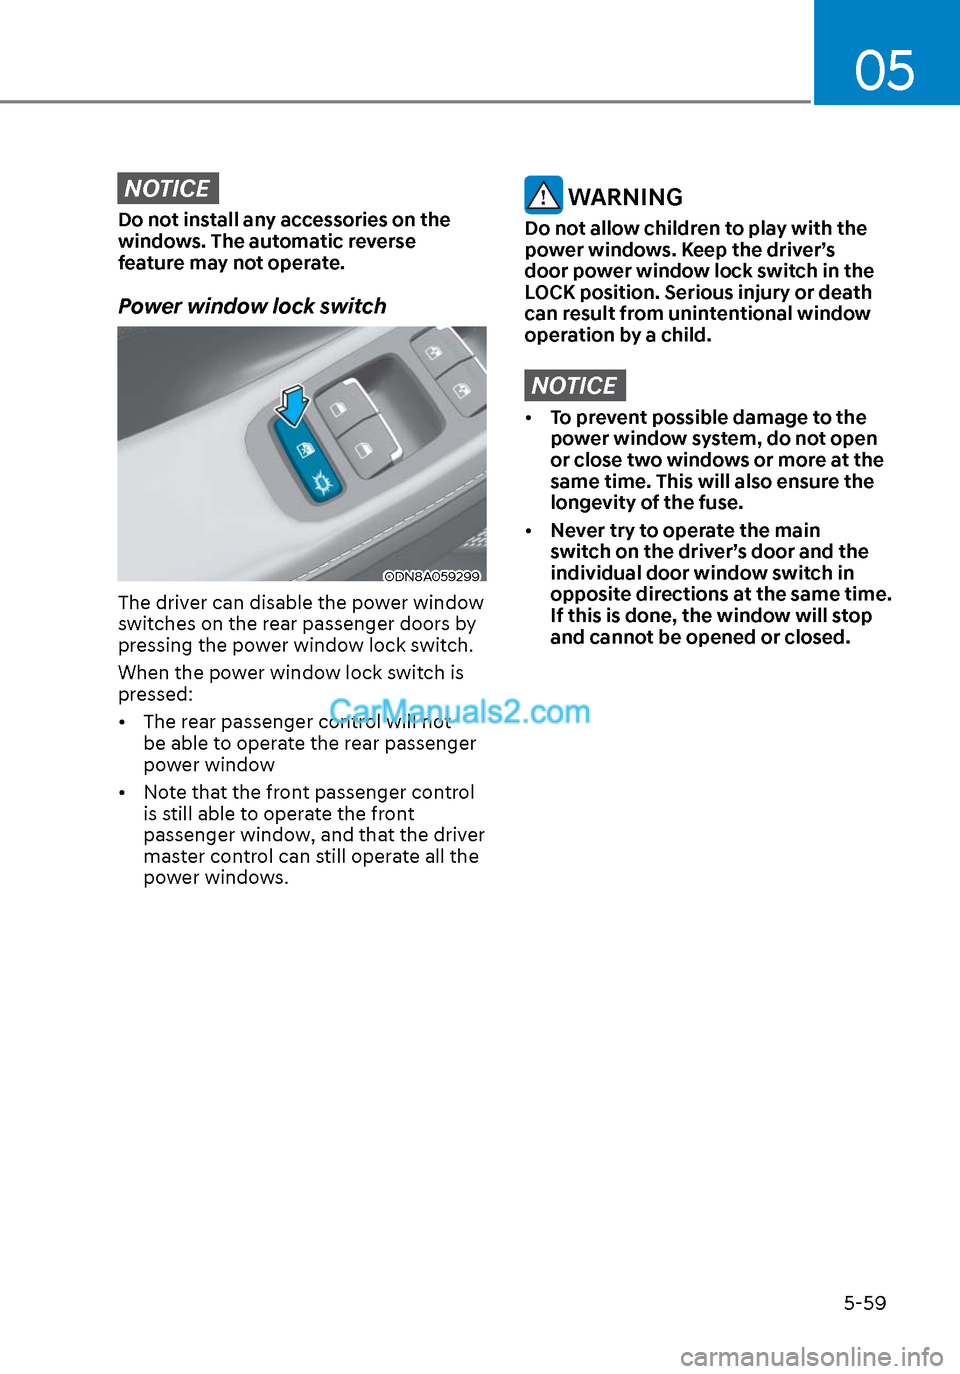
Power window lock switch
ODN8A059299ODN8A059299
The driver can disable the power window
switches on the rear passenger doors by
pressing the power window lock switch.
When the power window lock switch is
pressed:
• The rear passenger control will not be able to operate the rear passenger
power window
• Note that the front passenger control is still able to operate the front
passenger window, and that the driver
master control can still operate all the
power windows.
WARNING
Do not allow children to play with the
power windows. Keep the driver’s
door power window lock switch in the
LOCK position. Serious injury or death
can result from unintentional window
operation by a child.
NOTICE
• To prevent possible damage to the
power window system, do not open
or close two windows or more at the
same time. This will also ensure the
longevity of the fuse.
• Never try to operate the main
switch on the driver’s door and the
individual door window switch in
opposite directions at the same time.
If this is done, the window will stop
and cannot be opened or closed.
Page 276 of 537

Convenient Features5-146
Sunvisor
OTM048089OTM048089
To use a sunvisor, pull it downward.
To use a sunvisor for a side window, pull
it downward, unsnap it from the bracket
(1) and swing it to the side (2).
To use the vanity mirror, pull down the
sunvisor and slide the mirror cover (3).
Adjust the sunvisor forward or backward
(4, if equipped) as needed.
Use the ticket holder (5) to hold tickets.
Close the vanity mirror cover securely
and return the sunvisor to its original
position after use.
NOTICE
Close the vanity mirror cover securely
and return the sunvisor to its original
position after use.
WARNING
For your safety, do not block your view
when using the sunvisor.
NOTICE
Do not put several tickets in the ticket
holder at one time. This could cause
damage to the ticket holder.
Power Outlet
ODN8059220ODN8059220
The power outlet is designed to provide
power for mobile telephones or other
devices designed to operate with vehicle
electrical systems. The devices should
draw less than 180 W with the engine
running.
WARNING
Avoid electrical shocks. Do not place
your fingers or foreign objects (pin, etc.)
into a power outlet or touch the power
outlet with a wet hand.
Page 282 of 537

Convenient Features5-152
INFOTAINMENT SYSTEM
NOTICE
• If you install an aftermarket HID
head lamp, your vehicle’s audio and
electronic devices may not function
properly.
• Prevent chemicals such as perfume,
cosmetic oil, sunscreen, hand
cleaner, and air freshener from
contacting the interior parts
because they may cause damage or
discoloration.
USB and iPod® Port
ODN8059229ODN8059229
You can use an AUX or USB cable to
connect audio devices to the vehicle AUX
or USB port.
Information
When using a portable audio device
connected to the power outlet, noise may
occur during playback. If this happens,
use the portable audio device’s power
source.
iPod® is a trademark of Apple Inc.
Antenna
ODN8059226ODN8059226
Shark fin antenna (1, if equipped)
The shark fin antenna receives
transmitted data. (for example : GPS)
Glass antenna (2)
Your vehicle uses a glass antenna to
receive both AM and FM signals.
WARNING
• Do not clean the inside of the rear
window glass with a cleaner or
scraper to remove foreign deposits
as this may cause damage to the
antenna elements.
• To prevent damage to the rear glass antenna, never use sharp
instruments or window cleaner
containing abrasives to clean the
window. Clean the inside surface of
the rear glass window with a piece of
soft cloth.
• Avoid adding metallic coatings such as Ni, Cd, etc. These can degrade
the receiving AM and FM broadcast
signals.
• When putting a sticker on the inside surface of the rear window, be
careful not to damage the rear glass
antenna.
• Do not put sharp instruments nearby the rear glass antenna.
Page 480 of 537

08
8-33
• The negative battery cable must
be removed first and installed last
when the battery is disconnected.
Disconnect the battery charger in the
following order:
1. Turn off the battery charger main
switch.
2. Unhook the negative clamp from the negative battery terminal.
3. Unhook the positive clamp from the positive battery terminal.
• Always use a genuine HYUNDAI
approved battery when you replace
the battery.
By jump starting
After a jump start from a good battery,
drive the vehicle for 20-30 minutes
before it is shutoff. The vehicle may
not restart if you shut it off before the
battery had a chance to adequately
recharge. See “Jump Starting” in chapter
7 for more information on jump starting
procedures.
Information
An inappropriately disposed
battery can be harmful to
the environment and human
health. Dispose of the battery
according to your local law(s) or
regulations.
Reset Features
The following items may need to be reset
after the battery has been discharged or
the battery has been disconnected. See
chapter 3 or 4 for:
• Power Windows
• Trip Computer
• Climate Control System
• Clock
• Audio System
• Sunroof
Page 497 of 537

Maintenance8-50
Instrument panel fuse panel
Fuse Name (A) Circuit Protected
S/HEATER (FRT) 25A F
ront Seat Warmer Control Module, Front Air Ventilation Seat
Control Module
TRUNK 10A ICU Junction Block (Trunk Lid Relay)
DOOR LOCK 20A ICU Junction Block (Door Lock Relay,
Door Unlock Relay, Two Turn Unlock Relay)
MODULE1 7.5A Key Solenoid
MODULE3 10A Driver Door Module, Passenger Seat Relax Unit,
Hazard Switch, Crash Pad Switch (Up),
Front Mood Lamp Unit, Start/stop Button Switch,
Driver/Passeger Smart Key Outside Handle
S/HEATER (RR) 25A Rear Seat Warmer Control Module
P/SEAT (PASS) 30A Passenger Seat Manual Switch, Passenger Seat Relax Unit MODULE6 10A Driver Door ModuleSAFETY
P/WINDOW (RH) 30APassenger Safety Power Window Module,
Rear Power Window Switch RH
P/SEAT (DRV) 30A Dirver Seat Manual Switch, Driver IMS Module
IBU1 15A IBU, Driver/Passenger Door NFC Module, IAU,
BLE Unit, Ignition Switch
AMP 25A AMP, DC-DC Converter (AMP)
SAFETY
P/WINDOW (LH) 30ADriver Safety Power Window Module,
Rear Power Window Switch LH
BRAKE SWITCH 10A IBU, Stop Lamp Switch
SUNROOF2 20A Panorama Sunroof, Data Link ConnectorAIR BAG2 10A SRS Contorl ModuleAIR BAG1 15A SRS Contorl Module, Passenger Occupant Detection Sensor
E-SHIFTER1 10A SCU, Electronic ATM Shift Lever
MEMORY 10A Driver IMS Module, Security Indicator, A/C Switch,
Driver/Passenger Power Outside Mirror,
A/C Control Module, Instrument Cluster,
Rain Sensor, Head-Up Display
Page 531 of 537

IndexI-12
Manual climate control system ........................................................................\
.. 5-118 Heating and air conditioning ........................................................................\
. 5-119
Mode selection ........................................................................\
...................... 5-120
Instrument panel vents ........................................................................\
.......... 5-122
Temperature control ........................................................................\
.............. 5-122
Air intake control ........................................................................\
.................. 5-122
Fan speed control ........................................................................\
.................. 5-123
Air conditioning ........................................................................\
.................... 5-123
System operation ........................................................................\
................... 5-124
System maintenance ........................................................................\
.............. 5-125
Air conditioning refrigerant label......................................\
............................ 5-126
Mirrors ................................................................\
................................................. 5-46
Inside rearview mirror ........................................................................\
............. 5-46
HomeLink
® system.................................................................\
......................... 5-47
Side view mirrors ........................................................................\
.................... 5-53
Adjusting the side view mirrors ...................................................................... 5-54
Folding the side view mirrors ........................................................................\
. 5-54
Reverse parking aid function ........................................................................\
.. 5-55
N
Navigation-based Smart Cruise Control (NSCC) .............................................. 6-105
O
Occupant Classification System (OCS) ............................................................... 3-47
Odometer ...............................................................\
................................................ 4-5
Oil (Engine) ........................................................................\
................................. 8-19
Outside temperature gauge ........................................................................\
............ 4-5
Owner maintenance ........................................................................\
....................... 8-5
P
Panoramic sunroof ........................................................................\
....................... 5-60
Parking lamp position ........................................................................\
.................. 5-75
Passenger’s front air bag ........................................................................\
.............. 3-39
Power brakes ........................................................................\
................................ 6-20
Power outlet ........................................................................\
............................... 5-146
Power window lock switch ........................................................................\
.......... 5-59
Pre-tensioner seat belt ........................................................................\
.................. 3-24 Retractor pretensioner ........................................................................\
............. 3-24