2020 Hyundai Sonata gauge
[x] Cancel search: gaugePage 86 of 537

4
Instrument Cluster ........................................................................\
................. 4-2Instrument Cluster Control ........................................................................\
.............. 4-3
Gauges and Meters ........................................................................\
.......................... 4-3
Transmission Shift Indicator ........................................................................\
............ 4-6
Warning and Indicator Lights ........................................................................\
.......... 4-7
LCD Display Messages ........................................................................\
.................... 4-15
LCD Display (TYPE A, B) ........................................................................\
....... 4-19LCD Display Control ........................................................................\
........................4-19
LCD Display Modes ........................................................................\
........................ 4-20
Trip Computer......................................................................\
.................................... 4-31
LCD Display (TYPE C) ........................................................................\
........... 4-34LCD Display Control ........................................................................\
....................... 4-34
View Modes ........................................................................\
.................................... 4-35
Utility View Mode ........................................................................\
........................... 4-36
Option Menu ........................................................................\
................................... 4-38
User Settings Mode ........................................................................\
........................ 4-39
4. Instrument Cluster
Page 87 of 537

4-2
Instrument Cluster
ODN8A049039/Odn8a049032/ODN8A049002ODN8A049039/Odn8a049032/ODN8A049002
INSTRUMENT CLUSTER
1. Tachometer
2. Speedometer
3. Engine coolant temperature gauge
4. Fuel gauge
5. Warning and indicator lights
6. LCD display (including trip computer)
The actual cluster in the vehicle may differ from the illustration.
For more information, refer to the "Gauges and Meters" in this chapter.
Type AType A
Type BType B
Type CType C
Page 88 of 537

04
4-3
Instrument Cluster Control
Adjusting instrument cluster
illumination
ODN8A059337ODN8A059337
When the vehicle's parking lamps or
headlamps are on, press the illumination
control button to adjust the brightness of
the instrument panel illumination.
When pressing the illumination control
button, the interior switch illumination
intensity is also adjustable.
• The brightness of the instrument panel illumination is displayed.
• If the brightness reaches the maximum or minimum level, a chime
will sound.
WARNING
Never adjust the instrument cluster
while driving. Doing so could lead to
driver distraction which may cause an
accident and lead to vehicle damage,
serious injury, or death.
Gauges and Meters
Speedometer
OLX2048102LOLX2048102LODN8049004LODN8049004L
The speedometer indicates the speed of
the vehicle and is calibrated in miles per
hour (MPH) and/or kilometers per hour
(km/h).
Tachometer
OLX2048105OLX2048105ODN8049005ODN8049005
The tachometer indicates the
approximate number of engine
revolutions per minute (RPM).
Use the tachometer to select the correct
shift points and to prevent lugging and/
or over-revving the engine.
NOTICE
Do not operate the engine within the
tachometer's RED ZONE. This may
cause severe engine damage.
Type CType CType A, BType A, B
Type CType CType A, BType A, B
Page 89 of 537

Instrument Cluster4-4
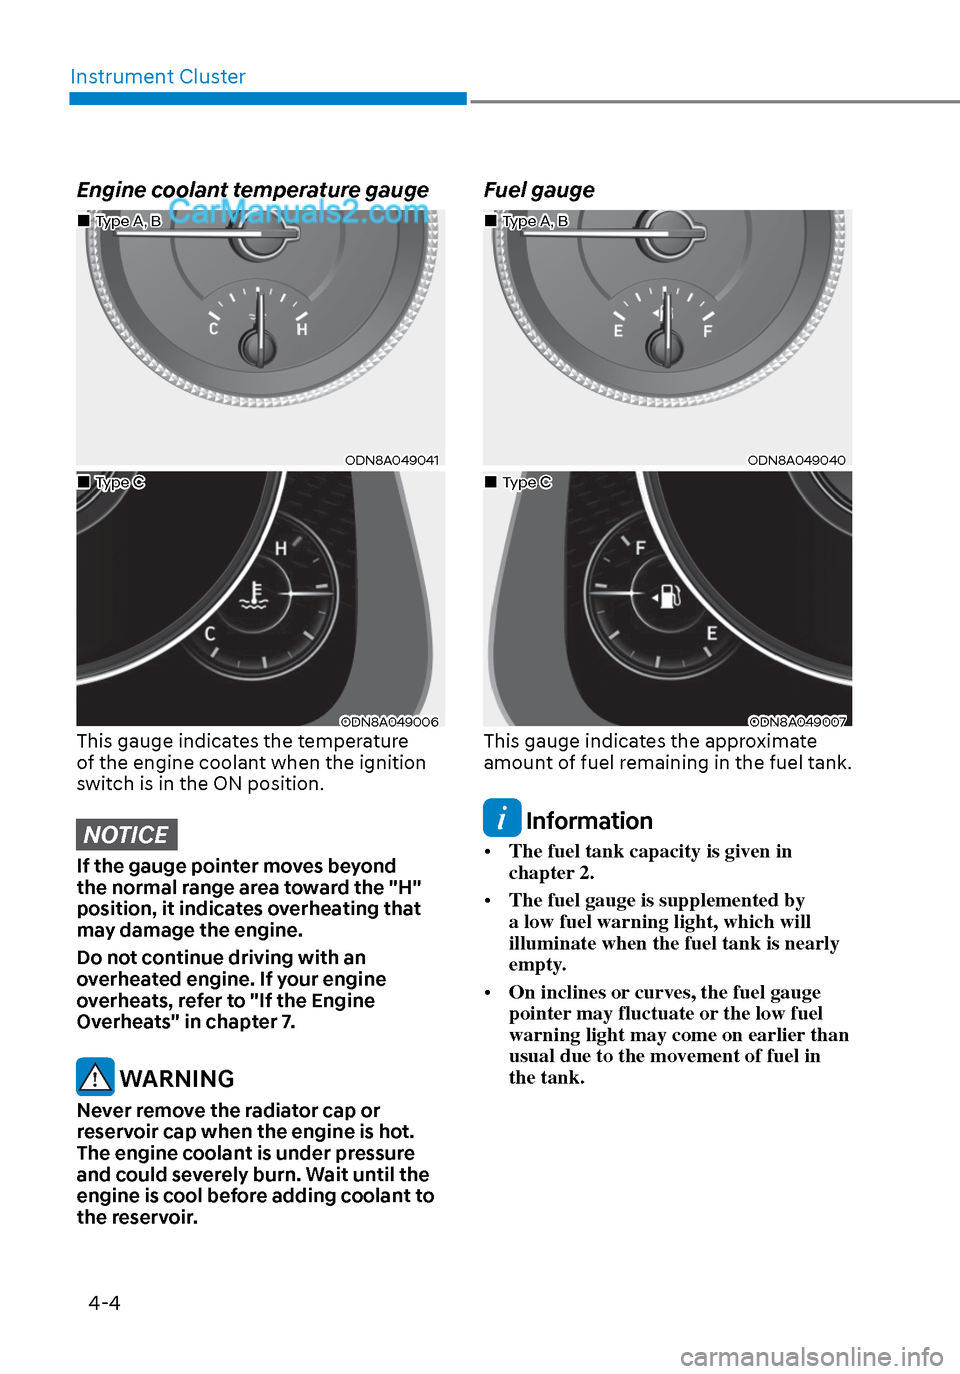
Engine coolant temperature gauge
ODN8A049041ODN8A049041
ODN8A049006ODN8A049006This gauge indicates the temperature
of the engine coolant when the ignition
switch is in the ON position.
NOTICE
If the gauge pointer moves beyond
the normal range area toward the "H"
position, it indicates overheating that
may damage the engine.
Do not continue driving with an
overheated engine. If your engine
overheats, refer to "If the Engine
Overheats" in chapter 7.
WARNING
Never remove the radiator cap or
reservoir cap when the engine is hot.
The engine coolant is under pressure
and could severely burn. Wait until the
engine is cool before adding coolant to
the reservoir.
Fuel gauge
ODN8A049040ODN8A049040
ODN8A049007ODN8A049007This gauge indicates the approximate
amount of fuel remaining in the fuel tank.
Information
• The fuel tank capacity is given in
chapter 2.
• The fuel gauge is supplemented by
a low fuel warning light, which will
illuminate when the fuel tank is nearly
empty.
• On inclines or curves, the fuel gauge
pointer may fluctuate or the low fuel
warning light may come on earlier than
usual due to the movement of fuel in
the tank.
Type A, BType A, B
Type CType C
Type A, BType A, B
Type CType C
Page 90 of 537

04
4-5
WARNING
Running out of fuel can expose vehicle
occupants to danger.
You must stop and obtain additional
fuel as soon as possible after the
warning light comes on or when the
gauge indicator comes close to the "E
(Empty)" level.
NOTICE
Avoid driving with an extremely low
fuel level. Running out of fuel could
cause the engine to misfire and damage
the catalytic converter.
Outside temperature gauge
OTMA048112OTMA048112
oDN8A049031oDN8A049031This gauge indicates the current outside
air temperature by 1°F (1°C). - Temperature range: -40°F ~ 140°F (40°C ~ 60°C)
Note that the temperature indicated
on the LCD display may not change
as quickly as the outside temperature
(there may be a slight delay before the
temperature changes.) You can change the temperature unit
from °F to °C or °C to °F in the User
Settings mode in the cluster:
- Go to User Settings Mode → Other → Temperature Unit.
For vehicles equipped with Automatic
Climate Control, you can also:
- Press and hold the AUTO and OFF buttons on the climate control unit for
3 seconds
Both the temperature unit on the cluster
LCD display and climate control screen
will change.
Odometer
OTMA048183OTMA048183
ODN8A049037ODN8A049037The odometer indicates the total
distance that the vehicle has been
driven and should be used to determine
when periodic maintenance should be
performed.
Type CType C
Type A, BType A, B
Type CType C
Type A, BType A, B
Page 173 of 537

05
5-43
Tilt Steering / Telescope Steering
When adjusting the steering wheel to a
comfortable position, adjust the steering
wheel so that it points toward your chest,
not toward your face. Make sure you can
see the instrument cluster warning lights
and gauges. After locking the lever, push
the steering wheel both up and down to
be certain it is locked in position. Always
adjust the position of the steering wheel
before driving.
WARNING
NEVER adjust the steering wheel while
driving. This may cause loss of vehicle
control resulting in an accident.
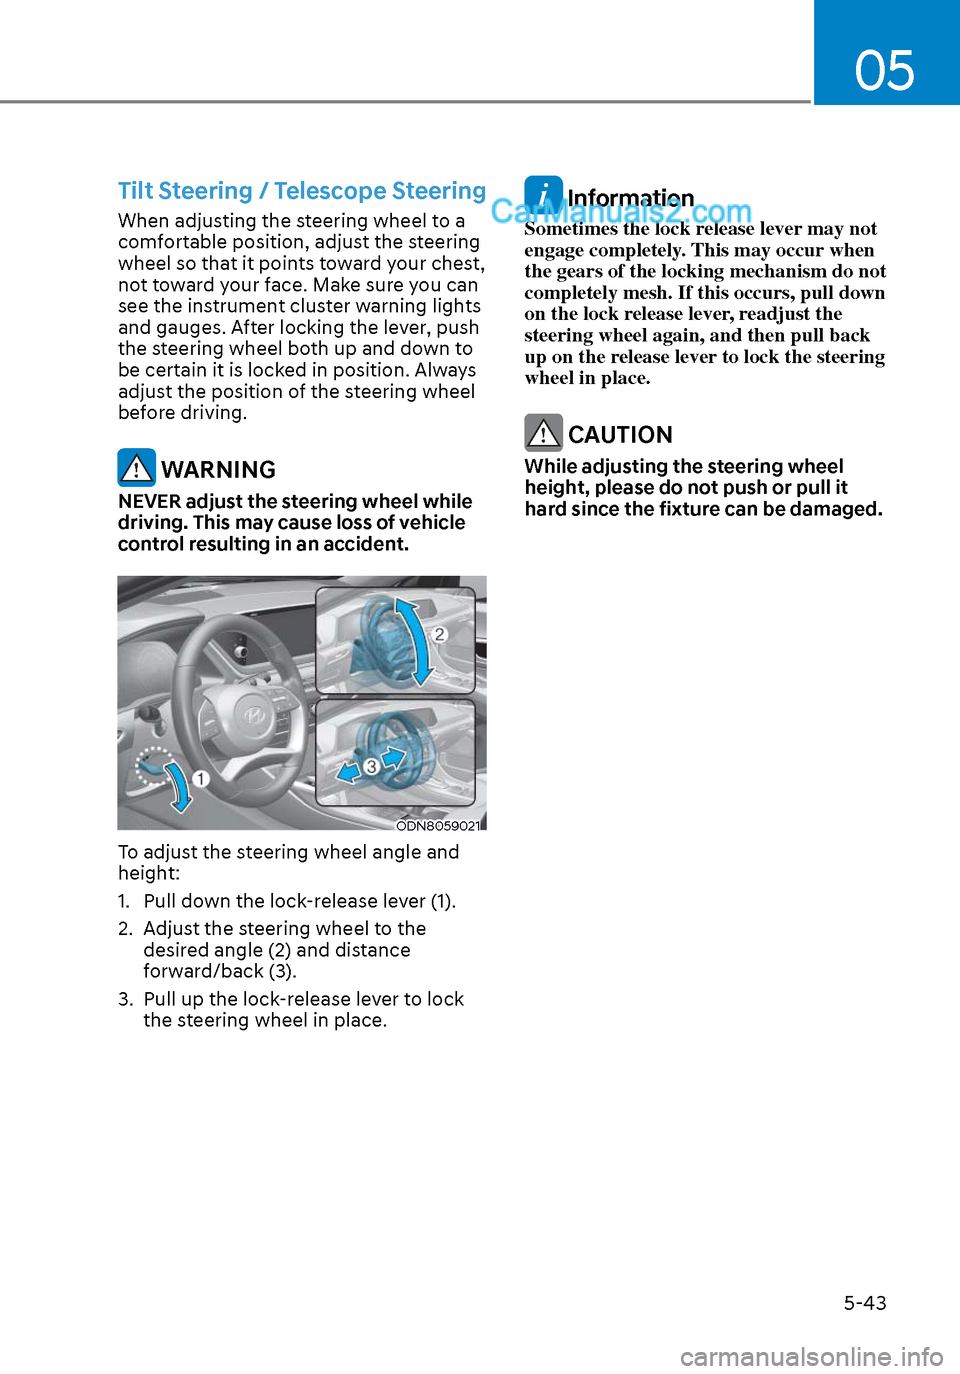
ODN8059021ODN8059021
To adjust the steering wheel angle and
height:
1. Pull down the lock-release lever (1).
2. Adjust the steering wheel to the desired angle (2) and distance
forward/back (3).
3. Pull up the lock-release lever to lock the steering wheel in place.
Information
Sometimes the lock release lever may not
engage completely. This may occur when
the gears of the locking mechanism do not
completely mesh. If this occurs, pull down
on the lock release lever, readjust the
steering wheel again, and then pull back
up on the release lever to lock the steering
wheel in place.
CAUTION
While adjusting the steering wheel
height, please do not push or pull it
hard since the fixture can be damaged.
Page 254 of 537

Convenient Features5-124
System Operation
Cooling / Ventilation
1. Select the Face Level mode.
2. Set the air intake control to fresh mode.
3. Set the temperature control to the desired position.
4. Set the fan speed control to the desired speed.
Heating
1. Select the Floor Level mode.
2. Set the air intake control to fresh mode.
3. Set the temperature control to the desired position.
4. Set the fan speed control to the desired speed.
5. If desired, turn the air conditioning ON with the temperature control knob set
to heat in order to dehumidify the air
before it enters into the cabin.
If the windshield fogs up, select the Floor
& Defrost
mode or press the Front
Defrost mode.
Operation Tips
• To keep dust or unpleasant fumes fr
om entering the vehicle through the
ventilation system, temporarily set
the air intake control to recirculation
mode. Return the control to Fresh
mode when the unpleasant air outside
has diminished. This will help keep the
driver alert and comfortable.
• To help prevent the inside of the windshield from fogging, set the air
intake control to fresh mode and fan
speed to the desired position, turn
on the air conditioning system, and
adjust the temperature control to the
desired temperature.
Air conditioning
Your HYUNDAI vehicle air conditioning
system is filled with R-1234yf refrigerant.
1. Start the engine.
2. Press the air conditioning button.
3. Set the mode to the Face Level
mode.
4. Set the air intake control to Recirculation mode temporarily to
allow the cabin to cool quickly. When
the desired temperature in the cabin
is reached, change the air intake
control back to Fresh mode.
5. Adjust the fan speed control and temperature control to maintain
maximum comfort.
When maximum cooling is desired, set
the temperature control to the MAX A/C
position, then set the fan speed control
to the highest setting.
NOTICE
When using the air conditioning system,
monitor the engine temperature gauge
closely while driving up hills or in heavy
traffic when outside temperatures are
high. Air conditioning system operation
when climbing a steep grade or in high
outside ambient temperatures can
cause engine overheating.
Continue to use the fan, but turn the air
conditioning system off if the engine
temperature gauge indicates engine
overheating.
Page 265 of 537

05
5-135
System Operation
Cooling / Ventilation
1. Select the Face Level mode.
2. Set the air intake control to fresh mode.
3. Set the temperature control to the desired position.
4. Set the fan speed control to the desired speed.
Heating
1. Select the Floor Level mode.
2. Set the air intake control to fresh mode.
3. Set the temperature control to the desired position.
4. Set the fan speed control to the desired speed.
5. If desired, turn the air conditioning ON with the temperature control knob set
to heat in order to dehumidify the air
before it enters into the cabin.
If the windshield fogs up, select the Floor
& Defrost
mode or press the Front
Defrost mode.
Operation Tips
• To keep dust or unpleasant fumes fr
om entering the car through the
ventilation system, temporarily set the
air intake control to the recirculation
mode. Return the control to the to
Fresh mode when the unpleasant air
outside has diminished. This will help
keep the driver alert and comfortable.
• To help prevent the inside of the windshield from fogging, set the air
intake control to fresh mode and the
fan speed to the desired position, turn
on the air conditioning system, and
adjust the temperature control to the
desired temperature.
Air conditioning
Your HYUNDAI vehicle air conditioning
system is filled with R-1234yf refrigerant.
1. Start the engine.
2. Press the air conditioning button.
3. Set the mode to the Face Level
mode.
4. Set the air intake control to Recirculation mode temporarily to
allow the cabin to cool quickly. When
the desired temperature in the cabin
is reached, change the air intake
control back to Fresh mode.
5. Adjust the fan speed control and temperature control to maintain
maximum comfort.
When maximum cooling is desired, set
the temperature control to the MAX A/C
position, then set the fan speed control
to the highest setting.
NOTICE
When using the air conditioning system,
monitor the engine temperature gauge
closely while driving up hills or in heavy
traffic when outside temperatures.
Air conditioning system operation
when climbing a steep grade or in
high outside ambient temperatures
can cause engine overheating.
Continue to use the fan, but turn the air
conditioning system off if the engine
temperature gauge indicates engine
overheating.