Page 485 of 527

Maintenance
8-36
Vehicle Capacity Weight
The number of designated seating
positions multiplied by 150 lbs. (68
kg) plus the rated cargo and luggage
load.
Vehicle Maximum Load on the Tire
Load on an individual tire due to curb
and accessory weight plus maximum
occupant and cargo weight.
Vehicle Normal Load on the Tire
Load on an individual tire that is
determined by distributing to each
axle its share of the curb weight,
accessory weight, and normal
occupant weight and dividing by 2.
Vehicle Placard
A label permanently attached
to a vehicle showing the
original equipment tire size and
recommended inflation pressure.
All Season Tires
HYUNDAI specifies all season
tires on some models to provide
good performance for use all year
round, including snowy and icy
road conditions. All season tires
are identified by ALL SEASON and/
or M+S (Mud and Snow) on the tire
sidewall. Snow tires have better
snow traction than all season tires
and may be more appropriate in
some areas.
Summer Tires
HYUNDAI specifies summer tires on
some models to provide superior
performance on dry roads. Summer
tire performance is substantially
reduced in snow and ice. Summer
tires do not have the tire traction
rating M+S (Mud and Snow) on
the tire side wall. If you plan to
operate your vehicle in snowy or icy
conditions, HYUNDAI recommends
the use of snow tires or all season
tires on all four wheels.
Snow Tires
If you equip your car with snow
tires, they should be the same size
and have the same load capacity as
the original tires. Snow tires should
be installed on all four wheels;
otherwise, poor handling may result.
Snow tires should carry 4 psi (28 kPa)
more air pressure than the pressure
recommended for the standard
tires on the tire label on the driver’s
side of the center pillar, or up to the
maximum pressure shown on the tire
sidewall, whichever is less. Do not
drive faster than 75 mph (120 km/h)
when your vehicle is equipped with
snow tires.
Radial-Ply Tires
Radial-ply tires provide improved
tread life, road hazard resistance
and smoother high speed ride. The
radial-ply tires used on this vehicle
are of belted construction, and are
selected to complement the ride
and handling characteristics of your
vehicle.
Page 487 of 527

Maintenance
8-38
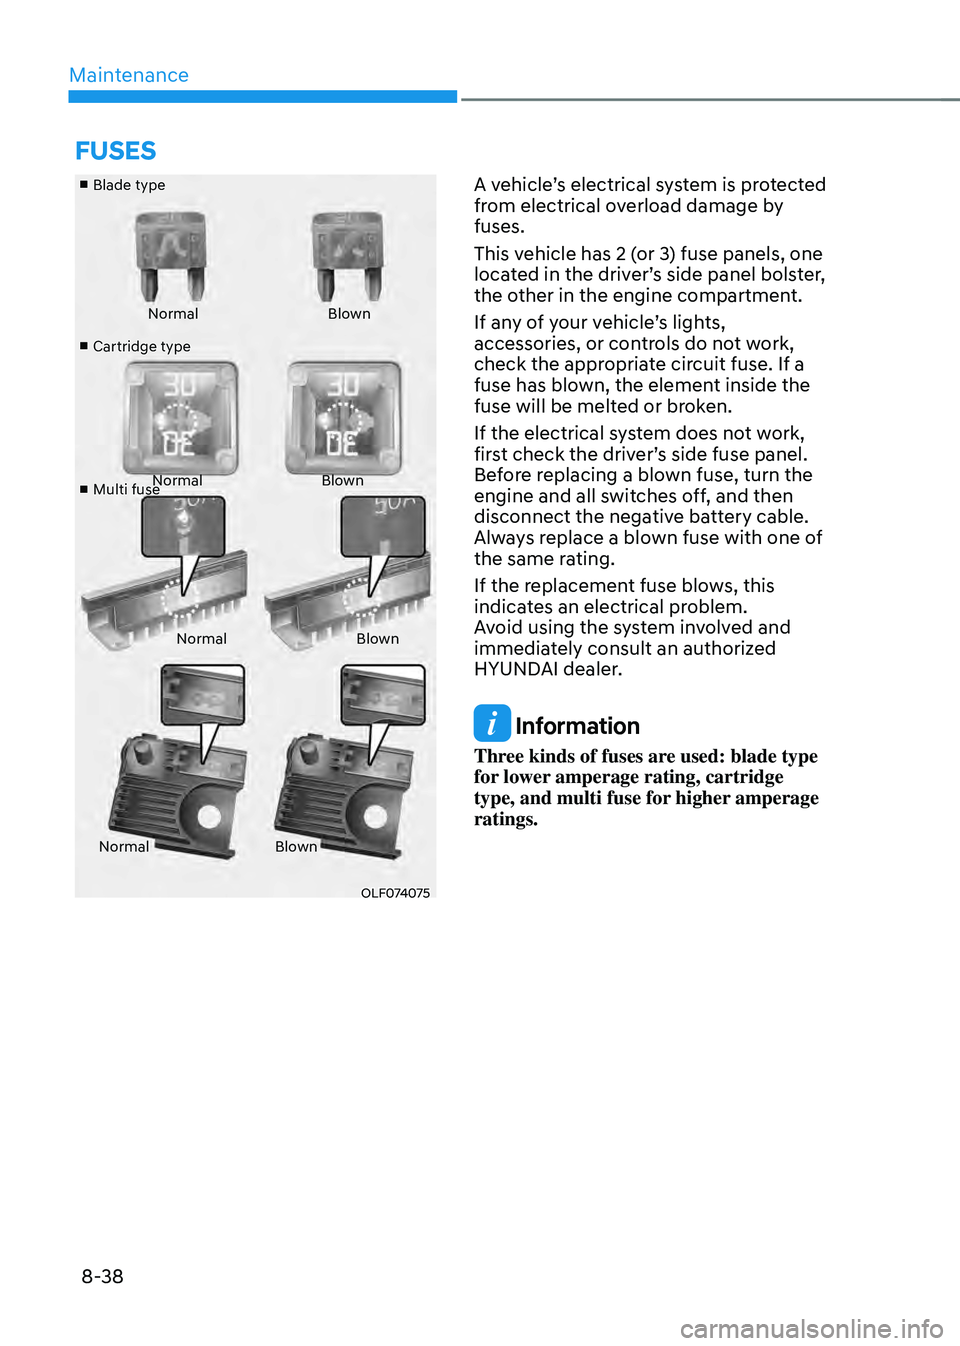
■ Blade type
■
Cartridge type
■
Multi fuse Normal
Blown
Normal Blown
Normal Blown
Normal Blown
OLF074075
A vehicle’s electrical system is protected
from electrical overload damage by
fuses.
This vehicle has 2 (or 3) fuse panels, one
located in the driver’s side panel bolster,
the other in the engine compartment.
If any of your vehicle’s lights,
accessories, or controls do not work,
check the appropriate circuit fuse. If a
fuse has blown, the element inside the
fuse will be melted or broken.
If the electrical system does not work,
first check the driver’s side fuse panel.
Before replacing a blown fuse, turn the
engine and all switches off, and then
disconnect the negative battery cable.
Always replace a blown fuse with one of
the same rating.
If the replacement fuse blows, this
indicates an electrical problem.
Avoid using the system involved and
immediately consult an authorized
HYUNDAI dealer.
Information
Three kinds of fuses are used: blade type
for lower amperage rating, cartridge
type, and multi fuse for higher amperage
ratings.
FUSES
Page 489 of 527
Maintenance
8-40
Engine Compartment Panel Fuse
Replacement
„„Blade type fuse
ODN8H089043
„„Cartridge type fuse
ODN8H089019
1. Turn the vehicle off.
2. Turn all other switches off.
3. Remove the fuse panel cover by
pressing the tap and pulling up.
4. Check the removed fuse; replace it
if it is blown. To remove or insert the
fuse, use the fuse puller in the engine
compartment fuse panel.
5. Push in a new fuse of the same
rating, and make sure it fits tightly in
the clips. If it fits loosely, consult an
authorized HYUNDAI dealer.
NOTICE
After checking the fuse panel in the
engine compartment, securely
install the fuse panel cover. You may
hear a clicking sound if the cover is
securely latched. If it is not securely
latched, electrical failure may occur
from water contact.
Multi fuse
ODN8H089018
If the multi fuse is blown, consult an
authorized HYUNDAI dealer.
Page 491 of 527
Maintenance
8-42
Engine compartment fuse panel
ODN8H089059
Inside the fuse/relay box cover, you can
find the fuse/relay label describing fuse/
relay names and ratings.
Information
Not all fuse panel descriptions in this
manual may be applicable to your vehicle;
the information is accurate at the time of
printing. When you inspect the fuse panel
in your vehicle, refer to the fuse panel
label.
ODN8H080022N
Page 493 of 527

Maintenance
8-44
Information
• A normally functioning lamp may
flicker momentarily to stabilize the
vehicle’s electrical control system.
However, if the lamp goes out after
flickering momentarily, or continues to
flicker, have the system checked by an
authorized HYUNDAI dealer.
• The position lamp may not turn on
when the position lamp switch is turned
on, but the position lamp and headlamp
switch may turn on when the headlamp
switch is turned on. This may be caused
by network failure or vehicle electrical
control system malfunction. If this
occurs, have the system checked by an
authorized HYUNDAI dealer.
Information
The headlamp aiming should be adjusted
after an accident or after the headlamp
assembly is reinstalled at an authorized
HYUNDAI dealer.
Headlamp, Parking Lamp,
Daytime Running Light, Turn
Signal Lamp and Side Marker
Replacement
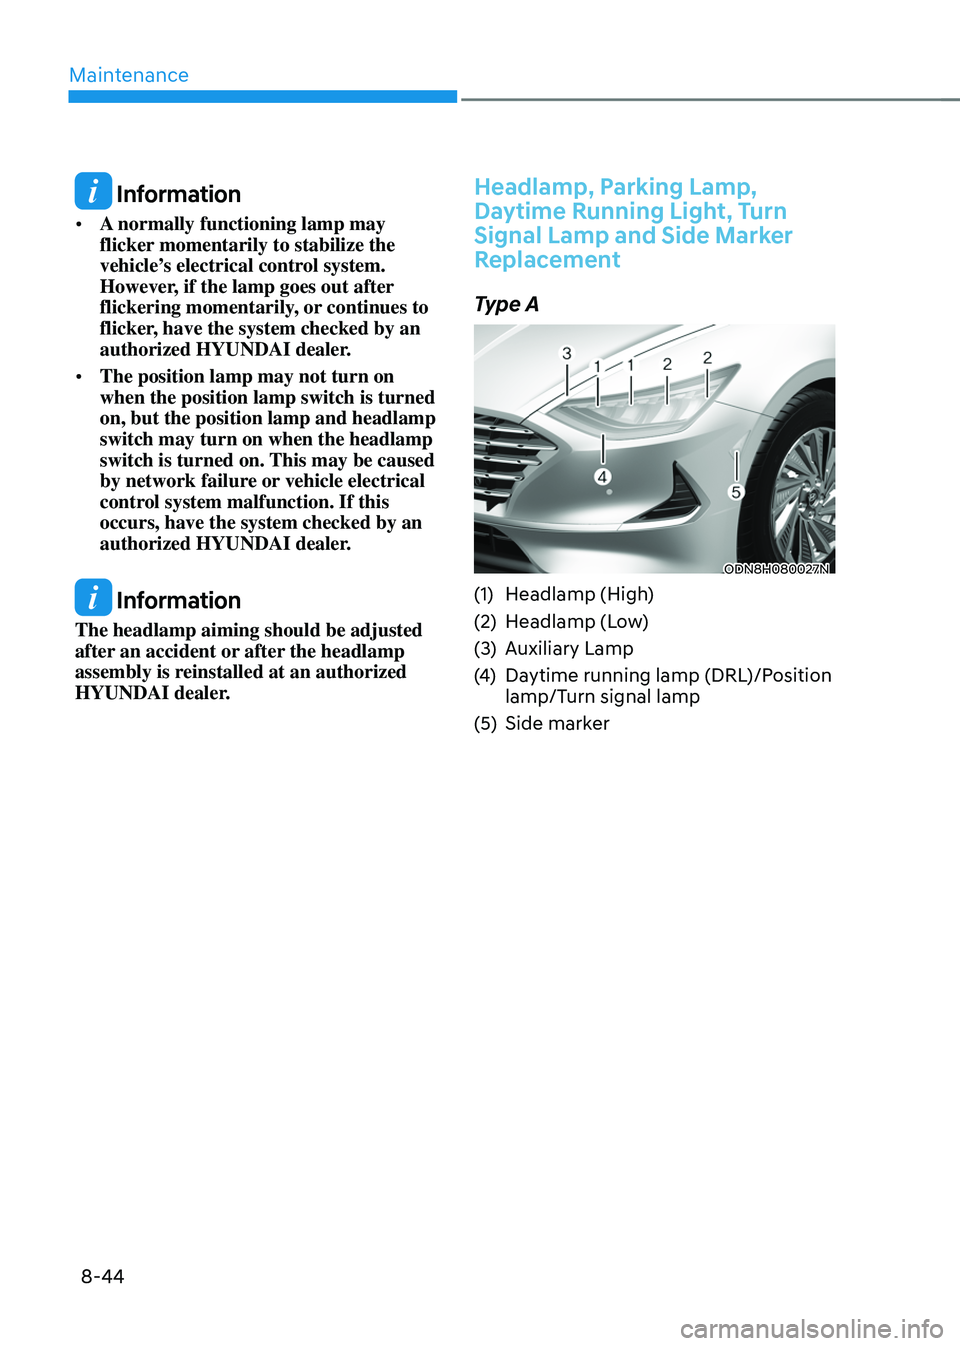
Type A
ODN8H080027N
(1) Headlamp (High)
(2) Headlamp (Low)
(3) Auxiliary Lamp
(4) Daytime running lamp (DRL)/Position
lamp/Turn signal lamp
(5) Side marker
Page 495 of 527

Maintenance
8-46
Tail lamp, stop lamp, turn signal
lamp, side marker (LED type)
If the LED lamp does not operate, have
the system checked by an authorized
HYUNDAI dealer.
The LED lamps cannot be replaced as
a single unit because it is an integrated
unit. The LED lamps has to be replaced
with the unit.
A skilled technician should check or
repair the LED lamp, for it may damage
related parts of the vehicle.
ODN8089031
Turn signal lamp (Bulb type)
1. Open the trunk lid.
2. Remove the service cover by pulling
out the service cover.
ODN8089032
3. Remove the socket from the
assembly by turning the socket
counterclockwise until the tabs on
the socket align with the slots on the
assembly.
4. Remove the bulb from the socket
by pressing it in and rotating it
counterclockwise until the tabs on the
bulb align with the slots in the socket.
Pull the bulb out of the socket.
5. Insert a new bulb by inserting it into
the socket and rotating it until it locks
into place.
6. Install the socket in the assembly by
aligning the tabs on the socket with
the slots in the assembly. Push the
socket into the assembly and turn the
socket clockwise.
Page 497 of 527
Maintenance
8-48
License Plate Light Bulb
Replacement
ODN8089033L
1. Using a flat-blade screwdriver gently
pry the lens cover from the lamp
housing.
2. Remove the socket from the
assembly by turning the socket
counterclockwise until the tabs on
the socket align with the slots on the
assembly.
3. Remove the bulb by pulling it straight
out.
4. Install a new bulb.
5. Reinstall in the reverse order.
Interior Lamp Replacement
Map/Personal lamp (LED type)
„„Map lamp
ODN8H089034N
„„Personal lamp
OLF077071
If the LED lamp does not operate, have
the system checked by an authorized
HYUNDAI dealer.
The LED lamps cannot be replaced as
a single unit because it is an integrated
unit. The LED lamps has to be replaced
with the unit.
A skilled technician should check or
repair the LED lamp, for it may damage
related parts of the vehicle.
Page 499 of 527

Maintenance
8-50
Exterior Care
Exterior general caution
It is very important to follow the label
directions when using any chemical
cleaner or polish. Read all warning and
caution statements that appear on the
label.
Finish maintenance
Washing
To help protect your vehicle’s finish from
rust and deterioration, wash it thoroughly
and frequently at least once a month
with lukewarm or cold water.
If you use your vehicle for off-road
driving, you should wash it after each
off-road trip. Pay special attention to the
removal of any accumulation of salt, dirt,
mud, and other foreign materials. Make
sure the drain holes in the lower edges
of the doors and rocker panels are kept
clear and clean.
Insects, tar, tree sap, bird droppings,
industrial pollution and similar deposits
can damage your vehicle’s finish if not
removed immediately.
Even prompt washing with plain water
may not completely remove all these
deposits. A mild soap, safe for use on
painted surfaces, should be used.
After washing, rinse the vehicle
thoroughly with lukewarm or cold water.
Do not allow soap to dry on the finish.
High-pressure washing
• When using high-pressure washers,
make sure to maintain sufficient
distance from the vehicle.
Insufficient clearance or excessive
pressure can lead to component
damage or water penetration.
• Do not spray the camera, sensors or
its surrounding area directly with a
high pressure washer. Shock applied
from high pressure water may cause
the device to not operate normally.
• Do not bring the nozzle tip close to
boots (rubber or plastic covers) or
connectors as they may be damaged
if they come into contact with high
pressure water.
WARNING
After washing the vehicle, test the
brakes while driving slowly to see
if they have been affected by water
before getting on the road. If braking
performance is impaired, dry the
brakes by applying them lightly while
maintaining a slow forward speed.
NOTICE
• Do not use strong soap, chemical
detergents or hot water, and do not
wash the vehicle in direct sunlight
or when the body of the vehicle is
warm.
• Be careful when washing the side
windows of your vehicle.
• Especially, with high-pressure water,
water may leak through the windows
and wet the interior.
• To prevent damage to the plastic
parts, do not clean with chemical
solvents or strong detergents.
• To prevent damage to the charging
door, make sure to close and lock the
vehicle doors when washing (high-
pressure washing, automatic car
washing, etc.) the vehicle.
APPEARANCE CARE