2020 HYUNDAI SONATA HYBRID ECU
[x] Cancel search: ECUPage 210 of 527
Convenient Features
5-62
EXTERIOR FEATURES
Hood
Opening the hood
ODN8A059040
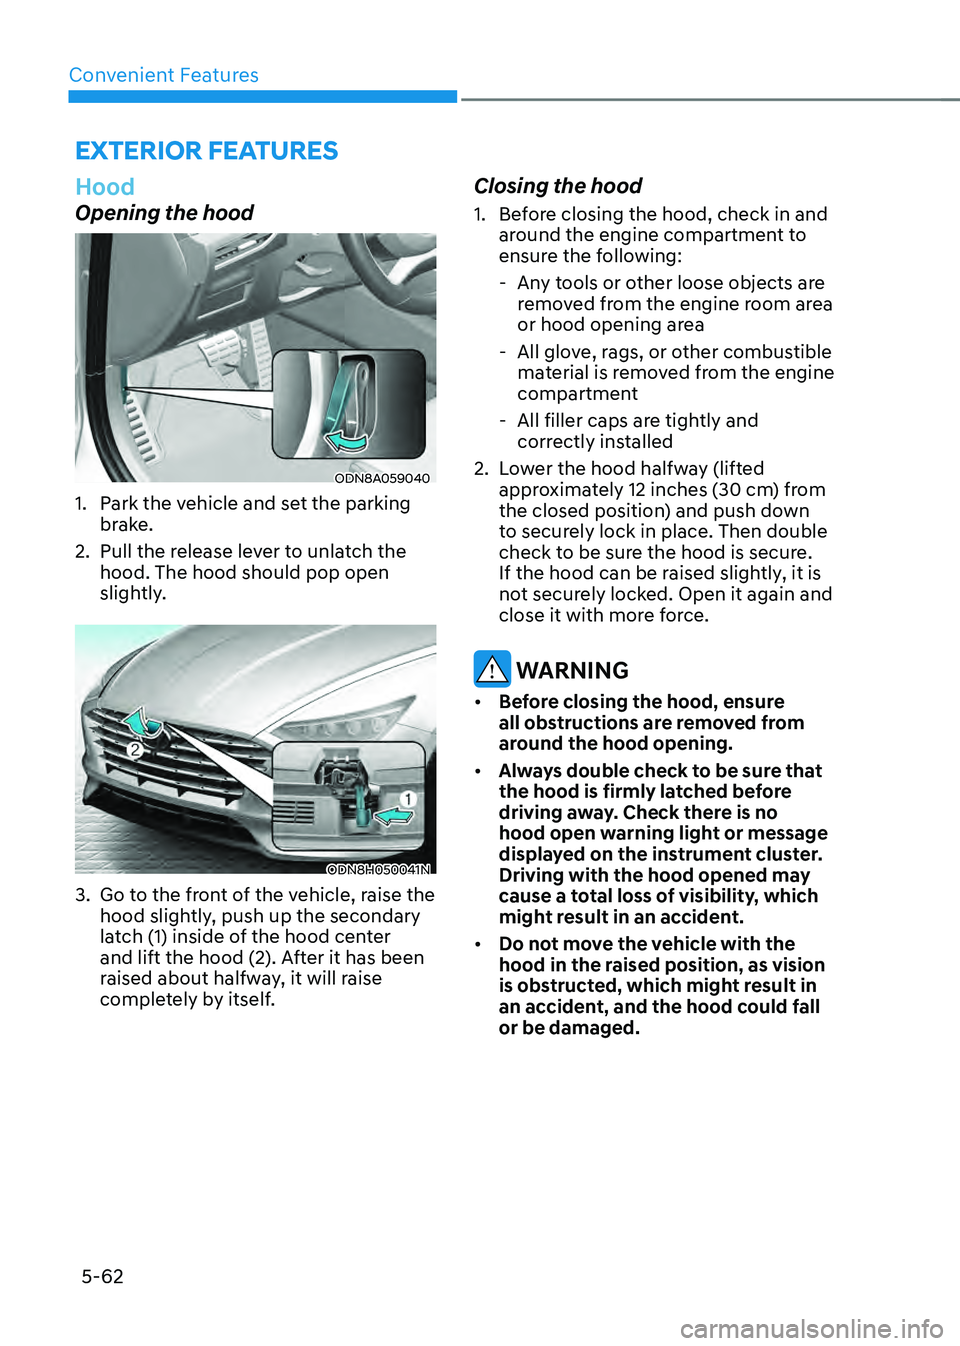
1. Park the vehicle and set the parking
brake.
2. Pull the release lever to unlatch the
hood. The hood should pop open
slightly.
ODN8H050041N
3. Go to the front of the vehicle, raise the
hood slightly, push up the secondary
latch (1) inside of the hood center
and lift the hood (2). After it has been
raised about halfway, it will raise
completely by itself.
Closing the hood
1. Before closing the hood, check in and
around the engine compartment to
ensure the following:
-Any tools or other loose objects are
removed from the engine room area
or hood opening area
-All glove, rags, or other combustible
material is removed from the engine
compartment
-All filler caps are tightly and
correctly installed
2. Lower the hood halfway (lifted
approximately 12 inches (30 cm) from
the closed position) and push down
to securely lock in place. Then double
check to be sure the hood is secure.
If the hood can be raised slightly, it is
not securely locked. Open it again and
close it with more force.
WARNING
• Before closing the hood, ensure
all obstructions are removed from
around the hood opening.
• Always double check to be sure that
the hood is firmly latched before
driving away. Check there is no
hood open warning light or message
displayed on the instrument cluster.
Driving with the hood opened may
cause a total loss of visibility, which
might result in an accident.
• Do not move the vehicle with the
hood in the raised position, as vision
is obstructed, which might result in
an accident, and the hood could fall
or be damaged.
Page 216 of 527
Convenient Features
5-68
Fuel Filler Door
Opening the fuel filler door
ODN8059050
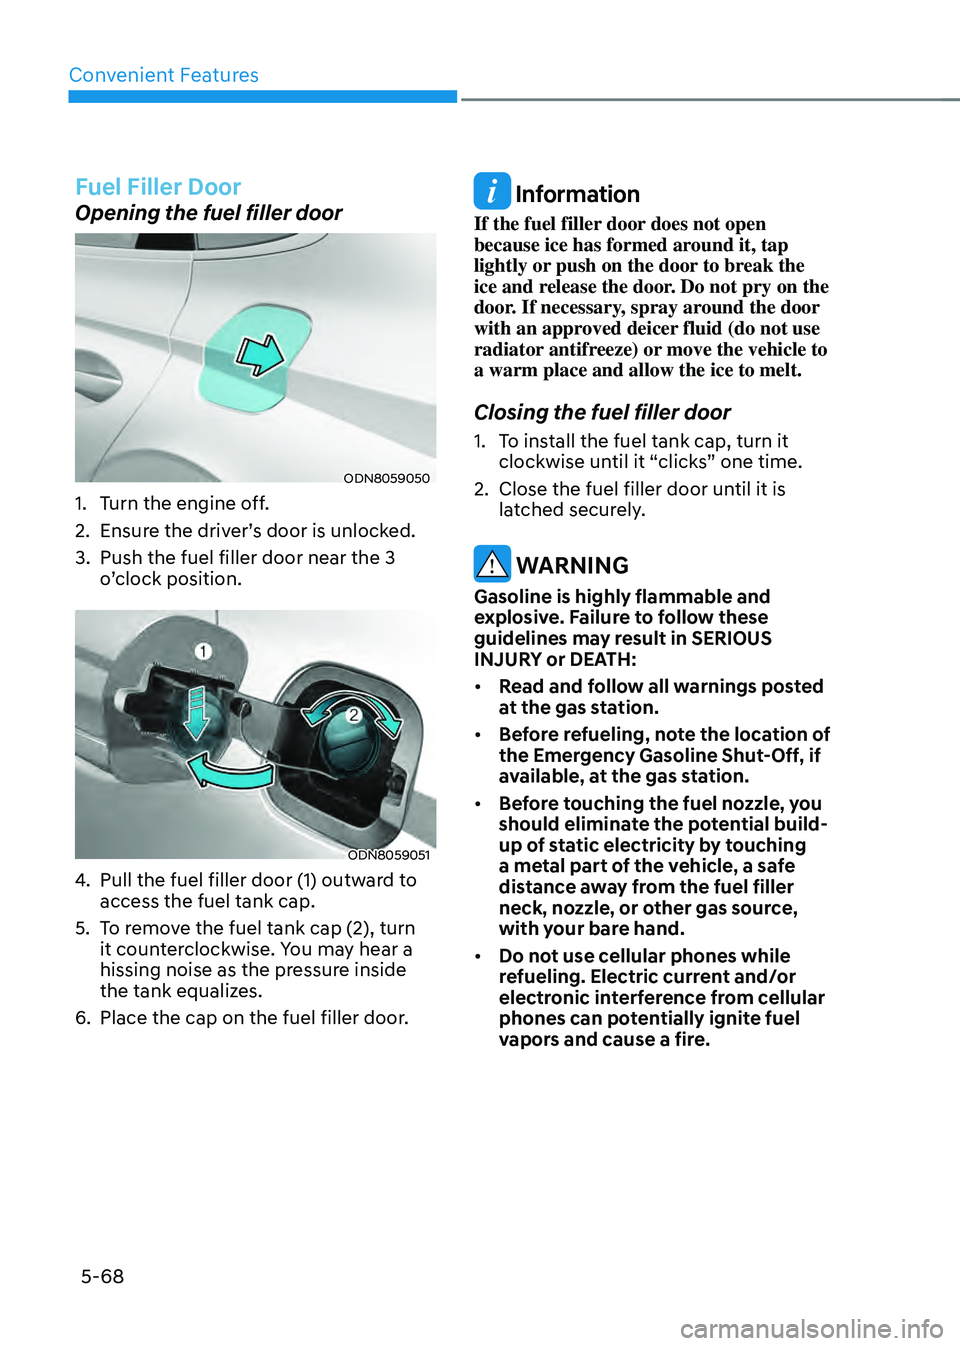
1. Turn the engine off.
2. Ensure the driver’s door is unlocked.
3. Push the fuel filler door near the 3
o’clock position.
ODN8059051
4. Pull the fuel filler door (1) outward to
access the fuel tank cap.
5. To remove the fuel tank cap (2), turn
it counterclockwise. You may hear a
hissing noise as the pressure inside
the tank equalizes.
6. Place the cap on the fuel filler door.
Information
If the fuel filler door does not open
because ice has formed around it, tap
lightly or push on the door to break the
ice and release the door. Do not pry on the
door. If necessary, spray around the door
with an approved deicer fluid (do not use
radiator antifreeze) or move the vehicle to
a warm place and allow the ice to melt.
Closing the fuel filler door
1. To install the fuel tank cap, turn it
clockwise until it “clicks” one time.
2. Close the fuel filler door until it is
latched securely.
WARNING
Gasoline is highly flammable and
explosive. Failure to follow these
guidelines may result in SERIOUS
INJURY or DEATH:
• Read and follow all warnings posted
at the gas station.
• Before refueling, note the location of
the Emergency Gasoline Shut-Off, if
available, at the gas station.
• Before touching the fuel nozzle, you
should eliminate the potential build-
up of static electricity by touching
a metal part of the vehicle, a safe
distance away from the fuel filler
neck, nozzle, or other gas source,
with your bare hand.
• Do not use cellular phones while
refueling. Electric current and/or
electronic interference from cellular
phones can potentially ignite fuel
vapors and cause a fire.
Page 217 of 527
05
5-69
• Do not get back into a vehicle
once you have begun refueling.
You can generate a buildup of
static electricity by touching,
rubbing or sliding against any item
or fabric capable of producing
static electricity. Static electricity
discharge can ignite fuel vapors
causing a fire. If you must re-enter
the vehicle, you should once again
eliminate potentially dangerous
static electricity discharge by
touching a metal part of the vehicle,
away from the fuel filler neck, nozzle
or other gasoline source, with your
bare hand.
• When using an approved portable
fuel container, be sure to place the
container on the ground prior to
refueling. Static electricity discharge
from the container can ignite fuel
vapors causing a fire.
Once refueling has begun, contact
between your bare hand and the
vehicle should be maintained until
the filling is complete.
• Use only approved portable plastic
fuel containers designed to carry and
store gasoline.
• When refueling, always move the
shift button to the P (Park) position,
set the parking brake, and place
the ignition switch to the LOCK/
OFF position. Sparks produced by
electrical components related to the
engine can ignite fuel vapors causing
a fire.
• Do not use matches or a lighter and
do not smoke or leave a lit cigarette
in your vehicle while at a gas station,
especially during refueling.
• Do not over-fill or top-off your
vehicle tank, which can cause
gasoline spillage.• If a fire breaks out during refueling,
leave the vicinity of the vehicle, and
immediately contact the manager
of the gas station and then contact
the local fire department. Follow any
safety instructions they provide.
• If pressurized fuel sprays out, it can
cover your clothes or skin and thus
subject you to the risk of fire and
burns. Always remove the fuel cap
carefully and slowly. If the cap is
venting fuel or if you hear a hissing
sound, wait until the condition stops
before completely removing the cap.
• Always check that the fuel cap is
installed securely to prevent fuel
spillage in the event of an accident.
Information
Make sure to refuel your vehicle according
to the “Fuel Requirements” suggested in
the Introduction chapter.
NOTICE
• Do not spill fuel on the exterior
surfaces of the vehicle. Any type of
fuel spilled on painted surfaces may
damage the paint.
• If the fuel filler cap requires
replacement, use only a genuine
HYUNDAI cap or the equivalent
specified for your vehicle. An
incorrect fuel filler cap can result
in a serious malfunction of the fuel
system or emission control system.
Page 228 of 527

Convenient Features
5-80
Luggage compartment lamp
ODN8059213L
The luggage compartment lamp comes
on when the trunk is opened.
NOTICE
The luggage compartment lamp comes
on as long as the trunk is open. To
prevent unnecessary battery system
drain, close the trunk securely after
using the luggage compartment.
Vanity mirror lamp
OOS047055
Push the switch to turn the light on or off.
•
: The lamp will turn on if this button is pressed.
•
: The lamp will turn o ff if this button is pressed.
NOTICE
Always have the switch in the off
position when the vanity mirror lamp
is not in use. If the sunvisor is closed
without the lamp off, it may discharge
the battery or damage the sunvisor.
Page 266 of 527
Convenient Features
5-118
STORAGE COMPARTMENT
WARNING
Never store cigarette lighters, propane
cylinders, or other flammable/explosive
materials in the vehicle. These items
may catch fire and/or explode if the
vehicle is exposed to hot temperatures
for extended periods.
WARNING
ALWAYS keep the storage compartment
covers closed securely while driving.
Items inside your vehicle are moving as
fast as the vehicle. If you have to stop
or turn quickly, or if there is a crash, the
items may fly out of the compartment
and may cause an injury if they strike
the driver or a passenger.
NOTICE
To avoid possible theft, do not leave
valuables in the storage compartments.
Center Console Storage
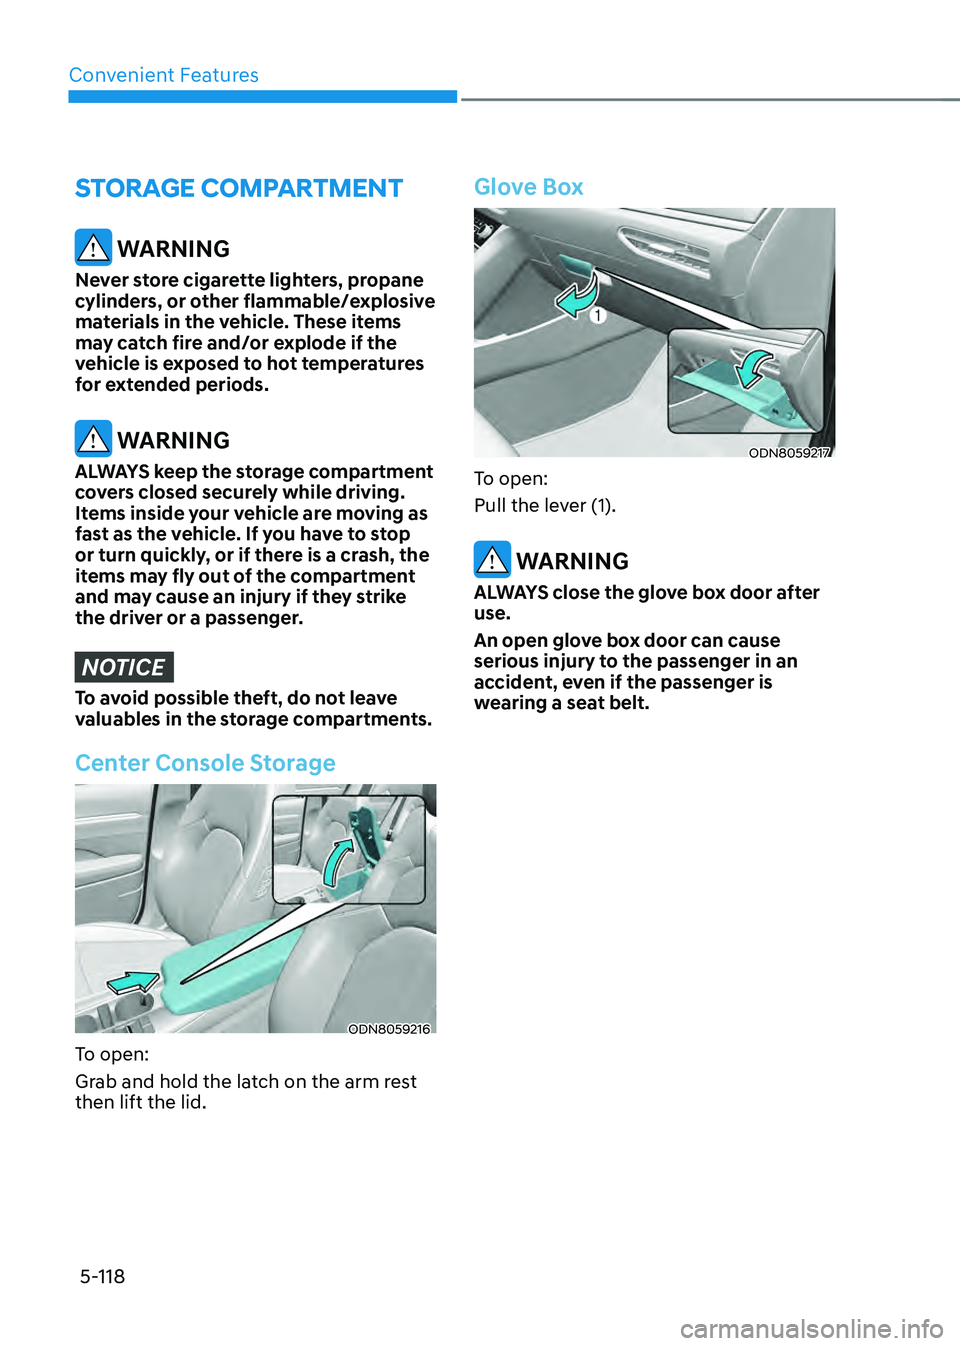
ODN8059216
To open:
Grab and hold the latch on the arm rest
then lift the lid.
Glove Box
ODN8059217
To open:
Pull the lever (1).
WARNING
ALWAYS close the glove box door after
use.
An open glove box door can cause
serious injury to the passenger in an
accident, even if the passenger is
wearing a seat belt.
Page 267 of 527
05
5-119
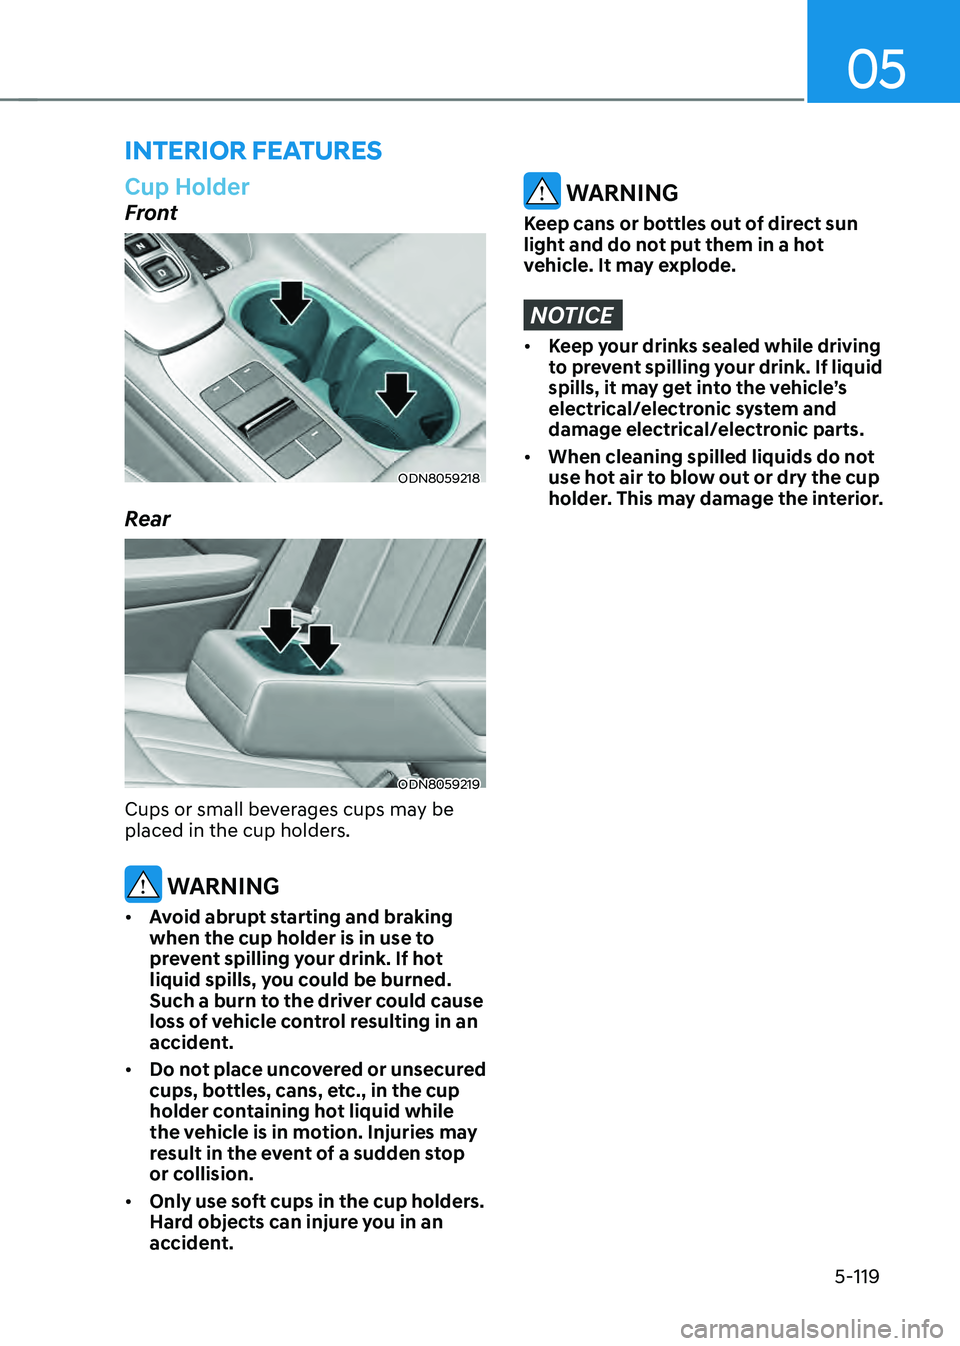
Cup Holder
Front
ODN8059218
Rear
ODN8059219
Cups or small beverages cups may be
placed in the cup holders.
WARNING
• Avoid abrupt starting and braking
when the cup holder is in use to
prevent spilling your drink. If hot
liquid spills, you could be burned.
Such a burn to the driver could cause
loss of vehicle control resulting in an
accident.
• Do not place uncovered or unsecured
cups, bottles, cans, etc., in the cup
holder containing hot liquid while
the vehicle is in motion. Injuries may
result in the event of a sudden stop
or collision.
• Only use soft cups in the cup holders.
Hard objects can injure you in an
accident.
WARNING
Keep cans or bottles out of direct sun
light and do not put them in a hot
vehicle. It may explode.
NOTICE
• Keep your drinks sealed while driving
to prevent spilling your drink. If liquid
spills, it may get into the vehicle’s
electrical/electronic system and
damage electrical/electronic parts.
• When cleaning spilled liquids do not
use hot air to blow out or dry the cup
holder. This may damage the interior.
INTERIOR FEATURES
Page 268 of 527
Convenient Features
5-120
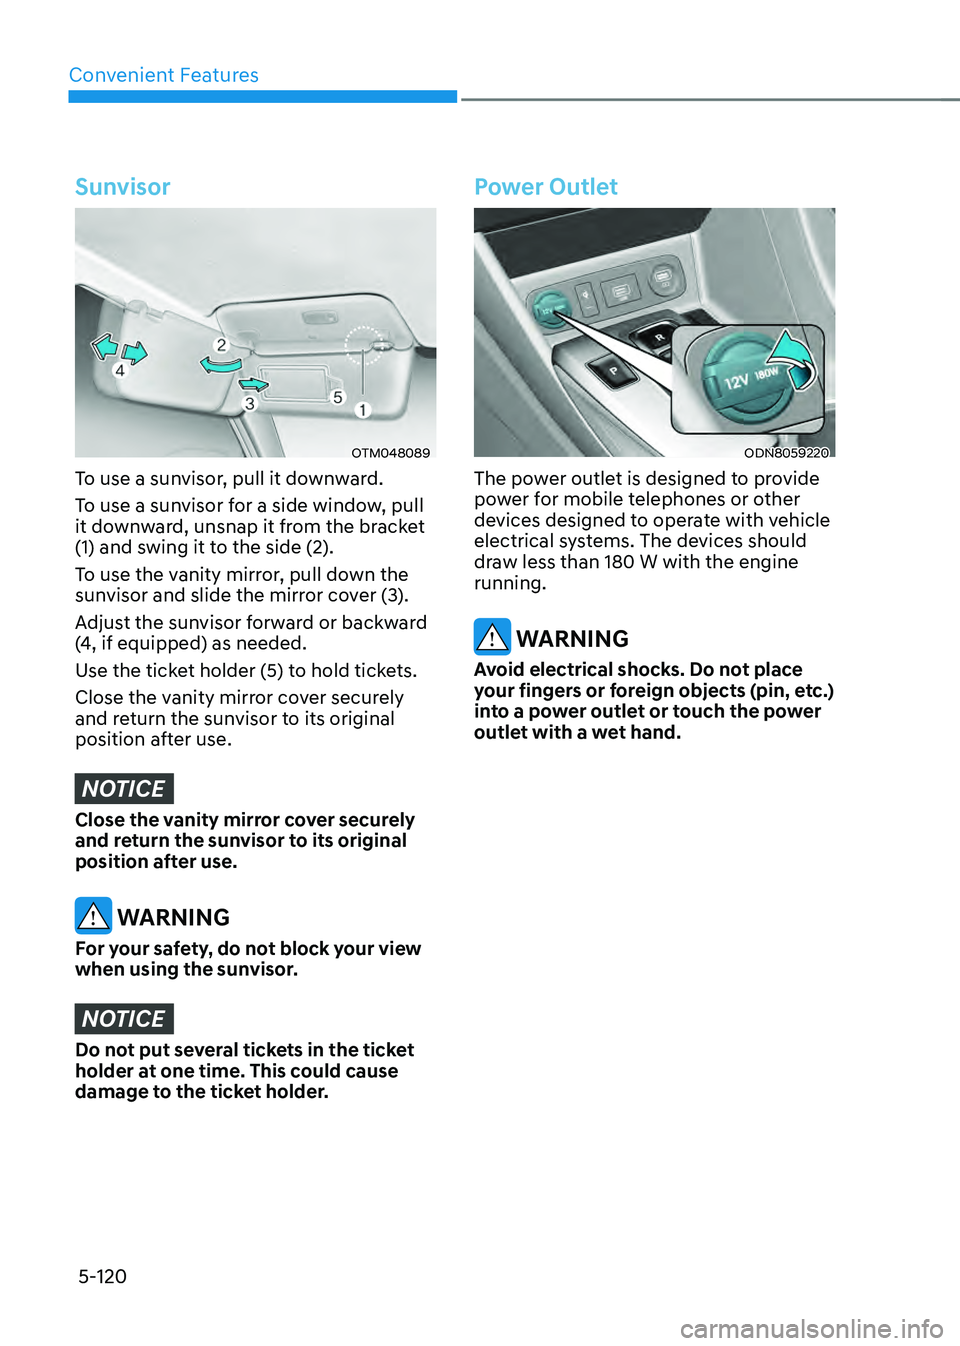
Sunvisor
OTM048089
To use a sunvisor, pull it downward.
To use a sunvisor for a side window, pull
it downward, unsnap it from the bracket
(1) and swing it to the side (2).
To use the vanity mirror, pull down the
sunvisor and slide the mirror cover (3).
Adjust the sunvisor forward or backward
(4, if equipped) as needed.
Use the ticket holder (5) to hold tickets.
Close the vanity mirror cover securely
and return the sunvisor to its original
position after use.
NOTICE
Close the vanity mirror cover securely
and return the sunvisor to its original
position after use.
WARNING
For your safety, do not block your view
when using the sunvisor.
NOTICE
Do not put several tickets in the ticket
holder at one time. This could cause
damage to the ticket holder.
Power Outlet
ODN8059220
The power outlet is designed to provide
power for mobile telephones or other
devices designed to operate with vehicle
electrical systems. The devices should
draw less than 180 W with the engine
running.
WARNING
Avoid electrical shocks. Do not place
your fingers or foreign objects (pin, etc.)
into a power outlet or touch the power
outlet with a wet hand.
Page 273 of 527
05
5-125
Floor Mat Anchor(s)
ALWAYS use the Floor Mat Anchors to
attach the front floor mats to the vehicle.
The anchors on the front floor carpet
keep the floor mats from sliding forward.
WARNING
Do not overlay additional mats or liners
over the floor mats. If using All Weather
mats, remove the carpeted floor mats
before installing them. Only use floor
mats designed to connect to the
anchors.
WARNING
The following must be observed when
installing ANY floor mat to the vehicle.
• Ensure to remove a protective
film attached on the carpet
before attaching a floor mat on
the front floor carpet. Otherwise,
the floor mat may move freely on
the protective film and it could
result in unintentional braking or
accelerating.
• Ensure that the floor mats are
securely attached to the vehicle’s
floor mat anchor(s) before driving
the vehicle.
• Do not use ANY floor mat that cannot
be firmly attached to the vehicle’s
floor mat anchors.
• Do not stack floor mats on top of one
another (e.g. all-weather rubber mat
on top of a carpeted floor mat). Only
a single floor mat should be installed
in each position.
IMPORTANT - Your vehicle was
manufactured with driver’s side floor
mat anchors that are designed to
securely hold the floor mat in place.
To avoid any interference with pedal
operation, HYUNDAI recommends that
the HYUNDAI floor mat designed for use
in your vehicle be installed.
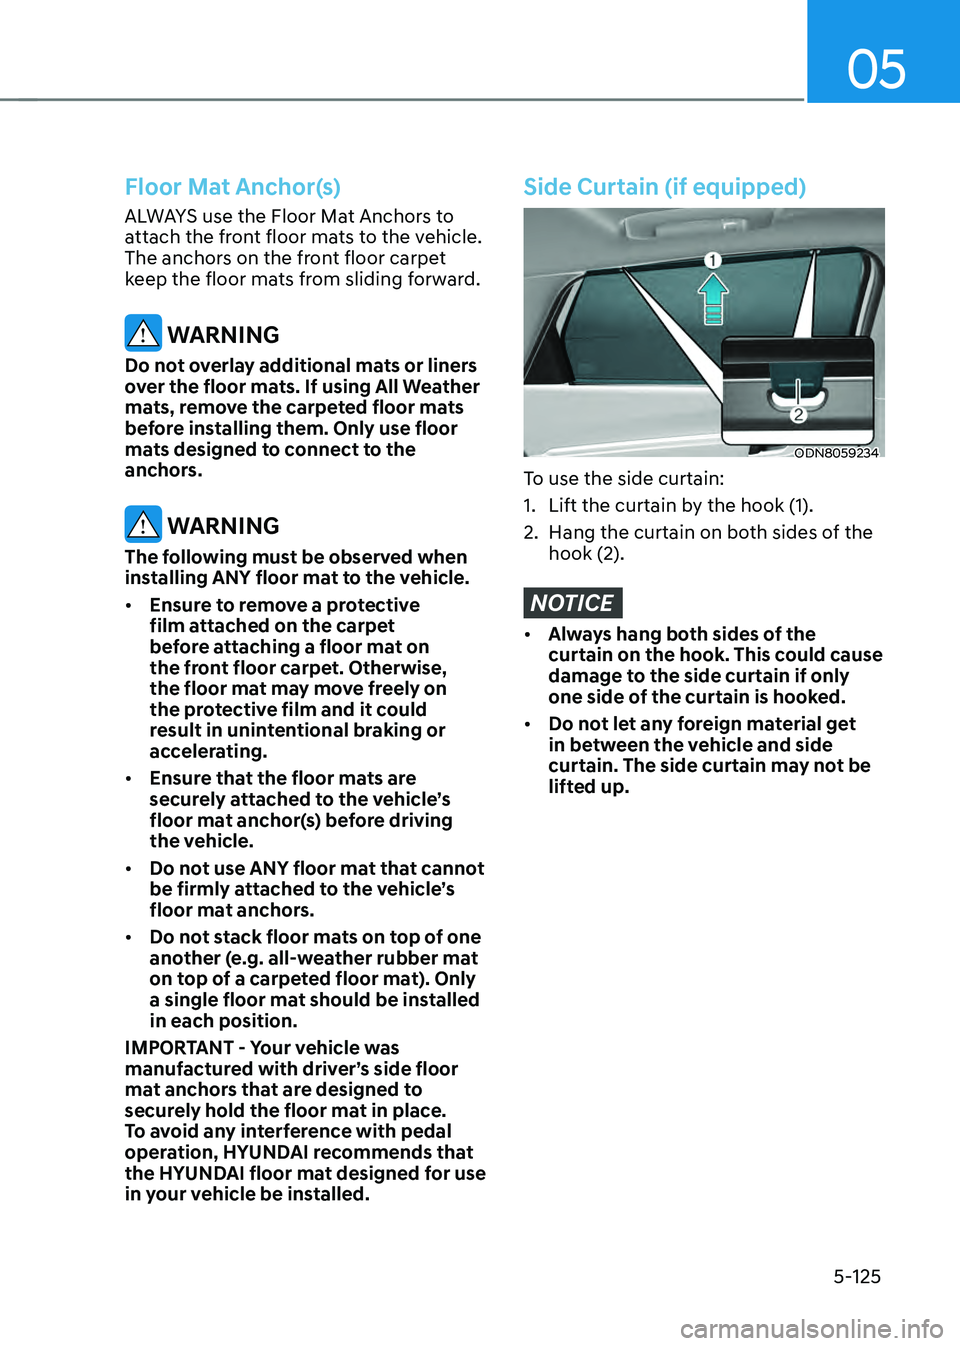
Side Curtain (if equipped)
ODN8059234
To use the side curtain:
1. Lift the curtain by the hook (1).
2. Hang the curtain on both sides of the
hook (2).
NOTICE
• Always hang both sides of the
curtain on the hook. This could cause
damage to the side curtain if only
one side of the curtain is hooked.
• Do not let any foreign material get
in between the vehicle and side
curtain. The side curtain may not be
lifted up.