2020 HYUNDAI SONATA HYBRID clock
[x] Cancel search: clockPage 434 of 527
Emergency situations
7-14
IF YOU HAVE A FLAT TIRE (WITH SPARE TIRE, IF EQUIPPED)
WARNING
Changing a tire can be dangerous.
Follow the instructions in this section
when changing a tire to reduce the risk
of serious injury or death.
CAUTION
Be careful as you use the jack handle to
stay clear of the flat end. The flat end
has sharp edges that could cause cuts.
Jack and Tools
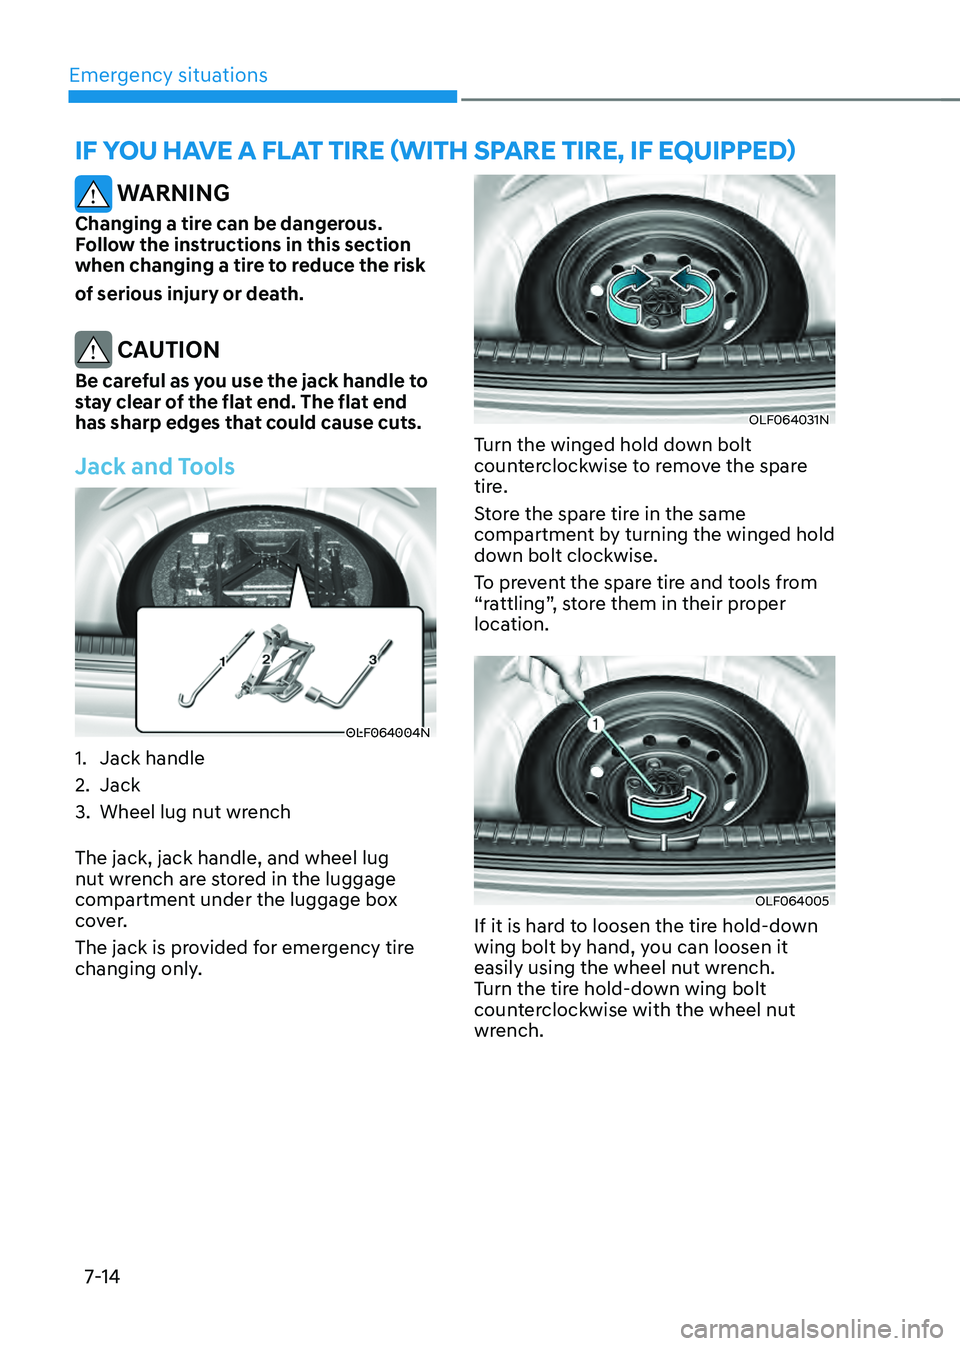
OLF064004N
1. Jack handle
2. Jack
3. Wheel lug nut wrench
The jack, jack handle, and wheel lug
nut wrench are stored in the luggage
compartment under the luggage box
cover.
The jack is provided for emergency tire
changing only.
OLF064031N
Turn the winged hold down bolt
counterclockwise to remove the spare
tire.
Store the spare tire in the same
compartment by turning the winged hold
down bolt clockwise.
To prevent the spare tire and tools from
“rattling”, store them in their proper
location.
OLF064005
If it is hard to loosen the tire hold-down
wing bolt by hand, you can loosen it
easily using the wheel nut wrench.
Turn the tire hold-down wing bolt
counterclockwise with the wheel nut
wrench.
Page 436 of 527
Emergency situations
7-16
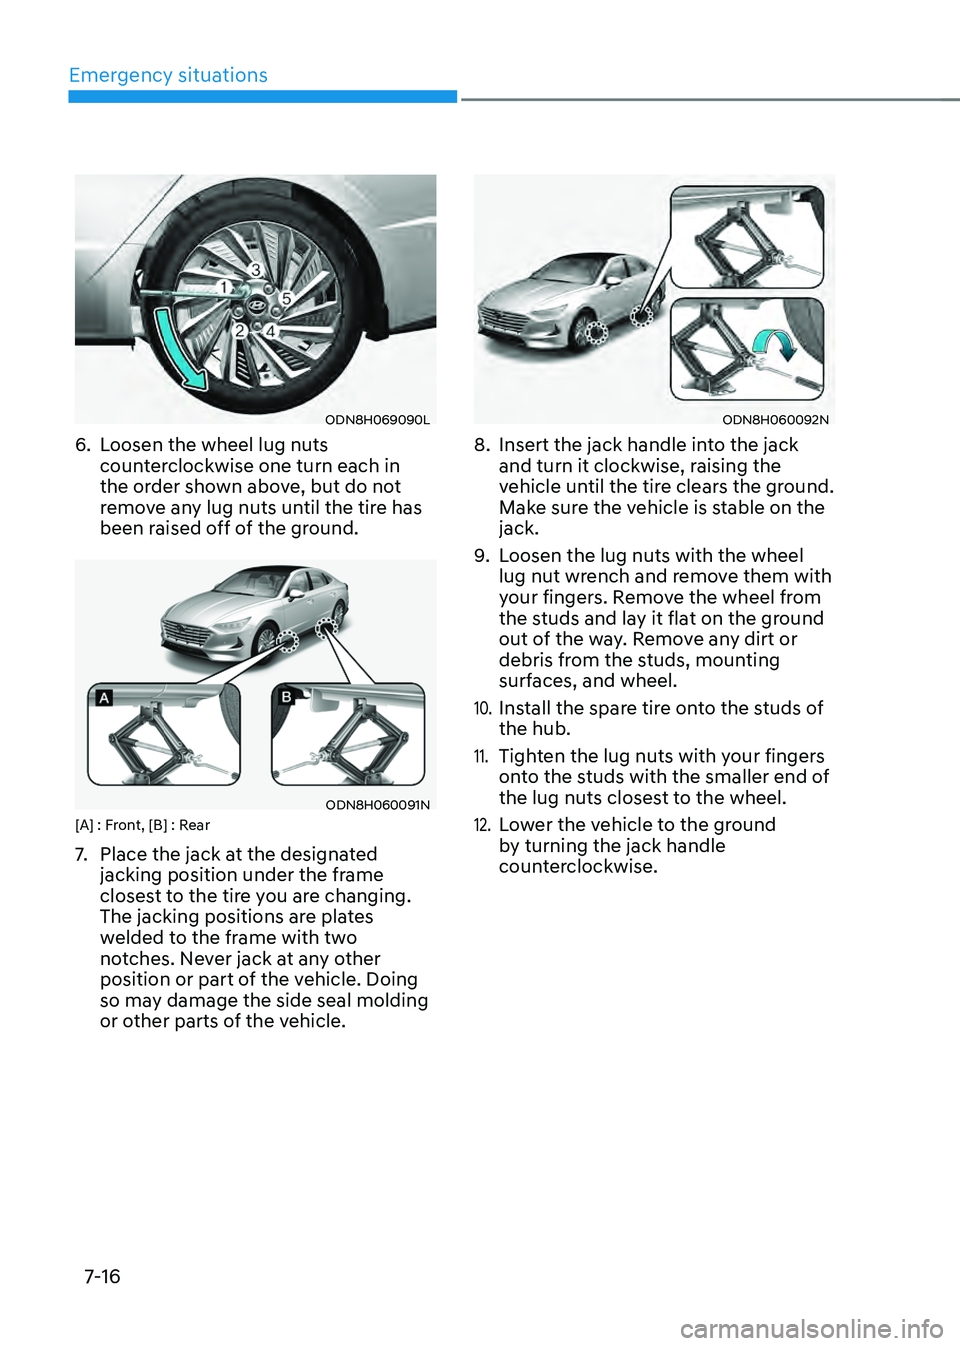
ODN8H069090L
6. Loosen the wheel lug nuts
counterclockwise one turn each in
the order shown above, but do not
remove any lug nuts until the tire has
been raised off of the ground.
ODN8H060091N[A] : Front, [B] : Rear
7. Place the jack at the designated
jacking position under the frame
closest to the tire you are changing.
The jacking positions are plates
welded to the frame with two
notches. Never jack at any other
position or part of the vehicle. Doing
so may damage the side seal molding
or other parts of the vehicle.
ODN8H060092N
8. Insert the jack handle into the jack
and turn it clockwise, raising the
vehicle until the tire clears the ground.
Make sure the vehicle is stable on the
jack.
9. Loosen the lug nuts with the wheel
lug nut wrench and remove them with
your fingers. Remove the wheel from
the studs and lay it flat on the ground
out of the way. Remove any dirt or
debris from the studs, mounting
surfaces, and wheel.
10. Install the spare tire onto the studs of
the hub.
11. Tighten the lug nuts with your fingers
onto the studs with the smaller end of
the lug nuts closest to the wheel.
12. Lower the vehicle to the ground
by turning the jack handle
counterclockwise.
Page 447 of 527
07
7-27
Removable Towing Hook
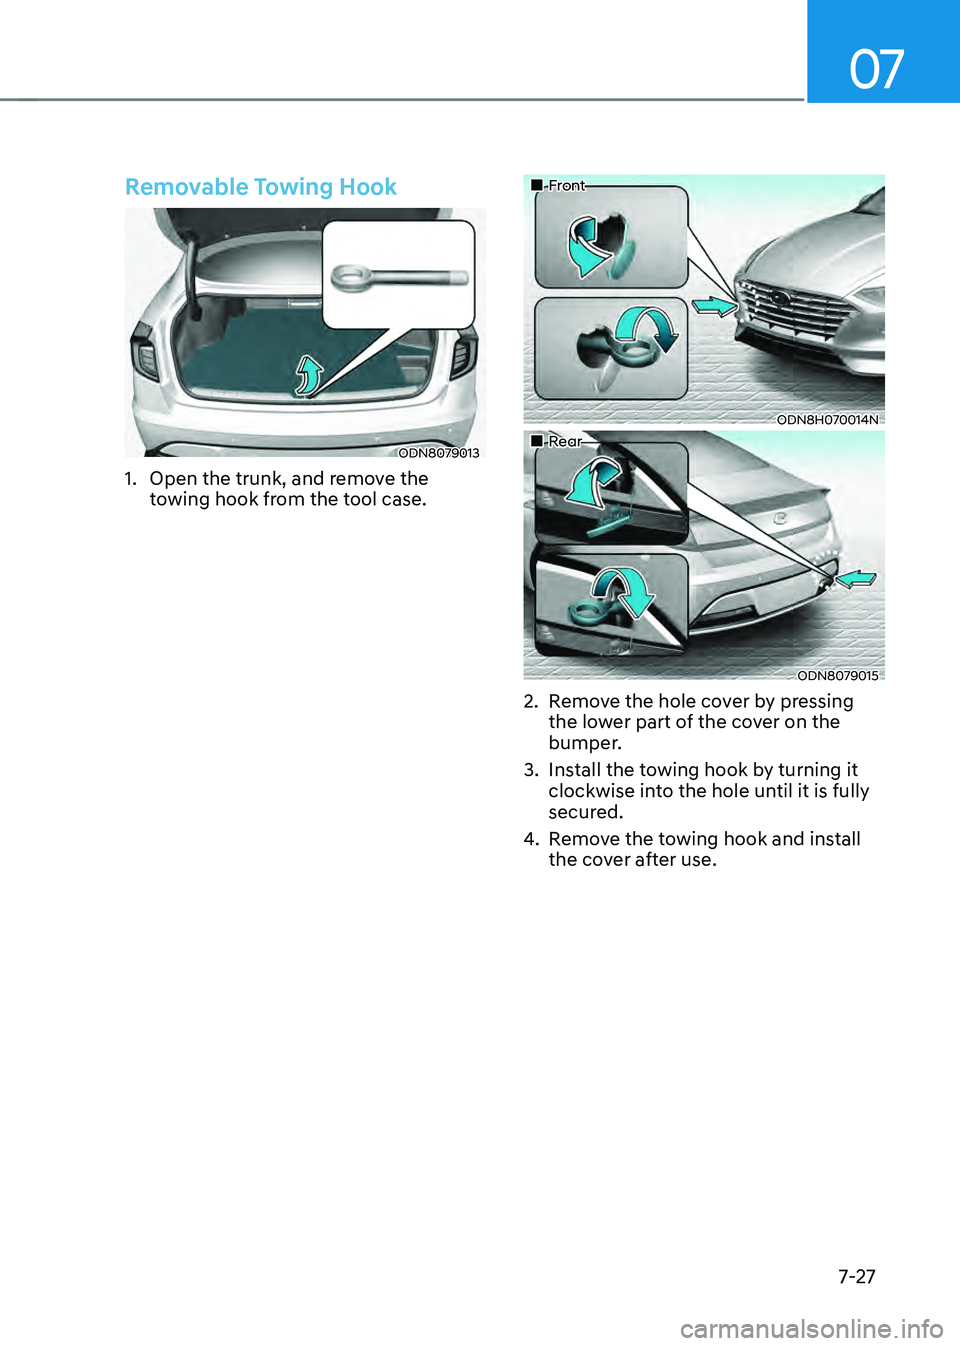
ODN8079013
1. Open the trunk, and remove the
towing hook from the tool case.
„„Front
ODN8H070014N
„„Rear
ODN8079015
2. Remove the hole cover by pressing
the lower part of the cover on the
bumper.
3. Install the towing hook by turning it
clockwise into the hole until it is fully
secured.
4. Remove the towing hook and install
the cover after use.
Page 467 of 527
Maintenance
8-18
Turn the vehicle off and wait until
the engine cools down. Use extreme
care when removing the engine
coolant cap and/or inverter coolant
cap. Wrap a thick towel around it,
and turn it counterclockwise slowly
while the pressure is released from
the cooling system. When you are sure
all the pressure has been released,
using a thick towel, continue turning
counterclockwise to remove it.
Information
The engine coolant and/or inverter coolant
level is influenced by the hybrid system
temperature. Before checking or refilling
the engine coolant and/or inverter coolant,
turn the hybrid vehicle off.
WARNING
The electric motor for the cooling fan may continue to
operate or start up when the
engine is not running and can
cause serious injury. Keep
hands, clothing and tools away
from the rotating fan blades of
the cooling fan.
Keep hands, clothing and tools away
from the rotating fan blades of the
cooling fan.
Always turn off the vehicle unless the
vehicle has to be inspected with the
engine on. Be cautious as the cooling
fan may operate if the negative (-)
battery terminal is not disconnected.
WARNING
Make sure the coolant cap is properly
closed after refilling coolant. Otherwise
the engine could be overheated while
driving.
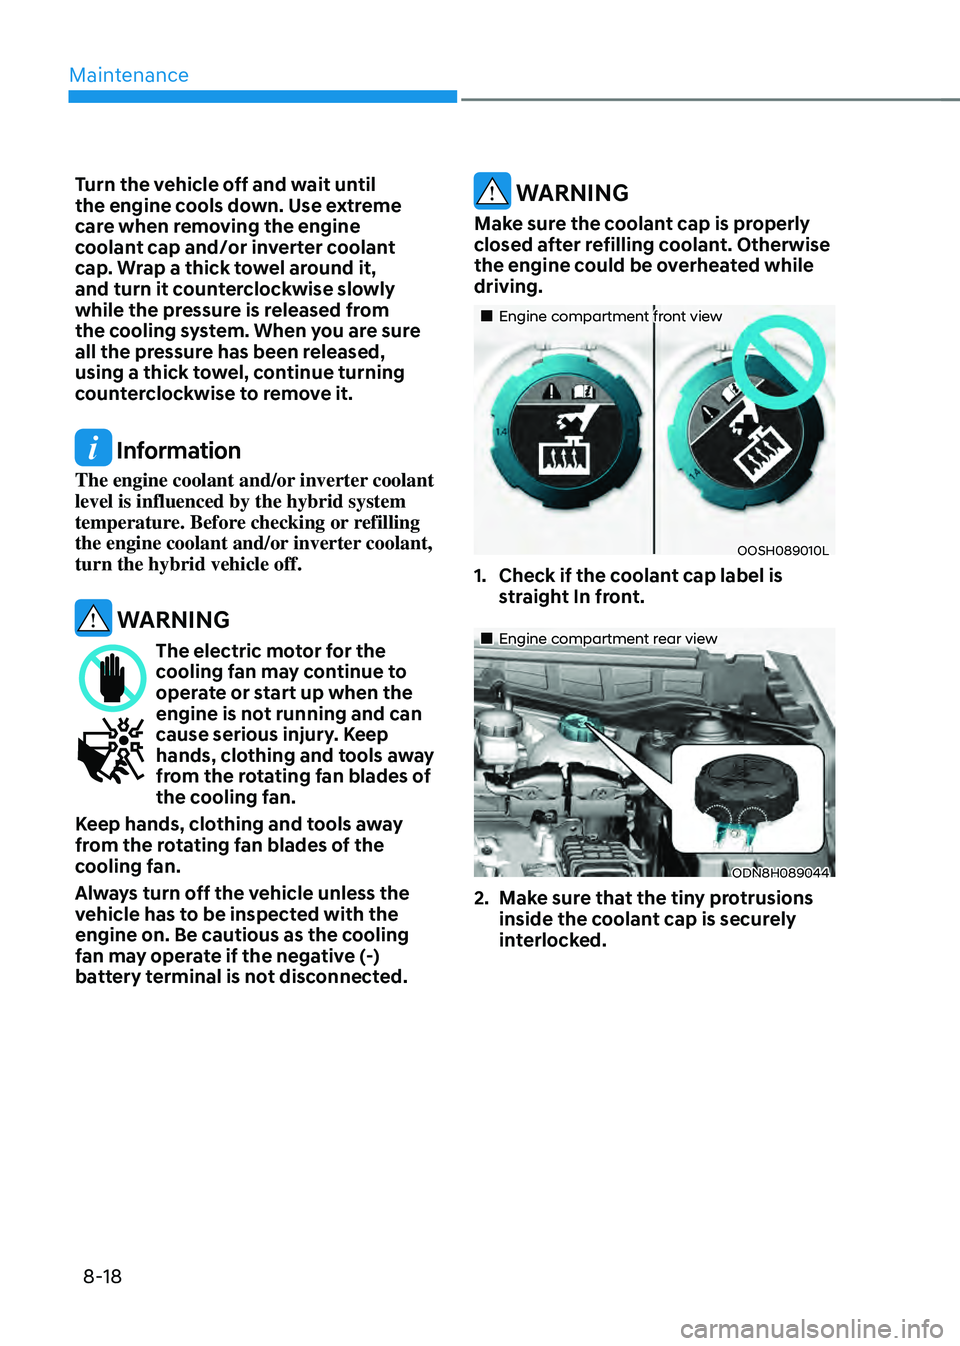
„„Engine compartment front view
OOSH089010L
1. Check if the coolant cap label is
straight In front.
„„Engine compartment rear view
ODN8H089044
2. Make sure that the tiny protrusions
inside the coolant cap is securely
interlocked.
Page 495 of 527

Maintenance
8-46
Tail lamp, stop lamp, turn signal
lamp, side marker (LED type)
If the LED lamp does not operate, have
the system checked by an authorized
HYUNDAI dealer.
The LED lamps cannot be replaced as
a single unit because it is an integrated
unit. The LED lamps has to be replaced
with the unit.
A skilled technician should check or
repair the LED lamp, for it may damage
related parts of the vehicle.
ODN8089031
Turn signal lamp (Bulb type)
1. Open the trunk lid.
2. Remove the service cover by pulling
out the service cover.
ODN8089032
3. Remove the socket from the
assembly by turning the socket
counterclockwise until the tabs on
the socket align with the slots on the
assembly.
4. Remove the bulb from the socket
by pressing it in and rotating it
counterclockwise until the tabs on the
bulb align with the slots in the socket.
Pull the bulb out of the socket.
5. Insert a new bulb by inserting it into
the socket and rotating it until it locks
into place.
6. Install the socket in the assembly by
aligning the tabs on the socket with
the slots in the assembly. Push the
socket into the assembly and turn the
socket clockwise.
Page 496 of 527
08
8-47
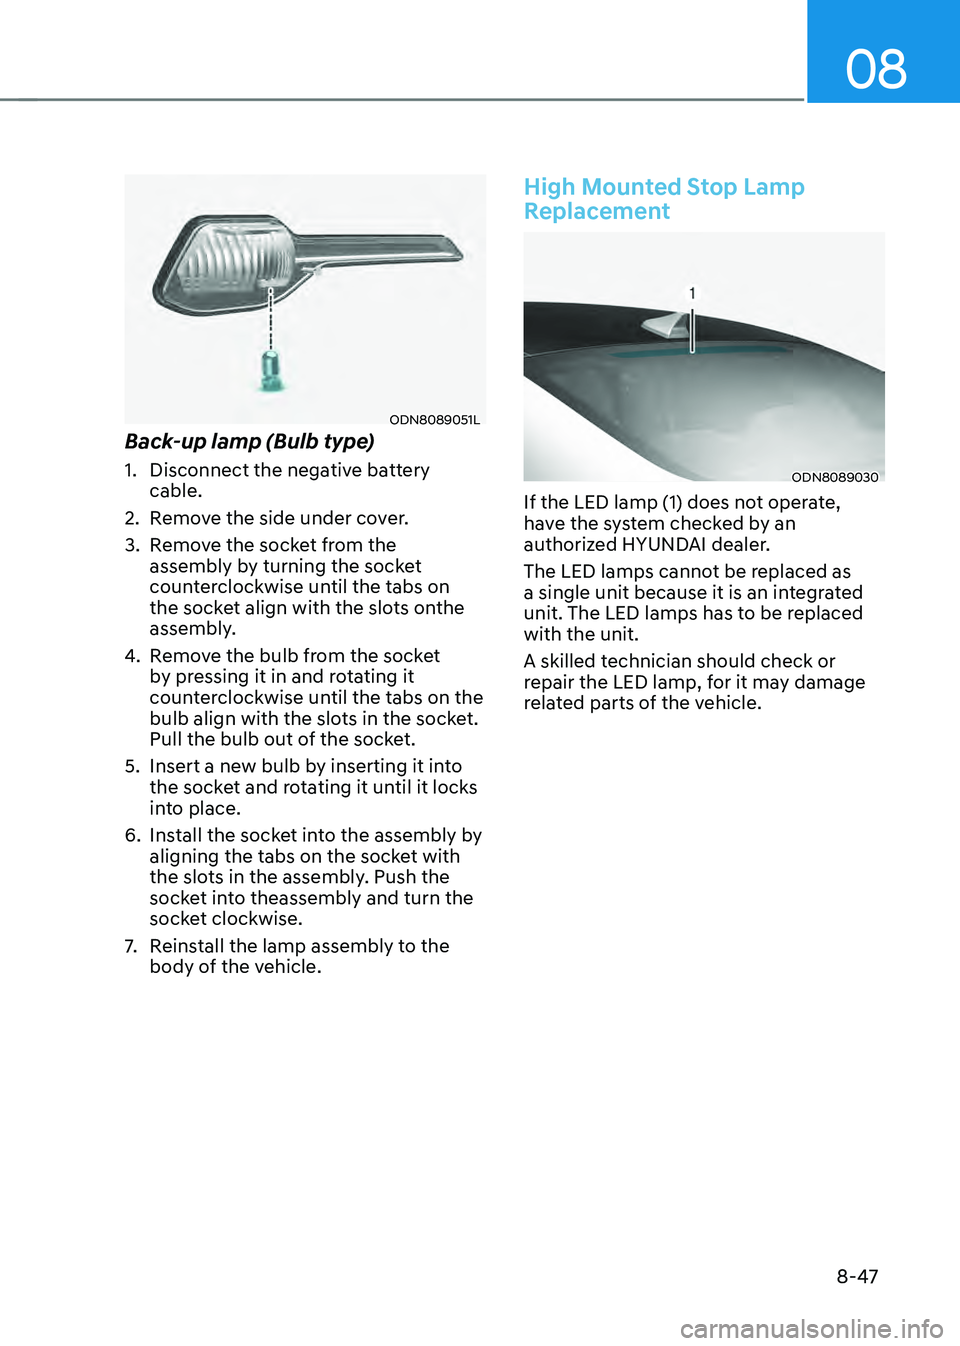
ODN8089051L
Back-up lamp (Bulb type)
1. Disconnect the negative battery
cable.
2. Remove the side under cover.
3. Remove the socket from the
assembly by turning the socket
counterclockwise until the tabs on
the socket align with the slots onthe
assembly.
4. Remove the bulb from the socket
by pressing it in and rotating it
counterclockwise until the tabs on the
bulb align with the slots in the socket.
Pull the bulb out of the socket.
5. Insert a new bulb by inserting it into
the socket and rotating it until it locks
into place.
6. Install the socket into the assembly by
aligning the tabs on the socket with
the slots in the assembly. Push the
socket into theassembly and turn the
socket clockwise.
7. Reinstall the lamp assembly to the
body of the vehicle.
High Mounted Stop Lamp
Replacement
ODN8089030
If the LED lamp (1) does not operate,
have the system checked by an
authorized HYUNDAI dealer.
The LED lamps cannot be replaced as
a single unit because it is an integrated
unit. The LED lamps has to be replaced
with the unit.
A skilled technician should check or
repair the LED lamp, for it may damage
related parts of the vehicle.
Page 497 of 527
Maintenance
8-48
License Plate Light Bulb
Replacement
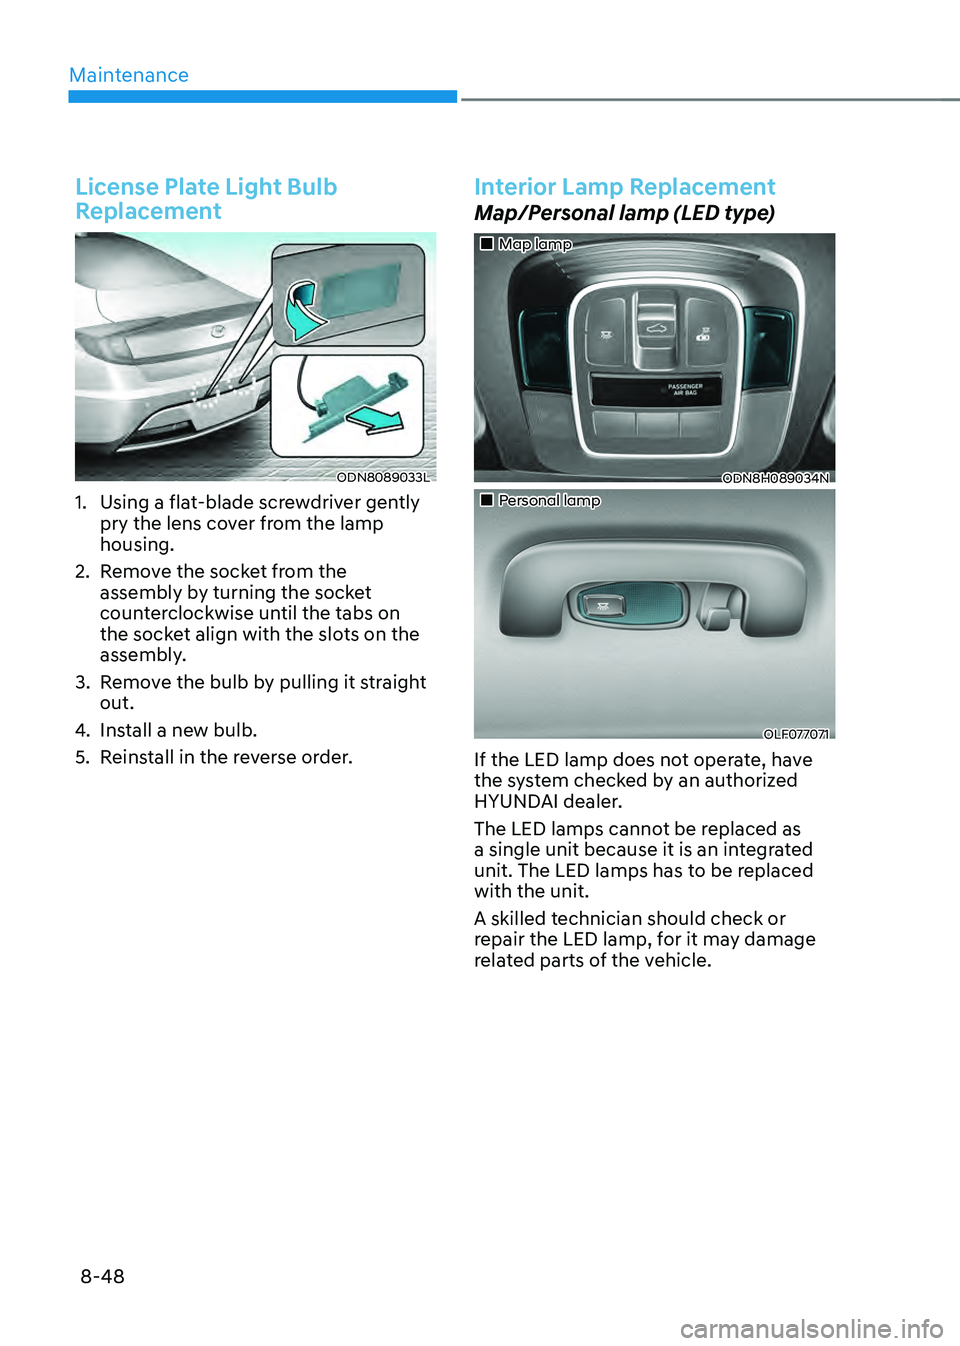
ODN8089033L
1. Using a flat-blade screwdriver gently
pry the lens cover from the lamp
housing.
2. Remove the socket from the
assembly by turning the socket
counterclockwise until the tabs on
the socket align with the slots on the
assembly.
3. Remove the bulb by pulling it straight
out.
4. Install a new bulb.
5. Reinstall in the reverse order.
Interior Lamp Replacement
Map/Personal lamp (LED type)
„„Map lamp
ODN8H089034N
„„Personal lamp
OLF077071
If the LED lamp does not operate, have
the system checked by an authorized
HYUNDAI dealer.
The LED lamps cannot be replaced as
a single unit because it is an integrated
unit. The LED lamps has to be replaced
with the unit.
A skilled technician should check or
repair the LED lamp, for it may damage
related parts of the vehicle.
Page 513 of 527
I
I-5
Child-protector rear door lock ........................................................................\
....5-33
Climate control additional features
....................................................................5-117
Automatic ventilation
........................................................................\
............5-117
Sunroof inside air recirculation
.....................................................................5-117
Smart seat warmer/air ventilation seat
.........................................................5-117
Washer fluid logic
........................................................................\
................5-117
Clock
........................................................................\
.........................................5-124
Clothes hanger
........................................................................\
..........................5-124
Coasting guide
........................................................................\
.............................6-17
Consumer information
........................................................................\
.................1-10
Cup holder
........................................................................\
.................................5-119
D
Daytime running light (DRL)
........................................................................\
......5-72
Declaration of conformity ........................................................................\
............ 6-77
Defroster
........................................................................\
...................................5-117
Dimensions
........................................................................\
...................................2-7
Door locks
........................................................................\
...................................5-28
Operating door locks from outside the vehicle
..............................................5-28
Central door lock/unlock switch
....................................................................5-30
Auto door lock/unlock features
......................................................................5-31
Rear Occupant Alert (ROA) system
...............................................................5-32
Child-protector rear door lock
........................................................................\
5-33
Vehicle Auto-Shut Off Function
.....................................................................5-33
Drive mode integrated control system
.................................................................6-33
Drive mode
........................................................................\
.............................6-33
Drive mode on trip computer
........................................................................\
..6-37
Driver Attention Warning (DAW)
......................................................................6-78
Leading vehicle departure alert
......................................................................6-83
Driver position memory system ........................................................................\
... 5-35
Storing positions into memory
.......................................................................5-35
Easy access function
........................................................................\
..............5-37
Driving at night
........................................................................\
.........................6-133
Driving in flooded areas
........................................................................\
...........6-134
Driving in the rain
........................................................................\
.....................6-133
Driving the hybrid vehicle
........................................................................\
...........1-13