2020 Hyundai Santa Fe security
[x] Cancel search: securityPage 92 of 557
Convenient features of your vehicle
Interior Features ................................................3-168
Ashtray ........................................................................\
....3-168
Cup Holder ......................................................................3-\
168
Sunvisor ........................................................................\
...3-169
Power Outlet ..................................................................3-170
AC Inverter......................................................................3-\
171
USB Charger ...................................................................3-173\
Wireless Cellular Phone Charging System..............3-173
Clock ........................................................................\
.........3-175
Coat Hook .......................................................................3\
-176
Floor Mat Anchor(s).....................................................3-176
Luggage Net Holder .....................................................3-177
Cargo Security Screen .................................................3-178
Side Curtain ....................................................................3-18\
0
Exterior Features ...............................................3-181
Roof Side Rails ..............................................................3-181
3
Page 112 of 557
3-23
Convenient features of your vehicle
3
This system helps to protect your vehi-
cle and valuables. The horn will sound
and the hazard warning lights will blink
continuously if any of the following
occur:
- A door is opened without using theremote key or smart key.
- The liftgate is opened without using the remote key or smart key.
- The engine hood is opened.
The alarm continues for 30 seconds
(repeats 2 times unless the system is
disarmed), then the system resets. To
turn off the alarm, unlock the doors
with the remote key or smart key.
The Theft Alarm System automatically
sets 30 seconds after you lock the
doors and the liftgate. For the system
to activate, you must lock the doors
and the liftgate from outside the vehi-
cle with the remote key or smart key or
by pressing the button on the outside
of the door handle with the smart key
in your possession.
The hazard warning lights will blink
and the chime will sound once to indi-
cate the system is armed.
Once the security system is set, open-
ing any door, the liftgate, or the hood without using the remote key or smart
key will cause the alarm to activate.
The Theft Alarm System will not set if
the hood, the liftgate, or any door is
not fully closed. If the system will not
set, check the hood, the liftgate, or the
doors are fully closed.
Do not attempt to alter this system or
add other devices to it.
Information
• Do not lock the doors until all pas-
sengers have left the vehicle. If the
remaining passenger leaves the
vehicle when the system is armed,
the alarm will be activated.
• If the vehicle is not disarmed with the remote key or smart key, open
the doors by using the mechanical
key and place the ignition switch in
the ON position (for remote key) or
start the engine (for smart key) by
directly pressing the ignition switch
with the smart key.
• If the system is disarmed by unlock- ing the vehicle, but neither a door or
the liftgate is opened within 30 sec-
onds, the doors will relock and the
system will rearm automatically.
i
Even if your vehicle is
equipped with the Rear
Occupant Alert (ROA) system,
always make sure you check
the rear seat before you get
off the vehicle.
The alert may not operate if:
- The movement does notcontinue for a certain period
of time or the movement is
small.
- The rear passenger is cov- ered with an obstacle such
as a blanket.
- Also, always be cautious of the passenger’s safety as
the detection function and
2nd alert may not operate
according to the surround-
ing environment and certain
conditions.
WARNING
T TH
H E
EF
FT
T -
-A
A L
LA
A R
RM
M
S
S Y
Y S
ST
T E
EM
M
Page 123 of 557
3-34
Convenient features of your vehicle
To adjust the Zone setting:
1. Determine the desired Zone Number based upon your current
location on the Zone Map.
2. Press and hold the button for 6 seconds, the current Zone
Number will appear on the display.
3. Pressing and holding the button again will cause the numbers to
increment (Note: they will repeat
…13, 14, 15, 1, 2, …). Releasing
the button when the desired Zone
Number appears on the display
will set the new Zone.
4. Within about 5 seconds the com- pass will start displaying a com-
pass heading again.
There are some conditions that can
cause changes to the vehicle mag-
nets, such as installing a ski rack or
a CB antenna. Body repair work on
the vehicle can also cause changes
to the vehicle’s magnetic field. In
these situations, the compass will
need to be re-calibrated to quickly
correct these changes. If you need to recalibrate the com-
pass:
1. Press and hold the button for
more than 9 seconds. When the
compass memory is cleared a "C"
will appear in the display.
2. Drive the vehicle in 2 complete cir- cles at less than 5 mph (8 km/h).
Integrated HomeLink®Wireless
Control System
The HomeLink®Wireless Control
System can replace up to three
hand-held radio-frequency (RF)
transmitters with a single built-in
device. This innovative feature will
learn the radio frequency codes of
most current transmitters to operate
devices such as gate operators,
garage door openers, entry door
locks, security systems, even home
lighting. Both standard and rolling
code-equipped transmitters can be
programmed by following the out-
lined procedures.
Additional HomeLink
®information
can be found at: www.homelink.com
or by calling 1-800-355-3515.
Retain the original transmitter of the
RF device you are programming for
use in other vehicles as well as for
future HomeLink
®programming. It is
also suggested that upon the sale of
the vehicle, the programmed
HomeLink
®buttons be erased for
security purposes.
Page 126 of 557
3-37
Convenient features of your vehicle
3
Gate operator & Canadian program-ming
During programming, your handheld
transmitter may automatically stop
transmitting. Continue to press the
Integrated HomeLink
®Wireless
Control System button (note steps 2
through 3 in the Programming portion
of this document) while you press
and re-press ("cycle") your handheld
transmitter every two seconds until
the frequency signal has been
learned. The indicator light will flash
slowly and then rapidly after several
seconds upon successful training.
Operating HomeLink®
To operate, simply press and release
the programmed HomeLink®button.
Activation will now occur for the
trained device (i.e. garage door
opener, gate operator, security sys-
tem, entry door lock, home/office
lighting, etc.). For convenience, the
hand-held transmitter of the device
may also be used at any time.
Reprogramming a single HomeLink®
button
To program a device to HomeLink®
using a HomeLink®button previously
trained, follow these steps:
1. Press and hold the desired HomeLink
®button. DO NOT
release the button.
2. The indicator light will begin to flash after 20 seconds. Without releasing
the HomeLink
®button, proceed
with "Programming" step 2.
For questions or comments, contact
HomeLink
®at www.homelink.comor
1-800-355-3515.
Erasing HomeLink®buttons
Individual buttons cannot be erased.
However, to erase all three pro-
grammed buttons:
1. Press and hold the two outer HomeLink
®buttons until the indi-
cator light begins to flash after 10
seconds.
2. Release both buttons. Do not hold for longer than 20 seconds.
The Integrated HomeLink
®Wireless
Control System is now in the training
(learn) mode and can be pro-
grammed at any time following the
appropriate steps in the
Programming chapters above.
NVS
®is a registered trademark and
Z-Nav™ is a trademark of the Gentex
Corporation, Zeeland, Michigan.
HomeLink
®is a registered trademark
owned by Johnson Controls,
Incorporated, Milwaukee, Wisconsin.
FCC ID: NZLTLMHL4
IC: 4112A-TLMHL4
Page 267 of 557
3-178
Convenient features of your vehicle
Cargo Security Screen
(if equipped)
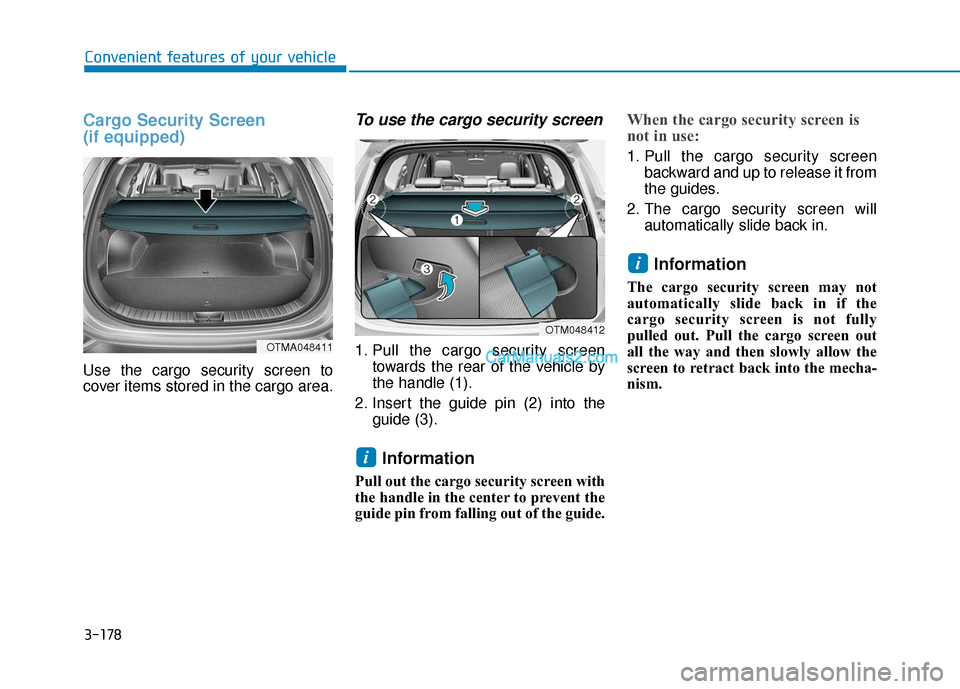
Use the cargo security screen to
cover items stored in the cargo area.
To use the cargo security screen
1. Pull the cargo security screentowards the rear of the vehicle by
the handle (1).
2. Insert the guide pin (2) into the guide (3).
Information
Pull out the cargo security screen with
the handle in the center to prevent the
guide pin from falling out of the guide.
When the cargo security screen is
not in use:
1. Pull the cargo security screenbackward and up to release it from
the guides.
2. The cargo security screen will automatically slide back in.
Information
The cargo security screen may not
automatically slide back in if the
cargo security screen is not fully
pulled out. Pull the cargo screen out
all the way and then slowly allow the
screen to retract back into the mecha-
nism.
i
i
OTMA048411
OTM048412
Page 268 of 557

3-179
Convenient features of your vehicle
3
To remove the cargo securityscreen
1. Push one side of the cargo screen
inward to compress the spring
mechanism and release the
screen from the vehicle.
2. While the mechanism is com- pressed, pull out the cargo securi-
ty screen.
3. Open the luggage tray and keep the cargo security screen in the
tray.
To remove the cargo securityscreen from the luggage tray
1. Pull up the screen board. 2. Push in the guide pin.
OTMA048413OTLE055152
OTLE055153
Page 269 of 557
3-180
Convenient features of your vehicle
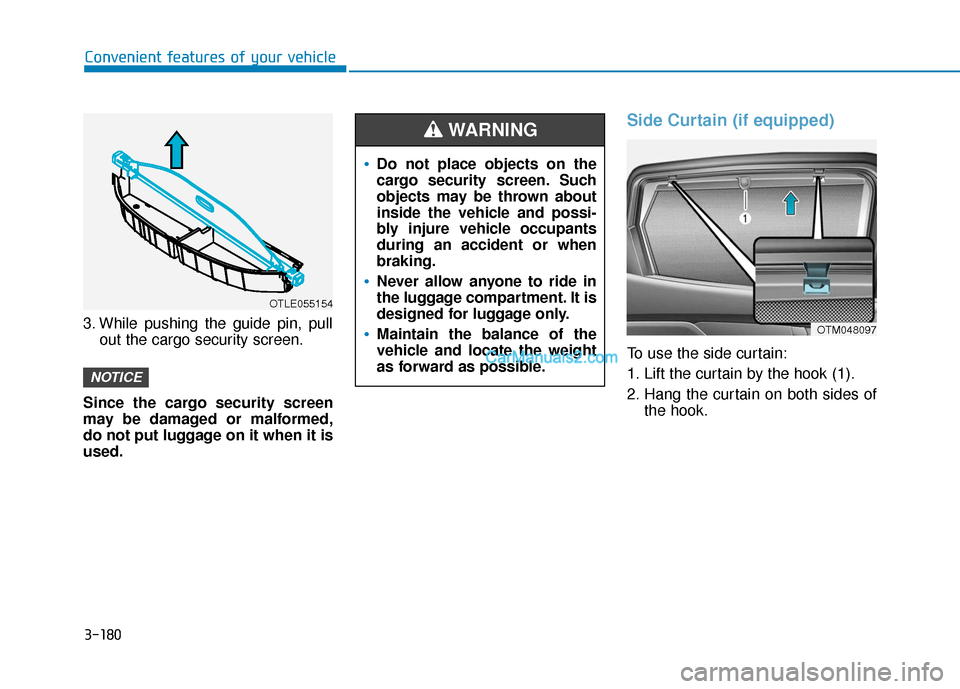
3. While pushing the guide pin, pull out the cargo security screen.
Since the cargo security screen
may be damaged or malformed,
do not put luggage on it when it is
used.
Side Curtain (if equipped)
To use the side curtain:
1. Lift the curtain by the hook (1).
2. Hang the curtain on both sides of the hook.
NOTICE
OTLE055154
Do not place objects on the
cargo security screen. Such
objects may be thrown about
inside the vehicle and possi-
bly injure vehicle occupants
during an accident or when
braking.
Never allow anyone to ride in
the luggage compartment. It is
designed for luggage only.
Maintain the balance of the
vehicle and locate the weight
as forward as possible.
WARNING
OTM048097
Page 546 of 557

I-3
Battery ........................................................................\
.....7-33Battery recharging ......................................................7-35
Battery saver function ...................................................3-118
Before driving ...................................................................5-4
Blade type fuse ...............................................................7-54
Blind-Spot Collision Warning (BCW) system ...............5-68
Blind-Spot Collision-Avoidance Assist (BCA) system ..5-68
Blind-spot View Monitor system ..................................3-131
Bluetooth
®Wireless Technology ......................................4-4
Bottle holder .................................................................3-168
Brake fluid ......................................................................7-\
26
Brake system ...................................................................5-20 Anti-lock Brake System (ABS)..................................5-30
Auto hold ....................................................................5-27\
Disc brakes wear indicator .........................................5-21
Downhill Brake Control (DBC) .................................5-36
Electronic Parking Brake (EPB) ................................5-21
Electronic Stability Control (ESC).............................5-32
Good braking practices ..............................................5-39
Hill-start Assist Control (HAC) .................................5-36
Power brakes ..............................................................5-20
Vehicle Stability Management (VSM) .......................5-35
Bulb replacement ............................................................7-65 Daytime running light (DRL) ....................................7-65
Front fog lamp ............................................................7-69
Front parking lamp .....................................................7-65
Front turn signal lamp ................................................7-65 Headlamp....................................................................7-65\
High mounted stop lamp ............................................7-73
Interior light................................................................7-74
License plate light ......................................................7-73
Rear combination light bulb .......................................7-70
Side marker ................................................................7-65
Side repeater lamp ......................................................7-69
Bulb wattage .....................................................................8-3\
Button start/stop, see engine start/stop button ..................5-9
Capacities (Lubricants) .....................................................8-7
Care Exterior care ...............................................................7-76
Interior care ................................................................7-81
Tire care ......................................................................7-\
37
Cargo security screen ....................................................3-178
Cartridge type fuse..........................................................7-54
Cellular phone holder ...................................................3-139
Center console storage ..................................................3-165
Central door lock/unlock switch .....................................3-16
Certification label ...........................................................8-10
Chains Tire chains ................................................................5-129
Check tire inflation pressure ...........................................7-39
I
Index
B
C