Page 124 of 557

3-35
Convenient features of your vehicle
3
Programming HomeLink®
Please note the following:
When programming a garage dooropener, it is advised to park the
vehicle outside of the garage.
It is recommended that a new bat- tery be placed in the hand-held
transmitter of the device being pro-
grammed to HomeLink
®for quicker
training and accurate transmission
of the radio-frequency signal.
Some vehicles may require the igni- tion switch to be placed in the ACC
(or "Accessories") position for pro-
gramming and/or operation of
HomeLink
®.
In the event that there are still pro- gramming difficulties or questions
after following the programming
steps listed below, contact
HomeLink
®at: www.homelink.com
or by calling 1-800-355-3515.
Programming
To train most devices, follow these
instructions:
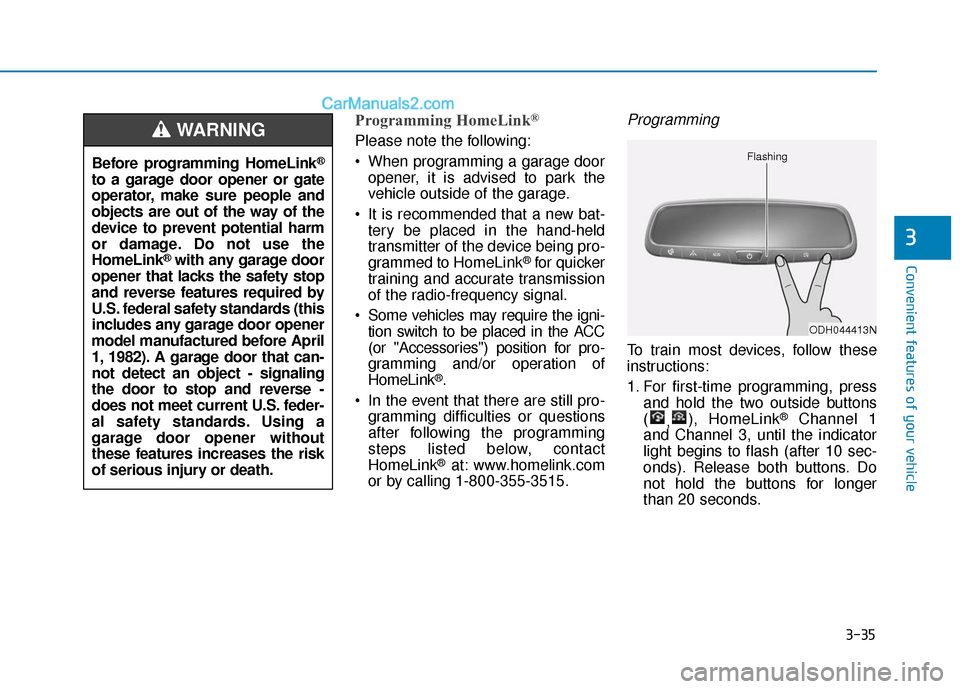
1. For first-time programming, press and hold the two outside buttons
( ,), HomeLink
®Channel 1
and Channel 3, until the indicator
light begins to flash (after 10 sec-
onds). Release both buttons. Do
not hold the buttons for longer
than 20 seconds.
ODH044413N
Flashing
Before programming HomeLink®
to a garage door opener or gate
operator, make sure people and
objects are out of the way of the
device to prevent potential harm
or damage. Do not use the
HomeLink
®with any garage door
opener that lacks the safety stop
and reverse features required by
U.S. federal safety standards (this
includes any garage door opener
model manufactured before April
1, 1982). A garage door that can-
not detect an object - signaling
the door to stop and reverse -
does not meet current U.S. feder-
al safety standards. Using a
garage door opener without
these features increases the risk
of serious injury or death.
WARNING
Page 125 of 557

3-36
Convenient features of your vehicle
2. Position the end of your hand-held transmitter 1-3 inches (2-8 cm)
away from the HomeLink
®button
you wish to program while keeping
the indicator light in view.
3. Simultaneously press and hold both the HomeLink
®and hand-
held transmitter buttons until the
HomeLink
®indicator light changes
from a slow to a rapid blinking
light. Now you may release both
the HomeLink
®and hand-held
transmitter buttons.
Information
Some devices may require you to
replace this Programming step 3 with
procedures noted in the "Gate
Operator/Canadian Programming"
chapter. If the HomeLink
®indicator
light does not change to a rapidly
blinking light after performing these
steps, contact HomeLink
®at
www.homelink.com.
4. Press and hold for 5 seconds then release the programmed HomeLink
®
button up to two separate times to
activate the door. If the door does not
activate, press and hold the just-
trained HomeLink
®button and
observe the indicator light.
stantly, programming is complete
and your device should activate
when the HomeLink
®button is
pressed and released.
for 2 seconds and then turns to a
constant light, continue with
"Programming" steps 5-7 to com-
plete the programming of a rolling
code equipped device (most com-
monly a garage door opener). 5. At the garage door opener receiver
(motor-head unit) in the garage,
locate the "learn" or "smart" button.
This can usually be found where
the hanging antenna wire is
attached to the motor-head unit.
6. Firmly press and release the "learn" or "smart" button. (The
name and color of the button vary
by manufacturer). There are 30
seconds to initiate step 7.
7. Return to the vehicle and firmly press, hold for 2 seconds and
release the programmed
HomeLink
®button. Repeat the
"press/hold/release" sequence a
second time, and, depending on
the brand of the garage door
opener (or other rolling code
equipped device), repeat this
sequence a third time to complete
the programming process.
HomeLink
®should now activate your
rolling code equipped device.
i
ODH044414N
Flashing
Page 205 of 557

3-116
Convenient features of your vehicleThe system may not operate nor-
mally if any of the following con-
ditions should occur:
1) When the illumination from an on-coming vehicle or a
vehicle in front is dim. Such
examples may include:
When the headlamps of an on-
coming vehicle or the tail
lamps of a vehicle in front is
covered with dust, snow, or
water.
When the headlamps on an on-
coming vehicle are OFF, but the
fog lamps are ON.
2) When the High Beam Assist camera is adversely affected
by an external condition.
Such examples may include:
When the vehicle's head-
lamps have been damaged or
not repaired properly.
When the vehicle headlamps
are not aimed properly.
When the vehicle is driven on
a narrow curved road or rough
road.
When the vehicle is driven on
an uphill road or downhill
road.
When only part of the vehicle in
front is visible on a crossroad
or curved road.
When there is a traffic light,
reflecting sign, flashing sign or
mirror.
When the road conditions are
bad such as being wet or cov-
ered with snow.
When a vehicle suddenly
appears from a curve.
When the vehicle is tilted from
a flat tire or being towed.
When the Lane Keeping Assist
(LKA) system warning light
illuminates.
When the light from the on-
coming or front vehicle is not
detected because of exhaust
fume, smoke, fog, snow, etc.
When the front window is cov-
ered with foreign matters such
as ice, dust, fog, or is damaged.
3) When the forward visibility is poor. Such examples may
include:
When the headlamps of an on-
coming vehicle or a vehicle in
front is not detected due to
poor outside visibility (smog,
smoke, dust, fog, heavy rain,
snow, etc.).
When the windshield visibility
is poor.
WARNING