Page 294 of 557

5-20
Driving your vehicle
Power Brakes
Your vehicle has power-assisted
brakes that adjust automatically
through normal usage.
If the engine is not running or is
turned off while driving, the power
assist for the brakes will not work.
You can still stop your vehicle by
applying greater force to the brake
pedal than typical. The stopping dis-
tance, however, will be longer than
with power brakes.
When the engine is not running, the
reserve brake power is partially
depleted each time the brake pedal
is applied. Do not pump the brake
pedal when the power assist has
been interrupted.
B BR
RA
A K
KI
IN
N G
G
S
S Y
Y S
ST
T E
EM
M
Take the following precautions:
Do not drive with your foot
resting on the brake pedal.
This will create abnormal high
brake temperatures, exces-
sive brake lining and pad
wear, and increased stopping
distances.
When descending down a
long or steep hill, move the
gear shift lever to Manual
Shift Mode and manually
downshift to a lower gear in
order to control your speed
without using the brake pedal
excessively. Applying the
brakes continuously will
cause the brakes to overheat
and could result in a tempo-
rary loss of braking perform-
ance.
Wet brakes may impair the
vehicle's ability to safely slow
down; the vehicle may also
pull to one side when the
brakes are applied. Applying
the brakes lightly will indicate
whether they have been
affected in this way. Always
test your brakes in this fash-
ion after driving through deep
water. To dry the brakes, light-
ly tap the brake pedal to heat
up the brakes while maintain-
ing a safe forward speed until
brake performance returns to
normal. Avoid driving at high
speeds until the brakes func-
tion correctly.WARNING
Page 295 of 557

5-21
Driving your vehicle
5
Disc Brakes Wear Indicator
When your brake pads are worn and
new pads are required, you will hear
a high pitched warning sound from
your front or rear brakes. You may
hear this sound come and go or it
may occur whenever you depress
the brake pedal.
Note that some driving conditions or
climates may cause a brake squeal
when you first apply (or lightly apply)
the brakes. This is normal and does
not indicate a problem with your
brakes.
To avoid costly brake repairs, do
not continue to drive with worn
brake pads.
Information
Always replace brake pads as com-
plete front or rear axle sets.
Electronic Parking Brake (EPB)
Applying the parking brake
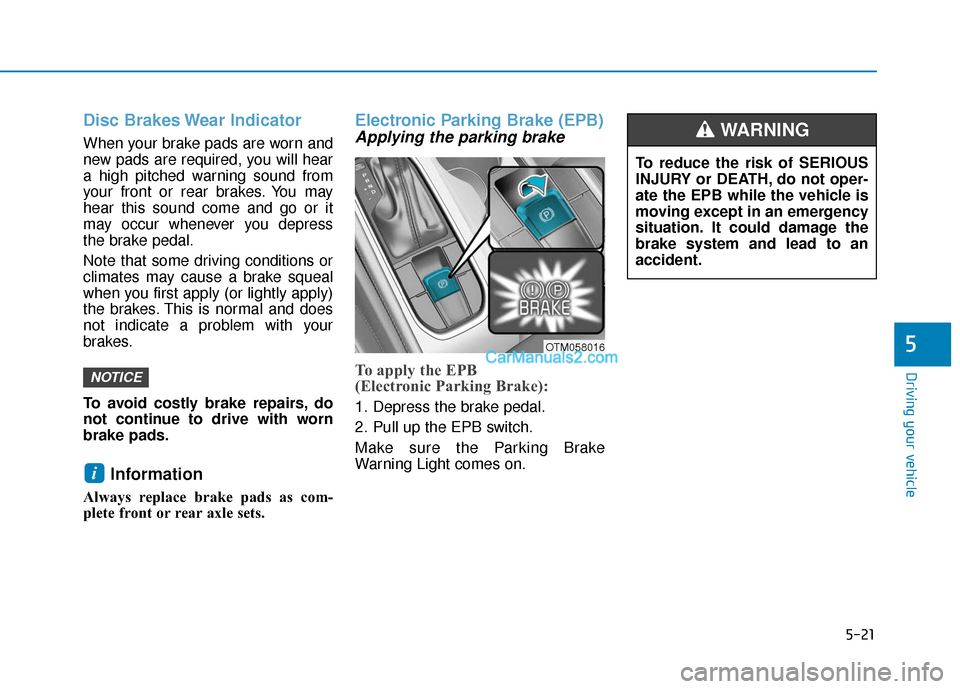
To apply the EPB
(Electronic Parking Brake):
1. Depress the brake pedal.
2. Pull up the EPB switch.
Make sure the Parking Brake
Warning Light comes on.
i
NOTICE
OTM058016
To reduce the risk of SERIOUS
INJURY or DEATH, do not oper-
ate the EPB while the vehicle is
moving except in an emergency
situation. It could damage the
brake system and lead to an
accident.
WARNING
Page 296 of 557

5-22
Releasing the parking brake
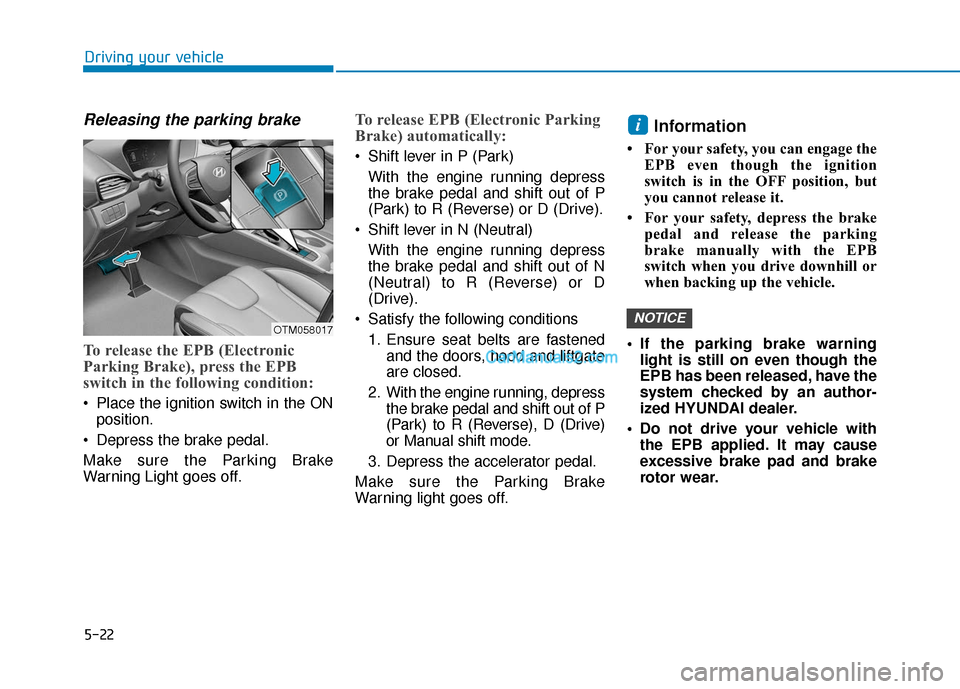
To release the EPB (Electronic
Parking Brake), press the EPB
switch in the following condition:
Place the ignition switch in the ONposition.
Depress the brake pedal.
Make sure the Parking Brake
Warning Light goes off.
To release EPB (Electronic Parking
Brake) automatically:
Shift lever in P (Park) With the engine running depress
the brake pedal and shift out of P
(Park) to R (Reverse) or D (Drive).
Shift lever in N (Neutral) With the engine running depress
the brake pedal and shift out of N
(Neutral) to R (Reverse) or D
(Drive).
Satisfy the following conditions 1. Ensure seat belts are fastened and the doors, hood and liftgate
are closed.
2. With the engine running, depress the brake pedal and shift out of P
(Park) to R (Reverse), D (Drive)
or Manual shift mode.
3. Depress the accelerator pedal.
Make sure the Parking Brake
Warning light goes off.
Information
• For your safety, you can engage the EPB even though the ignition
switch is in the OFF position, but
you cannot release it.
• For your safety, depress the brake pedal and release the parking
brake manually with the EPB
switch when you drive downhill or
when backing up the vehicle.
If the parking brake warning light is still on even though the
EPB has been released, have the
system checked by an author-
ized HYUNDAI dealer.
Do not drive your vehicle with the EPB applied. It may cause
excessive brake pad and brake
rotor wear.
NOTICE
i
Driving your vehicle
OTM058017
Page 451 of 557
I : Inspect and if necessary, adjust, correct, clean or replace.
R : Replace or change.
*
4: Transfer case oil and rear differential oil should be changed anytime they have been submerged in water.
Normal Maintenance Schedule (2.4 GDI) (CONT)
Months1224364860728496108120132144156168180
Miles×1,0007.51522.53037.54552.56067.57582.59097.5105112.5
Km×1,0001224364860728496108120132144156168180
Brake lines, hoses and connectionsIIIIIIIIIIIIIII
Disc brakes and padsIIIIIIIIIIIIIII
Steering gear rack, linkage and boots/
lower arm ball joint, upper arm ball jointIIIIIIIIIIIIIII
Driveshaft and bootsIIIIIII
Suspension mounting boltsIIIIIIIIIIIIIII
Air conditioner refrigerantIIIIIIIIIIIIIII
Air conditioner compressorIIIIIIIIIIIIIII
Propeller shaft (AWD)IIIIIII
Exhaust pipe and mufflerIIIIIIIIIIIIIII
Automatic transmission fluidNo check, No service required
Rear differential oil (AWD) *4III
Transfer case oil (AWD)*4III
MAINTENANCEINTERVALS
MAINTENANCE
ITEM
Maintenance
7
7-9
Page 453 of 557
Maintenance Under Severe Usage Conditions (2.4 GDI)
The following items must be serviced more frequently on cars normally used under severe driving conditions. Refer
to the chart below for the appropriate maintenance intervals.
I : Inspect and if necessary, adjust, correct, clean or replace.
R : Replace or change.
MAINTENANCE ITEMMAINTENANCEOPERATIONMAINTENANCE INTERVALSDRIVING
CONDITION
Engine oil and filterREvery 3,750 miles or 6 monthsA, B, C, D, E, F, G, H, I, J, K
Air cleaner filterRMore frequentlyC, E
Spark plugsRMore frequentlyA, B, F, G, H, I, K
Automatic transmission fluidREvery 60,000 milesA, C, D, E, F, G, H, I, J
Front brake disc/pads, calipersIMore frequentlyC, D, E, G, H
Rear brake disc/padsIMore frequentlyC, D, E, G, H
Maintenance
7
7-11
Page 456 of 557
I : Inspect and if necessary, adjust, correct, clean or replace.
R : Replace or change.
Normal Maintenance Schedule (2.0 T-GDI) (CONT)
Months1224364860728496108120132144156168180
Miles×1,00061218243036424854606672788490
Km×1,000102030405060708090100110120130140150
Battery conditionIIIIIIIIIIIIIII
Brake lines, hoses and connectionsIIIIIIIIIIIIIII
Disc brakes and padsIIIIIII
Steering gear rack, linkage and boots/
lower arm ball joint, upper arm ball jointIIIIIIIIIIIIIII
Driveshaft and bootsIIIIIII
Suspension mounting boltsIIIIIIIIIIIIIII
Air conditioner refrigerantIIIIIIIIIIIIIII
Air conditioner compressorIIIIIIIIIIIIIII
Propeller shaft (AWD)IIIIIII
MAINTENANCEINTERVALS
MAINTENANCE
ITEM
Maintenance
7-14
Page 458 of 557
Maintenance Under Severe Usage Conditions (2.0 T-GDI)
The following items must be serviced more frequently on cars normally used under severe driving conditions. Refer
to the chart below for the appropriate maintenance intervals.
I : Inspect and if necessary, adjust, correct, clean or replace.
R : Replace or change.
MAINTENANCE ITEMMAINTENANCE OPERATIONMAINTENANCE INTERVALSDRIVING
CONDITION
Engine oil and filterREvery 3,000 miles or 6 monthsA, B, C, D, E, F, G, H, I, J, K
Air cleaner filterRMore frequentlyC, E
Spark plugsRMore frequentlyA, B, F, G, H, I, K
Automatic transmission fluidREvery 60,000 milesA, C, D, E, F, G, H, I, J
Front brake disc/pads, calipersIMore frequentlyC, D, E, G, H
Rear brake disc/padsIMore frequentlyC, D, E, G, H
Maintenance
7-16
Page 462 of 557

7-20
Maintenance
Brake Hoses and Lines
Visually check for proper installation,
chafing, cracks, deterioration and
any leakage. Replace any deteriorat-
ed or damaged parts immediately.
Brake Fluid
Check the brake fluid level in the
brake fluid reservoir. The level should
be between the MIN and the MAX
marks on the side of the reservoir.
Use only hydraulic brake fluid con-
forming to DOT 3 or DOT 4 specifi-
cation.
Parking Brake
Inspect the parking brake system
including the parking brake pedal
and cables.
Brake Discs, Pads, Calipers
and Rotors
Check the pads for excessive wear,
discs for run out and wear, and
calipers for fluid leakage.
Exhaust Pipe and Muffler
Visually inspect the exhaust pipes,
muffler and hangers for cracks, dete-
rioration, or damage. Start the engine
and listen carefully for any exhaust
gas leakage. Tighten connections or
replace parts as necessary.
Suspension Mounting Bolts
Check the suspension connections
for looseness or damage. Retighten
to the specified torque.
Steering Gear Box, Linkage &
Boots/Lower Arm Ball Joint
With the vehicle stopped and the
engine off, check for excessive free-
play in the steering wheel. Check the
linkage for bends or damage. Check
the dust boots and ball joints for
deterioration, cracks, or damage.
Replace any damaged parts.
Drive Shafts and Boots
Check the drive shafts, boots and
clamps for cracks, deterioration, or
damage. Replace any damaged
parts and, if necessary, repack the
grease.
Air Conditioning Refrigerant
Check the air conditioning lines and
connections for leakage and dam-
age.