2020 Hyundai Santa Fe brake light
[x] Cancel search: brake lightPage 413 of 557
5-139
Driving your vehicle
5
5. Start the vehicle, apply the brakes,shift to neutral, release the park-
ing brake and slowly release the
brakes until the trailer chocks
absorb the load.
6. Reapply the brakes and parking brakes.
7. Move the shift lever to P (Park).
8. Shut off the vehicle and release the vehicle brakes but leave the
parking brake set.Driving the vehicle after it hasbeen parked on a hill
1. With the gear shift lever in P
(Park), apply the brakes and hold
the brake pedal down while per-
forming the following:
and
2. Slowly remove your foot from the brake pedal.
3. Drive slowly until the trailer is clear of the chocks.
4. Stop and have someone pick up and store the chocks.
Maintenance when trailer tow-
ing
Your vehicle will need service more
often when you regularly pull a trail-
er. Important items to pay particular
attention to include engine oil, auto-
matic transmission fluid, axle lubri-
cant and cooling system fluid. Brake
condition is another important item to
frequently check. If you’re trailering,
it’s a good idea to review these items
before you start your trip. Don't forget
to also maintain your trailer and
hitch. Follow the maintenance sched-
ule that accompanied your trailer and
check it periodically. Preferably,
inspect the vehicle and trailer at the
start of each day's driving. Inspect
the hitch mounting to make sure the
hitch is properly secured to the vehi-
cle. Inspect the trailer electrical
wiring to make sure brake lights, turn
signal lights, running lights, and haz-
ard lights are working properly.
Do not get out of the vehicle
without the parking brake
firmly set. If you have left the
engine running, the vehicle
can move suddenly. You and
others could be seriously or
fatally injured.
Do not apply the accelerator
pedal to hold the vehicle on
an uphill.
WARNING
Page 423 of 557
6-3
What to do in an emergency
If you Have a Flat Tire While
Driving
If a tire goes flat while you are driving:
Take your foot off the acceleratorpedal and let the vehicle slow down
while driving straight ahead. Do not
apply the brakes immediately or
attempt to pull off the road as this
may cause loss of vehicle control
resulting in an accident. When the
vehicle has slowed to such a speed
that it is safe to do so, brake care-
fully and pull off the road. Drive off
the road as far as possible and
park on firm, level ground. If you
are on a divided highway, do not
park in the median area between
the two traffic lanes.
When the vehicle is stopped, press the hazard warning flasher button,
move the shift lever into P (Park),
and apply the parking brake, and
place the ignition switch in the
LOCK/OFF position.
Have all passengers get out of the vehicle. Be sure they all get out on
the side of the vehicle that is away
from traffic.
When changing a flat tire, follow the instructions provided later in
this chapter.
If the Engine Doesn't Turn
Over or Turns Over Slowly
Be sure the shift lever is in N
(Neutral) or P (Park). The engine
starts only when the shift lever is in
N (Neutral) or P (Park).
Check the battery connections to be sure they are clean and tight.
Turn on the interior light. If the light dims or goes out when you oper-
ate the starter, the battery is
drained.
Do not push or pull the vehicle to
start it. This could cause damage to
your vehicle. See instructions for
"Jump Starting" provided in this
chapter.
If the Engine Turns Over
Normally but Doesn't Start
Check the fuel level and add fuel if
necessary.
If the engine still does not start, have
your vehicle checked by an author-
ized HYUNDAI dealer.
6
I I F
F
T
T H
H E
E
E
E N
N G
GI
IN
N E
E
W
W I
IL
L L
L
N
N O
O T
T
S
S T
T A
A R
RT
T
Push or pull starting the vehicle
may cause the catalytic con-
verter to overload which can
lead to damage to the emission
control system.
CAUTION
Page 425 of 557
6-5
What to do in an emergency
6
Information
An inappropriately disposedbattery can be harmful to the
environment and human
health. Dispose of the battery
according to your local law(s)
or regulations.
To prevent damage to your vehicle:
Only use a 12-volt power supply (battery or jumper system) to
jump start your vehicle.
Do not attempt to jump start your vehicle by push-starting.
Jump starting procedure
1. Position the vehicles close enough that the jumper cables will reach,
but do not allow the vehicles to
touch.
2. Avoid fans or any moving parts in the engine compartment at all
times, even when the vehicles are
turned off.
3. Turn off all electrical devices such as radios, lights, air conditioning,
etc. Put the vehicles in P (Park)
and set the parking brakes. Turn
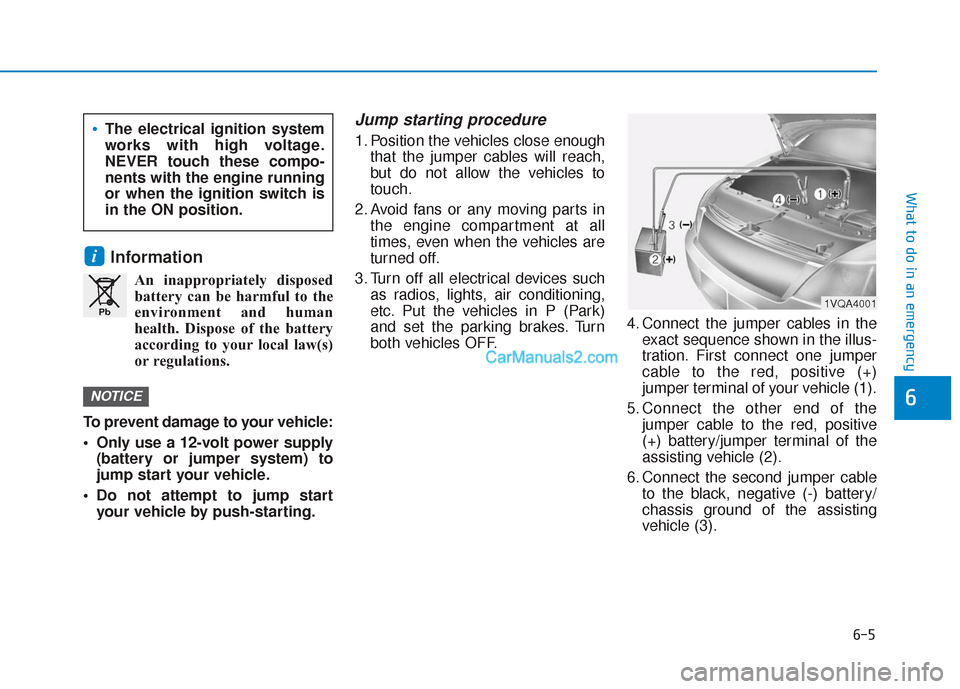
both vehicles OFF. 4. Connect the jumper cables in the
exact sequence shown in the illus-
tration. First connect one jumper
cable to the red, positive (+)
jumper terminal of your vehicle (1).
5. Connect the other end of the jumper cable to the red, positive
(+) battery/jumper terminal of the
assisting vehicle (2).
6. Connect the second jumper cable to the black, negative (-) battery/
chassis ground of the assisting
vehicle (3).
NOTICE
i
Pb
The electrical ignition system
works with high voltage.
NEVER touch these compo-
nents with the engine running
or when the ignition switch is
in the ON position.
1VQA4001
Page 433 of 557
6-13
What to do in an emergency
6
You may not be able identify a tire
with low pressure by simply looking
at it. Always use a good quality tire
pressure gage to measure the tire's
inflation pressure. Please note that a
tire that is hot (from being driven) will
have a higher pressure measure-
ment than a tire that is cold.
A cold tire means the vehicle has
been sitting for 3 hours and driven for
less than 1 mile (1.6 km) in that 3
hour period.
Allow the tire to cool before measur-
ing the inflation pressure. Always be
sure the tire is cold before inflating to
the recommended pressure.Information
This device complies with Part 15 of
the FCC rules.
Operation is subject to the following
three conditions:
1. This device may not cause harmfulinterference.
2. This device must accept any inter- ference received, including interfer-
ence that may cause undesired oper-
ation.
3. Changes or modifications not expressly approved by the party
responsible for compliance could
void the user's authority to operate
the equipment.
i
The TPMS cannot alert you to
severe and sudden tire dam-
age caused by external fac-
tors such as nails or road
debris.
If you feel any vehicle instabil-
ity, immediately take your foot
off the accelerator, apply the
brakes gradually with light
force, and slowly move to a
safe position off the road.
WARNING
Tampering with, modifying, or
disabling the Tire Pressure
Monitoring System (TPMS)
components may interfere with
the system's ability to warn the
driver of low tire pressure con-
ditions and/or TPMS malfunc-
tions. Tampering with, modify-
ing, or disabling the Tire
Pressure Monitoring System
(TPMS) components may void
the warranty for that portion of
the vehicle.
WARNING
Page 448 of 557
Owner Maintenance Schedule
When you stop for fuel:
• Check the engine oil level.
Check the coolant level in theengine coolant reservoir.
Check the windshield washer fluid level.
Check the tire for low or under- inflated tires.
While operating your vehicle:
Note any changes in the sound ofthe exhaust or any smell of
exhaust fumes in the vehicle.
Check for vibrations in the steer- ing wheel. Notice if there is any
increased steering effort or loose-
ness in the steering wheel, or
change in its straight-ahead posi-
tion.
Notice if your vehicle constantly turns slightly or "pulls" to one side
when traveling on smooth, level
road.
When stopping, listen and check for unusual sounds, pulling to one
side, increased brake pedal travel
or "hard-to-push" brake pedal.
If any slipping or changes in the operation of your transmission
occurs, check the transmission
fluid level.
Check the automatic transmission P (Park) function. Check the parking brake.
Check for fluid leaks under your
vehicle (water dripping from the air
conditioning system during or
after use is normal).
At least monthly:
Check coolant level in the enginecoolant reservoir.
Check the operation of all exterior lights, including the brake lights,
turn signals and hazard warning
flashers.
Check the inflation pressures of all tires including the spare for tires
that are worn, show uneven wear,
or are damaged.
Check for loose wheel lug nuts.
At least twice a year: (i.e., every Spring and Autumn)
Check radiator, heater and air
conditioning hoses for leaks or
damage.
Check windshield washer spray and wiper operation. Clean wiper
blades with a clean cloth damp-
ened with washer a fluid.
Be careful when checking your
engine coolant level when the
engine is hot. This may result in
coolant being blown out of the
opening and cause serious
burns and other injuries.
WARNING
Maintenance
7-6
Page 507 of 557
L
LI
IG
G H
H T
T
B
B U
U L
LB
B S
S
Consult an authorized HYUNDAI
dealer to replace most vehicle light
bulbs. It is difficult to replace vehicle
light bulbs because other parts of the
vehicle must be removed before you
can get to the bulb. This is especially
true for removing the headlamp
assembly to get to the bulb(s).
Removing/installing the headlamp
assembly can result in damage to
the vehicle.
Information
The headlamp and tail lamp lenses
could appear frosty if the vehicle is
washed after driving or the vehicle is
driven at night in wet weather. This
condition is caused by temperature
difference between the lamp inside
and outside and, it does not indicate a
problem with your vehicle. When
moisture condenses in the lamp, it will
be removed after driving with the
headlamp on. The removable level
may differ depending on lamp size,
lamp position and environmental con-
dition. However, if moisture is not
removed, we recommend that your
vehicle is inspected by an authorized
HYUNDAI dealer.
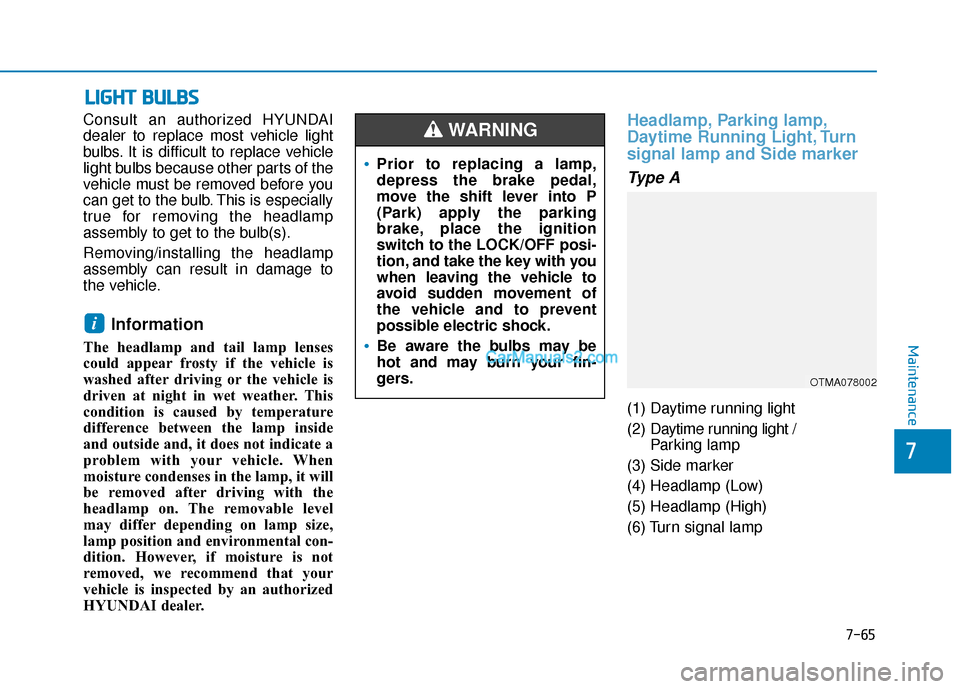
Headlamp, Parking lamp,
Daytime Running Light, Turn
signal lamp and Side marker
Type A
(1) Daytime running light
(2) Daytime running light /
Parking lamp
(3) Side marker
(4) Headlamp (Low)
(5) Headlamp (High)
(6) Turn signal lamp
i
•Prior to replacing a lamp,
depress the brake pedal,
move the shift lever into P
(Park) apply the parking
brake, place the ignition
switch to the LOCK/OFF posi-
tion, and take the key with you
when leaving the vehicle to
avoid sudden movement of
the vehicle and to prevent
possible electric shock.
Be aware the bulbs may be
hot and may burn your fin-
gers.
WARNING
OTMA078002
Maintenance
7-65
7
Page 518 of 557
A
AP
PP
PE
EA
A R
RA
A N
N C
CE
E
C
C A
A R
RE
E
Exterior Care
Exterior general caution
It is very important to follow the label
directions when using any chemical
cleaner or polish. Read all warning
and caution statements that appear
on the label.
Protecting your vehicle's finish
Washing
To help protect your vehicle’s finish
from rust and deterioration, wash it
thoroughly and frequently at least
once a month with lukewarm or cold
water.
If you use your vehicle for off-road
driving, you should wash it after each
off-road trip. Pay special attention to
the removal of any accumulation of
salt, dirt, mud, and other foreign
materials. Make sure the drain holes
in the lower edges of the doors and
rocker panels are kept clear and
clean. Insects, tar, tree sap, bird droppings,
industrial pollution and similar
deposits can damage your vehicle’s
finish if not removed immediately.
Even prompt washing with plain
water may not completely remove all
these deposits. A mild soap, safe for
use on painted surfaces, should be
used.
After washing, rinse the vehicle thor-
oughly with lukewarm or cold water.
Do not allow soap to dry on the fin-
ish.
Do not use strong soap, chemi-
cal detergents or hot water, and
do not wash the vehicle in direct
sunlight or when the body of the
vehicle is warm.
Be careful when washing the side windows of your vehicle.
Especially, with high-pressure
water, water may leak through
the windows and wet the interi-
or.
To prevent damage to the plastic parts, do not clean with chemi-
cal solvents or strong deter-
gents.
NOTICE
After washing the vehicle, test
the brakes while driving slowly
to see if they have been affected
by water before getting on the
road. If braking performance is
impaired, dry the brakes by
applying them lightly while
maintaining a slow forward
speed.
WARNING
Maintenance
7-76
Page 521 of 557
Bright-metal maintenance
To remove road tar and insects,use a tar remover, not a scraper or
other sharp object.
To protect the surfaces of bright- metal parts from corrosion, apply
a coating of wax or chrome pre-
servative and rub to a high luster.
During winter weather or in coastal areas, cover the bright
metal parts with a heavier coating
of wax or preservative. If neces-
sary, coat the parts with non-cor-
rosive petroleum jelly or other pro-
tective compound.
Underbody maintenance
Corrosive materials used for ice and
snow removal and dust control may
collect on the underbody. If these
materials are not removed, acceler-
ated rusting can occur on underbody
parts such as the fuel lines, frame,
floor pan and exhaust system, even
though they have been treated with
rust protection. Thoroughly flush the vehicle under-
body and wheel openings with luke-
warm or cold water once a month,
after off-road driving and at the end
of each winter. Pay special attention
to these areas because it is difficult
to see all the mud and dirt. It will do
more harm than good to wet down
the road grime without removing it.
The lower edges of doors, rocker
panels, and frame members have
drain holes that should not be
allowed to clog with dirt; trapped
water in these areas can cause rust-
ing.
Aluminum wheel maintenance
The aluminum wheels are coated
with a clear protective finish.
Do not use abrasive cleaner, pol-
ishing compound, solvent, or
wire brushes on aluminum
wheels.
Clean the wheel when it has cooled.
Use only a mild soap or neutral detergent, and rinse thoroughly
with water. Also, clean the
wheels after driving on salted
roads.
Do not wash the wheels with high-speed car wash brushes.
Do not use any cleaners con- taining acid or alkaline deter-
gents.
NOTICE
After washing the vehicle, test
the brakes while driving slowly
to see if they have been affected
by water. If braking performance
is impaired, dry the brakes by
applying them lightly while
maintaining a slow forward
speed.
WARNING
Maintenance
7-79
7