2020 Hyundai Santa Fe shift lever
[x] Cancel search: shift leverPage 313 of 557

5-39
Driving your vehicle
5
Good Braking Practices
Wet brakes can be dangerous! The
brakes may get wet if the vehicle is
driven through standing water or if it
is washed. Your vehicle will not stop
as quickly if the brakes are wet. Wet
brakes may cause the vehicle to pull
to one side.To dry the brakes, apply the brakes
lightly until the braking action returns
to normal, taking care to keep the
vehicle under control at all times. If
the braking action does not return to
normal, stop as soon as it is safe to
do so and call an authorized
HYUNDAI dealer for assistance.
DO NOT drive with your foot resting
on the brake pedal. Even light, but
constant pedal pressure can result in
the brakes overheating, brake wear,
and possibly even brake failure.
If a tire goes flat while you are driv-
ing, apply the brakes gently and
keep the vehicle pointed straight
ahead while you slow down. When
you are moving slowly enough for it
to be safe to do so, pull off the road
and stop in a safe location.
Keep your foot firmly on the brake
pedal when the vehicle is stopped to
prevent the vehicle from rolling for-
ward.
Whenever leaving the vehicle or
parking, always come to a com-
plete stop and continue to
depress the brake pedal. Move
the shift lever into P (Park) posi-
tion, then apply the parking
brake, and place the ignition
switch in the LOCK/OFF posi-
tion.
Vehicles parked with the park-
ing brake not applied or not
fully engaged may roll inadver-
tently and may cause injury to
the driver and others. ALWAYS
apply the parking brake before
exiting the vehicle.
WARNING
Page 316 of 557

5-42
Driving your vehicle
When driving on normal roads,
deactivate the AWD LOCK mode
by pushing the AWD LOCK button
(AWD LOCK indicator light goes
off). Driving on normal roads with
the AWD LOCK mode, especially,
when cornering may cause
mechanical noise or vibration. The
noise and vibration will disappear
when the AWD LOCK mode is
deactivated. Prolong driving with
the noise and vibration may dam-
age some parts of the power train.
Information
When the AWD LOCK mode is deac-
tivated, a sensation may be felt as the
driving power is delivered entirely to
the front wheels.
For safe AWD operation
Before driving
Make sure all passengers are wearing seat belts.
Sit upright and closer to the steer- ing wheel than usual. Adjust the
steering wheel to a position com-
fortable for you to drive.
Driving on snow-covered or icy
roads
Start off slowly by applying theaccelerator pedal gently.
Use snow tires or tire chains.
Keep sufficient distance between your vehicle and the vehicle in
front of you.
Apply engine braking during decel- eration by switching the gear shift
lever to Manual Shift Mode and
manually selecting a lower gear.
Avoid speeding, rapid accelera- tion, sudden brake applications,
and sharp turns to prevent skids.
Driving in sand or mud
Maintain slow and constant speed.
Use tire chains driving in mud ifnecessary.
Keep sufficient distance between your vehicle and the vehicle in
front of you.
Reduce vehicle speed and always check the road condition.
Avoid speeding, rapid accelera- tion, sudden brake applications,
and sharp turns to prevent getting
stuck.
i
NOTICE
When the vehicle is stuck in
snow, sand or mud, place a non-
slip material under the drive
wheels to provide traction OR
Slowly spin the wheels in for-
ward and reverse directions
which causes a rocking motion
that may free the vehicle.
However, avoid running the
engine continuously at high
rpm, doing so may damage the
AWD system.
CAUTION
Page 321 of 557

5-47
Driving your vehicle
Auto stop
To stop the engine in idle stop mode
1. Decrease the vehicle speed to 0mph.
2. Depress the brake pedal with the shift lever in D (Drive) or N
(Neutral).
The auto stop indicator ( ) illumi-
nates in green on the instrument
cluster, when the engine stops.
Information
The driving speed must reach at least
3 mph (5 km/h) after an idle stop to
stop the engine in idle stop mode
again. In auto stop mode, when the driver
opens the hood, the ISG system will
be deactivated.
When the system is deactivated:
The ISG OFF button indicator illumi-
nates.
The message, "Auto Stop is Off!.
Start vehicle manually", appears on
the LCD display with a beep sound.
At this time, restart the vehicle man-
ually by depressing the brake pedal
with the vehicle shifted to P (Park) or
N (Neutral). But for your safety,
restart the vehicle in the P (Park)
position.
i
5
OTMA058163
■
Type A■ Type B
OTMA048415
■ Type A
OTM048416
■ Type B
OIK057173N
Page 322 of 557

5-48
Auto start
To restart the engine in the auto
stop mode
Release the brake pedal.
- When Auto Hold is activated, if yourelease the brake pedal, the
engine will be in the auto stop
state. However, if you depress the
accelerator pedal, the engine will
start again.
The auto stop indicator ( ) goes
OFF on the instrument cluster, when
the engine is restarted.
The engine is automatically restart-
ed in the following situations.
The brake vacuum pressure is low
The engine has stopped for about 5 minutes
The air conditioning is ON with the fan speed set to the highest posi-
tion
The front defroster is ON
The battery is weak
The cooling and heating perform- ance of the climate control system
is unsatisfactory
The vehicle is shifted to P (Park) when Auto Hold is activated
The door is opened or the seatbelt is unfastened when Auto Hold is
activated
The EPB switch is pressed when Auto Hold is activated
The auto stop indicator ( ) blinks
in green for 5 seconds on the instru-
ment cluster.
The auto start is temporarily deac-
tivated in the following situations.
When the shift lever is shifted from N
(Neutral) to R (Reverse), D (Drive) or
Manual shift mode without the brake
pedal depressed. A message "Press
brake pedal for Auto Start" will
appear on the LCD display. To acti-
vate auto start, depress the brake
pedal.
Driving your vehicle
OIK057086N
Page 327 of 557

5-53
Driving your vehicle
Limitation of SMART mode
The SMART mode may be limited in
following situations. (The OFF indica-
tor illuminates in those situations.)
The driver manually moves theshift lever :
It deactivates SMART mode. The
vehicle drives, as the driver manu-
ally moves the shift lever.
The cruise control is activated : The cruise control system may
deactivate the SMART mode when
the vehicle is controlled by the set
speed of the smart cruise control
system. (SMART mode is not
deactivated just by activating the
cruise control system.) The transmission oil temperature is
either extremely low or extremely
high :
The SMART mode can be active in
most of the normal driving situa-
tions. However, an extremely high/
low transmission oil temperature
may temporarily deactivate the
SMART mode, because the trans-
mission condition is out of normal
operation condition.
Smart Shift in Trip Computer
mode
Select the Trip Computer mode ( )
on the instrument cluster LCD display
and move to the smart shift screen.
Then, the driver can see the drive
mode selected and the drive mode
which is automatically switched by
the SMART mode.
The drive mode selected by the driv-
er (1) and the driving style gauge (2)
showing the driver's driving style are
displayed on the screen.
5
OIK047179N
Page 358 of 557

5-84
Driving your vehicle
- Normal:
When this condition is selected, the
initial Rear Cross-Traffic Collision
Warning is activated normally. If this
setting feels sensitive, change the
option to 'Later'.
The warning activation time may feel
late if the a vehicle at the side or rear
abruptly accelerates.
- Later:
Select this warning activation time
when the traffic is light and you are
driving in a low speed.
Information
If you change the warning timing, the
warning time of other systems may
change. Always be aware before
changing the warning timing. The driver can select the warning
volume of the Rear Cross-Traffic
Collision Warning by selecting 'User
Settings
→Driver Assistance →
Warning Volume →High/Medium/
Low'.
Information
If you change the warning volume, the
warning volume of other systems may
change. Always be aware before
changing the warning volume.
For more details, refer to "LCD
Display" in chapter 3.
Operating conditions
To operate:
Go to the 'User Settings → Driver
Assistance →Blind-Spot Safety →
Rear Cross-Traffic Safety' on the
LCD display. The system will turn on
and standby to activate.
The system will activate when vehi-
cle speed is below 6 mph (10 km/h)
and with the shift lever in R
(Reverse).
* The system will not activate when the vehicle speed exceeds 6 mph
(10 km/h). The system will activate
again when the speed is below 6
mph (10 km/h).
The system's detecting range is
approximately 1 – 65 ft. (0.5 – 20 m).
An approaching vehicle will be
detected if the vehicle speed is with-
in 5 – 22.5 mph (8 – 36 km/h).
Note that the detecting range may
vary under certain conditions. As
always, use caution and pay close
attention to your surroundings when
backing up your vehicle.
i
i
OTMA058094
Page 360 of 557

5-86
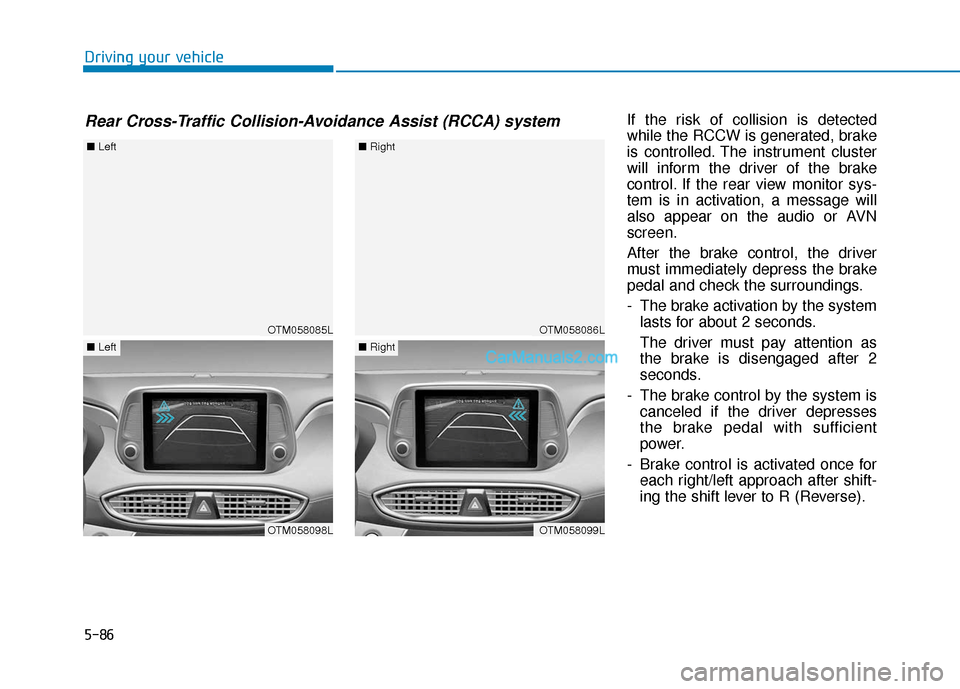
Driving your vehicleIf the risk of collision is detected
while the RCCW is generated, brake
is controlled. The instrument cluster
will inform the driver of the brake
control. If the rear view monitor sys-
tem is in activation, a message will
also appear on the audio or AVN
screen.
After the brake control, the driver
must immediately depress the brake
pedal and check the surroundings.
- The brake activation by the systemlasts for about 2 seconds.
The driver must pay attention as
the brake is disengaged after 2
seconds.
- The brake control by the system is canceled if the driver depresses
the brake pedal with sufficient
power.
- Brake control is activated once for each right/left approach after shift-
ing the shift lever to R (Reverse).
Rear Cross-Traffic Collision-Avoidance Assist (RCCA) system
OTM058085L
■ Left
OTM058098L
■Left
OTM058086L
■Right
OTM058099L
■Right
Page 413 of 557

5-139
Driving your vehicle
5
5. Start the vehicle, apply the brakes,shift to neutral, release the park-
ing brake and slowly release the
brakes until the trailer chocks
absorb the load.
6. Reapply the brakes and parking brakes.
7. Move the shift lever to P (Park).
8. Shut off the vehicle and release the vehicle brakes but leave the
parking brake set.Driving the vehicle after it hasbeen parked on a hill
1. With the gear shift lever in P
(Park), apply the brakes and hold
the brake pedal down while per-
forming the following:
and
2. Slowly remove your foot from the brake pedal.
3. Drive slowly until the trailer is clear of the chocks.
4. Stop and have someone pick up and store the chocks.
Maintenance when trailer tow-
ing
Your vehicle will need service more
often when you regularly pull a trail-
er. Important items to pay particular
attention to include engine oil, auto-
matic transmission fluid, axle lubri-
cant and cooling system fluid. Brake
condition is another important item to
frequently check. If you’re trailering,
it’s a good idea to review these items
before you start your trip. Don't forget
to also maintain your trailer and
hitch. Follow the maintenance sched-
ule that accompanied your trailer and
check it periodically. Preferably,
inspect the vehicle and trailer at the
start of each day's driving. Inspect
the hitch mounting to make sure the
hitch is properly secured to the vehi-
cle. Inspect the trailer electrical
wiring to make sure brake lights, turn
signal lights, running lights, and haz-
ard lights are working properly.
Do not get out of the vehicle
without the parking brake
firmly set. If you have left the
engine running, the vehicle
can move suddenly. You and
others could be seriously or
fatally injured.
Do not apply the accelerator
pedal to hold the vehicle on
an uphill.
WARNING