2020 Hyundai Santa Fe Safety lock
[x] Cancel search: Safety lockPage 288 of 557
5-14
Driving your vehicle
A
AU
U T
TO
O M
M A
AT
TI
IC
C
T
T R
R A
A N
N S
SM
M I
IS
S S
SI
IO
O N
N
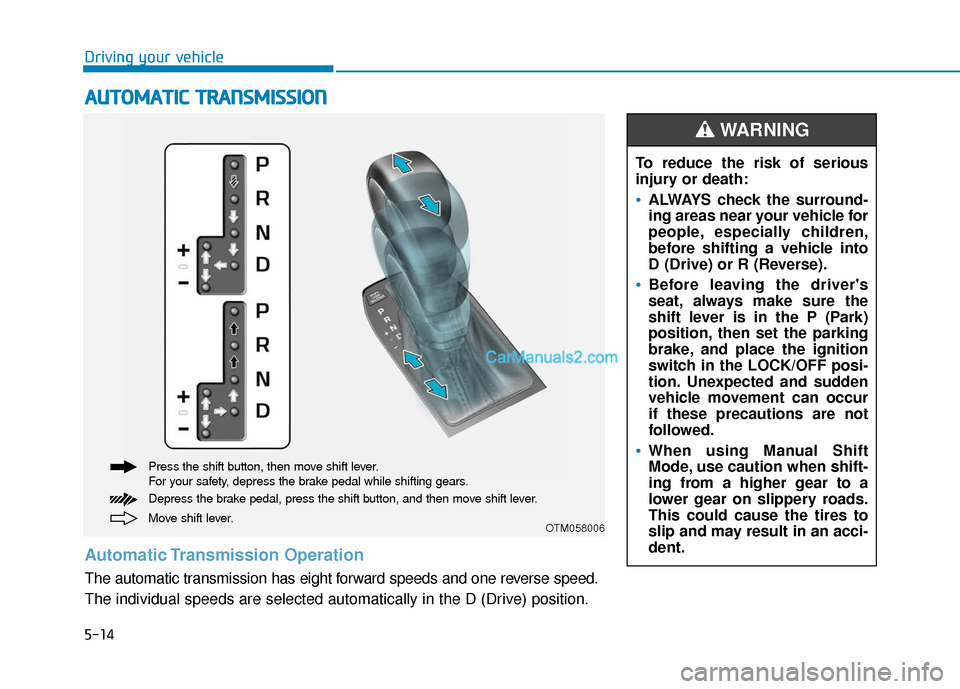
Move shift lever. Press the shift button, then move shift lever.
For your safety, depress the brake pedal while shifting gears.
Depress the brake pedal, press the shift button, and then move shift lever.OTM058006
Automatic Transmission Operation
The automatic transmission has eight forward speeds and one reverse speed.
The individual speeds are selected automatically in the D (Drive) position. To reduce the risk of serious
injury or death:
ALWAYS check the surround-
ing areas near your vehicle for
people, especially children,
before shifting a vehicle into
D (Drive) or R (Reverse).
Before leaving the driver's
seat, always make sure the
shift lever is in the P (Park)
position, then set the parking
brake, and place the ignition
switch in the LOCK/OFF posi-
tion. Unexpected and sudden
vehicle movement can occur
if these precautions are not
followed.
When using Manual Shift
Mode, use caution when shift-
ing from a higher gear to a
lower gear on slippery roads.
This could cause the tires to
slip and may result in an acci-
dent.
WARNING
Page 291 of 557
5-17
Driving your vehicle
5
• If the driver presses the lever to + (Up) or - (Down) position, the
transmission may not make the
requested gear change if the next
gear is outside of the allowable
engine rpm range. The driver must
execute upshifts in accordance with
road conditions, taking care to keep
the engine rpms below the red zone.
• When accelerating from a stop on a slippery road, push the shift lever
forward into the + (Up) position.
This allows the transmission to
shift into the 2
ndgear which is bet-
ter for smooth driving on a slippery
road. Push the shift lever to the -
(Down) side to shift back to the 1
st
gear.
• When driving in Manual Shift Mode, slow down before shifting to
a lower gear. Otherwise, the lower
gear may not be engaged if the
engine rpms are outside of the
allowable range.
Shift-lock system
For your safety, the automatic trans-
mission has a shift-lock system
which prevents shifting the transmis-
sion from P (Park) into R (Reverse)
unless the brake pedal is depressed.
To shift the transmission from P
(Park) into R (Reverse):
1. Depress and hold the brake pedal.
2. Start the engine or place the igni-tion switch in the ON position.
3. Move the shift lever.
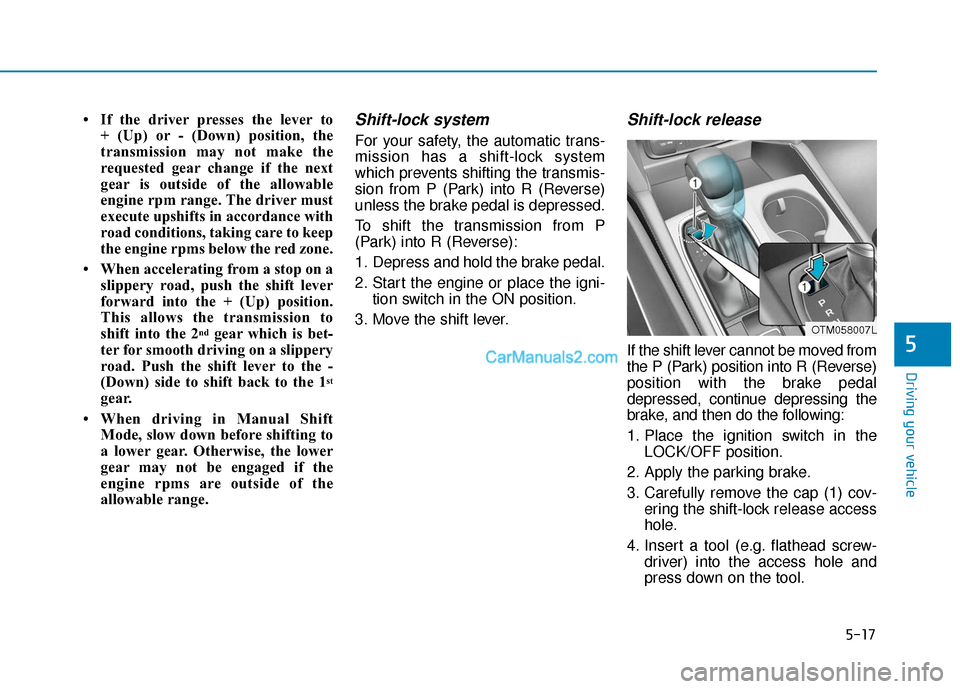
Shift-lock release
If the shift lever cannot be moved from
the P (Park) position into R (Reverse)
position with the brake pedal
depressed, continue depressing the
brake, and then do the following:
1. Place the ignition switch in the LOCK/OFF position.
2. Apply the parking brake.
3. Carefully remove the cap (1) cov- ering the shift-lock release access
hole.
4. Insert a tool (e.g. flathead screw- driver) into the access hole and
press down on the tool.
OTM058007L
Page 305 of 557
5-31
Driving your vehicle
5
ABS is an electronic braking system
that helps prevent a braking skid.
ABS allows the driver to steer and
brake at the same time.
Using ABS
To obtain the maximum benefit from
your ABS in an emergency situation,
do not attempt to modulate your
brake pressure and do not try to
pump your brakes. Depress your
brake pedal as hard as possible.
When you apply your brakes under
conditions which may lock the
wheels, you may hear sounds from
the brakes, or feel a corresponding
sensation in the brake pedal. This is
normal and it means your ABS is
active.
ABS does not reduce the time or dis-
tance it takes to stop the vehicle.
Always maintain a safe distance from
the vehicle in front of you.
ABS will not prevent a skid that
results from sudden changes in
direction, such as trying to take a
corner too fast or making a sudden
lane change. Always drive at a safe
speed for the road and weather con-
ditions.ABS cannot prevent a loss of stabili-
ty. Always steer moderately when
braking hard. Severe or sharp steer-
ing wheel movement can still cause
your vehicle to veer into oncoming
traffic or off the road.
On loose or uneven road surfaces,
operation of the anti-lock brake sys-
tem may result in a longer stopping
distance than for vehicles equipped
with a conventional brake system.
The ABS warning light ( ) will stay
on for several seconds after the igni-
tion switch is in the ON position.
During that time, the ABS will go
through self-diagnosis and the light
will go off if everything is normal. If
the light stays on, you may have a
problem with your ABS. Contact an
authorized HYUNDAI dealer as soon
as possibleTire chains are installed on
your vehicle.
The safety features of an ABS
or ESC equipped vehicle should
not be tested by high speed
driving or cornering. This could
endanger the safety of yourself
or others.
Page 350 of 557

5-76
Warning message
Blind-Spot Collision Warning
(BCW) system disabled.
Radar blocked
This warning message may appear
when :
- One or both of the sensors on therear bumper is blocked by dirt or
snow or a foreign object.
- Driving in rural areas where the sensor does not detect another
vehicle for an extended period of
time.
- When there is inclement weather such as heavy snow or rain. If any of these conditions occur, the
light on the BCW/BCA switch and the
system will turn off automatically.
When the BCW canceled warning
message is displayed in the cluster,
check to make sure that the rear
bumper is free from any dirt or snow
in the areas where the sensor is
located. Remove any dirt, snow, or
foreign material that could interfere
with the radar sensors.
After any dirt or debris is removed,
the system should operate normally
after about 10 minutes of driving the
vehicle.
If the system still does not operate
normally have your vehicle inspected
by an authorized HYUNDAI dealer.
Information
Turn off the BCW, BCA and RCCW
system when a trailer or carrier is
installed.
- Press the BCW/BCA switch (the
indicator on the switch will turn off)
- Deactivate the RCCW system by deselecting
'User Settings → →
Driver Assistance
→
→ Blind-Spot Safety →
→
Rear Cross-
Traffic Collision Warning' (if
equipped)
i
Driving your vehicle
OIK057092L
Page 363 of 557

5-89
Driving your vehicle
5
If any of these conditions occur, the
light on the BCW/BCA switch and the
system will turn off automatically.
When the BCW canceled warning
message is displayed in the cluster,
check to make sure that the rear
bumper is free from any dirt or snow
in the areas where the sensor is
located. Remove any dirt, snow, or
foreign material that could interfere
with the radar sensors.
After any dirt or debris is removed,
the system should operate normally
after about 10 minutes of driving the
vehicle.
If the system still does not operate
normally have your vehicle inspected
by an authorized HYUNDAI dealer.
Information
Turn off the BCW and RCCW system
when a trailer or carrier is installed.
- Press the BCW/BCA switch (theindicator on the switch will turn
off)
- Deactivate the RCCW system by deselecting ‘User Settings → →
Driver
Assistance →
→
Blind-Spot Safety →
→
Rear Cross-Traffic Collision Warning’
Check Blind-Spot Collision
Warning (BCW) system
If there is a problem with the BCW
system, a warning message will
appear and the light on the switch
will turn off. The system will turn off
automatically. RCCW and RCCA will
not operate also if the BCW system
turns off due to malfunction. Have
your vehicle inspected by an author-
ized HYUNDAI dealer.
Limitations of the System
The driver must be cautious in the
below situations, because the sys-
tem may not detect other vehicles or
objects in certain circumstances.
When a trailer or carrier is installed.
The vehicle drives in inclement weather such as heavy rain or snow.
The sensor is polluted with rain, snow, mud, etc.
The rear bumper where the sensor is located is covered with a foreign
object such as a bumper sticker, a
bumper guard, a bike rack, etc.
The rear bumper is damaged, or the sensor is out of the original
default position.
The vehicle height gets lower or higher due to heavy loading in a
trunk, abnormal tire pressure, etc.
When the temperature of the rear bumper is high.
When the sensors are blocked by other vehicles, walls or parking-lot
pillars.
The vehicle drives on a curved road.
i
OTM058151L
Page 436 of 557
6-16
What to do in an emergency
Changing Tires
Follow these steps to change your
vehicle's tire:
1. Park on a level, firm surface.
2. Move the shift lever into P (Park),apply the parking brake, and place
the ignition switch in the LOCK/OFF
position.
3. Press the hazard warning flasher button.
4. Remove the wheel lug nut wrench, jack, jack handle, and spare tire
from the vehicle.
5. Block both the front and rear of the tire diagonally opposite of the tire
you are changing.
A vehicle can slip or roll off of a
jack causing serious injury or
death to you or those nearby.
Take the following safety pre-
cautions:
Never place any portion of
your body under a vehicle that
is supported by a jack.
NEVER attempt to change a
tire in the lane of traffic.
ALWAYS move the vehicle
completely off the road on
level, firm ground away from
traffic before trying to change
a tire. If you cannot find a level,
firm place off the road, call a
towing service for assistance.
Be sure to use the jack pro-
vided with the vehicle.
ALWAYS place the jack on the
designated jacking positions
on the vehicle and NEVER on
the bumpers or any other part
of the vehicle for jacking sup-
port.
Do not start or run the engine
while the vehicle is on the
jack.
Do not allow anyone to remain
in the vehicle while it is on the
jack.
Keep children away from the
road and the vehicle.
WARNING Ensure the spare tire retainer
guide is properly aligned with
the center of the spare tire to
prevent the spare tire from "rat-
tling".
Otherwise, it may cause the
spare tire to fall off the carrier
and lead to an accident.
CAUTION
Page 479 of 557
T
TI
IR
R E
ES
S
A
A N
N D
D
W
W H
HE
EE
EL
LS
S
Tire Care
For proper maintenance, safety, and
maximum fuel economy, you must
always maintain recommended tire
inflation pressures and stay within
the load limits and weight distribution
recommended for your vehicle.
All specifications (sizes and pres-
sures) can be found on a label
attached to the driver's side center
pillar.Replace tires that are worn,
show uneven wear, or are dam-
aged. Worn tires can cause
loss of braking effectiveness,
steering control, or traction.
ALWAYS replace tires with the
same size as each tire that
was originally supplied with
this vehicle. Using tires and
wheels other than the recom-
mended sizes could cause
unusual handling characteris-
tics, poor vehicle control, or
negatively affect your vehi-
cle's Anti-Lock Brake System
(ABS) resulting in a serious
accident.
Tire failure may cause loss of
vehicle control resulting in an
accident. To reduce risk of
SERIOUS INJURY or DEATH,
take the following precautions:
Inspect your tires monthly for
proper inflation as well as
wear and damage.
The recommended cold tire
pressure for your vehicle can
be found in this manual and on
the tire label located on the dri-
ver's side center pillar. Always
use a tire pressure gauge to
measure tire pressure. Tires
with too much or too little
pressure wear unevenly caus-
ing poor handling.
Check the pressure of the
spare every time you check
the pressure of the other tires
on your vehicle.
WARNING
OTM078063L
Maintenance
7
7-37
Page 499 of 557
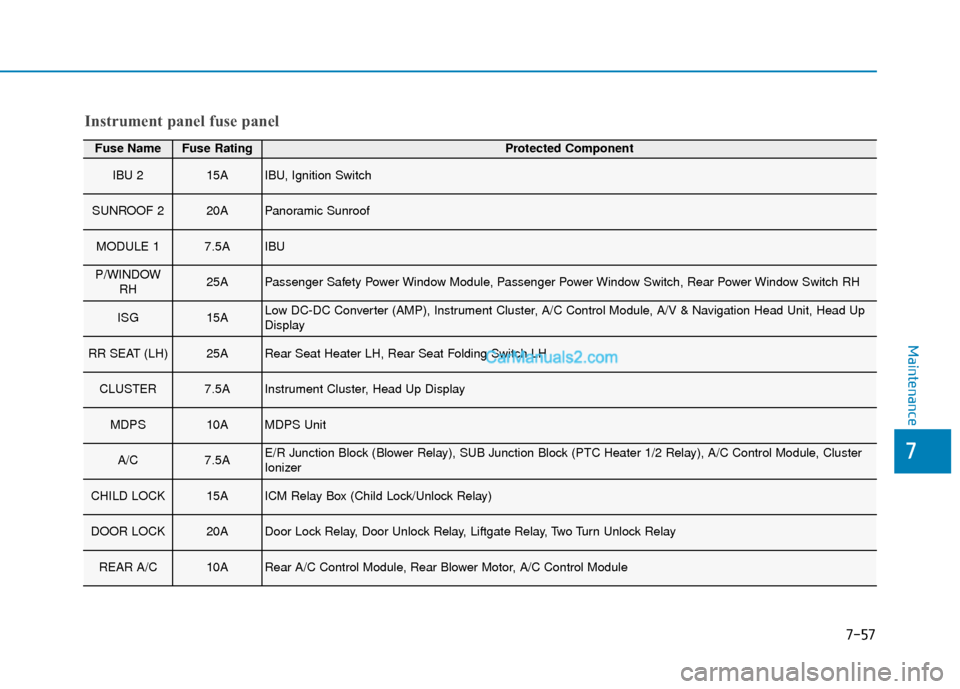
Fuse NameFuse RatingProtected Component
IBU 215AIBU, Ignition Switch
SUNROOF 220APanoramic Sunroof
MODULE 17.5AIBU
P/WINDOWRH25APassenger Safety Power Window Module, Passenger Power Window Switch, Rear Power Window Switch RH
ISG15ALow DC-DC Converter (AMP), Instrument Cluster, A/C Control Module, A/V & Navigation Head Unit, Head Up
Display
RR SEAT (LH)25ARear Seat Heater LH, Rear Seat Folding Switch LH
CLUSTER7.5AInstrument Cluster, Head Up Display
MDPS10AMDPS Unit
A/C7.5AE/R Junction Block (Blower Relay), SUB Junction Block (PTC Heater 1/2 Relay), A/C Control Module, Cluster
Ionizer
CHILD LOCK15AICM Relay Box (Child Lock/Unlock Relay)
DOOR LOCK20ADoor Lock Relay, Door Unlock Relay, Liftgate Relay, Two Turn Unlock Relay
REAR A/C10ARear A/C Control Module, Rear Blower Motor, A/C Control Module
Instrument panel fuse panel
Maintenance
7
7-57