2020 Hyundai Santa Fe service
[x] Cancel search: servicePage 458 of 557

Maintenance Under Severe Usage Conditions (2.0 T-GDI)
The following items must be serviced more frequently on cars normally used under severe driving conditions. Refer
to the chart below for the appropriate maintenance intervals.
I : Inspect and if necessary, adjust, correct, clean or replace.
R : Replace or change.
MAINTENANCE ITEMMAINTENANCE OPERATIONMAINTENANCE INTERVALSDRIVING
CONDITION
Engine oil and filterREvery 3,000 miles or 6 monthsA, B, C, D, E, F, G, H, I, J, K
Air cleaner filterRMore frequentlyC, E
Spark plugsRMore frequentlyA, B, F, G, H, I, K
Automatic transmission fluidREvery 60,000 milesA, C, D, E, F, G, H, I, J
Front brake disc/pads, calipersIMore frequentlyC, D, E, G, H
Rear brake disc/padsIMore frequentlyC, D, E, G, H
Maintenance
7-16
Page 473 of 557
W
WI
IP
P E
ER
R
B
B L
LA
A D
DE
ES
S
Blade Inspection
Contamination of either the windshield
or the wiper blades with foreign matter
can reduce the effectiveness of the
windshield wiper functionality.
Common sources of contamination
are insects, tree sap, and hot wax
treatments used by some commercial
car washes. If the blades are not wip-
ing properly, clean both the window
and the blades with a clean cloth
dampened with washer fluid.
To prevent damage to the wiper
blades, arms or other compo-
nents, do not:
Use gasoline, kerosene, paint
thinner, or other solvents on or
near them.
Attempt to move the wipers manually.
Use non-specified wiper blades.
Information
Commercial hot waxes applied by auto-
matic car washes have been known to
make the windshield difficult to clean.
Blade Replacement
When the wipers no longer clean
adequately, the blades may be worn
or cracked, and require replacement.
To prevent damage to the wiper
arms or other components, do not
attempt to move the wipers manu-
ally.
The use of a non-specified wiper
blade could result in wiper mal-
function and failure.
In order to prevent damage to the hood and the wiper arms, the
wiper arms should only be lifted
when in the top wiping position.
Always return the wiper arms to the windshield before driving.
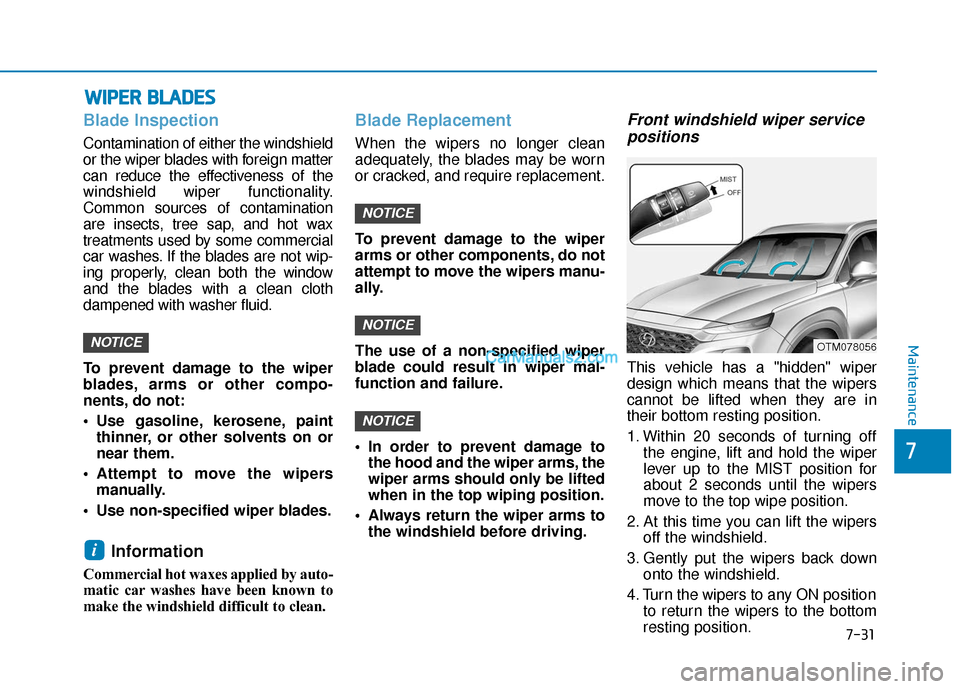
Front windshield wiper servicepositions
This vehicle has a "hidden" wiper
design which means that the wipers
cannot be lifted when they are in
their bottom resting position.
1. Within 20 seconds of turning off
the engine, lift and hold the wiper
lever up to the MIST position for
about 2 seconds until the wipers
move to the top wipe position.
2. At this time you can lift the wipers off the windshield.
3. Gently put the wipers back down onto the windshield.
4. Turn the wipers to any ON position to return the wipers to the bottom
resting position.
NOTICE
NOTICE
NOTICE
i
NOTICEOTM078056Maintenance
7
7-31
Page 476 of 557
When you do not use the vehiclefor a long time in a low tempera-
ture area, disconnect the battery
and keep it indoors.
Always charge the battery fully to prevent battery case damage
in low temperature areas.
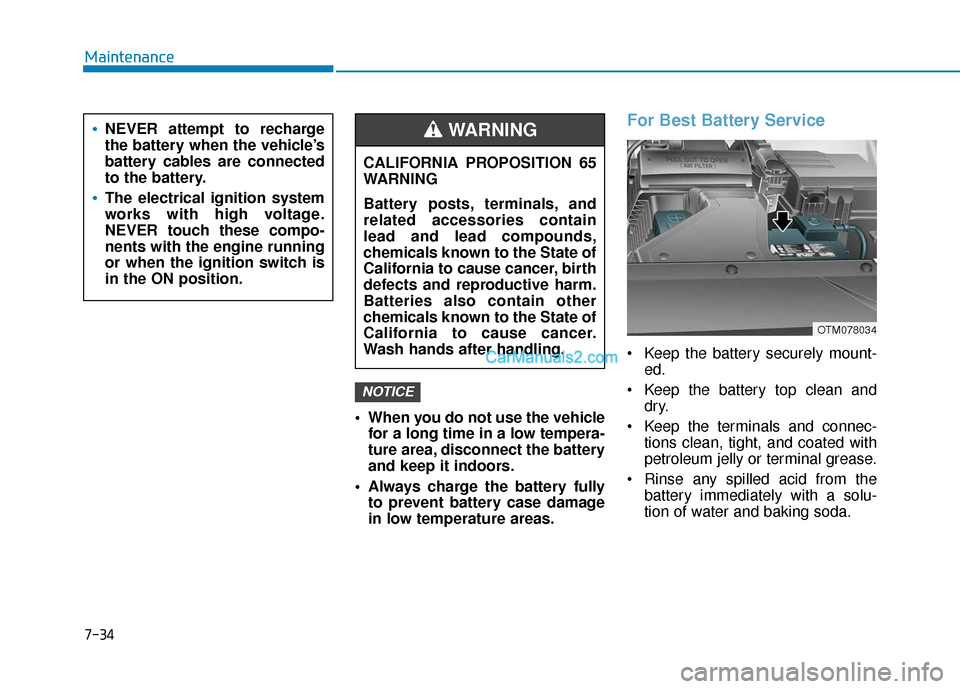
For Best Battery Service
Keep the battery securely mount- ed.
Keep the battery top clean and dry.
Keep the terminals and connec- tions clean, tight, and coated with
petroleum jelly or terminal grease.
Rinse any spilled acid from the battery immediately with a solu-
tion of water and baking soda.
NOTICE
NEVER attempt to recharge
the battery when the vehicle’s
battery cables are connected
to the battery.
The electrical ignition system
works with high voltage.
NEVER touch these compo-
nents with the engine running
or when the ignition switch is
in the ON position.
CALIFORNIA PROPOSITION 65
WARNING
Battery posts, terminals, and
related accessories contain
lead and lead compounds,
chemicals known to the State of
California to cause cancer, birth
defects and reproductive harm.
Batteries also contain other
chemicals known to the State of
California to cause cancer.
Wash hands after handling.
WARNING
OTM078034
Maintenance
7-34
Page 477 of 557
Battery Recharging
AGM battery
Absorbent Glass Matt (AGM)batteries are maintenance-free
and we recommend that the
AGM battery be serviced by an
authorized retailer of Genesis
Branded products. For charging
your AGM battery, use only fully
automatic battery chargers that
are specially developed for AGM
batteries.
When replacing the AGM bat- tery, we recommend that you
use parts for replacement from
an authorized retailer of Genesis
Branded products.
Do not open or remove the cap on top of the battery. This may
cause leaks of internal elec-
trolyte that could result in
severe injury.
NOTICE
Always follow these instruc-
tions when recharging your
vehicle's battery to avoid the
risk of SERIOUS INJURY or
DEATH from explosions or acid
burns:
Before performing mainte-
nance or recharging the bat-
tery, turn off all accessories
and place the ignition switch
to the LOCK/OFF position.
Keep all flames, sparks, or
smoking materials away from
the battery.
Always work outdoors or in an
area with plenty of ventilation.
Wear eye protection when
checking the battery during
charging.
The battery must be removed
from the vehicle and placed in
a well ventilated area.
WARNING
Watch the battery during
charging, and stop or reduce
the charging rate if the battery
cells begin boiling violently.
The negative battery cable
must be removed first and
installed last when the battery
is disconnected. Disconnect
the battery charger in the fol-
lowing order:
(1) Turn off the battery charger main switch.
(2) Unhook the negative clamp from the negative battery
terminal.
(3) Unhook the positive clamp from the positive battery
terminal.
Always use a genuine
HYUNDAI approved battery
when you replace the battery.
Maintenance
7
7-35
Page 484 of 557

Compact spare tire replacement
A compact spare tire has a shorter
tread life than a regular size tire.
Replace it when you can see the
tread wear indicator bars on the tire.
The replacement compact spare tire
should be the same size and design
tire as the one provided with your
new vehicle and should be mounted
on the same compact spare tire
wheel. The compact spare tire is not
designed to be mounted on a regular
size wheel, and the compact spare
tire wheel is not designed for mount-
ing a regular size tire.
Wheel Replacement
When replacing the metal wheels for
any reason, make sure the new
wheels are equivalent to the original
factory units in diameter, rim width
and offset.
Tire Traction
Tire traction can be reduced if you
drive on worn tires, tires that are
improperly inflated or on slippery
road surfaces. Tires should be
replaced when the tread depth is at
least 2/32 inch (1.6 mm). To reduce
the possibility of losing control, slow
down whenever there is rain, snow or
ice on the road.
The original tire should be
repaired or replaced as soon as
possible to avoid failure of the
spare and loss of vehicle con-
trol resulting in an accident. The
compact spare tire is for emer-
gency use only. Do not operate
your vehicle over 50 mph (80
km/h) when using the compact
spare tire.
WARNING
Tires degrade over time, even
when they are not being used.
Regardless of the remaining
tread, HYUNDAI recommends
that tires be replaced after six
(6) years of normal service.
When replacing tires (or
wheels), it is recommended to
replace the two front or two
rear tires (or wheels) as a pair.
Replacing just one tire can
seriously affect your vehicle's
handling. If only replacing one
pair of tires, it is recommend-
ed to install the pair of new
tires on the rear axle.
Heat caused by hot climates
or frequent high loading con-
ditions can accelerate the
aging process. Failure to fol-
low this warning may cause
sudden tire failure, which
could lead to a loss of vehicle
control resulting in an acci-
dent.
Maintenance
7-42
Page 487 of 557

4. Tire ply composition andmaterial
The number of layers or plies of rub-
ber-coated fabric in the tire. Tire
manufacturers also must indicate the
materials in the tire, which include
steel, nylon, polyester, and others.
The letter "R" means radial ply con-
struction; the letter "D" means diago-
nal or bias ply construction; and the
letter "B" means belted-bias ply con-
struction.
5. Maximum permissible infla-tion pressure
This number is the greatest amount
of air pressure that should be put in
the tire. Do not exceed the maximum
permissible inflation pressure. Refer
to the Tire and Loading Information
label for recommended inflation
pressure.
6. Maximum load rating
This number indicates the maximum
load in kilograms and pounds that
can be carried by the tire. When
replacing the tires on the vehicle,
always use a tire that has the same
load rating as the factory installed
tire.
7. Uniform tire quality grading
Quality grades can be found where
applicable on the tire sidewall
between tread shoulder and maxi-
mum section width.
For example:
TREAD WEAR 200
TRACTION AA
TEMPERATURE A
Tread wear
The tread wear grade is a compara-
tive rating based on the wear rate of
the tire when tested under controlled
conditions on a specified govern-
ment test course. For example, a tire
graded 150 would wear one-and-a-
half times (1½) as well on the gov-
ernment course as a tire graded 100.
The relative performance of tires
depends upon the actual conditions
of their use, however, and may
depart significantly from the norm
due to variations in driving habits,
service practices and differences in
road characteristics and climate.
These grades are molded on the
sidewalls of passenger vehicle tires.
The tires available as standard or
optional equipment on your vehicle
may vary with respect to grade.
Maintenance
7
7-45
Page 513 of 557
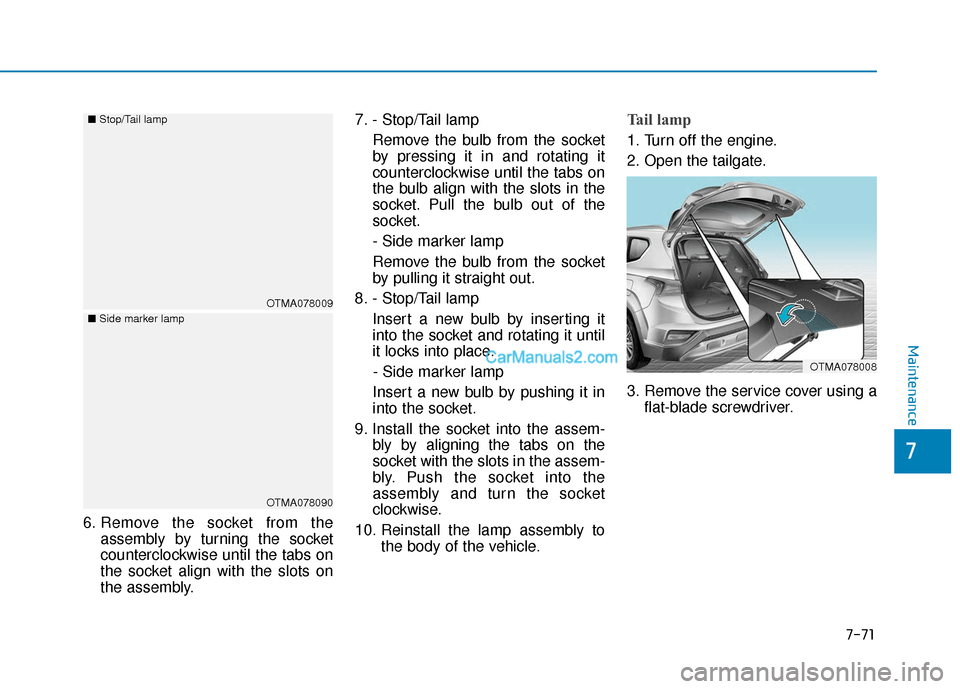
6. Remove the socket from theassembly by turning the socket
counterclockwise until the tabs on
the socket align with the slots on
the assembly. 7. - Stop/Tail lamp
Remove the bulb from the socket
by pressing it in and rotating it
counterclockwise until the tabs on
the bulb align with the slots in the
socket. Pull the bulb out of the
socket.
- Side marker lamp
Remove the bulb from the socket
by pulling it straight out.
8. - Stop/Tail lamp Insert a new bulb by inserting it
into the socket and rotating it until
it locks into place.- Side marker lamp
Insert a new bulb by pushing it in
into the socket.
9. Install the socket into the assem- bly by aligning the tabs on the
socket with the slots in the assem-
bly. Push the socket into the
assembly and turn the socket
clockwise.
10. Reinstall the lamp assembly to the body of the vehicle.
Tail lamp
1. Turn off the engine.
2. Open the tailgate.
3. Remove the service cover using aflat-blade screwdriver.
OTMA078008
OTMA078009
■
Stop/Tail lamp
OTMA078090
■
Side marker lamp
Maintenance
7-71
7
Page 552 of 557
I-9
Liftgate ........................................................................\
....3-50Power liftgate .............................................................3-52
Smart liftgate ..............................................................3-59
Light ........................................................................\
......3-112 Auto light position ....................................................3-112
Battery saver function ..............................................3-118
Daytime running light (DRL)...................................3-112
Front fog lamp ..........................................................3-118
Headlamp delay function..........................................3-119
Headlamp leveling device ........................................3-119
Headlamp position ....................................................3-113
High Beam Assist (HBA) system.............................3-114
High beam operation ................................................3-114
Lane change signals..................................................3-117
One-touch turn signal function.................................3-118
Parking lamp position...............................................3-113
Turn signals ..............................................................3-117
Light bulbs ......................................................................7-\
65
Lubricants and capacities..................................................8-7
Luggage compartment lamp .........................................3-121
Luggage net holder .......................................................3-177
Luggage tray .................................................................3-167
Maintenance Explanation of scheduled maintenance items ............7-18
Maintenance services ...................................................7-4 Maintenance under severe usage
conditions (2.0 T-GDI) ............................................7-16
Maintenance under severe usage conditions (2.4 GDI) ..............................................7-11
Normal maintenance schedule (2.0 T-GDI) ...............7-13
Normal maintenance schedule (2.4 GDI) ....................7-8
Owner maintenance ......................................................7-5
Scheduled maintenance services ..................................7-7
Tire maintenance ........................................................7-43
Maintenance services ........................................................7-4
Manual climate control system .....................................3-137
Master warning mode .....................................................3-94
Mirrors ........................................................................\
....3-30 Adjusting the side view mirrors .................................3-39
Day/night rearview mirror..........................................3-30
Electrochromic mirror (ECM)....................................3-31
Folding the side view mirrors ....................................3-39
Inside rearview mirror ................................................3-30
Reverse parking aid function .....................................3-39
Side view mirrors .......................................................3-38
Moonroof, see sunroof ....................................................3-45
Multi fuse ........................................................................\
7-54
Multimedia system............................................................4-2 Antenna ........................................................................\
4-2
Audio / Video / Navigation system ..............................4-4
AUX, USB and iPod
®port ..........................................4-2
Bluetooth®Wireless Technology..................................4-4
Steering wheel audio controls ......................................4-3I
Index
M