2020 Hyundai Santa Fe BRAKES
[x] Cancel search: BRAKESPage 408 of 557
5-134
Driving your vehicle
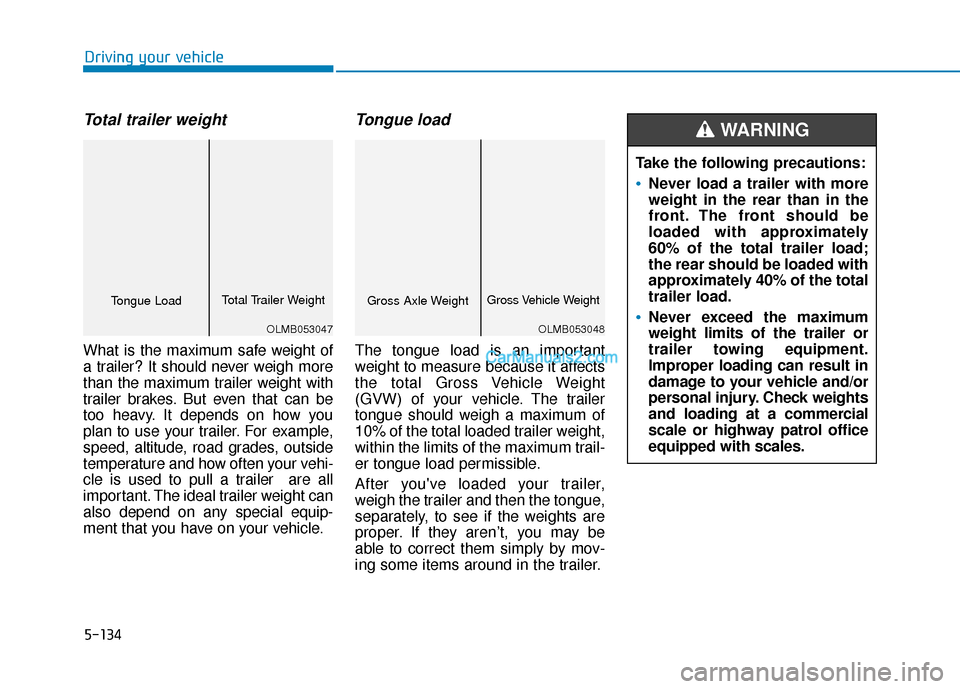
Total trailer weight
What is the maximum safe weight of
a trailer? It should never weigh more
than the maximum trailer weight with
trailer brakes. But even that can be
too heavy. It depends on how you
plan to use your trailer. For example,
speed, altitude, road grades, outside
temperature and how often your vehi-
cle is used to pull a trailer are all
important. The ideal trailer weight can
also depend on any special equip-
ment that you have on your vehicle.
Tongue load
The tongue load is an important
weight to measure because it affects
the total Gross Vehicle Weight
(GVW) of your vehicle. The trailer
tongue should weigh a maximum of
10% of the total loaded trailer weight,
within the limits of the maximum trail-
er tongue load permissible.
After you've loaded your trailer,
weigh the trailer and then the tongue,
separately, to see if the weights are
proper. If they aren’t, you may be
able to correct them simply by mov-
ing some items around in the trailer.
OLMB053047
Tongue LoadTotal Trailer Weight
OLMB053048
Gross Axle WeightGross Vehicle Weight
Take the following precautions:
Never load a trailer with more
weight in the rear than in the
front. The front should be
loaded with approximately
60% of the total trailer load;
the rear should be loaded with
approximately 40% of the total
trailer load.
Never exceed the maximum
weight limits of the trailer or
trailer towing equipment.
Improper loading can result in
damage to your vehicle and/or
personal injury. Check weights
and loading at a commercial
scale or highway patrol office
equipped with scales.
WARNING
Page 410 of 557
5-136
Driving your vehicle
Safety chains
You should always attach chains
between your vehicle and your trail-
er. Cross the safety chains under the
tongue of the trailer so that the
tongue will not drop to the road if it
becomes separated from the hitch.
Instructions about safety chains may
be provided by the hitch manufactur-
er or trailer manufacturer. Follow the
manufacturer’s recommendation for
attaching safety chains. Always leave
just enough slack so you can turn
with your trailer. And, never allow
safety chains to drag on the ground.
Trailer brakes
If your trailer is equipped with a brak-
ing system, make sure it conforms to
federal and/or local regulations and
that it is properly installed and oper-
ating correctly.
If your trailer weighs more than the
maximum trailer weight without trail-
er brakes loaded, then it needs its
own brakes and they must be ade-
quate. Be sure to read and follow the
instructions for the trailer brakes so
you’ll be able to install, adjust and
maintain them properly. Do not tap
into your vehicle's brake system.
Trailer brakes must be applied sepa-
rately from your vehicle's brake sys-
tem.
Driving with a trailer
Towing a trailer requires a certain
amount of experience. Before setting
out for the open road, you must get
to know your trailer. Acquaint your-
self with the feel of handling and
braking with the added weight of the
trailer. And always keep in mind that
the vehicle you are driving is now
longer and not nearly as responsive
as your vehicle is by itself.
Before you start, check the trailer
hitch and platform, safety chains,
electrical connector(s), lights, tires
and brakes.
During your trip, occasionally check
to be sure that the load is secure,
and that the lights and trailer brakes
are still working.
Do not use a trailer with its own
brakes unless you are absolute-
ly certain that you have properly
set up the brake system. Use an
experienced, competent trailer
shop for this work.
WARNING
Page 412 of 557
5-138
Driving your vehicle
Driving on hills
Reduce speed and shift to a lower
gear before you start down a long or
steep downgrade. If you don't shift
down, you might have to use your
brakes so much that they would get
overheated and may not operate effi-
ciently.
On a long uphill grade, shift down
and reduce your speed to around 45
mph (70 km/h) to reduce the possi-
bility of engine and transmission
overheating.
If your trailer weighs more than the
maximum trailer weight without trailer
brakes, you should drive in D (Drive)
when towing a trailer. Operating your
vehicle in D (Drive) when towing a
trailer will minimize heat build-up and
extend the life of your transmission.To prevent engine and/or trans-
mission overheating:
When towing a trailer on steep
grades (in excess of 6%) pay
close attention to the engine
coolant temperature gauge to
ensure the engine does not
overheat. If the needle of the
coolant temperature gauge
moves towards "H" (HOT), pull
over and stop as soon as it is
safe to do so, and allow the
engine to idle until it cools
down. You may proceed once the
engine has cooled sufficiently.
When towing a trailer, your vehi- cle speed may be much slower
than the general flow of traffic,
especially when climbing an
uphill grade. Use the right hand
lane when towing a trailer on an
uphill grade. Choose your vehi-
cle speed according to the max-
imum posted speed limit for
vehicles with trailers, the steep-
ness of the grade, and your trail-
er weight.
Parking on hills
Generally, if you have a trailer attached
to your vehicle, you should not park
your vehicle on a hill.
However, if you ever have to park your
trailer on a hill, here's how to do it:
1. Pull the vehicle into the parking area.
Turn the steering wheel in the direction of the curb (right if head-
ed down hill, left if headed up hill).
2. Shift the vehicle to P (Park).
3. Set the parking brake and shut off the vehicle.
4. Place wheel chocks under the trailer wheels on the down hill side
of the wheels.
NOTICE
Page 413 of 557
5-139
Driving your vehicle
5
5. Start the vehicle, apply the brakes,shift to neutral, release the park-
ing brake and slowly release the
brakes until the trailer chocks
absorb the load.
6. Reapply the brakes and parking brakes.
7. Move the shift lever to P (Park).
8. Shut off the vehicle and release the vehicle brakes but leave the
parking brake set.Driving the vehicle after it hasbeen parked on a hill
1. With the gear shift lever in P
(Park), apply the brakes and hold
the brake pedal down while per-
forming the following:
and
2. Slowly remove your foot from the brake pedal.
3. Drive slowly until the trailer is clear of the chocks.
4. Stop and have someone pick up and store the chocks.
Maintenance when trailer tow-
ing
Your vehicle will need service more
often when you regularly pull a trail-
er. Important items to pay particular
attention to include engine oil, auto-
matic transmission fluid, axle lubri-
cant and cooling system fluid. Brake
condition is another important item to
frequently check. If you’re trailering,
it’s a good idea to review these items
before you start your trip. Don't forget
to also maintain your trailer and
hitch. Follow the maintenance sched-
ule that accompanied your trailer and
check it periodically. Preferably,
inspect the vehicle and trailer at the
start of each day's driving. Inspect
the hitch mounting to make sure the
hitch is properly secured to the vehi-
cle. Inspect the trailer electrical
wiring to make sure brake lights, turn
signal lights, running lights, and haz-
ard lights are working properly.
Do not get out of the vehicle
without the parking brake
firmly set. If you have left the
engine running, the vehicle
can move suddenly. You and
others could be seriously or
fatally injured.
Do not apply the accelerator
pedal to hold the vehicle on
an uphill.
WARNING
Page 423 of 557
6-3
What to do in an emergency
If you Have a Flat Tire While
Driving
If a tire goes flat while you are driving:
Take your foot off the acceleratorpedal and let the vehicle slow down
while driving straight ahead. Do not
apply the brakes immediately or
attempt to pull off the road as this
may cause loss of vehicle control
resulting in an accident. When the
vehicle has slowed to such a speed
that it is safe to do so, brake care-
fully and pull off the road. Drive off
the road as far as possible and
park on firm, level ground. If you
are on a divided highway, do not
park in the median area between
the two traffic lanes.
When the vehicle is stopped, press the hazard warning flasher button,
move the shift lever into P (Park),
and apply the parking brake, and
place the ignition switch in the
LOCK/OFF position.
Have all passengers get out of the vehicle. Be sure they all get out on
the side of the vehicle that is away
from traffic.
When changing a flat tire, follow the instructions provided later in
this chapter.
If the Engine Doesn't Turn
Over or Turns Over Slowly
Be sure the shift lever is in N
(Neutral) or P (Park). The engine
starts only when the shift lever is in
N (Neutral) or P (Park).
Check the battery connections to be sure they are clean and tight.
Turn on the interior light. If the light dims or goes out when you oper-
ate the starter, the battery is
drained.
Do not push or pull the vehicle to
start it. This could cause damage to
your vehicle. See instructions for
"Jump Starting" provided in this
chapter.
If the Engine Turns Over
Normally but Doesn't Start
Check the fuel level and add fuel if
necessary.
If the engine still does not start, have
your vehicle checked by an author-
ized HYUNDAI dealer.
6
I I F
F
T
T H
H E
E
E
E N
N G
GI
IN
N E
E
W
W I
IL
L L
L
N
N O
O T
T
S
S T
T A
A R
RT
T
Push or pull starting the vehicle
may cause the catalytic con-
verter to overload which can
lead to damage to the emission
control system.
CAUTION
Page 425 of 557
6-5
What to do in an emergency
6
Information
An inappropriately disposedbattery can be harmful to the
environment and human
health. Dispose of the battery
according to your local law(s)
or regulations.
To prevent damage to your vehicle:
Only use a 12-volt power supply (battery or jumper system) to
jump start your vehicle.
Do not attempt to jump start your vehicle by push-starting.
Jump starting procedure
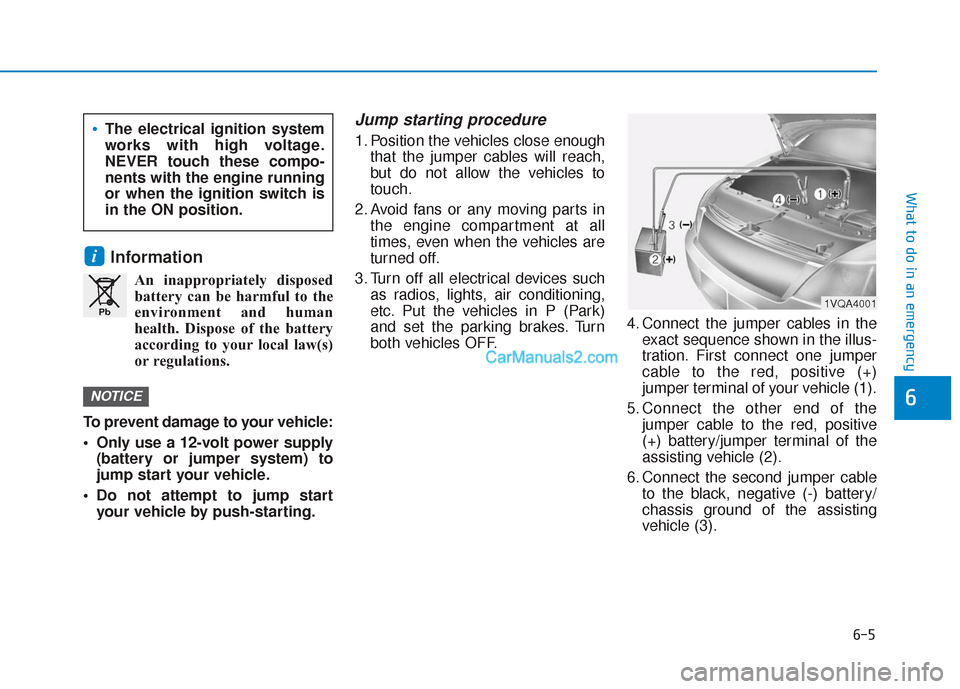
1. Position the vehicles close enough that the jumper cables will reach,
but do not allow the vehicles to
touch.
2. Avoid fans or any moving parts in the engine compartment at all
times, even when the vehicles are
turned off.
3. Turn off all electrical devices such as radios, lights, air conditioning,
etc. Put the vehicles in P (Park)
and set the parking brakes. Turn
both vehicles OFF. 4. Connect the jumper cables in the
exact sequence shown in the illus-
tration. First connect one jumper
cable to the red, positive (+)
jumper terminal of your vehicle (1).
5. Connect the other end of the jumper cable to the red, positive
(+) battery/jumper terminal of the
assisting vehicle (2).
6. Connect the second jumper cable to the black, negative (-) battery/
chassis ground of the assisting
vehicle (3).
NOTICE
i
Pb
The electrical ignition system
works with high voltage.
NEVER touch these compo-
nents with the engine running
or when the ignition switch is
in the ON position.
1VQA4001
Page 433 of 557
6-13
What to do in an emergency
6
You may not be able identify a tire
with low pressure by simply looking
at it. Always use a good quality tire
pressure gage to measure the tire's
inflation pressure. Please note that a
tire that is hot (from being driven) will
have a higher pressure measure-
ment than a tire that is cold.
A cold tire means the vehicle has
been sitting for 3 hours and driven for
less than 1 mile (1.6 km) in that 3
hour period.
Allow the tire to cool before measur-
ing the inflation pressure. Always be
sure the tire is cold before inflating to
the recommended pressure.Information
This device complies with Part 15 of
the FCC rules.
Operation is subject to the following
three conditions:
1. This device may not cause harmfulinterference.
2. This device must accept any inter- ference received, including interfer-
ence that may cause undesired oper-
ation.
3. Changes or modifications not expressly approved by the party
responsible for compliance could
void the user's authority to operate
the equipment.
i
The TPMS cannot alert you to
severe and sudden tire dam-
age caused by external fac-
tors such as nails or road
debris.
If you feel any vehicle instabil-
ity, immediately take your foot
off the accelerator, apply the
brakes gradually with light
force, and slowly move to a
safe position off the road.
WARNING
Tampering with, modifying, or
disabling the Tire Pressure
Monitoring System (TPMS)
components may interfere with
the system's ability to warn the
driver of low tire pressure con-
ditions and/or TPMS malfunc-
tions. Tampering with, modify-
ing, or disabling the Tire
Pressure Monitoring System
(TPMS) components may void
the warranty for that portion of
the vehicle.
WARNING
Page 451 of 557
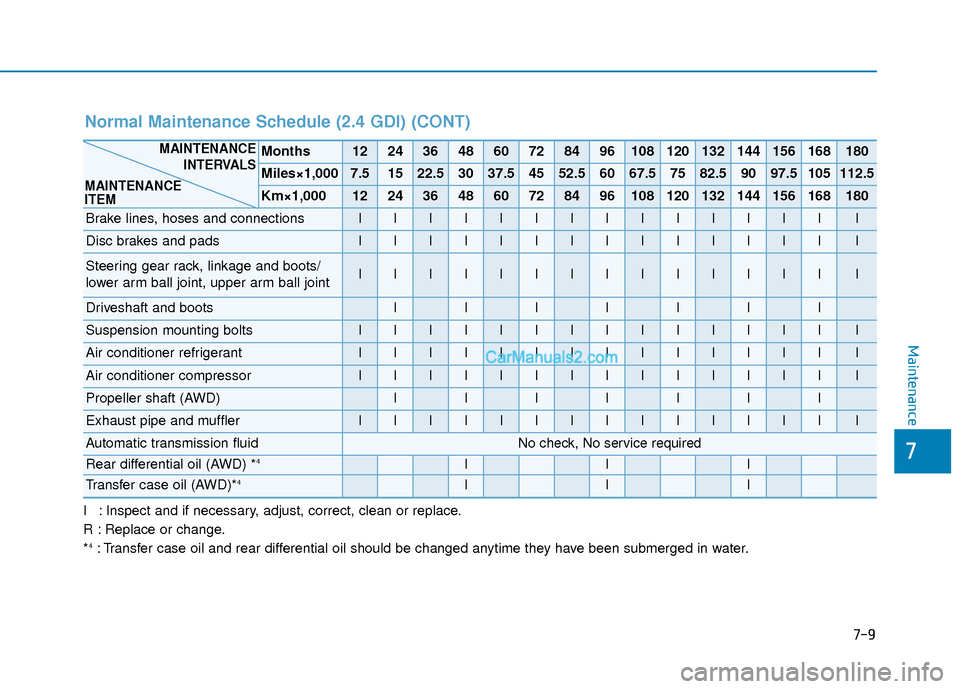
I : Inspect and if necessary, adjust, correct, clean or replace.
R : Replace or change.
*
4: Transfer case oil and rear differential oil should be changed anytime they have been submerged in water.
Normal Maintenance Schedule (2.4 GDI) (CONT)
Months1224364860728496108120132144156168180
Miles×1,0007.51522.53037.54552.56067.57582.59097.5105112.5
Km×1,0001224364860728496108120132144156168180
Brake lines, hoses and connectionsIIIIIIIIIIIIIII
Disc brakes and padsIIIIIIIIIIIIIII
Steering gear rack, linkage and boots/
lower arm ball joint, upper arm ball jointIIIIIIIIIIIIIII
Driveshaft and bootsIIIIIII
Suspension mounting boltsIIIIIIIIIIIIIII
Air conditioner refrigerantIIIIIIIIIIIIIII
Air conditioner compressorIIIIIIIIIIIIIII
Propeller shaft (AWD)IIIIIII
Exhaust pipe and mufflerIIIIIIIIIIIIIII
Automatic transmission fluidNo check, No service required
Rear differential oil (AWD) *4III
Transfer case oil (AWD)*4III
MAINTENANCEINTERVALS
MAINTENANCE
ITEM
Maintenance
7
7-9