2020 Hyundai Santa Fe height
[x] Cancel search: heightPage 114 of 557

3-25
Convenient features of your vehicle
3
Recalling Positions from
Memory
1. Shift to P (Park) while the ignitionswitch is in the ON position.
2. Press the desired memory button (1 or 2). The system will beep
once, and then the driver's seat
position, side view mirror position,
instrument panel illumination
intensity and head-up display
height/brightness will automatical-
ly adjust to the stored positions.
3. "Driver 1 (or 2) settings applied" will appear on the cluster LCD dis-
play.
Information
• While recalling the "1" memoryposition, pressing the SET or 1 but-
ton temporarily stops the adjust-
ment of the recalled memory posi-
tion. Pressing the 2 button recalls
the "2" memory position. • While recalling the "2" memory
position, pressing the SET or 2 but-
ton temporarily stops the adjust-
ment of the recalled memory posi-
tion. Pressing the 1 button recalls
the "1" memory position.
• While recalling the stored positions, pressing one of the control buttons
for the driver's seat, side view mir-
ror, instrument panel illumination
or head-up display will cause the
movement of that component to stop
and move in the direction that the
control button is pressed.
Resetting the Driver's Seat
Memory System
Take the following procedures to reset
the driver's seat memory system,
when it does not operate properly.
To reset the driver's seat memo-ry system
1. Place the ignition switch to the ON
position, shift to P (Park), and
open the driver's door. 2. Operate the control switch to set
the driver's seat and seatback to
the foremost position.
3. Simultaneously press the SET button and push forward the seat
movement switch over 2 seconds.
While resetting the driver's seatmemory system
1. It starts with the notification sound.
2. The driver's seat and seatback is
adjusted to the rearward position
with the notification sound.
3. The driver's seat and seatback is re-adjusted to the default position
(central position) with the notifica-
tion sound.
However, in the following cases, the
resetting procedure and the notifica-
tion sound may stop.
- The memory button is pressed.
- The control switch is operated.
- The gear is shifted out of P (Park).
- The driving speed exceeds 2 mph (3 km/h).
- The driver's door is closed.
i
Page 117 of 557

3-28
Convenient features of your vehicle
Tilt Steering / Telescopic
Steering
When adjusting the steering wheel to
a comfortable position, adjust the
steering wheel so that it points
toward your chest, not toward your
face. Make sure you can see the
instrument cluster warning lights and
gauges. After adjusting, push the
steering wheel both up and down to
be certain it is locked in position.
Always adjust the position of the
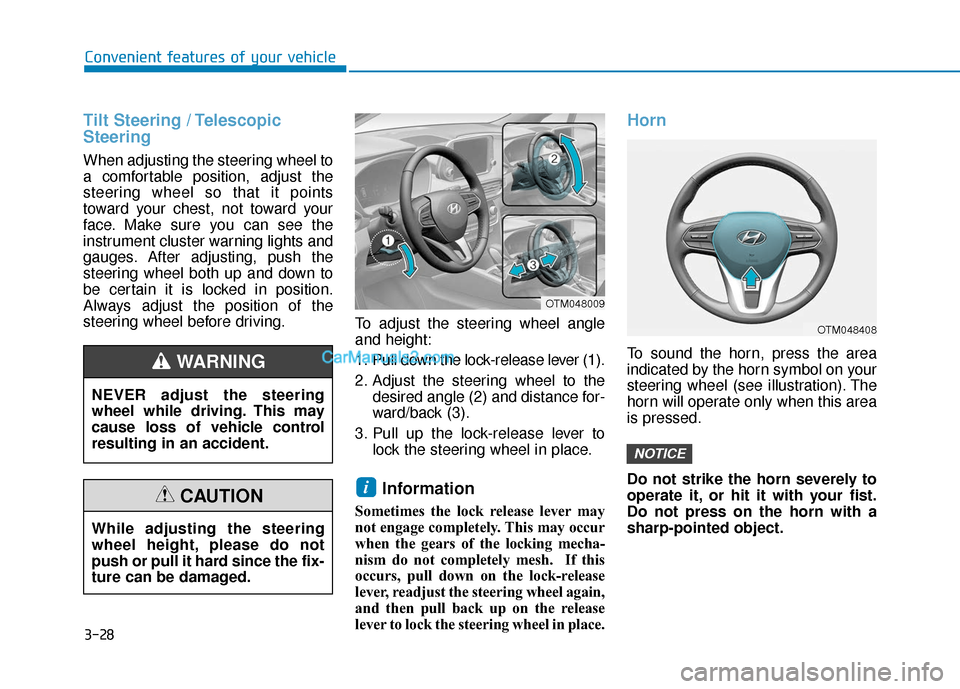
steering wheel before driving.To adjust the steering wheel angle
and height:
1. Pull down the lock-release lever (1).
2. Adjust the steering wheel to the
desired angle (2) and distance for-
ward/back (3).
3. Pull up the lock-release lever to lock the steering wheel in place.
Information
Sometimes the lock release lever may
not engage completely. This may occur
when the gears of the locking mecha-
nism do not completely mesh. If this
occurs, pull down on the lock-release
lever, readjust the steering wheel again,
and then pull back up on the release
lever to lock the steering wheel in place.
Horn
To sound the horn, press the area
indicated by the horn symbol on your
steering wheel (see illustration). The
horn will operate only when this area
is pressed.
Do not strike the horn severely to
operate it, or hit it with your fist.
Do not press on the horn with a
sharp-pointed object.
NOTICE
i
OTM048408
OTM048009
NEVER adjust the steering
wheel while driving. This may
cause loss of vehicle control
resulting in an accident.
WARNING
While adjusting the steering
wheel height, please do not
push or pull it hard since the fix-
ture can be damaged.
CAUTION
Page 147 of 557

3-58
Convenient features of your vehicle
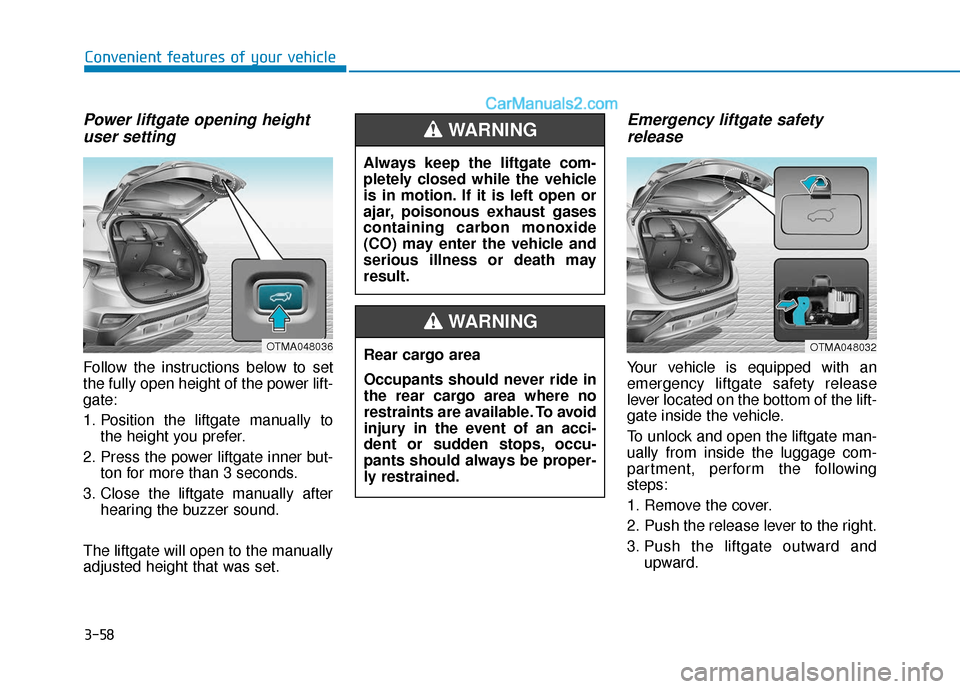
Power liftgate opening heightuser setting
Follow the instructions below to set
the fully open height of the power lift-
gate:
1. Position the liftgate manually to
the height you prefer.
2. Press the power liftgate inner but- ton for more than 3 seconds.
3. Close the liftgate manually after hearing the buzzer sound.
The liftgate will open to the manually
adjusted height that was set.
Emergency liftgate safety release
Your vehicle is equipped with an
emergency liftgate safety release
lever located on the bottom of the lift-
gate inside the vehicle.
To unlock and open the liftgate man-
ually from inside the luggage com-
partment, perform the following
steps:
1. Remove the cover.
2. Push the release lever to the right.
3. Push the liftgate outward and
upward.
OTMA048036
Always keep the liftgate com-
pletely closed while the vehicle
is in motion. If it is left open or
ajar, poisonous exhaust gases
containing carbon monoxide
(CO) may enter the vehicle and
serious illness or death may
result.
WARNING
Rear cargo area
Occupants should never ride in
the rear cargo area where no
restraints are available. To avoid
injury in the event of an acci-
dent or sudden stops, occu-
pants should always be proper-
ly restrained.
WARNING
OTMA048032
Page 186 of 557

3-97
Convenient features of your vehicle
3
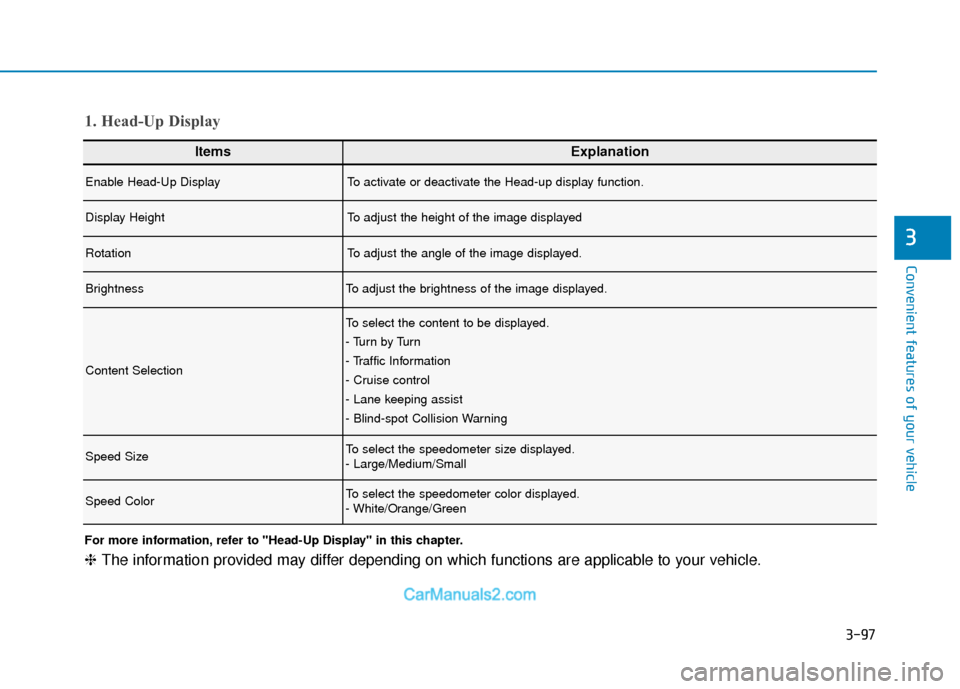
ItemsExplanation
Enable Head-Up DisplayTo activate or deactivate the Head-up display function.
Display HeightTo adjust the height of the image displayed
RotationTo adjust the angle of the image displayed.
BrightnessTo adjust the brightness of the image displayed.
Content Selection
To select the content to be displayed.
- Tu r n b y Tu r n
- Traffic Information
- Cruise control
- Lane keeping assist
- Blind-spot Collision Warning
Speed SizeTo select the speedometer size displayed.
- Large/Medium/Small
Speed ColorTo select the speedometer color displayed.
- White/Orange/Green
1. Head-Up Display
For more information, refer to "Head-Up Display" in this chapter.
❈The information provided may differ depending on which functions are applicable to your vehicle.
Page 200 of 557

3-111
Convenient features of your vehicle
3
Head-up display ON/OFF
To activate the head up display,
select ‘Head-UP Display’ on the User
Settings mode on the instrument
cluster LCD display.
If you do not select ‘Head-Up
Display’, the head up display will be
deactivated.
Head-up display information
1. Turn By Turn (TBT) navigation infor-mation
2. Speed limit signs
3. Speedometer
4. Cruise setting speed
5. Smart Cruise Control (SCC) infor- mation (if equipped)
6. Lane Keeping Assist (LKA) sys- tem information (if equipped)
7. Blind-spot Collision Warning (BCW) system information (if equipped)
8. Warning lights (Low fuel, etc.)
9. Audio/Video information
Information
If you select the Turn By Turn (TBT)
navigation information as HUD con-
tents, the Turn By Turn (TBT) naviga-
tion information will not be displayed
in the instrument cluster LCD display.
Head-up display setting
On the LCD display, you can change
the head up display settings as fol-
lows.
Enable Head-up display
Display Height
Rotation
Brightness
Content Selection
Speed Size
Speed Color
For more details, refer to "LCD
Display" in this chapter.
i
OTMA048418OIK047152N
Page 224 of 557

3-135
Convenient features of your vehicle
3
Conditions Where the ReverseParking Distance Warning sys-tem May Not Operate
The Reverse Parking Distance
Warning system may not operate
normally when any of the following
occur:
The sensor is covered with dirt or
debris such as snow or ice, or the
sensor cover is blocked.
The Reverse Parking Distance
Warning system may experience a
malfunction when the following
occurs:
Driving on uneven road surfacessuch as unpaved roads, gravel,
bumps, or gradient.
Objects generating excessive noise such as vehicle horns, loud
motorcycle engines, or truck air
brakes can interfere with the sen-
sor.
Heavy rain or water spray is pres- ent.
Wireless transmitters or mobile phones are present near the sen-
sor.
The sensor is covered with snow.
Any non-factory equipment or accessories have been installed, or
if the vehicle bumper height or sen-
sor installation has been modified.
Detecting range may decrease when:
Outside air temperature isextremely hot or cold.
Undetectable objects smaller than 40 inches (1 m) and narrower than
6 inches (14 cm) in diameter.
The following objects may not be
recognized by the sensor:
Sharp or slim objects such asropes, chains or small poles.
Objects, which tend to absorb sensor frequency such as clothes,
spongy material or snow.
Page 225 of 557

3-136
Reverse Parking DistanceWarning system Precautions
The Reverse Parking Distance
Warning system may not operate
consistently in some circum-
stances depending on the speed
of the vehicle and the shapes of
the objects detected.
The Reverse Parking Distance Warning system may malfunction if
the vehicle bumper height or sen-
sor installation has been modified
or damaged. Any non-factory
installed equipment or accessories
may also interfere with the sensor
performance.
The sensor may not recognize objects less than 12 in. (30 cm)
from the sensor, or it may sense
an incorrect distance. Use caution.
When the sensor is blocked with snow, dirt, debris, or ice, the rear
parking assist system may be
inoperative until the snow or ice
melts, or the debris is removed.
Use a soft cloth to wipe debris
away from the sensor. Do not push, scratch or strike the
sensor with any hard objects that
could damage the surface of the
sensor. Sensor damage could
occur.
Do not spray the sensors or its surrounding area directly with a
high pressure washer. Doing so
may cause the sensors to fail to
operate normally.
Convenient features of your vehicle
Extreme caution should always
be taken to avoid accidents or
vehicle injuries. Do not solely
rely on the Reverse Parking
Distance Warning system.
Always drive safely and cau-
tiously, especially when back-
ing up in reverse.
WARNING
Page 272 of 557

4-2
Multimedia System
• If you install an aftermarket HID head lamp, your vehicle's audio
and electronic devices may not
function properly.
Prevent chemicals such as per- fume, cosmetic oil, sun cream,
hand cleaner, and air freshener
from contacting the interior
parts because they may cause
damage or discoloration.
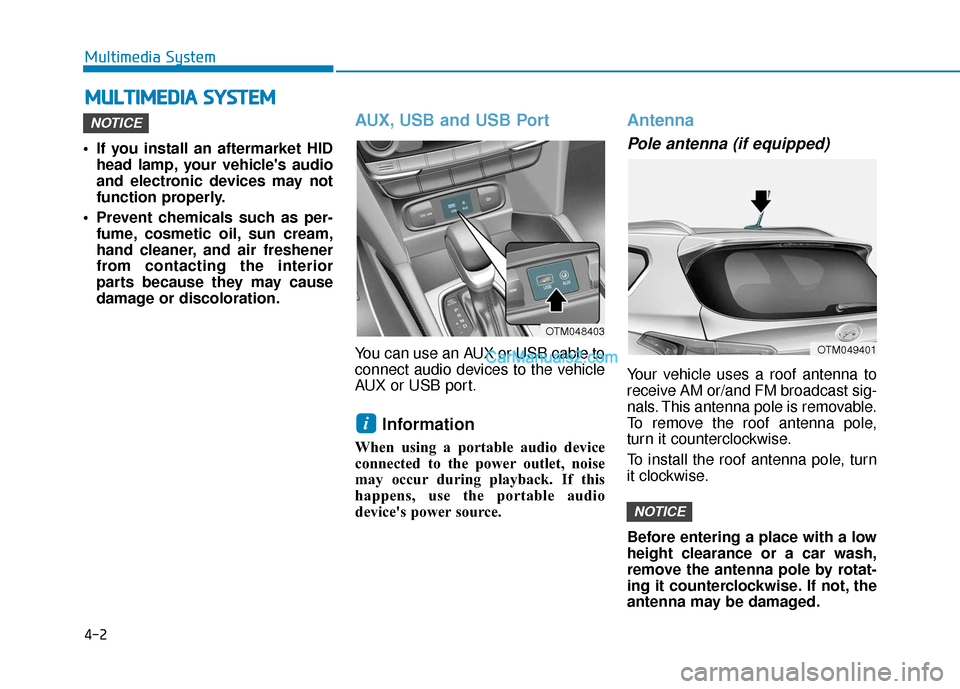
AUX, USB and USB Port
You can use an AUX or USB cable to
connect audio devices to the vehicle
AUX or USB port.
Information
When using a portable audio device
connected to the power outlet, noise
may occur during playback. If this
happens, use the portable audio
device's power source.
Antenna
Pole antenna (if equipped)
Your vehicle uses a roof antenna to
receive AM or/and FM broadcast sig-
nals. This antenna pole is removable.
To remove the roof antenna pole,
turn it counterclockwise.
To install the roof antenna pole, turn
it clockwise.
Before entering a place with a low
height clearance or a car wash,
remove the antenna pole by rotat-
ing it counterclockwise. If not, the
antenna may be damaged.
NOTICE
i
NOTICE
M M U
UL
LT
T I
IM
M E
ED
D I
IA
A
S
S Y
Y S
ST
T E
EM
M
OTM049401
OTM048403