2020 Hyundai Santa Fe cover
[x] Cancel search: coverPage 103 of 557

3-14
Convenient features of your vehicle
To remove the cover:
1. Pull out the door handle.
2. Press the lock located at the side of the cover with a key or flat-blade
screwdriver (1).
3. Push out the cover (2) while pressing the lock.
Be careful not to damage the
cover while removing it or mis-
place it after removing it.
After removing the cover, turn the
key toward the front of the vehicle to
unlock and toward the rear of the
vehicle to lock.
If you lock the driver's door with a
mechanical key, the driver’s door will
lock. If you unlock the driver's door
with a mechanical key, you can open
and close the driver’s door only.
Once the doors are unlocked, they
may be opened by pulling the door
handle. When closing the door, push
the door by hand. Make sure that
doors are closed securely.
Remote key
To lock the doors, press the Door
Lock button (1) on the remote key.
Press the Door Unlock button (2) on
the remote key, the driver's door will
unlock. If you press the Door Unlock
button on the remote key again with-
in four seconds, then all the doors
will unlock.
Once the doors are unlocked, they
may be opened by pulling the door
handle. When closing the door, push
the door by hand. Make sure that
doors are closed securely.
Smart key
Press the button on the driver's out-
side door handle while carrying the
Smart Key with you or press the
Door Unlock button on the Smart
Key, the driver's door will unlock.
NOTICE
OPD047001NOTM048000
OPD046004
Door
UnlockDoor Lock
L
L
L
L
o
o
o
o
c
c
c
c
k
k
k
k
/
/
/
/
U
U
U
U
n
n
n
n
l
l
l
l
o
o
o
o
c
c
c
c
k
k
k
k
Page 110 of 557

3-21
Convenient features of your vehicle
3
Rear Occupant Alert (ROA)
System (if equipped)
The Rear Occupant Alert (ROA) sys-
tem is provided to help prevent exit-
ing the vehicle with the rear passen-
ger left in the vehicle.
1st alert- When you open the front doorafter opening and closing the rear
door and turning off the engine,
the “Check rear seats” warning
message appears on the cluster.
2nd alert - After the 1st alert the 2nd alertoperates when any movement is
detected in the vehicle after the
driver’s door is closed and all the
doors are locked. The horn will
activate for about 25 seconds. If
the system continues to detect a
movement the alert operates up
to 8 times.
- Unlock the door with the remote key or smart key to stop the alert.
- The system detects movement in the vehicle for 24 hours after the
door is locked.The Safe Exit Assist (SEA)
system may not operate nor-
mally if there is any vehicle or
obstacle at the rear area of
your vehicle.
The Safe Exit Assist (SEA)
system may not operate nor-
mally when a vehicle is com-
ing rapidly two lanes over
from your vehicle or a vehicle
is approaching at a fast speed
from the rear in the lane next
to your vehicle.
The Safe Exit Assist (SEA)
system may be activated later
than normal or may not oper-
ate normally if a vehicle is
approaching fast from the rear
of your vehicle.
CAUTIONThe Safe Exit Assist (SEA)
system will not operate if
there is a malfunction with the
Blind-Spot Collision Warning
(BCW) system as follows:
- When the BCW warning message appears
When the BCW sensor or
the sensor surrounding is
polluted or covered
- When the BCW does not warn or warns wrongly
For more details, refer to cau-
tions and limitations in "Blind-
Spot Collision Warning (BCW)"
in chapter 5.
The system does not detect
every obstacle approaching
the vehicle exit.
The driver and passenger are
responsible for any obstacles
while exiting the vehicle.
Always check the surrounding
before you exit the vehicle.
WARNING
Page 118 of 557
3-29
Convenient features of your vehicle
3
Heated Steering Wheel
(if equipped)
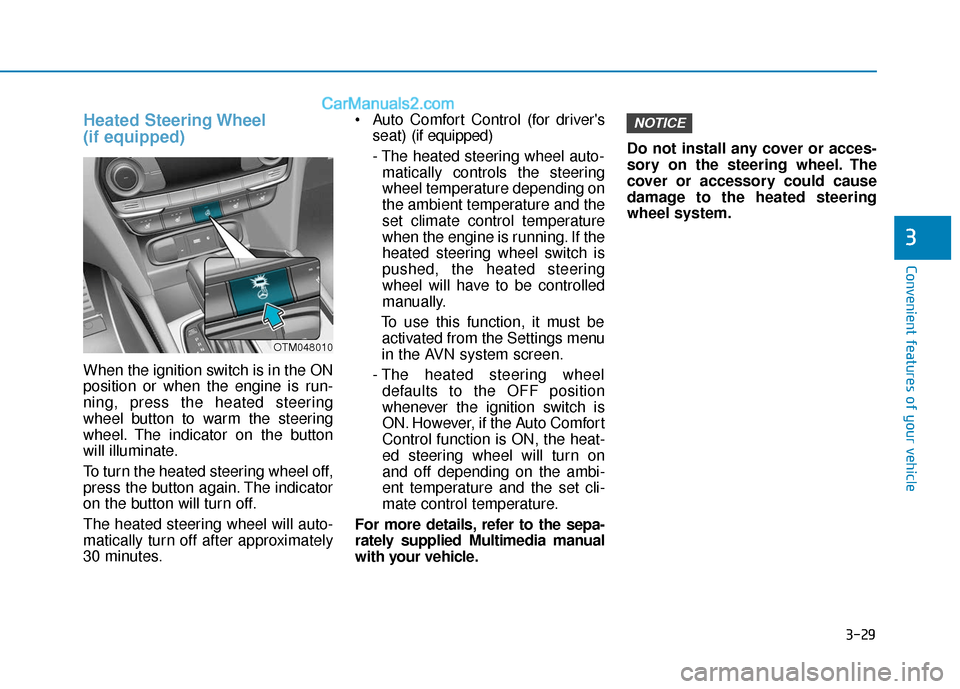
When the ignition switch is in the ON
position or when the engine is run-
ning, press the heated steering
wheel button to warm the steering
wheel. The indicator on the button
will illuminate.
To turn the heated steering wheel off,
press the button again. The indicator
on the button will turn off.
The heated steering wheel will auto-
matically turn off after approximately
30 minutes. Auto Comfort Control (for driver's
seat) (if equipped)
- The heated steering wheel auto- matically controls the steering
wheel temperature depending on
the ambient temperature and the
set climate control temperature
when the engine is running. If the
heated steering wheel switch is
pushed, the heated steering
wheel will have to be controlled
manually.
To use this function, it must be activated from the Settings menu
in the AVN system screen.
- The heated steering wheel defaults to the OFF position
whenever the ignition switch is
ON. However, if the Auto Comfort
Control function is ON, the heat-
ed steering wheel will turn on
and off depending on the ambi-
ent temperature and the set cli-
mate control temperature.
For more details, refer to the sepa-
rately supplied Multimedia manual
with your vehicle. Do not install any cover or acces-
sory on the steering wheel. The
cover or accessory could cause
damage to the heated steering
wheel system.
NOTICE
OTM048010
Page 137 of 557

3-48
Convenient features of your vehicle
Periodically remove any dirt that may accumulate on the sunroof
guide rail or between the sun-
roof and roof panel which can
make a noise.
Do not try to open the sunroof when the temperature is below
freezing or when the sunroof is
covered with snow or ice, other-
wise the motor could be dam-
aged. In cold and wet climates, the
sunroof may not work properly.
Resetting the Sunroof
The sunroof may need to be reset if
the following conditions occur:
The battery is discharged or dis-connected or the sunroof fuse has
been replaced or disconnected
The sunroof control lever is not operating correctly
To reset the sunroof, perform the fol-
lowing steps:
1. Turn the engine on and close the sunroof glass and sunshade com-
pletely. 2. Release the control lever.
3. Push and hold the sunroof control
lever forward (to close the sun-
shade) for about 10 seconds until
the sunroof moves slightly, then
release the control lever.
4. Push and hold the sunroof control lever forward until the sunroof
operates as follows:
Sunshade Open → Glass Tilt Open
→ Glass Slide Open → Glass Slide
Close → Sunshade Close
Then, release the control lever.
When this is complete, the sunroof
system is reset.
For more information, contact an
authorized HYUNDAI dealer.
Information
If you do not reset the sunroof, it may
not work properly.
Sunroof Open Warning
(if equipped)
If the driver turns off the engine when the sunroof is not fully
closed, the warning chime will
sound for approximately 3 seconds
and the sunroof open warning will
appear on the cluster LCD display.
If the driver turns off the engine and opens the door when the sun-
roof is not fully closed, the sunroof
open warning will appear on the
cluster LCD display until the door is
closed or the sunroof is fully closed.
Close the sunroof securely when
leaving your vehicle.
i
NOTICE
OTM048118
Page 140 of 557
3-51
Convenient features of your vehicle
3
Make certain that you close the
liftgate before driving your vehi-
cle. Possible damage may occur
to the liftgate struts and mounting
hinges if the liftgate is not closed
prior to driving.
Emergency liftgate safetyrelease
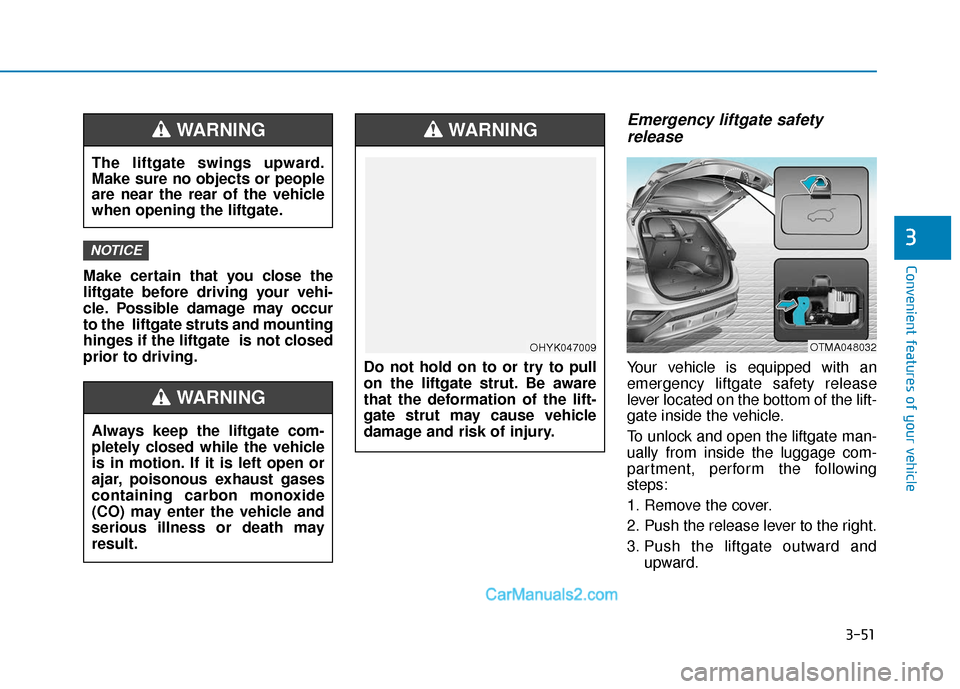
Your vehicle is equipped with an
emergency liftgate safety release
lever located on the bottom of the lift-
gate inside the vehicle.
To unlock and open the liftgate man-
ually from inside the luggage com-
partment, perform the following
steps:
1. Remove the cover.
2. Push the release lever to the right.
3. Push the liftgate outward and
upward.
NOTICE
OTMA048032
The liftgate swings upward.
Make sure no objects or people
are near the rear of the vehicle
when opening the liftgate.
WARNING
Do not hold on to or try to pull
on the liftgate strut. Be aware
that the deformation of the lift-
gate strut may cause vehicle
damage and risk of injury.
WARNING
OHYK047009
Always keep the liftgate com-
pletely closed while the vehicle
is in motion. If it is left open or
ajar, poisonous exhaust gases
containing carbon monoxide
(CO) may enter the vehicle and
serious illness or death may
result.
WARNING
Page 147 of 557
3-58
Convenient features of your vehicle
Power liftgate opening heightuser setting
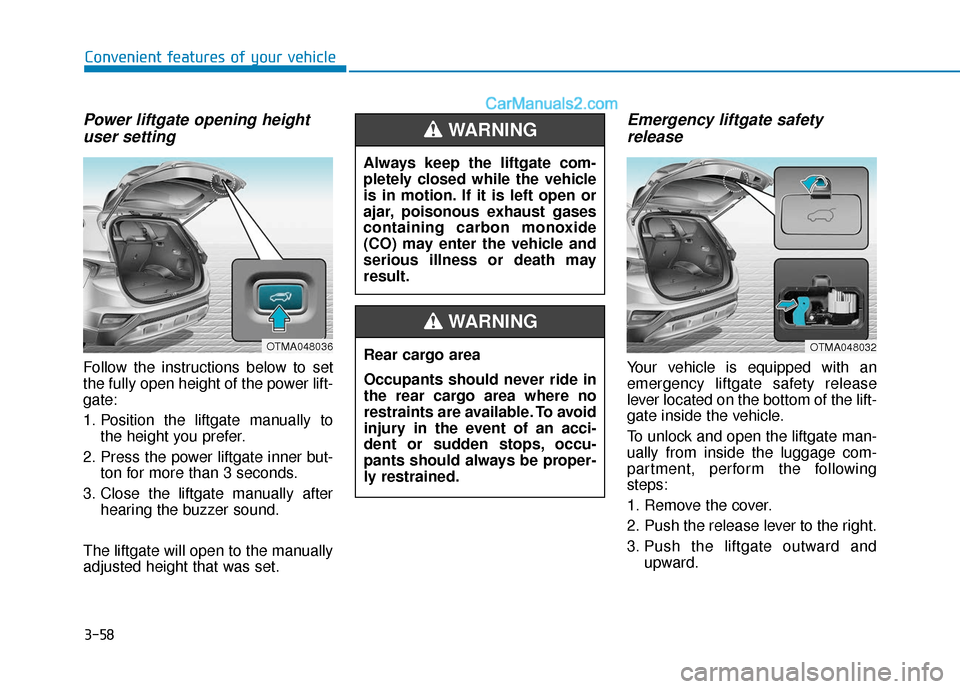
Follow the instructions below to set
the fully open height of the power lift-
gate:
1. Position the liftgate manually to
the height you prefer.
2. Press the power liftgate inner but- ton for more than 3 seconds.
3. Close the liftgate manually after hearing the buzzer sound.
The liftgate will open to the manually
adjusted height that was set.
Emergency liftgate safety release
Your vehicle is equipped with an
emergency liftgate safety release
lever located on the bottom of the lift-
gate inside the vehicle.
To unlock and open the liftgate man-
ually from inside the luggage com-
partment, perform the following
steps:
1. Remove the cover.
2. Push the release lever to the right.
3. Push the liftgate outward and
upward.
OTMA048036
Always keep the liftgate com-
pletely closed while the vehicle
is in motion. If it is left open or
ajar, poisonous exhaust gases
containing carbon monoxide
(CO) may enter the vehicle and
serious illness or death may
result.
WARNING
Rear cargo area
Occupants should never ride in
the rear cargo area where no
restraints are available. To avoid
injury in the event of an acci-
dent or sudden stops, occu-
pants should always be proper-
ly restrained.
WARNING
OTMA048032
Page 153 of 557
3-64
Convenient features of your vehicle
Do not get back into a vehicle
once you have begun refuel-
ing. You can generate a build-
up of static electricity by
touching, rubbing or sliding
against any item or fabric
capable of producing static
electricity. Static electricity
discharge can ignite fuel
vapors causing a fire. If you
must re-enter the vehicle, you
should once again eliminate
potentially dangerous static
electricity discharge by touch-
ing a metal part of the vehicle,
away from the fuel filler neck,
nozzle or other gasoline
source, with your bare hand.
When using an approved
portable fuel container, be
sure to place the container on
the ground prior to refueling.
Static electricity discharge
from the container can ignite
fuel vapors causing a fire.
Do not over-fill or top-off your
vehicle tank, which can cause
gasoline spillage.
If a fire breaks out during refu-
eling, leave the vicinity of the
vehicle, and immediately con-
tact the manager of the gas
station and then contact the
local fire department. Follow
any safety instructions they
provide.
If pressurized fuel sprays out,
it can cover your clothes or
skin and thus subject you to
the risk of fire and burns.
Always remove the fuel cap
carefully and slowly. If the cap
is venting fuel or if you hear a
hissing sound, wait until the
condition stops before com-
pletely removing the cap.
Always check that the fuel cap
is installed securely to pre-
vent fuel spillage in the event
of an accident.
Once refueling has begun,
contact between your bare
hand and the vehicle should
be maintained until the filling
is complete.
Use only approved portable
plastic fuel containers designed
to carry and store gasoline.
When refueling, always move
the shift lever to the P (Park)
position (for automatic trans-
mission/dual clutch transmis-
sion), set the parking brake,
and place the ignition switch
to the LOCK/OFF position.
Sparks produced by electrical
components related to the
engine can ignite fuel vapors
causing a fire.
Do not use matches or a
lighter and do not smoke or
leave a lit cigarette in your
vehicle while at a gas station,
especially during refueling.
Page 173 of 557

3-84
Convenient features of your vehicle
SMART Mode IndicatorLight (if equipped)
This indicator light illuminates:
When you select ''SMART" mode
as drive mode.
For more details, refer to "Drive
Mode Integrated Control System''
in chapter 5.
All Wheel Drive LOCK Indicator Light (if equipped)
This indicator light illuminates:
When you set the ignition switch
or the Engine Start/Stop button to
the ON position.
- The AWD LOCK indicator lightilluminates for about 3 seconds
and then goes off.
When you select AWD Lock mode by pressing the AWD LOCK but-
ton.
- The AWD LOCK mode is totransfer a portion of the drive
torque to the rear wheels for
increased traction on wet pave-
ment, snow covered roads or
when driving off road.
Downhill Brake Control(DBC) Indicator Light(if equipped)
This indicator light illuminates:
When you set the ignition switch
or the Engine Start/Stop button to
the ON position.
- The Downhill Brake ControlIndicator Light illuminates for about
3 seconds and then goes off.
When you activate the system by pressing the DBC button.
This indicator light blinks:
When the DBC is operating.
This indicator light illuminates yel-
low:
When there is a malfunction withthe DBC system.
If this occurs, have your vehicle
inspected by an authorized
HYUNDAI dealer.
For more details, refer to
"Downhill Brake Control (DBC)
System" in chapter 5.
AWD Lock Mode
Do not use the AWD lock mode
on dry paved roads. Doing so
can cause abnormal noise or
vibration, and may damage the
AWD system.
CAUTION
60$57