2020 Hyundai Santa Fe transmission shift
[x] Cancel search: transmission shiftPage 291 of 557
5-17
Driving your vehicle
5
• If the driver presses the lever to + (Up) or - (Down) position, the
transmission may not make the
requested gear change if the next
gear is outside of the allowable
engine rpm range. The driver must
execute upshifts in accordance with
road conditions, taking care to keep
the engine rpms below the red zone.
• When accelerating from a stop on a slippery road, push the shift lever
forward into the + (Up) position.
This allows the transmission to
shift into the 2
ndgear which is bet-
ter for smooth driving on a slippery
road. Push the shift lever to the -
(Down) side to shift back to the 1
st
gear.
• When driving in Manual Shift Mode, slow down before shifting to
a lower gear. Otherwise, the lower
gear may not be engaged if the
engine rpms are outside of the
allowable range.
Shift-lock system
For your safety, the automatic trans-
mission has a shift-lock system
which prevents shifting the transmis-
sion from P (Park) into R (Reverse)
unless the brake pedal is depressed.
To shift the transmission from P
(Park) into R (Reverse):
1. Depress and hold the brake pedal.
2. Start the engine or place the igni-tion switch in the ON position.
3. Move the shift lever.
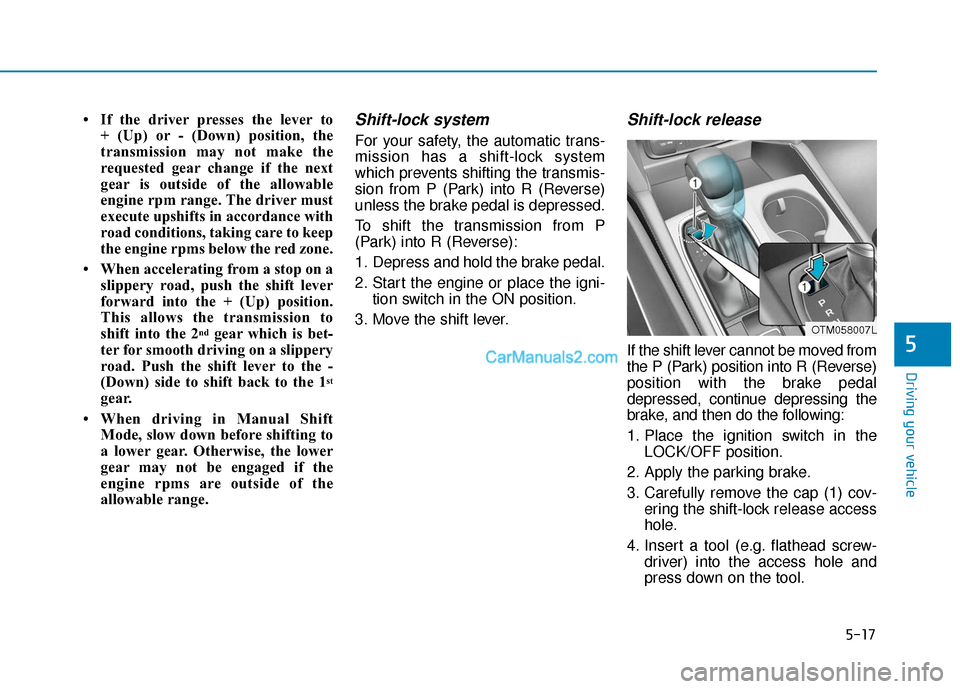
Shift-lock release
If the shift lever cannot be moved from
the P (Park) position into R (Reverse)
position with the brake pedal
depressed, continue depressing the
brake, and then do the following:
1. Place the ignition switch in the LOCK/OFF position.
2. Apply the parking brake.
3. Carefully remove the cap (1) cov- ering the shift-lock release access
hole.
4. Insert a tool (e.g. flathead screw- driver) into the access hole and
press down on the tool.
OTM058007L
Page 325 of 557
5-51
Driving your vehicle
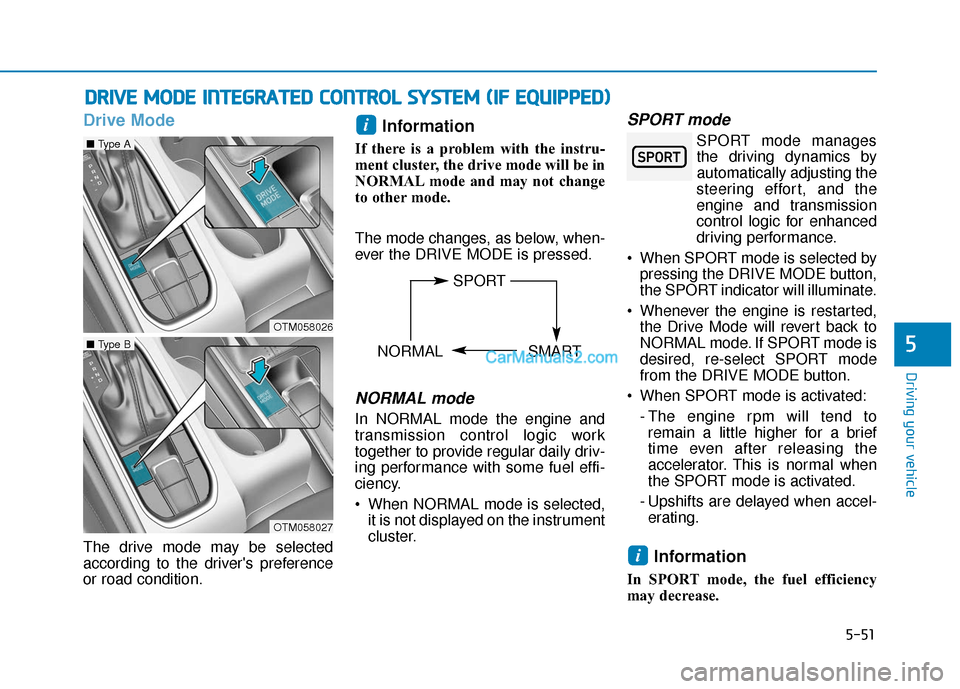
Drive Mode
The drive mode may be selected
according to the driver's preference
or road condition.
Information
If there is a problem with the instru-
ment cluster, the drive mode will be in
NORMAL mode and may not change
to other mode.
The mode changes, as below, when-
ever the DRIVE MODE is pressed.
NORMAL mode
In NORMAL mode the engine and
transmission control logic work
together to provide regular daily driv-
ing performance with some fuel effi-
ciency.
When NORMAL mode is selected,it is not displayed on the instrument
cluster.
SPORT mode
SPORT mode managesthe driving dynamics by
automatically adjusting the
steering effort, and the
engine and transmission
control logic for enhanced
driving performance.
When SPORT mode is selected by pressing the DRIVE MODE button,
the SPORT indicator will illuminate.
Whenever the engine is restarted, the Drive Mode will revert back to
NORMAL mode. If SPORT mode is
desired, re-select SPORT mode
from the DRIVE MODE button.
When SPORT mode is activated: - The engine rpm will tend toremain a little higher for a brief
time even after releasing the
accelerator. This is normal when
the SPORT mode is activated.
- Upshifts are delayed when accel- erating.
Information
In SPORT mode, the fuel efficiency
may decrease.
i
i
D D R
RI
IV
V E
E
M
M O
OD
DE
E
I
IN
N T
TE
EG
G R
RA
A T
TE
ED
D
C
C O
O N
NT
TR
R O
O L
L
S
S Y
Y S
ST
T E
EM
M
(
( I
IF
F
E
E Q
Q U
UI
IP
P P
PE
ED
D )
)
5
OTM058026
■ Type A
OTM058027
■ Type B
SPORT
NORMAL SMART
Page 327 of 557

5-53
Driving your vehicle
Limitation of SMART mode
The SMART mode may be limited in
following situations. (The OFF indica-
tor illuminates in those situations.)
The driver manually moves theshift lever :
It deactivates SMART mode. The
vehicle drives, as the driver manu-
ally moves the shift lever.
The cruise control is activated : The cruise control system may
deactivate the SMART mode when
the vehicle is controlled by the set
speed of the smart cruise control
system. (SMART mode is not
deactivated just by activating the
cruise control system.) The transmission oil temperature is
either extremely low or extremely
high :
The SMART mode can be active in
most of the normal driving situa-
tions. However, an extremely high/
low transmission oil temperature
may temporarily deactivate the
SMART mode, because the trans-
mission condition is out of normal
operation condition.
Smart Shift in Trip Computer
mode
Select the Trip Computer mode ( )
on the instrument cluster LCD display
and move to the smart shift screen.
Then, the driver can see the drive
mode selected and the drive mode
which is automatically switched by
the SMART mode.
The drive mode selected by the driv-
er (1) and the driving style gauge (2)
showing the driver's driving style are
displayed on the screen.
5
OIK047179N
Page 399 of 557
5-125
Driving your vehicle
5
Hazardous Driving Conditions
When hazardous driving elements
are encountered such as water,
snow, ice, mud and sand, take the
below suggestions:
Drive cautiously and keep a longerbraking distance.
Avoid abrupt braking or steering.
When your vehicle is stuck in snow, mud, or sand, use second
gear. Accelerate slowly to avoid
unnecessary wheel spin.
Put sand, rock salt, tire chains or other non-slip materials under the
wheels to provide additional trac-
tion while the vehicle becomes
stuck in ice, snow, or mud.
Rocking the Vehicle
If it is necessary to rock the vehicle
to free it from snow, sand, or mud,
first turn the steering wheel right and
left to clear the area around your
front wheels. Then, shift back and
forth between R (Reverse) and a for-
ward gear.
Try to avoid spinning the wheels, and
do not race the engine.
To prevent transmission wear, wait
until the wheels stop spinning before
shifting gears. Release the accelera-
tor pedal while shifting, and press
lightly on the accelerator pedal while
the transmission is in gear. Slowly
spinning the wheels in forward and
reverse directions causes a rocking
motion that may free the vehicle.
S SP
P E
EC
CI
IA
A L
L
D
D R
RI
IV
V I
IN
N G
G
C
C O
O N
ND
DI
IT
T I
IO
O N
NS
S
Downshifting with an automatic
transmission while driving on
slippery surfaces can cause an
accident. The sudden change in
tire speed could cause the tires
to skid. Be careful when down-
shifting on slippery surfaces.
WARNING
If the vehicle is stuck and
excessive wheel spin occurs,
the temperature in the tires can
increase very quickly. If the tires
become damaged, a tire blow
out or tire explosion can occur.
This condition is dangerous -
you and others may be injured.
Do not attempt this procedure if
people or objects are anywhere
near the vehicle.
If you attempt to free the vehicle,
the vehicle can overheat quickly,
possibly causing an engine
compartment fire or other dam-
age. Try to avoid spinning the
wheels as much as possible to
prevent overheating of either the
tires or the engine. DO NOT
allow the vehicle to spin the
wheels above 35 mph (56 km/h).
WARNING
Page 412 of 557
5-138
Driving your vehicle
Driving on hills
Reduce speed and shift to a lower
gear before you start down a long or
steep downgrade. If you don't shift
down, you might have to use your
brakes so much that they would get
overheated and may not operate effi-
ciently.
On a long uphill grade, shift down
and reduce your speed to around 45
mph (70 km/h) to reduce the possi-
bility of engine and transmission
overheating.
If your trailer weighs more than the
maximum trailer weight without trailer
brakes, you should drive in D (Drive)
when towing a trailer. Operating your
vehicle in D (Drive) when towing a
trailer will minimize heat build-up and
extend the life of your transmission.To prevent engine and/or trans-
mission overheating:
When towing a trailer on steep
grades (in excess of 6%) pay
close attention to the engine
coolant temperature gauge to
ensure the engine does not
overheat. If the needle of the
coolant temperature gauge
moves towards "H" (HOT), pull
over and stop as soon as it is
safe to do so, and allow the
engine to idle until it cools
down. You may proceed once the
engine has cooled sufficiently.
When towing a trailer, your vehi- cle speed may be much slower
than the general flow of traffic,
especially when climbing an
uphill grade. Use the right hand
lane when towing a trailer on an
uphill grade. Choose your vehi-
cle speed according to the max-
imum posted speed limit for
vehicles with trailers, the steep-
ness of the grade, and your trail-
er weight.
Parking on hills
Generally, if you have a trailer attached
to your vehicle, you should not park
your vehicle on a hill.
However, if you ever have to park your
trailer on a hill, here's how to do it:
1. Pull the vehicle into the parking area.
Turn the steering wheel in the direction of the curb (right if head-
ed down hill, left if headed up hill).
2. Shift the vehicle to P (Park).
3. Set the parking brake and shut off the vehicle.
4. Place wheel chocks under the trailer wheels on the down hill side
of the wheels.
NOTICE
Page 413 of 557
5-139
Driving your vehicle
5
5. Start the vehicle, apply the brakes,shift to neutral, release the park-
ing brake and slowly release the
brakes until the trailer chocks
absorb the load.
6. Reapply the brakes and parking brakes.
7. Move the shift lever to P (Park).
8. Shut off the vehicle and release the vehicle brakes but leave the
parking brake set.Driving the vehicle after it hasbeen parked on a hill
1. With the gear shift lever in P
(Park), apply the brakes and hold
the brake pedal down while per-
forming the following:
and
2. Slowly remove your foot from the brake pedal.
3. Drive slowly until the trailer is clear of the chocks.
4. Stop and have someone pick up and store the chocks.
Maintenance when trailer tow-
ing
Your vehicle will need service more
often when you regularly pull a trail-
er. Important items to pay particular
attention to include engine oil, auto-
matic transmission fluid, axle lubri-
cant and cooling system fluid. Brake
condition is another important item to
frequently check. If you’re trailering,
it’s a good idea to review these items
before you start your trip. Don't forget
to also maintain your trailer and
hitch. Follow the maintenance sched-
ule that accompanied your trailer and
check it periodically. Preferably,
inspect the vehicle and trailer at the
start of each day's driving. Inspect
the hitch mounting to make sure the
hitch is properly secured to the vehi-
cle. Inspect the trailer electrical
wiring to make sure brake lights, turn
signal lights, running lights, and haz-
ard lights are working properly.
Do not get out of the vehicle
without the parking brake
firmly set. If you have left the
engine running, the vehicle
can move suddenly. You and
others could be seriously or
fatally injured.
Do not apply the accelerator
pedal to hold the vehicle on
an uphill.
WARNING
Page 440 of 557
6-20
What to do in an emergency
Jack label
To prevent damaging the com-
pact spare tire and your vehicle:
Drive slowly enough for the
road conditions to avoid all
hazards, such as a potholes
or debris.
Avoid driving over obstacles.
The compact spare tire diame-
ter is smaller than the diame-
ter of a conventional tire and
reduces the ground clearance
approximately 1 inch (25 mm).
Do not use tire chains on the
compact spare tire. Because
of the smaller size, a tire chain
will not fit properly.
Do not use the compact spare
tire on any other wheels, nor
should standard tires, snow
tires, wheel covers or trim
rings be used with the com-
pact spare wheel.
CAUTION
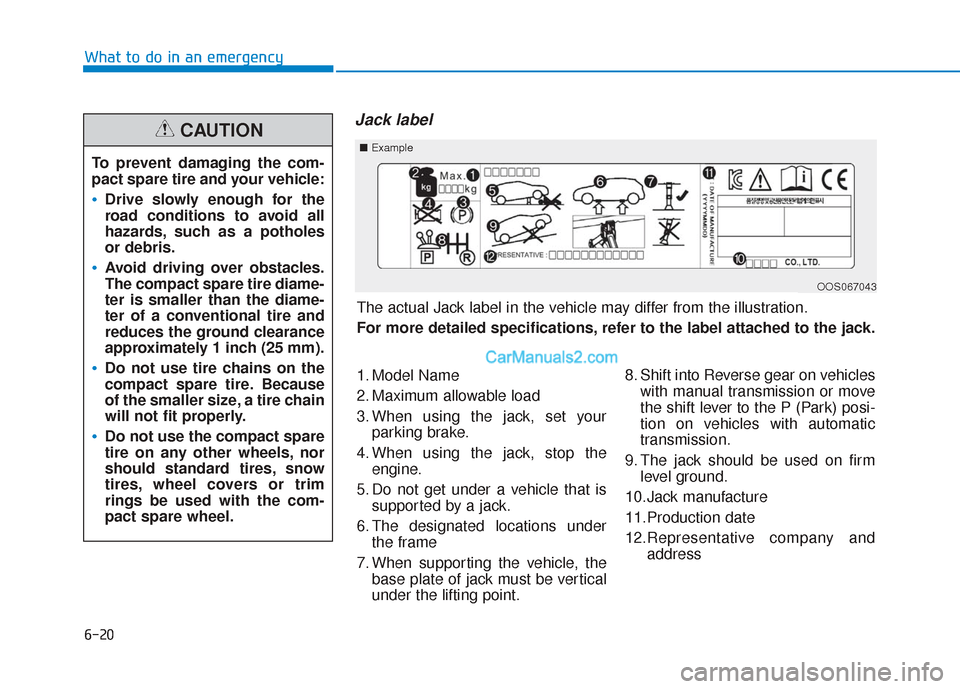
The actual Jack label in the vehicle may differ from the illustration.
For more detailed specifications, refer to the label attached to the jack.
1. Model Name
2. Maximum allowable load
3. When using the jack, set yourparking brake.
4. When using the jack, stop the engine.
5. Do not get under a vehicle that is supported by a jack.
6. The designated locations under the frame
7. When supporting the vehicle, the base plate of jack must be vertical
under the lifting point. 8. Shift into Reverse gear on vehicles
with manual transmission or move
the shift lever to the P (Park) posi-
tion on vehicles with automatic
transmission.
9. The jack should be used on firm level ground.
10.Jack manufacture
11.Production date
12.Representative company and address
■Example
OOS067043
Page 442 of 557
6-22
What to do in an emergency
When towing your vehicle in an
emergency without wheel dollies:
1. Place the ignition switch in the ACC position.
2. Place the shift lever in N (Neutral).
3. Release the parking brake.
Emergency Towing
If towing is necessary, we recom-
mend you have it done by an author-
ized HYUNDAI dealer or a commer-
cial tow truck service.
If your vehicle is equipped with
a rollover sensor, place the igni-
tion switch in the LOCK/OFF or
ACC position when the vehicle
is being towed. The side impact
and curtain air bag may deploy
if the sensor detects the situa-
tion as a rollover.WARNING
Failure to place the shift lever in
N (Neutral) when being towed
with the front wheels on the
ground can cause internal dam-
age to the transmission.
CAUTION