2020 Hyundai Kona head light
[x] Cancel search: head lightPage 13 of 505
1-2
E
EX
X T
TE
ER
R I
IO
O R
R
O
O V
VE
ER
R V
V I
IE
E W
W
Your vehicle at a glance
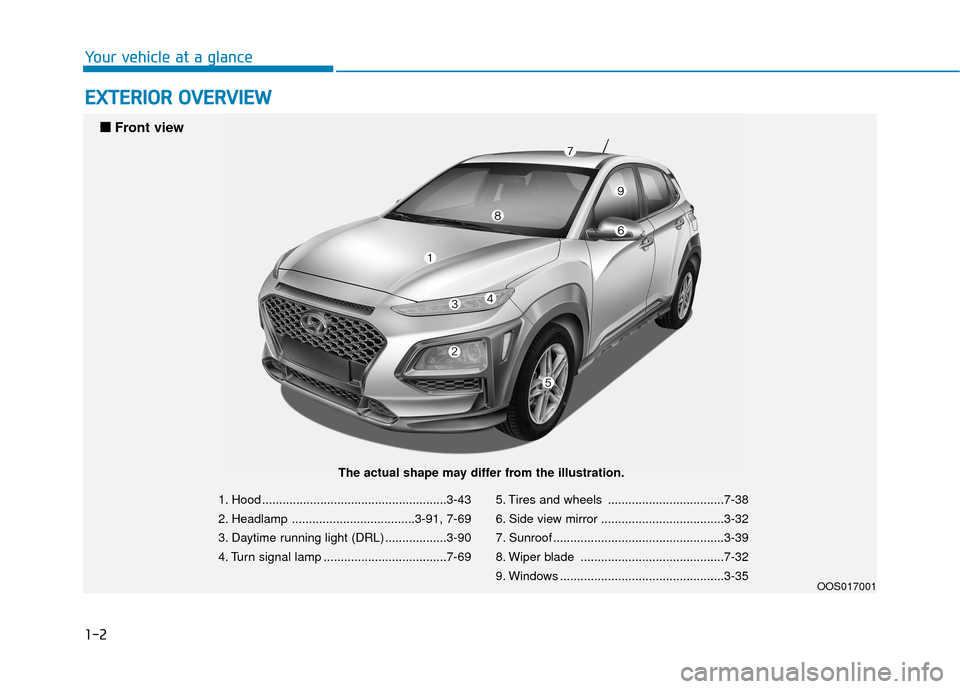
1. Hood ......................................................3-43
2. Headlamp ....................................3-91, 7-69
3. Daytime running light (DRL) ..................3-90
4. Turn signal lamp ....................................7-69 5. Tires and wheels ..................................7-38
6. Side view mirror ....................................3-32
7. Sunroof ..................................................3-39
8. Wiper blade ..........................................7-32
9. Windows ................................................3-35
OOS017001
■
■
Front view
The actual shape may differ from the illustration.
Page 18 of 505

Safety system of your vehicle
Important Safety Precautions ..............................2-2
Always Wear Your Seat Belt ..........................................2-2
Restrain All Children .........................................................2-2
Air Bag Hazards .................................................................2-2
Driver Distraction ..............................................................2-2
Control Your Speed ...........................................................2-2
Keep Your Vehicle in Safe Condition ............................2-2
Seats ........................................................................\
2-3
Safety Precautions ...........................................................2-4
Front Seats ........................................................................\
.2-5
Rear Seats........................................................................\
.2-11
Head Restraints ...............................................................2-14
Seat Warmers and Air Ventilation Seats ...................2-18
Seat Belts ..............................................................2-21
Seat Belt Safety Precautions .......................................2-21
Seat Belt Warning Light ................................................2-22
Seat Belt Restraint System...........................................2-23
Additional Seat Belt Safety Precautions ...................2-30
Care of Seat Belts...........................................................2-33
Child Restraint System (CRS) .............................2-34
Children Always in the Rear .........................................2-34
Selecting a Child Restraint System (CRS) .................2-35
Installing a Child Restraint System (CRS)..................2-37
Air Bag
- Advanced Supplemental Restraint System ...2-45
Where Are the Air Bags? ..............................................2-47
How Does the Air Bag System Operate?..................2-50
What to Expect After an Air Bag Inflates ................2-55
Occupant Classification System (OCS).......................2-56
Why Didn't My Air Bag Go Off in a Collision? ........2-61
SRS Care ........................................................................\
....2-66
Additional Safety Precautions .....................................2-67
Air Bag Warning Labels .................................................2-67
This chapter provides you with important information about how to protect yourself and your passengers.
It explains how to properly use your seats and seat belts, and how your air bags work.
Additionally, this chapter explains how to properly restrain infants and children in your vehicle.
2
Page 67 of 505

2-50
Safety system of your vehicle
They are designed to help protect the
heads of the front seat occupants
and the rear outboard seat occupants
in certain side impact collisions.
The curtain air bags are designed to
deploy during certain side impact
collisions, depending on the crash
severity.
The side and curtain air bags on
both sides of the vehicle may deploy
if a rollover or possible rollover is
detected.
The curtain air bags are not designed
to deploy in all side impact or rollover
situations.
How Does the Air Bag System
Operate?
The SRS consists of the following
components:
1. Driver's front air bag module
2. Passenger's front air bag module
3. Side air bag modules
4. Curtain air bag modules
5. Retractor pre-tensioner
6. Air bag warning light
7. SRS control module (SRSCM)/ Rollover sensor
8. Front impact sensors
9. Side impact sensors
To reduce the risk of serious
injury or death from an inflating
curtain air bag, take the follow-
ing precautions:
All seat occupants must wear
seat belts at all times to help
keep occupants positioned
properly.
Properly secure child
restraints as far away from the
door as possible.
Do not place any objects over
the air bag. Also, do not attach
any objects around the area
the air bag inflates such as the
door, side door glass, front
and rear pillar, roof side rail.
Do not hang other objects
except clothes, especially
hard or breakable objects. In
an accident, it may cause
vehicle damage or personal
injury.
Do not allow passengers to
lean their heads or bodies onto
doors, put their arms on the
doors, stretch their arms out of
the window, or place objects
between the doors and seats.
Do not open or repair the side
curtain air bags.
WARNING
OOS037063N
Page 85 of 505

Convenient features of your vehicle
Accessing Your Vehicle .........................................3-3
Remote Key........................................................................\
.3-3
Smart Key ........................................................................\
....3-6
Immobilizer System .........................................................3-11
Door Locks ............................................................3-13
Operating Door Locks from Outside the Vehicle ....3-13
Operating Door Locks from Inside the Vehicle .......3-14
Automatic Door Lock and Unlock Features .............3-16
Child-Protector Rear Door Locks ...............................3-17
Theft-Alarm System ............................................3-18
Steering Wheel .....................................................3-18
Electric Power Steering (EPS) .....................................3-18
Tilt Steering / Telescope Steering ..............................3-19
Heated Steering Wheel (for Canada) .........................3-20
Horn ........................................................................\
............3-21
Mirrors ...................................................................3-21
Inside Rearview Mirror ..................................................3-21
Side View Mirrors ...........................................................3-32
Windows ................................................................3-35
Power Windows ...............................................................3-36
Sunroof..................................................................3-39
Sunroof opening and closing .......................................3-40
Sliding the sunroof .........................................................3-40
Tilting the sunroof ..........................................................3-40
Sunshade ........................................................................\
...3-41Resetting the sunroof ....................................................3-41
Sunroof Open Warning ..................................................3-42
Exterior Features .................................................3-43
Hood ........................................................................\
...........3-43
Liftgate ........................................................................\
......3-44
Fuel Filler Door ................................................................3-46
Instrument Cluster ...............................................3-49
Instrument Cluster Control............................................3-50
Gauges and Meters ........................................................3-51
Transmission shift indicator .........................................3-54
Warning and Indicator Lights .......................................3-55
LCD Display Messages ...................................................3-67
LCD Display ...........................................................3-72
LCD Display Control ........................................................3-72
LCD Display Modes .........................................................3-73
Trip Computer .......................................................3-83
Head Up Display (HUD) .......................................3-87
Lighting..................................................................3-90
Exterior Lights .................................................................3-90
Smart cornering lamp ....................................................3-97
Interior Lights...................................................................3-98
Welcome System ...........................................................3-100
3
Page 106 of 505

3-22
Convenient features of your vehicle
When cleaning the mirror, use a
paper towel or similar material
dampened with glass cleaner. Do
not spray glass cleaner directly on
the mirror as this may cause the
liquid cleaner to enter the mirror
housing.
Day/night rearview mirror (if equipped)
[A] : Day/night lever, [B] : Day, [C] : Night
Make this adjustment before you
start driving and while the day/night
lever is in the day position.
Pull the day/night lever towards you
to reduce glare from the headlights
of the vehicles behind you during
night driving.
Remember that you lose some
rearview clarity in the night position.
Electric Chromic Mirror (ECM) (if equipped)
Some vehicles come equipped with
an electrochromic mirror that helps
control glare while driving at night or
under low light driving conditions.
When the engine is running, the
glare is automatically controlled by
the sensor mounted in the rearview
mirror. The sensor detects the light
level around the vehicle, and auto-
matically adjusts to control the head-
lamp glare from vehicles behind you.
Whenever the shift lever is placed in
R (Reverse), the mirror will automat-
ically go to the brightest setting in
order to improve the driver’s view
behind the vehicle.
NOTICE
OOS047009
NEVER adjust the mirror while
driving. This may cause loss of
vehicle control resulting in an
accident.
WARNING
Page 108 of 505

3-24
Convenient features of your vehicle
Your vehicle may be equipped with a
Gentex Automatic-Dimming Mirror
with a Z-Nav™ Electronic Compass
Display and an Integrated HomeLink
®
Wireless Control System. During
nighttime driving, this feature will
automatically detect and reduce
rearview mirror glare while the com-
pass indicates the direction the vehicle
is traveling. The HomeLink
®Universal
Transceiver allows you to activate your
garage door(s), electric gate, home
lighting, etc.
(1) HomeLink Channel 1
(2) HomeLink Channel 2
(3) HomeLink Channel 3
(4) Garage Door Opener Status
Indicator : Closing or Closed
(5) HomeLink Operation Indicator
(6) Garage Door Opener Status Indicator : Opening or Opened
(7) HomeLink User Interface Indicator
Automatic-Dimming Night Vision
Safety™ (NVS®) Mirror
(if equipped)
The NVS®Mirror automatically
reduces glare by monitoring light lev-
els in the front and the rear of the
vehicle. Any object that obstructs
either light sensor will degrade the
automatic dimming control feature.
For more information regarding
NVS
®mirrors and other applica-
tions, please refer to the Gentex
website:
www.gentex.com
Your mirror will automatically dim
upon detecting glare from the vehi-
cles traveling behind you.
The mirror defaults to the ON posi-
tion each time the vehicle is started.
Z-Nav™ Compass Display
The NVS™ Mirror in your vehicle is
also equipped with a Z-Nav™
Compass that shows the vehicle
Compass heading in the Display
Window using the 8 basic cardinal
headings (N, NE, E, SE, etc.).
Compass function
The Compass can be turned ON and
OFF, but it returns to ON after the
ignition is cycled.
1. Press and release the Control Button within 1 second to turn the
display feature OFF.
2. Press and release the Control Button again within 1 second to
turn the display back ON.
Additional options can be set with
press and hold sequences of the
Control Button and are detailed
below.
OOS047094N
Page 110 of 505

3-26
Convenient features of your vehicle
To adjust the Zone setting:
1. Determine the desired Zone Number based upon your current
location on the Zone Map.
2. Press and hold the Control Button for up to 6 seconds, the current
Zone Number will appear on the
display.
3. Release and press the Control Button and then hold the Control
Button again will cause the num-
bers to increment (Note: they will
repeat …13, 14, 15, 1, 2, …).
Releasing the button when the
desired Zone Number appears on
the display will set the new Zone.
4. Within about 5 seconds the com- pass will start displaying a com-
pass heading again.
There are some conditions that can
cause changes to the vehicle mag-
nets, such as installing a ski rack or
a CB antenna. Body repair work on
the vehicle can also cause changes
to the vehicle's magnetic field. In
these situations, the compass will
need to be re-calibrated to correct
these changes. If you need to recalibrate the com-
pass:
1. Press and hold the Control Button
for more than 6 seconds. When
the compass memory is cleared, a
"C" will appear in the display.
2. Drive the vehicle in 2 complete cir- cles at less than 5 mph (8 km/h).
Integrated HomeLink®Wireless
Control System
The HomeLink®Wireless Control
System can replace up to three
hand-held radio-frequency (RF)
transmitters with a single built-in
device. This innovative feature will
learn the radio frequency codes of
most current transmitters to operate
devices such as gate operators,
garage door openers, entry door
locks, security systems, even home
lighting. Both standard and rolling
code-equipped transmitters can be
programmed by following the out-
lined procedures.
Additional HomeLink
®information
can be found at: www.homelink.com,
www.youtube.com/HomeLinkGentex
or by calling 1-800-355-3515. Retain the original transmitter of the
RF device you are programming for
use in other vehicles as well as for
future HomeLink
®programming. It is
also suggested that upon the sale of
the vehicle, the programmed
HomeLink
®buttons be erased for
security purposes.
Before programming HomeLink
®
to a garage door opener or gate
operator, make sure people and
objects are out of the way of the
device to prevent potential harm
or damage. Do not use the
HomeLink
®with any garage
door opener that lacks the safe-
ty stop and reverse features
required by U.S. federal safety
standards (this includes any
garage door opener model man-
ufactured before April 1, 1982). A
garage door that cannot detect
an object - signaling the door to
stop and reverse - does not meet
current U.S. federal safety stan-
dards. Using a garage door
opener without these features
increases the risk of serious
injury or death.
WARNING
Page 120 of 505

3-36
Convenient features of your vehicle
Power Windows
The ignition switch must be in the ON
position to be able to raise or lower
the windows. Each door has a Power
Window switch to control that door’s
window. The driver has a Power
Window Lock switch which can block
the operation of passenger windows.
The power windows will operate for
approximately 30 seconds after the
ignition switch is placed in the ACC
or LOCK/OFF position. However, if
the front doors are opened, the
Power Windows will not operate even
within the 30 second period.
Information
• In cold and wet climates, power win-dows may not work properly due to
freezing conditions.
• While driving with the rear win- dows down or with the sunroof (if
equipped) opened (or partially
opened), your vehicle may demon-
strate a wind buffeting or pulsation
noise. This noise is normal and can
be reduced or eliminated by taking
the following actions. If the noise
occurs with one or both of the rear
windows down, partially lower both
front windows approximately one
inch. If you experience the noise
with the sunroof open, slightly close
the sunroof.
Window opening and closing
To open:
Press the window switch down to the
first detent position (5). Release the
switch when you want the window to
stop.
To close:
Pull the window switch up to the first
detent position (5). Release the win-
dow switch when you want the win-
dow to stop.
i
To avoid serious injury or death,
do not extend your head, arms
or body outside the windows
while driving.
WARNING
OOS047018