2020 Hyundai Ioniq Hybrid fuel
[x] Cancel search: fuelPage 278 of 635
5-12
Driving your vehicle
Dual Clutch Transmission
Operation
The dual clutch transmission has six
forward speeds and one reverse
speed.
The individual speeds are selected
automatically when the shift lever is
in the D (Drive) position.
The dual clutch transmission can
be thought of as an automatically
shifting manual transmission. It
gives the driving feel of a manual
transmission, yet provides the
ease of a fully automatic transmis-
sion.
When D (Drive) is selected, the
transmission will automatically shift
through the gears similar to a con-
ventional automatic transmission.
Unlike a traditional automatic
transmission, the gear shifting can
sometimes be felt and heard as the
actuators engage the clutches and
the gears are selected.
The dual clutch transmission incor-
porates a dry-type dual clutch
mechanism, which allows for better
acceleration performance and
increased fuel efficiency while driv-
ing.
D DU
UA
AL
L
C
CL
LU
UT
TC
CH
H
T
TR
RA
AN
NS
SM
MI
IS
SS
SI
IO
ON
N
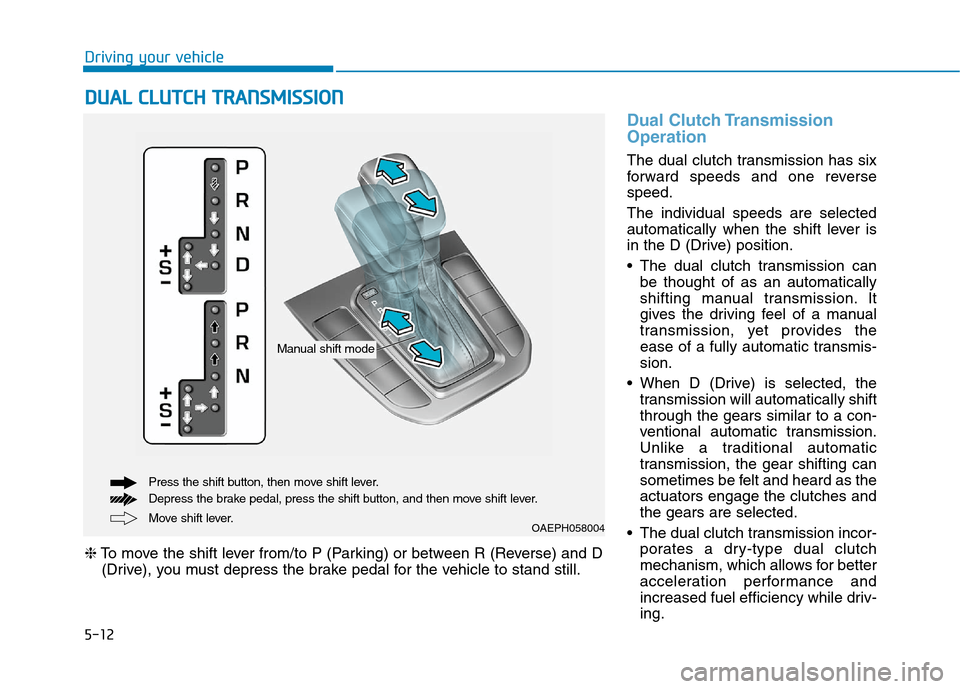
Move shift lever. Press the shift button, then move shift lever.
Depress the brake pedal, press the shift button, and then move shift lever.OAEPH058004
❈To move the shift lever from/to P (Parking) or between R (Reverse) and D
(Drive), you must depress the brake pedal for the vehicle to stand still.
Manual shift mode
Page 283 of 635
5-17
Driving your vehicle
R (Reverse)
Use this position to drive the vehicle
backward.
Always come to a complete stop
before shifting into or out of R
(Reverse); you may damage the
transmission if you shift into R
(Reverse) while the vehicle is in
motion.
N (Neutral)
The wheels and transmission are not
engaged.
Always depress the brake pedal
when you are shifting from N
(Neutral) to another gear.
D (Drive)
This is the normal driving position.
The transmission will automatically
shift through a six-gear sequence,
providing the best fuel economy and
power.
For extra power when passing anoth-
er vehicle or driving uphill depress
the accelerator pedal further until
you feel the transmission downshift
to a lower gear.
To stop the vehicle during driving,
please press brake pedal fully to pre-
vent unintended movement.If you drive the vehicle with the shift
lever in D (Drive), the vehicle will
automatically change to ECO mode.
The indicator will illuminate on
the instrument cluster.
When driving in ECO mode, the vehi-
cle improves fuel efficiency for eco-
friendly driving.
S (Sport)
If you drive the vehicle with the shift
lever in S (Sport), the vehicle will
automatically change to SPORT
mode. The indicator will illumi-
nate on the instrument cluster.
When driving in SPORT mode, the
vehicle provides sporty but firm rid-
ing.
Information
In SPORT mode, the fuel efficiency
may decrease.
i
NOTICE
5
Do not drive with the shift lever
in N (Neutral). The engine brake
will not work and lead to an
accident.
WARNING
Do not shift into gear unless
your foot is firmly on the brake
pedal. Shifting into gear when
the engine is running at high
speed can cause the vehicle to
move very rapidly. You could
lose control of the vehicle and
hit people or objects.
WARNING
Page 291 of 635

5-25
Driving your vehicle
5
The coasting guide function informs
the driver when to take the foot off
from the accelerator by anticipating a
decelerating event* based on the
analysis of driving routes and road
conditions of the navigation. It
encourages the driver to remove foot
from the pedal and allow coasting
down the road with EV motor only.
This helps prevent unnecessary fuel
consumption and increases fuel effi-
ciency.
Information
Example of a deceleration event is
making a right/left turn, driving
through a rotary, entering or exiting a
highway (freeway), etc. The driver can activate the coasting
guide by placing the ignition switch in
the ON position and by selecting:
User Settings →Convenience →
Coasting Guide
For the explanation of the system,
press and hold the [OK] button.
Operation conditions
To activate the system, take the fol-
lowing procedures. Enter your desti-
nation information on the navigation
and select the driving route. Have the
vehicle in ECO mode by driving the
vehicle in D (Drive). Then, satisfy the
following.
- The operational speed is above 25
mph (40 km/h).
Information
The operating speed may vary due to
difference between instrument cluster
and navigation effected by tire infla-
tion level.
Information
Coasting guide is only a supplemental
system to assist with fuel-efficient
driving. Thus, the operating condi-
tions may be different in accordance
with traffic/road conditions (i.e. driv-
ing in a traffic jam, driving on a slope,
driving on a curve). Thus, take the
actual driving conditions into consid-
eration, such as distances from the
vehicles ahead/behind, while referring
to the coasting guide system as guid-
ance.
i
i
i
C CO
OA
AS
ST
TI
IN
NG
G
G
GU
UI
ID
DE
E
(
(I
IF
F
E
EQ
QU
UI
IP
PP
PE
ED
D)
)
OAEPH047504L/OAEPH059618L ■Type A■Type B
Page 426 of 635
5-160
Driving your vehicle
Driving too fast through large pud-
dles can affect your brakes. If you
must go through puddles, try to
drive through them slowly.
If you believe your brakes may be
wet, apply them lightly while driv-
ing until normal braking operation
returns.
Hydroplaning
If the road is wet enough and you are
going fast enough, your vehicle may
have little or no contact with the road
surface and actually ride on the
water. The best advice is SLOW
DOWN when the road is wet.
The risk of hydroplaning increas-
es as the depth of tire tread
decreases, refer to "Tire Tread" in
chapter 7.
Driving in Flooded Areas
Avoid driving through flooded areas
unless you are sure the water is no
higher than the bottom of the wheel
hub. Drive through any water slowly.
Allow adequate stopping distance
because brake performance may be
reduced.
After driving through water, dry the
brakes by gently applying them sev-
eral times while the vehicle is moving
slowly.
Highway Driving
Tires
Adjust the tire inflation, as specified.
Under-inflation may overheat or
damage the tires.
Do not install worn-out or damaged
tires, which may reduce traction or
adversely affect vehicle handling.
This could lead to sudden tire failure
that may cause loss of vehicle con-
trol resulting in an accident.
Information
Never over-inflate your tires above the
maximum inflation pressure, as speci-
fied on your tires.
Fuel, engine coolant and engine
oil
Driving at higher speeds on the high-
way consumes more fuel and is less
efficient than driving at a slower,
more moderate speed. Maintain a
moderate speed in order to conserve
fuel when driving on the highway.
Be sure to check both the engine
coolant level and the engine oil
before driving.
Drive belt
A loose or damaged drive belt may
overheat the engine.
i
In a rollover crash, an unbelted
person is significantly more
likely to die than a person wear-
ing a seat belt. Make sure all
passengers are wearing their
seat belts.
WARNING
Page 431 of 635
5-165
Driving your vehicle
5
Two labels on your driver's door sill
show how much weight your vehicle
was designed to carry: the Tire and
Loading Information Label and the
Certification Label.
Before loading your vehicle, familiar-
ize yourself with the following terms
for determining your vehicle's weight
ratings, from the vehicle's specifica-
tions and the Certification Label:
Base Curb Weight
This is the weight of the vehicle
including a full tank of fuel and all
standard equipment. It does not
include passengers, cargo, or option-
al equipment.
Vehicle Curb Weight
This is the weight of your new vehicle
when you picked it up from your deal-
er plus any aftermarket equipment.Cargo Weight
This figure includes all weight added
to the Base Curb Weight, including
cargo and optional equipment.
GAW (Gross Axle Weight)
This is the total weight placed on
each axle (front and rear) - including
vehicle curb weight and all payload.
GAWR (Gross Axle Weight Rating)
This is the maximum allowable
weight that can be carried by a single
axle (front or rear). These numbers
are shown on the Certification Label.
The total load on each axle must
never exceed its GAWR.GVW (Gross Vehicle Weight)
This is the Base Curb Weight plus
actual Cargo Weight plus passen-
gers.
GVWR (Gross Vehicle Weight
Rating)
This is the maximum allowable
weight of the fully loaded vehicle
(including all options, equipment,
passengers and cargo). The GVWR
is shown on the Certification Label
located on the driver’s door sill.
V VE
EH
HI
IC
CL
LE
E
L
LO
OA
AD
D
L
LI
IM
MI
IT
T
Page 435 of 635

5-169
Driving your vehicle
5
Certification label
The certification label is located on
the driver's door sill at the center pil-
lar and shows the maximum allow-
able weight of the fully loaded vehi-
cle. This is called the GVWR (Gross
Vehicle Weight Rating). The GVWR
includes the weight of the vehicle, all
occupants, fuel and cargo.
This label also tells you the maxi-
mum weight that can be supported
by the front and rear axles, called
Gross Axle Weight Rating (GAWR).The total weight of the vehicle,
including all occupants, accessories,
cargo, and trailer tongue load must
not exceed the Gross Vehicle Weight
Rating (GVWR) or the Gross Axle
Weight Rating (GAWR). To find out
the actual loads on your front and
rear axles, you need to go to a weigh
station and weigh your vehicle. Be
sure to spread out your load equally
on both sides of the centerline.
OBH059070
Overloading
Never exceed the GVWR for
your vehicle, the GAWR for
either the front or rear axle
and vehicle capacity weight.
Exceeding these ratings can
affect your vehicle's handling
and braking ability, and cause
an accident.
Do not overload your vehicle.
Overloading your vehicle can
cause heat buildup in your
vehicle's tires and possible
tire failure, increased stop-
ping distances and poor vehi-
cle handling-all of which may
result in a crash.
WARNING
Page 439 of 635
6-3
What to do in an emergency
If You Have a Flat Tire While
Driving
If a tire goes flat while you are driving:
Take your foot off the accelerator
pedal and let the vehicle slow
down while driving straight ahead.
Do not apply the brakes immedi-
ately or attempt to pull off the road
as this may cause loss of vehicle
control resulting in an accident.
When the vehicle has slowed to
such a speed that it is safe to do
so, brake carefully and pull off the
road. Drive off the road as far as
possible and park on firm, level
ground. If you are on a divided
highway, do not park in the median
area between the two traffic lanes.
When the vehicle is stopped, press
the hazard warning flasher button,
move the shift lever into P (Park),
and apply the parking brake, and
place the Engine Start/Stop button
in the OFF position.
Have all passengers get out of the
vehicle. Be sure they all get out on
the side of the vehicle that is away
from traffic.
When changing a flat tire, follow
the instructions provided later in
this chapter.
Hybrid vehicle
Be sure the shift lever is in P
(Park). The vehicle starts only
when the shift lever is in P (Park).
This vehicle does not have a regu-
lar 12V battery that needs periodic
replacement. It is lithium ion poly-
mer type integrated into the HEV
high voltage battery. The vehicle
has a 12V battery protection sys-
tem that cuts 12V battery from
vehicle draw to prevent full dis-
charge. If vehicle will not start, first
try pressing the 12V Battery Reset
switch (left side of the steering
wheel near the fuel door open
switch) to reconnect the 12V bat-
tery, but you must start vehicle
within 15 seconds of pressing the
12V Battery Reset switch. After
starting vehicle, operate the vehi-
cle safely outdoors in ready mode
stopped and/or drive it for 30 min-
utes total to charge the 12V battery
fully.Push or pull starting the vehicle
may cause the catalytic converter
to overload which can lead to
damage to the emission control
system.
Check the fuel level and add fuel if
necessary.
If the vehicle still does not start, have
your vehicle checked by an author-
ized HYUNDAI dealer.
NOTICE
6
I IF
F
T
TH
HE
E
V
VE
EH
HI
IC
CL
LE
E
W
WI
IL
LL
L
N
NO
OT
T
S
ST
TA
AR
RT
T
Page 440 of 635
6-4
Plug-in hybrid vehicle
Be sure the shift lever is in P
(Park). The engine starts only
when the shift lever is in P (Park).
Check the battery connections to
be sure they are clean and tight.
Turn on the interior light. If the light
dims or goes out when you operate
the starter, the battery is drained.
Do not push or pull the vehicle to
start it. This could cause damage to
your vehicle. See instructions for
"Jump Starting" provided in this
chapter. Check the fuel level and add fuel if
necessary.
If the engine still does not start, have
your vehicle checked by an author-
ized HYUNDAI dealer.
What to do in an emergency
Push or pull starting the vehicle
may cause the catalytic con-
verter to overload which can
lead to damage to the emission
control system.
CAUTION