2020 Hyundai Ioniq Hybrid change wheel
[x] Cancel search: change wheelPage 415 of 613
5-101
Driving your vehicle
5
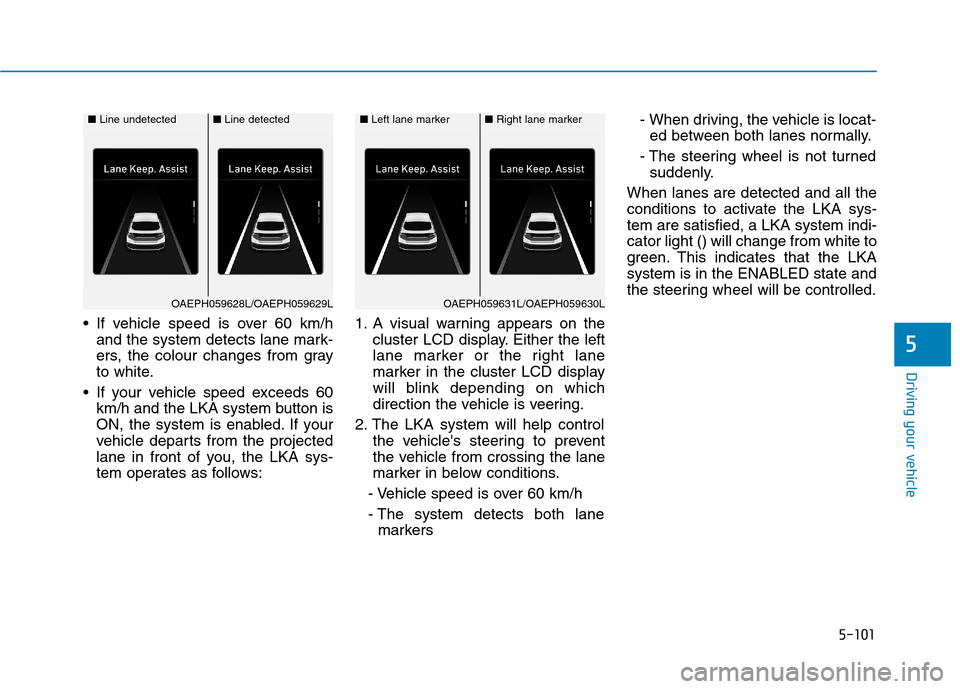
If vehicle speed is over 60 km/h
and the system detects lane mark-
ers, the colour changes from gray
to white.
If your vehicle speed exceeds 60
km/h and the LKA system button is
ON, the system is enabled. If your
vehicle departs from the projected
lane in front of you, the LKA sys-
tem operates as follows:1. A visual warning appears on the
cluster LCD display. Either the left
lane marker or the right lane
marker in the cluster LCD display
will blink depending on which
direction the vehicle is veering.
2. The LKA system will help control
the vehicle's steering to prevent
the vehicle from crossing the lane
marker in below conditions.
- Vehicle speed is over 60 km/h
- The system detects both lane
markers- When driving, the vehicle is locat-
ed between both lanes normally.
- The steering wheel is not turned
suddenly.
When lanes are detected and all the
conditions to activate the LKA sys-
tem are satisfied, a LKA system indi-
cator light () will change from white to
green. This indicates that the LKA
system is in the ENABLED state and
the steering wheel will be controlled.
■Line undetected■Line detected
OAEPH059628L/OAEPH059629L
■Left lane marker■Right lane marker
OAEPH059631L/OAEPH059630L
Page 418 of 613
5-104
Driving your vehicle
The LKA system will not be in the
ENABLED state and the steering
wheel will not be assisted when:
The turn signal is turned on before
changing a lane. If you change
lanes without the turn signal on,
the steering wheel might be con-
trolled.
The vehicle is not driven in the mid-
dle of the lane when the system is
turned on or right after changing a
lane.
ESC (Electronic Stability Control) or
VSM (Vehicle Stability Management)
is activated.
The vehicle is driven on a sharp
curve.
Vehicle speed is below 60 km/h or
over 180 km/h.
The vehicle makes sharp lane
changes.
The vehicle brakes suddenly.
Only one lane marker is detected.
The lane is very wide or narrow. There are more than two lane
markers on the road. (e.g. construc-
tion area)
The vehicle is driven on a steep
incline.
The steering wheel is turned sud-
denly.
The system may not operate for 15
seconds after the engine is started
or the camera is initialised or
rebooting of the front view camera.
Limitations of the System
The LKA system may operate pre-
maturely even if the vehicle does not
depart from the intended lane, OR,
the LKA system may not assist your
steering or warn you if the vehicle
leaves the intended lane under the
following circumstances:
When the lane and road condi-
tions are poor
It is difficult to distinguish the lane
marking from the road surface or
the lane marking is faded or not
clearly marked.
It is difficult to distinguish the color
of the lane marker from the road.
There are markings on the road
surface that look like a lane marker
that is inadvertently being detected
by the camera.
The lane marker is indistinct or
damaged.
The lane marker is merged or
divided. (e.g. tollgate)
The lane number increases or
decreases or the lane marker are
crossing complicatedly.
Page 420 of 613
5-106
Driving your vehicle
LKA system function change
The driver can change LKA to Lane
Departure Warning (LDW) or change
the LKA mode between Standard
LKA and Active LKA from the LCD
display. Go to the 'User settings →
Driver assistance →Lane safety →
LDW (Lane Departure
Warning)/Standard LKA/Active LKA'.
The system is automatically set to
Standard LKA if a function is not
selected.
LDW (Lane Departure Warning)
LDW system alerts the driver with a
visual warning and a warning alarm
when the system detects the vehicle
departing the lane. The steering
wheel will not be controlled.
Standard LKA (Lane Keep
Assist)
The Standard LKA mode guides the
driver to help keep the vehicle within
the lanes. It rarely controls the steer-
ing wheel, when the vehicle drives
well inside the lanes. However, it
starts to control the steering wheel,
when the vehicle is about to deviate
out of the lanes.
Active LKA (Lane Keep Assist)
The Active LKA mode provides more
frequent steering wheel control in
comparison with the Standard LKA
mode. Active LKA can reduce the dri-
ver’s fatigue to assist the steering for
maintaining the vehicle in the middle
of the lane.
Page 464 of 613
5-150
Driving your vehicle
Hazardous driving conditions
When hazardous driving elements
are encountered such as water,
snow, ice, mud and sand, take the
bellow suggestions:
Drive cautiously and keep a longer
braking distance.
Avoid abrupt braking or steering.
When your vehicle is stuck in snow,
mud, or sand, use second gear.
Accelerate slowly to avoid unnec-
essary wheel spin.
Put sand, rock salt, tyre chains or
other non-slip materials under the
wheels to provide additional trac-
tion whilst the vehicle becomes
stuck in ice, snow, or mud.
Rocking the vehicle
If it is necessary to rock the vehicle
to free it from snow, sand, or mud,
first turn the steering wheel right and
left to clear the area around your
front wheels. Then, shift back and
forth between R (Reverse) and a for-
ward gear.
Try to avoid spinning the wheels, and
do not race the engine.
To prevent transmission wear, wait
until the wheels stop spinning before
shifting gears. Release the accelera-
tor pedal whilst shifting, and press
lightly on the accelerator pedal whilst
the transmission is in gear. Slowly
spinning the wheels in forward and
reverse directions causes a rocking
motion that may free the vehicle.
S SP
PE
EC
CI
IA
AL
L
D
DR
RI
IV
VI
IN
NG
G
C
CO
ON
ND
DI
IT
TI
IO
ON
NS
S
Downshifting with a dual clutch
transmission whilst driving on
slippery surfaces can cause an
accident. The sudden change in
tyre speed could cause the
tyres to skid. Be careful when
downshifting on slippery sur-
faces.
WARNING
If the vehicle is stuck and
excessive wheel spin occurs,
the temperature in the tyres can
increase very quickly. If the
tyres become damaged, a tyre
blow out or tyre explosion can
occur. This condition is danger-
ous - you and others may be
injured. Do not attempt this pro-
cedure if people or objects are
anywhere near the vehicle.
If you attempt to free the vehi-
cle, the vehicle can overheat
quickly, possibly causing an
engine compartment fire or
other damage. Try to avoid spin-
ning the wheels as much as
possible to prevent overheating
of either the tyres or the engine.
DO NOT allow the vehicle to
spin the wheels above 56 km/h.
WARNING
Page 494 of 613
6-21
What to do in an emergency
6
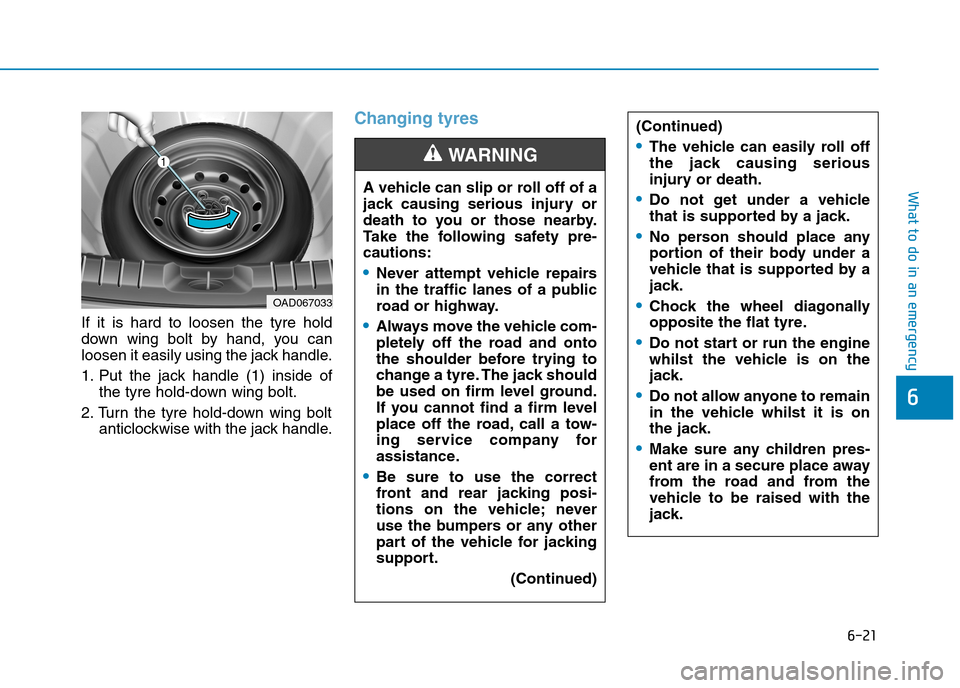
If it is hard to loosen the tyre hold
down wing bolt by hand, you can
loosen it easily using the jack handle.
1. Put the jack handle (1) inside of
the tyre hold-down wing bolt.
2. Turn the tyre hold-down wing bolt
anticlockwise with the jack handle.
Changing tyres
A vehicle can slip or roll off of a
jack causing serious injury or
death to you or those nearby.
Take the following safety pre-
cautions:
Never attempt vehicle repairs
in the traffic lanes of a public
road or highway.
Always move the vehicle com-
pletely off the road and onto
the shoulder before trying to
change a tyre. The jack should
be used on firm level ground.
If you cannot find a firm level
place off the road, call a tow-
ing service company for
assistance.
Be sure to use the correct
front and rear jacking posi-
tions on the vehicle; never
use the bumpers or any other
part of the vehicle for jacking
support.
(Continued)
WARNING
(Continued)
The vehicle can easily roll off
the jack causing serious
injury or death.
Do not get under a vehicle
that is supported by a jack.
No person should place any
portion of their body under a
vehicle that is supported by a
jack.
Chock the wheel diagonally
opposite the flat tyre.
Do not start or run the engine
whilst the vehicle is on the
jack.
Do not allow anyone to remain
in the vehicle whilst it is on
the jack.
Make sure any children pres-
ent are in a secure place away
from the road and from the
vehicle to be raised with the
jack.
OAD067033
Page 495 of 613
6-22
What to do in an emergency
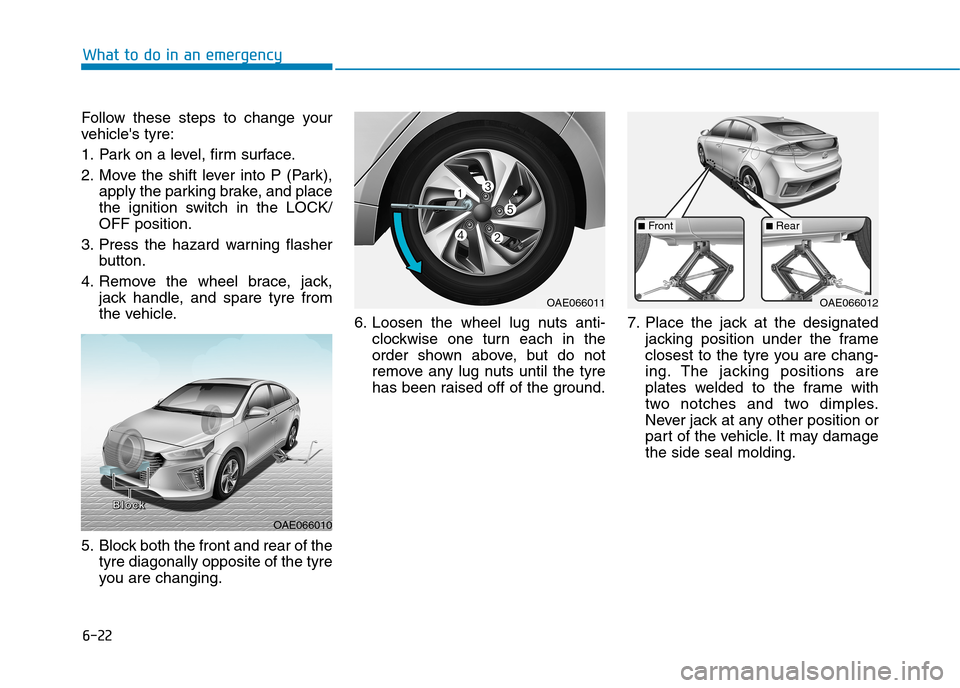
Follow these steps to change your
vehicle's tyre:
1. Park on a level, firm surface.
2. Move the shift lever into P (Park),
apply the parking brake, and place
the ignition switch in the LOCK/
OFF position.
3. Press the hazard warning flasher
button.
4. Remove the wheel brace, jack,
jack handle, and spare tyre from
the vehicle.
5. Block both the front and rear of the
tyre diagonally opposite of the tyre
you are changing.6. Loosen the wheel lug nuts anti-
clockwise one turn each in the
order shown above, but do not
remove any lug nuts until the tyre
has been raised off of the ground.7. Place the jack at the designated
jacking position under the frame
closest to the tyre you are chang-
ing. The jacking positions are
plates welded to the frame with
two notches and two dimples.
Never jack at any other position or
part of the vehicle. It may damage
the side seal molding.
OAE066010
B B B B
l l l l
o o o o
c c c c
k k k k
OAE066011OAE066012
■Front■Rear
Page 497 of 613
6-24
What to do in an emergency
If you have a tyre gauge, check the
tyre pressure (see "Tyres and
Wheels" in chapter 8 for tyre pres-
sure instructions.). If the pressure is
lower or higher than recommended,
drive slowly to the nearest service
station and adjust it to the recom-
mended pressure. Always reinstall
the valve cap after checking or
adjusting tyre pressure. If the cap is
not replaced, air may leak from the
tyre. If you lose a valve cap, buy
another and install it as soon as pos-
sible. After changing tyres, secure
the flat tyre and return the jack and
tools to their proper storage loca-
tions.
Check the tyre pressure as soon
as possible after installing a spare
tyre. Adjust it to the recommend-
ed pressure.If any of the equipment such as the
jack, lug nuts, studs, or other equip-
ment is damaged or in poor condi-
tion, do not attempt to change the
tyre and call for assistance.
Check and tighten the tyre wheel lug
nuts after driving over 50km if tyres
are replaced. Re-check the tyre
wheel lug nuts after driving over
1,000km.
Use of compact spare tyres
(if equipped)
Compact spare tyres are designed
for emergency use only. Drive care-
fully on the compact spare tyre and
always follow the safety precautions.
NOTICE
Your vehicle has metric threads
on the studs and lug nuts. Make
certain during tyre changing
that the same nuts that were
removed are reinstalled. If you
have to replace your lug nuts
make sure they have metric
threads to avoid damaging the
studs and ensure the wheel is
properly secured to the hub. We
recommend that you consult an
authorised HYUNDAI dealer for
assistance.
CAUTION
To prevent compact spare tyre
failure and loss of control pos-
sibly resulting in an accident:
Use the compact spare tyre
only in an emergency.
NEVER operate your vehicle
over 80 km/h (50 mph).
Do not exceed the vehicle’s
maximum load rating or the
load carrying capacity shown
on the sidewall of the com-
pact spare tyre.
Do not use the compact spare
tyre continuously. Repair or
replace the original tyre as
soon as possible to avoid fail-
ure of the compact spare tyre.
WARNING
Page 525 of 613
7-7
7
Maintenance
Owner maintenance schedule
When you stop for fuel:
Check the engine oil level.
Check the coolant level in the
engine coolant reservoir.
Check the windscreen washer fluid
level.
Check for low or under-inflated
tyres.
Whilst operating your vehicle:
Note any changes in the sound of
the exhaust or any smell of
exhaust fumes in the vehicle.
Check for vibrations in the steering
wheel. Notice if there is any
increased steering effort or loose-
ness in the steering wheel, or
change in its straight-ahead posi-
tion.
Notice if your vehicle constantly
turns slightly or “pulls” to one side
when travelling on smooth, level
road.
When stopping, listen and check
for unusual sounds, pulling to one
side, increased brake pedal travel
or “hard-to-push” brake pedal.
If any slipping or changes in the
operation of your transmission
occurs, check the transmission
fluid level.
Check the dual clutch transmission
P (Park) function.
Check the parking brake.
Check for fluid leaks under your
vehicle (water dripping from the air
conditioning system during or after
use is normal).
At least monthly:
Check coolant level in the engine
coolant reservoir.
Check the operation of all exterior
lights, including the stoplights, turn
signals and hazard warning flashers.
Check the inflation pressures of all
tyres including the spare for tyres
that are worn, show uneven wear,
or are damaged.
Check for loose wheel lug nuts.
At least twice a year:
(i.e., every Spring and Autumn)
Check radiator, heater and air condi-
tioning hoses for leaks or damage.
Check windscreen washer spray
and wiper operation. Clean wiper
blades with a clean cloth damp-
ened with washer fluid.
Check headlamp alignment.
Check muffler, exhaust pipes,
shields and clamps.
Check the seat belts for wear and
function. Be careful when checking your
engine coolant/inverter coolant
level when the engine is hot.
This may result in coolant being
blown out of the opening and
cause serious burns and other
injuries.
WARNING