Page 385 of 561
6-3
What to do in an emergency
If you Have a Flat Tire While
Driving
If a tire goes flat while you are driving:
Take your foot off the accelerator
pedal and let the vehicle slow down
while driving straight ahead. Do not
apply the brakes immediately to
slow down the vehicle, but use the
paddle shifter (left side lever) to
increase regenerative braking con-
trol. Also, do not or attempt to pull
off the road as this may cause loss
of vehicle control resulting in an
accident. When the vehicle has
slowed to such a speed that it is
safe to do so, brake carefully and
pull off the road. Drive off the road
as far as possible and park on firm,
level ground. If you are on a divided
highway, do not park in the median
area between the two traffic lanes.
When the vehicle is stopped, press
the hazard warning flasher button,
shift to P(Park), apply the parking
brake, and place the POWER but-
ton in the OFF position. Have all passengers get out of the
vehicle. Be sure they all get out on
the side of the vehicle that is away
from traffic.
When changing a flat tire, follow
the instructions provided later in
this chapter.
Confirm the EV Battery Is Not
Low on the Charge Gauge
Be sure the gear is in P (Park). The
vehicle starts only when the gear is
in P (Park).
Check the 12-volt battery connec-
tions to be sure they are clean and
tight.
Turn on the interior light. If the light
dims or goes out when you operate
the starter, the battery is drained.
Do not push or pull the vehicle to
start it. This could cause damage to
your vehicle. See instructions for
"Jump Starting" provided in this
chapter.
6
I IF
F
T
TH
HE
E
V
VE
EH
HI
IC
CL
LE
E
W
WI
IL
LL
L
N
NO
OT
T
S ST
TA
AR
RT
T
Page 387 of 561
6-5
What to do in an emergency
6
Information
An inappropriately disposed
battery can be harmful to the
environment and human
health. Dispose the battery
according to your local law(s)
or regulations.
To prevent damage to your vehi-
cle:
Only use a 12-volt power supply
(battery or jumper system) to
jump start your vehicle.
Do not attempt to jump start
your vehicle by push-starting.
Jump starting procedure
1. Position the vehicles close enough
that the jumper cables will reach,
but do not allow the vehicles to
touch.
2. Avoid fans or any moving parts in
the motor compartment at all
times, even when the vehicles are
turned off.
3. Turn off all electrical devices such
as radios, lights, air conditioning,
etc. Put the vehicles in P (Park)
and set the parking brakes. Turn
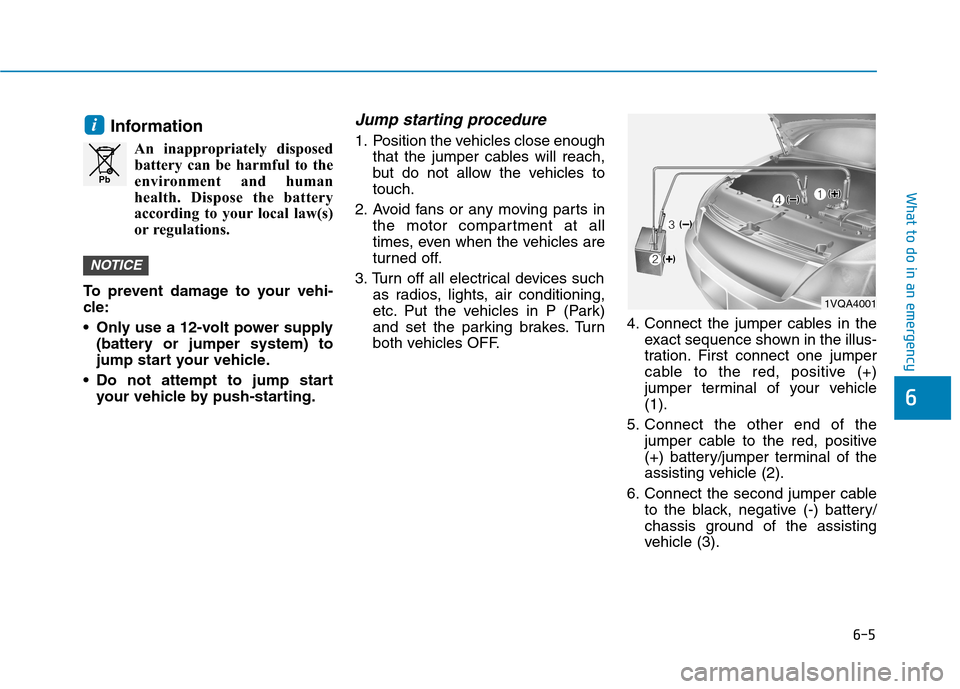
both vehicles OFF.4. Connect the jumper cables in the
exact sequence shown in the illus-
tration. First connect one jumper
cable to the red, positive (+)
jumper terminal of your vehicle
(1).
5. Connect the other end of the
jumper cable to the red, positive
(+) battery/jumper terminal of the
assisting vehicle (2).
6. Connect the second jumper cable
to the black, negative (-) battery/
chassis ground of the assisting
vehicle (3).
NOTICE
i
Pb
1VQA4001
Page 404 of 561
6-22
What to do in an emergency
When towing your vehicle in an
emergency without wheel dollies:
1. While depressing the brake pedal
shift to the N (Neutral) position
and turn the vehicle off. The
POWER button will be in the ACC
position.
2. Release the parking brake.
Failure to shift to N (Neutral) may
cause internal damage to the vehi-
cle.
Removable Towing Hook
1. Open the liftgate, and remove the
towing hook from the tool case.
2. Remove the hole cover by press-
ing the lower part of the cover on
the front or rear bumper.
3. Install the towing hook by turning it
clockwise into the hole until it is
fully secured.
4. Remove the towing hook and
install the cover after use.
NOTICE
If your vehicle is equipped with
a rollover sensor, place the
POWER button in the OFF or
ACC position when the vehicle
is being towed. The side impact
and curtain air bag may deploy
if the sensor detects the situa-
tion as a rollover.
WARNING
OAEE066010N
OAEE066011N
OAEE066013N
■Front
■Rear
Page 405 of 561
6-23
What to do in an emergency
6
Emergency Towing
If towing is necessary, we recom-
mend you have it done by an author-
ized HYUNDAI dealer or a commer-
cial tow truck service.
If towing service is not available in an
emergency, your vehicle may be
temporarily towed using a cable or
chain secured to the emergency tow-
ing hook at the front (or rear) of the
vehicle.
Use extreme caution when towing
the vehicle with a cable or chain. A
driver must be in the vehicle to steer
it and operate the brakes.
Towing in this manner may be done
only on hard-surfaced roads for a
short distance and at low speeds.
Also, the wheels, axles, power train,
steering and brakes must all be in
good condition.Always follow these emergency tow-
ing precautions:
While depressing the brake pedal
shift to the N (Neutral) position and
turn the vehicle off. The POWER
button will be in the ACC position.
Release the parking brake.
Depress the brake pedal with more
force than normal since you will
have reduced braking perform-
ance.
More steering effort will be
required because the power steer-
ing system will be disabled.
Use a vehicle heavier than your
own to tow your vehicle.
The drivers of both vehicles should
communicate with each other fre-
quently.
Before emergency towing, check
that the hook is not broken or dam-
aged.
Fasten the towing cable or chain
securely to the hook.
Do not jerk the hook. Apply steady
and even force. The driver must be in the vehi-
cle for steering and braking
operations when the vehicle is
being towed. Passengers other
than the driver must not be in
the vehicle.CAUTION
Page 411 of 561
7-5
7
Maintenance
O OW
WN
NE
ER
R
M
MA
AI
IN
NT
TE
EN
NA
AN
NC
CE
E
The following lists are vehicle checks
and inspections that should be per-
formed by the owner or an author-
ized HYUNDAI dealer at the frequen-
cies indicated to help ensure safe,
dependable operation of your vehi-
cle.
Any adverse conditions should be
brought to the attention of your deal-
er as soon as possible.
These Owner Maintenance vehicle
checks are generally not covered by
warranties and you may be charged
for labor, parts and lubricants used. Performing maintenance work
on a vehicle can be dangerous.
If you lack sufficient knowledge
and experience or the proper
tools and equipment to do the
work, have it done by an author-
ized HYUNDAI dealer.
ALWAYS follow these precau-
tions for performing mainte-
nance work:
•Park your vehicle on level
ground, shift to the P (Park)
position, apply the parking
brake, and place the POWER
button in the OFF position.
(Continued)
WARNING (Continued)
Block the tires (front and
back) to prevent the vehicle
from moving.
Remove loose clothing or jew-
elry that can become entan-
gled in moving parts.
Keep flames, sparks, or smok-
ing materials away from the
battery related parts.
Page 412 of 561
7-6
Maintenance
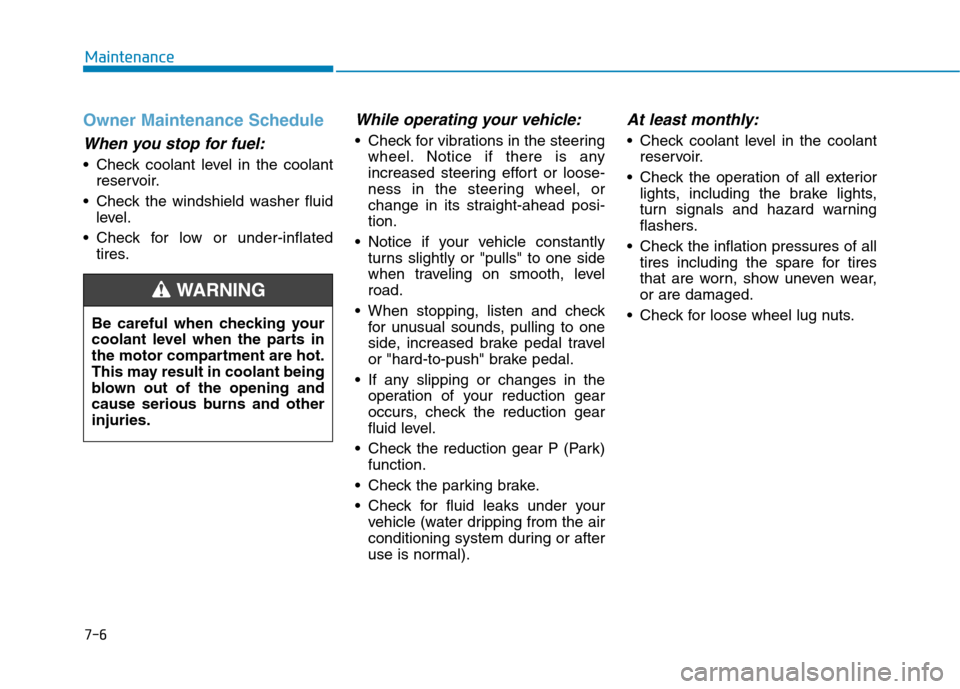
Owner Maintenance Schedule
When you stop for fuel:
• Check coolant level in the coolant
reservoir.
Check the windshield washer fluid
level.
Check for low or under-inflated
tires.
While operating your vehicle:
Check for vibrations in the steering
wheel. Notice if there is any
increased steering effort or loose-
ness in the steering wheel, or
change in its straight-ahead posi-
tion.
Notice if your vehicle constantly
turns slightly or "pulls" to one side
when traveling on smooth, level
road.
When stopping, listen and check
for unusual sounds, pulling to one
side, increased brake pedal travel
or "hard-to-push" brake pedal.
If any slipping or changes in the
operation of your reduction gear
occurs, check the reduction gear
fluid level.
Check the reduction gear P (Park)
function.
Check the parking brake.
Check for fluid leaks under your
vehicle (water dripping from the air
conditioning system during or after
use is normal).
At least monthly:
Check coolant level in the coolant
reservoir.
Check the operation of all exterior
lights, including the brake lights,
turn signals and hazard warning
flashers.
Check the inflation pressures of all
tires including the spare for tires
that are worn, show uneven wear,
or are damaged.
Check for loose wheel lug nuts.
Be careful when checking your
coolant level when the parts in
the motor compartment are hot.
This may result in coolant being
blown out of the opening and
cause serious burns and other
injuries.
WARNING
Page 450 of 561
7-44
Maintenance
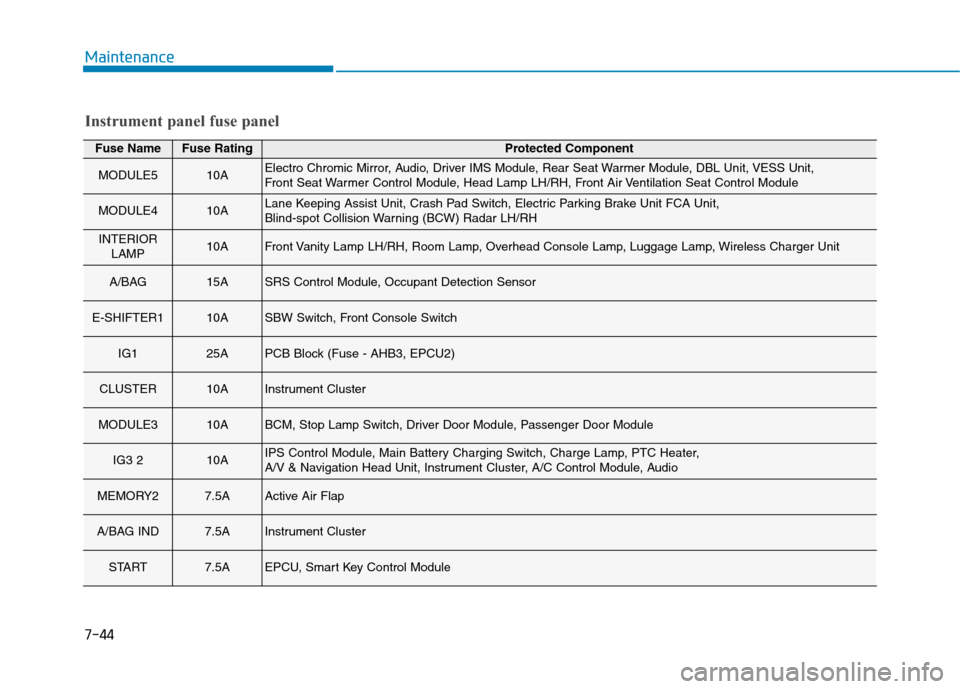
Fuse NameFuse RatingProtected Component
MODULE510AElectro Chromic Mirror, Audio, Driver IMS Module, Rear Seat Warmer Module, DBL Unit, VESS Unit,
Front Seat Warmer Control Module, Head Lamp LH/RH, Front Air Ventilation Seat Control Module
MODULE410ALane Keeping Assist Unit, Crash Pad Switch, Electric Parking Brake Unit FCA Unit,
Blind-spot Collision Warning (BCW) Radar LH/RH
INTERIOR
LAMP10AFront Vanity Lamp LH/RH, Room Lamp, Overhead Console Lamp, Luggage Lamp, Wireless Charger Unit
A/BAG 15ASRS Control Module, Occupant Detection Sensor
E-SHIFTER110ASBW Switch, Front Console Switch
IG125APCB Block (Fuse - AHB3, EPCU2)
CLUSTER10AInstrument Cluster
MODULE310ABCM, Stop Lamp Switch, Driver Door Module, Passenger Door Module
IG3 210AIPS Control Module, Main Battery Charging Switch, Charge Lamp, PTC Heater,
A/V & Navigation Head Unit, Instrument Cluster, A/C Control Module, Audio
MEMORY27.5AActive Air Flap
A/BAG IND7.5AInstrument Cluster
START7.5AEPCU, Smart Key Control Module
Instrument panel fuse panel
Page 456 of 561
7-50
Maintenance
Motor compartment fuse panel
Fuse NameFuse RatingProtected Component
B/UP LAMP10AE/R Junction Block (B/UP Lamp Relay), Multipurpose Check Connector
POWER
OUTLET140AE/R Junction Block (Power Outlet Relay)
H/LAMP HI10AE/R Junction Block (Head Lamp (HI) Relay)
AHB130AIBAU, Multipurpose Check Connector
AHB240AIBAU, Multipurpose Check Connector
EPB130AElectric Parking Brake Unit
EPB230AElectric Parking Brake Unit
B+140AIGPM (Fuse - BRAKE SWITCH, MODULE1, DOOR LOCK, PDM1, PDM2,
Fuse Switch, Leak Current Autocut Device)
BATT C/FAN25AE/R Junction Block (Battery C/Fan Relay)