2020 Hyundai Ioniq Electric tires
[x] Cancel search: tiresPage 371 of 561
5-135
Driving your vehicle
5
Hazardous Driving Conditions
When hazardous driving elements
are encountered such as water,
snow, ice, mud and sand, take the
bellow suggestions:
Drive cautiously and keep a longer
braking distance.
Avoid abrupt braking or steering.
When your vehicle is stuck in snow,
mud, or sand, use second gear.
Accelerate slowly to avoid unnec-
essary wheel spin.
Put sand, rock salt, tire chains or
other non-slip materials under the
wheels to provide additional trac-
tion while the vehicle becomes
stuck in ice, snow, or mud.
Rocking the Vehicle
If it is necessary to rock the vehicle
to free it from snow, sand, or mud,
first turn the steering wheel right and
left to clear the area around your
front wheels. Then, shift back and
forth between R (Reverse) and a for-
ward gear.
Try to avoid spinning the wheels, and
do not race the vehicle.
To prevent reduction gear wear, wait
until the wheels stop spinning before
shifting gears. Release the accelera-
tor pedal while shifting, and press
lightly on the accelerator pedal while
the reduction gear is in gear. Slowly
spinning the wheels in forward and
reverse directions causes a rocking
motion that may free the vehicle.
S SP
PE
EC
CI
IA
AL
L
D
DR
RI
IV
VI
IN
NG
G
C
CO
ON
ND
DI
IT
TI
IO
ON
NS
S
If the vehicle is stuck and
excessive wheel spin occurs,
the temperature in the tires can
increase very quickly. If the tires
become damaged, a tire blow
out or tire explosion can occur.
This condition is dangerous -
you and others may be injured.
Do not attempt this procedure if
people or objects are anywhere
near the vehicle.
If you attempt to free the vehi-
cle, the vehicle can overheat
quickly, possibly causing an
motor compartment fire or
other damage. Try to avoid spin-
ning the wheels as much as
possible to prevent overheating
of either the tires or the vehicle.
DO NOT allow the vehicle to
spin the wheels above 56 km/h
(35 mph).
WARNING
Page 372 of 561
5-136
Driving your vehicle
Information
The ESC system (if equipped) must be
turned OFF before rocking the vehi-
cle.
If you are still stuck after rocking
the vehicle a few times, have the
vehicle pulled out by a tow vehicle
to avoid vehicle overheating, pos-
sible damage to the reduction
gear and tire damage. See
"Towing" in chapter 6.
Smooth Cornering
Avoid braking or gear changing in
corners, especially when roads are
wet. Ideally, corners should always
be taken under gentle acceleration.
Driving at Night
Night driving presents more hazards
than driving in the daylight. Here are
some important tips to remember:
Slow down and keep more dis-
tance between you and other vehi-
cles, as it may be more difficult to
see at night, especially in areas
where there may not be any street
lights.
Adjust your mirrors to reduce the
glare from other driver's head-
lamps.
Keep your headlamps clean and
properly aimed. Dirty or improperly
aimed headlamps will make it
much more difficult to see at night.
Avoid staring directly at the head-
lamps of oncoming vehicles. You
could be temporarily blinded, and it
will take several seconds for your
eyes to readjust to the darkness.
Driving in the Rain
Rain and wet roads can make driving
dangerous. Here are a few things to
consider when driving in the rain or
on slick pavement:
Slow down and allow extra follow-
ing distance. A heavy rainfall
makes it harder to see and increas-
es the distance needed to stop
your vehicle.
Turn OFF your Cruise Control. (if
equipped)
Replace your windshield wiper
blades when they show signs of
streaking or missing areas on the
windshield.
Be sure your tires have enough
tread. If your tires do not have
enough tread, making a quick stop
on wet pavement can cause a skid
and possibly lead to an accident.
See "Tire Tread" in chapter 7.
Turn on your headlamps to make it
easier for others to see you.
Driving too fast through large pud-
dles can affect your brakes. If you
must go through puddles, try to
drive through them slowly.
NOTICE
i
Page 373 of 561

5-137
Driving your vehicle
5
If you believe your brakes may be
wet, apply them lightly while driv-
ing until normal braking operation
returns.
Hydroplaning
If the road is wet enough and you are
going fast enough, your vehicle may
have little or no contact with the road
surface and actually ride on the
water. The best advice is SLOW
DOWN when the road is wet.
The risk of hydroplaning increas-
es as the depth of tire tread
decreases, refer to "Tire Tread" in
chapter 7.
Driving in Flooded Areas
Avoid driving through flooded areas
unless you are sure the water is no
higher than the bottom of the wheel
hub. Drive through any water slowly.
Allow adequate stopping distance
because brake performance may be
reduced.
After driving through water, dry the
brakes by gently applying them sev-
eral times while the vehicle is moving
slowly.
Highway Driving
Tires
Adjust the tire inflation, as specified.
Under-inflation may overheat or
damage the tires.
Do not install worn-out or damaged
tires, which may reduce traction or
fail the braking operation.
Information
Never over-inflate your tires above the
maximum inflation pressure, as speci-
fied on your tires.
Coolant and high voltage bat-
tery
Be sure to check both the coolant
level and the high voltage battery
level before driving.
i
Page 374 of 561
5-138
Driving your vehicle
The severe weather conditions of
winter quickly wear out tires and
cause other problems. To minimize
winter driving problems, you should
take the following suggestions:
Snow or Icy Conditions
You need to keep sufficient distance
between your vehicle and the vehicle
in front of you.
Apply the brakes gently. Speeding,
rapid acceleration, sudden brake
applications, and sharp turns are
potentially very hazardous practices.
During deceleration use the paddle
shifter (left side lever) to increase
regenerative braking. However, avoid
increasing the regenerative braking
level suddenly. Sudden change of the
regenerative braking level on snowy
or icy roads may cause the vehicle to
skid and may cause loss of vehicle
control leading to an accident.
To drive your vehicle in deep snow, it
may be necessary to use snow tires.
Always carry emergency equipment.
Some of the items you may want to
carry include tow straps or chains, a
flashlight, emergency flares, sand, a
shovel, jumper cables, a window
scraper, gloves, ground cloth, cover-
alls, a blanket, etc.
Snow tires
If you mount snow tires on your vehi-
cle, make sure to use radial tires of
the same size and load range as the
original tires. Mount snow tires on all
four wheels to balance your vehicle’s
handling in all weather conditions.
The traction provided by snow tires
on dry roads may not be as high as
your vehicle's original equipment
tires. Check with the tire dealer for
maximum speed recommendations.
Information
Do not install studded tires without
first checking local, state and munici-
pal regulations for possible restric-
tions against their use.
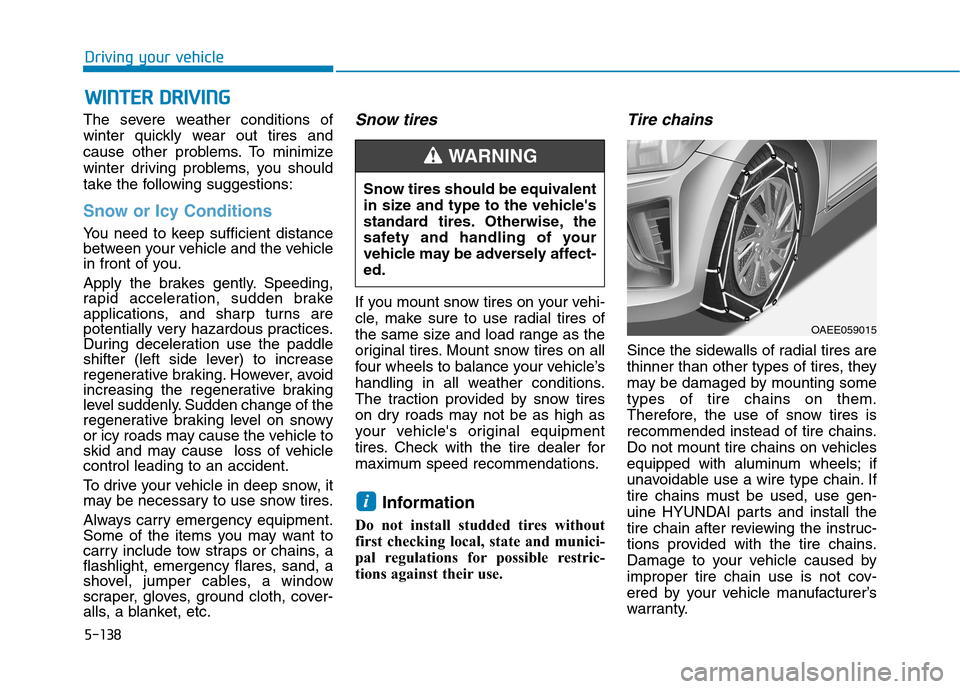
Tire chains
Since the sidewalls of radial tires are
thinner than other types of tires, they
may be damaged by mounting some
types of tire chains on them.
Therefore, the use of snow tires is
recommended instead of tire chains.
Do not mount tire chains on vehicles
equipped with aluminum wheels; if
unavoidable use a wire type chain. If
tire chains must be used, use gen-
uine HYUNDAI parts and install the
tire chain after reviewing the instruc-
tions provided with the tire chains.
Damage to your vehicle caused by
improper tire chain use is not cov-
ered by your vehicle manufacturer’s
warranty.
i
W WI
IN
NT
TE
ER
R
D
DR
RI
IV
VI
IN
NG
G
Snow tires should be equivalent
in size and type to the vehicle's
standard tires. Otherwise, the
safety and handling of your
vehicle may be adversely affect-
ed.
WARNING
OAEE059015
Page 375 of 561
5-139
Driving your vehicle
5
The use of tire chains may
adversely affect vehicle han-
dling:
Drive less than 20 mph (30
km/h) or the chain manufac-
turer's recommended speed
limit, whichever is lower.
Drive carefully and avoid
bumps, holes, sharp turns,
and other road hazards, which
may cause the vehicle to
bounce.
Avoid sharp turns or locked
wheel braking.
WARNING Information
• Install tire chains only in pairs and
on the front tires. It should be noted
that installing tire chains on the
tires will provide a greater driving
force, but will not prevent side
skids.
• Do not install studded tires without
first checking local, state and
municipal regulations for possible
restrictions against their use.
Chain Installation
When installing tire chains, follow the
manufacturer's instructions and
mount them as tightly possible. Drive
slowly (less than 20 mph (30 km/h))
with chains installed. If you hear the
chains contacting the body or chas-
sis, stop and tighten them. If they still
make contact, slow down until the
noise stops. Remove the tire chains
as soon as you begin driving on
cleared roads.
When mounting snow chains, park
the vehicle on level ground away
from traffic. Turn on the vehicle
Hazard Warning Flasher and place a
triangular emergency warning device
behind the vehicle (if available).
Always place the vehicle in P (Park),
apply the parking brake and turn off
the vehicle before installing snow
chains.i
Page 381 of 561

5-145
Driving your vehicle
5
Certification label
The certification label is located on
the driver’s door sill at the center pil-
lar and shows the maximum allow-
able weight of the fully loaded vehi-
cle. This is called the GVWR (Gross
Vehicle Weight Rating). The GVWR
includes the weight of the vehicle, all
occupants, fuel and cargo.
This label also tells you the maxi-
mum weight that can be supported
by the front and rear axles, called
Gross Axle Weight Rating (GAWR).The total weight of the vehicle,
including all occupants, accessories,
cargo, and trailer tongue load must
not exceed the Gross Vehicle Weight
Rating (GVWR) or the Gross Axle
Weight Rating (GAWR). To find out
the actual loads on your front and
rear axles, you need to go to a weigh
station and weigh your vehicle. Be
sure to spread out your load equally
on both sides of the centerline.
OBH059070
Overloading
Never exceed the GVWR for
your vehicle, the GAWR for
either the front or rear axle
and vehicle capacity weight.
Exceeding these ratings can
affect your vehicle’s handling
and braking ability, and cause
an accident.
Do not overload your vehicle.
Overloading your vehicle can
cause heat buildup in your
vehicle’s tires and possible
tire failure, increased stop-
ping distances and poor vehi-
cle handling-all of which may
result in a crash.
WARNING
Page 391 of 561
6-9
What to do in an emergency
6
Tire Pressure Monitoring
System
Each tire, including the spare (if pro-
vided), should be checked monthly
when cold and inflated to the inflation
pressure recommended by the vehi-
cle manufacturer on the vehicle plac-
ard or tire inflation pressure label. (If
your vehicle has tires of a different
size than the size indicated on the
vehicle placard or tire inflation pres-
sure label, you should determine the
proper tire inflation pressure for
those tires.)As an added safety feature, your
vehicle has been equipped with a tire
pressure monitoring system (TPMS)
that illuminates a low tire pressure
telltale when one or more of your
tires is significantly under-inflated.
Accordingly, when the low tire pres-
sure telltale illuminates, you should
stop and check your tires as soon as
possible, and inflate them to the
proper pressure. Driving on a signifi-
cantly under-inflated tire causes the
tire to overheat and can lead to tire
failure.
Under-inflation also reduces fuel effi-
ciency and tire tread life, and may
affect the vehicle’s handling and
stopping ability.
Please note that the TPMS is not a
substitute for proper tire mainte-
nance, and it is the driver’s responsi-
bility to maintain correct tire pres-
sure, even if under-inflation has not
reached the level to trigger illumina-
tion of the TPMS low tire pressure
telltale.Your vehicle has also been equipped
with a TPMS malfunction indicator to
indicate when the system is not
operating properly. The TPMS mal-
function indicator is combined with
the low tire pressure telltale. When
the system detects a malfunction,
the telltale will flash for approximate-
ly one minute and then remain con-
tinuously illuminated. This sequence
will continue upon subsequent vehi-
cle start-ups as long as the malfunc-
tion exists.
When the malfunction indicator is
illuminated, the system may not be
able to detect or signal low tire pres-
sure as intended. TPMS malfunc-
tions may occur for a variety of rea-
sons, including the installation of
replacement or alternate tires or
wheels on the vehicle that prevent
the TPMS from functioning properly.
Always check the TPMS malfunction
telltale after replacing one or more
tires or wheels on your vehicle to
ensure that the replacement or alter-
nate tires and wheels allow the
TPMS to continue to function proper-
ly. Over-inflation or under-inflation
can reduce tire life, adversely
affect vehicle handling, and
lead to sudden tire failure that
may cause loss of vehicle con-
trol resulting in an accident.
WARNING
Page 392 of 561

6-10
What to do in an emergency
If any of the below happens, have
the system checked by an author-
ized HYUNDAI dealer.
1. The Low Tire Pressure TPMS
Malfunction Indicator does not
illuminate for 3 seconds when
the POWER button is placed to
the ON position or vehicle is ON
( indicator ON).
2. The TPMS Malfunction Indicator
remains illuminated after blink-
ing for approximately 1 minute.
3. The Low Tire Pressure LCD dis-
play remains illuminated
Low Tire Pressure
Telltale
Low Tire Pressure LCD
Display with Position Indicator
When the tire pressure monitoring
system warning indicators are illumi-
nated and the warning message is
displayed on the cluster LCD display,
one or more of your tires is signifi-
cantly under-inflated. The LCD posi-
tion indicator will indicate which tire
is significantly under-inflated by illu-
minating the corresponding position
light.If any of your tire pressures are indi-
cated as being low, immediately
reduce your speed, avoid hard cor-
nering, and anticipate increased
stopping distances. You should stop
and check your tires as soon as pos-
sible. Inflate the tires to the proper
pressure as indicated on the vehi-
cle’s placard or tire inflation pressure
label located on the driver's side cen-
ter pillar outer panel.
If you cannot reach a service station
or if the tire cannot hold the newly
added air, replace the low pressure
tire with the spare tire.
The Low Tire Pressure LCD position
indicator will remain on and the
TPMS Malfunction Indicator may
blink for one minute and then remain
illuminated until you have the low
pressure tire repaired and replaced
on the vehicle.
NOTICE
OAEPH059643L