Page 480 of 538
7-40
Maintenance
Disc brake pads should be inspected
for wear whenever tires are rotated.
Information
The front tire size is different from the
rear tire size. So when you rotate tires,
check the tire and wheel size.
Wheel Alignment and Tire
Balance
The wheels on your vehicle were
aligned and balanced carefully at the
factory to give you the longest tire life
and best overall performance.
In most cases, you will not need to
have your wheels aligned again.
However, if you notice unusual tire
wear or your vehicle pulling one way
or the other, the alignment may need
to be reset.
If you notice your vehicle vibrating
when driving on a smooth road, your
wheels may need to be rebalanced.
Improper wheel weights can dam-
age your vehicle's aluminum
wheels. Use only approved wheel
weights.
NOTICE
i
Do not use the compact spare
tire for tire rotation.
WARNING
OHI078079
■19 inch tire
Page 481 of 538

7-41
07
Tire Replacement
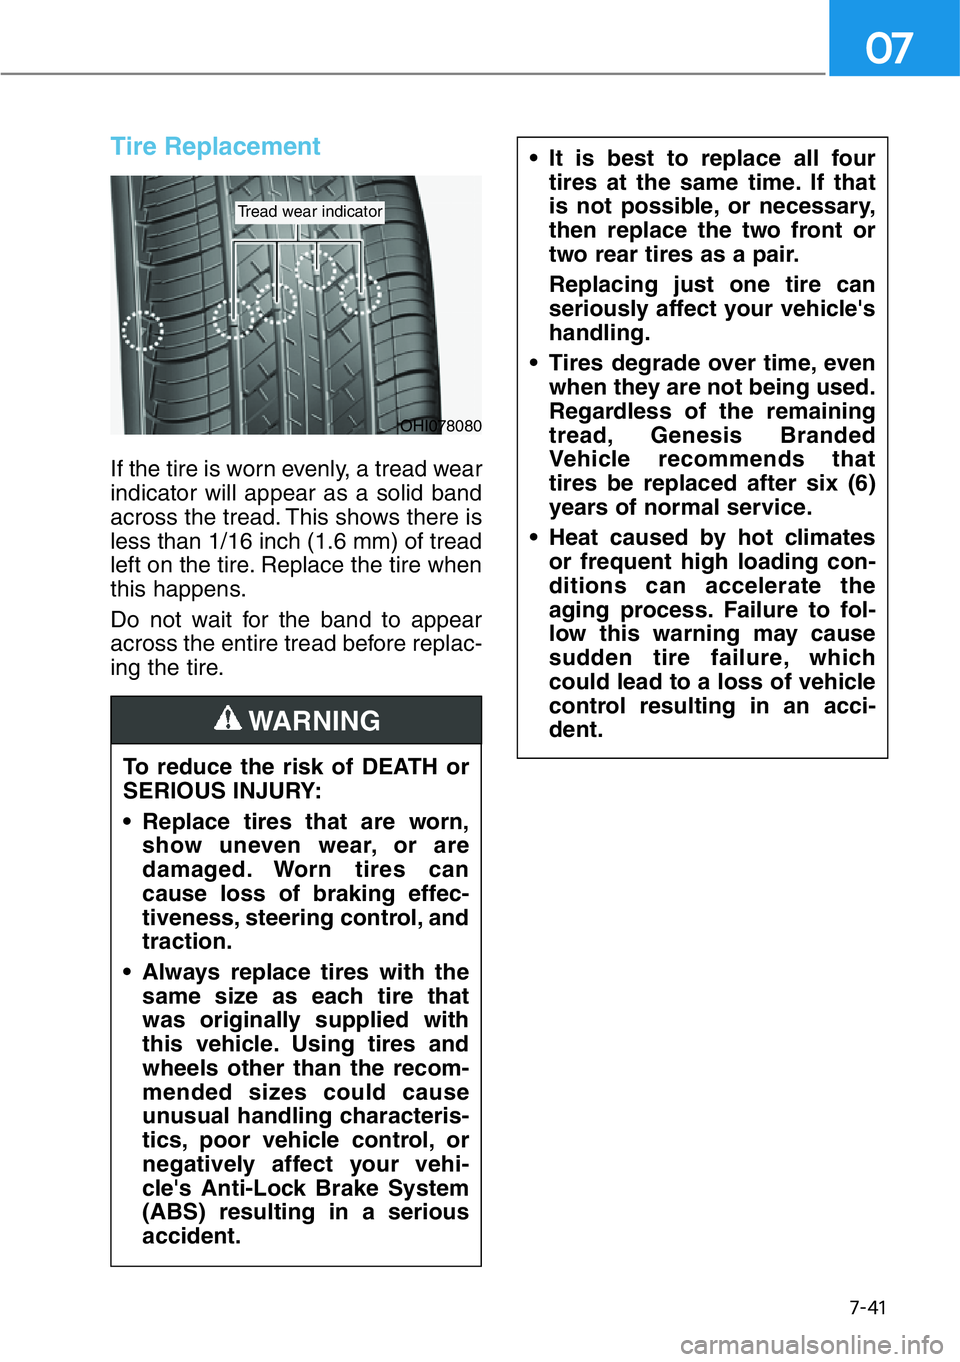
If the tire is worn evenly, a tread wear
indicator will appear as a solid band
across the tread. This shows there is
less than 1/16 inch (1.6 mm) of tread
left on the tire. Replace the tire when
this happens.
Do not wait for the band to appear
across the entire tread before replac-
ing the tire.
To reduce the risk of DEATH or
SERIOUS INJURY:
• Replace tires that are worn,
show uneven wear, or are
damaged. Worn tires can
cause loss of braking effec-
tiveness, steering control, and
traction.
• Always replace tires with the
same size as each tire that
was originally supplied with
this vehicle. Using tires and
wheels other than the recom-
mended sizes could cause
unusual handling characteris-
tics, poor vehicle control, or
negatively affect your vehi-
cle's Anti-Lock Brake System
(ABS) resulting in a serious
accident.
• It is best to replace all four
tires at the same time. If that
is not possible, or necessary,
then replace the two front or
two rear tires as a pair.
Replacing just one tire can
seriously affect your vehicle's
handling.
• Tires degrade over time, even
when they are not being used.
Regardless of the remaining
tread, Genesis Branded
Vehicle recommends that
tires be replaced after six (6)
years of normal service.
• Heat caused by hot climates
or frequent high loading con-
ditions can accelerate the
aging process. Failure to fol-
low this warning may cause
sudden tire failure, which
could lead to a loss of vehicle
control resulting in an acci-
dent.
WARNING
OHI078080
Tread wear indicator
Page 499 of 538
7-59
07
Fuse name Fuse rating Circuit protected
PRE-SAFETY
SEAT BELT 10APre Active Seat Belt Unit
GATEWAY 10AGATEWAY (IG1 (MCU))
BRAKE
SWITCH 10AStop Lamp Switch, IBU Control Module
IBU2 10AStart/Stop Button Switch
IBU1 15AIBU Control Module
MODULE12 10ADriver/Passenger Door Module, Rear Door Module LH/RH
MODULE9 10AMultifunction Switch
E-SHIFTER1 10AElectronic ATM Shift Lever
MULTI MEDIA3 10ARear Audio Switch, Rear USB Jack, Keyboard
MODULE11 10AIBU Control Module
HEATED
STEERING20AIBU Control Module
MULTI MEDIA1 30AFuse - MULTI MEDIA2, MULTI MEDIA3
A/C310A
Metal Core Block (PCB #1 - Blower Relay), Co2 Sensor,
Rear Sub Junction Block (Rear Blower Relay), A/C Control
Module, Front Incar Temperature Sensor, Front A/C
Controller, Ionizer
MULTI MEDIA2 15AA/V & Navigation Head Unit
POWER
OUTLET515AFront Power Outlet RH
POWER
OUTLET620AFront Power Outlet LH
Page 501 of 538

7-61
07
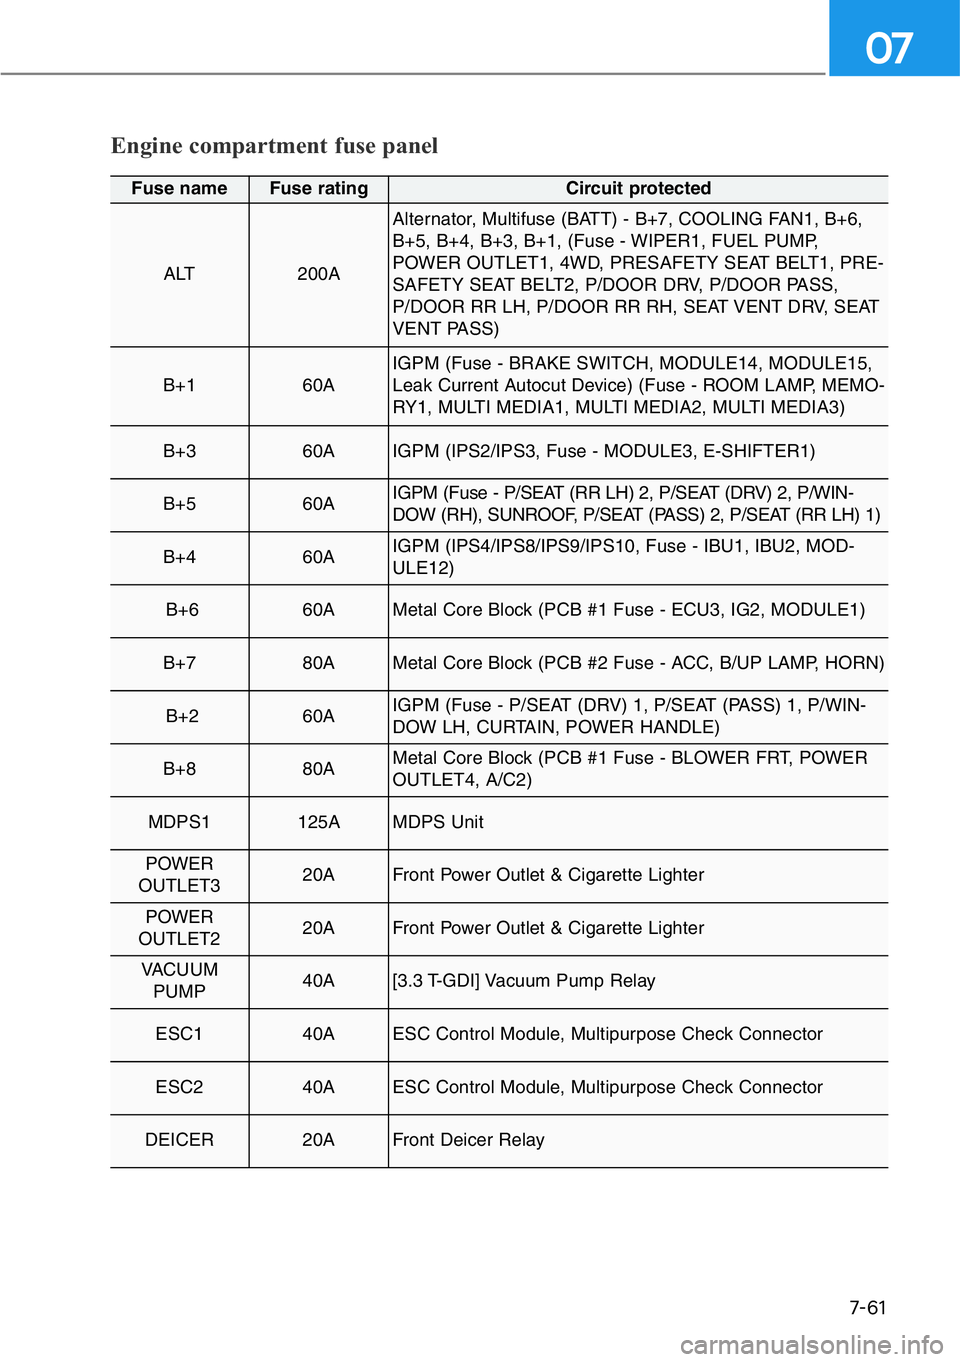
Engine compartment fuse panel
Fuse name Fuse rating Circuit protected
ALT 200A
Alternator, Multifuse (BATT) - B+7, COOLING FAN1, B+6,
B+5, B+4, B+3, B+1, (Fuse - WIPER1, FUEL PUMP,
POWER OUTLET1, 4WD, PRESAFETY SEAT BELT1, PRE-
SAFETY SEAT BELT2, P/DOOR DRV, P/DOOR PASS,
P/DOOR RR LH, P/DOOR RR RH, SEAT VENT DRV, SEAT
VENT PASS)
B+1 60AIGPM (Fuse - BRAKE SWITCH, MODULE14, MODULE15,
Leak Current Autocut Device) (Fuse - ROOM LAMP, MEMO-
RY1, MULTI MEDIA1, MULTI MEDIA2, MULTI MEDIA3)
B+3 60AIGPM (IPS2/IPS3, Fuse - MODULE3, E-SHIFTER1)
B+5 60AIGPM (Fuse - P/SEAT (RR LH) 2, P/SEAT (DRV) 2, P/WIN-
DOW (RH), SUNROOF, P/SEAT (PASS) 2, P/SEAT (RR LH) 1)
B+460AIGPM (IPS4/IPS8/IPS9/IPS10, Fuse - IBU1, IBU2, MOD-
ULE12)
B+6 60AMetal Core Block (PCB #1 Fuse - ECU3, IG2, MODULE1)
B+780AMetal Core Block (PCB #2 Fuse - ACC, B/UP LAMP, HORN)
B+2 60AIGPM (Fuse - P/SEAT (DRV) 1, P/SEAT (PASS) 1, P/WIN-
DOW LH, CURTAIN, POWER HANDLE)
B+8 80AMetal Core Block (PCB #1 Fuse - BLOWER FRT, POWER
OUTLET4, A/C2)
MDPS1125AMDPS Unit
POWER
OUTLET3 20AFront Power Outlet & Cigarette Lighter
POWER
OUTLET2 20AFront Power Outlet & Cigarette Lighter
VACUUM
PUMP 40A[3.3 T-GDI] Vacuum Pump Relay
ESC1 40AESC Control Module, Multipurpose Check Connector
ESC2 40AESC Control Module, Multipurpose Check Connector
DEICER 20A Front Deicer Relay
Page 504 of 538
7-64
Maintenance
Fuse name Fuse rating Circuit protected
MODULE210A4WD ECM, Active Air Flap, Smart Cruse Control Radar
MDPS210AMDPS Unit, Steering Angle Sensor
SENSOR510A[3.3 T-GDI] Engine Room Junction Block (Vacuum Pump-
Relay), Brake Vacuum Switch
HORN20AHorn Relay
ECU210AECM
TCU215ATCM, B/UP Lamp Relay, P/N Relay
B/UP
LAMP10AB/Up Lamp Relay
ACC40AACC Relay
Page 509 of 538

7-69
07
Consult an authorized retailer of
Genesis Branded products to
replace most vehicle light bulbs. It is
difficult to replace vehicle light bulbs
because other parts of the vehicle
must be removed before you can get
to the bulb. This is especially true for
removing the headlamp assembly to
get to the bulb(s).
Removing/installing the headlamp
assembly can result in damage to
the vehicle.
Information
The headlamp and tail lamp lenses
could appear frosty if the vehicle is
washed after driving or the vehicle is
driven at night in wet weather. This
condition is caused by temperature
difference between the lamp inside and
outside and, it does not indicate a
problem with your vehicle. When
moisture condenses in the lamp, it will
be removed after driving with the
headlamp on. The removable level
may differ depending on lamp size,
lamp position and environmental con-
dition. However, if moisture is not
removed, we recommend that your
vehicle is inspected by an authorized
retailer of Genesis Branded products.Light replacement
Be sure to replace the burned out
bulb with one of the same wattage
rating. Otherwise, it may cause
damage to the fuse or electric
wiring system.
To prevent damage, do not clean
the headlamp with chemical sol-
vents or strong detergents.Information
• A normally functioning lamp may
flicker momentarily to stabilize the
vehicle's electrical control system.
However, if the lamp goes out after
flickering momentarily, or contin-
ues to flicker, have the system
checked by an authorized retailer of
Genesis Branded products.
• The parking lamp may not turn on
when the parking lamp switch is
turned on, but the parking lamp
and headlamp switch may turn on
when the headlamp switch is turned
on. This may be caused by network
failure or vehicle electrical control
system malfunction. If this occurs,
have the system checked by an
authorized retailer of Genesis
Branded products.
i
NOTICE
NOTICE
i
LIGHT BULBS
• Prior to replacing a lamp,
depress the foot brake, shift
the gear to P (Park) apply the
parking brake, place the
Engine Start/Stop button to
the OFF position, and take the
key with you when leaving the
vehicle to avoid sudden
movement of the vehicle and
to prevent possible electric
shock.
• Be aware the bulbs may be hot
and may burn your fingers.
WARNING
Page 514 of 538

7-74
Maintenance
Exterior Care
Exterior general caution
It is very important to follow the label
directions when using any chemical
cleaner or polish. Read all warning
and caution statements that appear
on the label.
High-pressure washing
• When using high-pressure wash-
ers, make sure to maintain suffi-
cient distance from the vehicle.
Insufficient clearance or excessive
pressure can lead to component
damage or water penetration.
• Do not spray the camera, sensors
or its surrounding area directly with
a high pressure washer. Shock
applied from high pressure water
may cause the device to not oper-
ate normally.
• Do not bring the nozzle tip close to
boots (rubber or plastic covers)or
connectors as they may be dam-
aged if they come into contact with
high pressure water.
• Do not use any high-pressure noz-
zles, which induce either one-direct
water stream or water swirling.
Finish maintenance
Washing
To help protect your vehicle’s finish
from rust and deterioration, wash it
thoroughly and frequently at least
once a month with lukewarm or cold
water.
If you use your vehicle for off-road
driving, you should wash it after each
off-road trip. Pay special attention to
the removal of any accumulation of
salt, dirt, mud, and other foreign
materials. Make sure the drain holes
in the lower edges of the doors and
rocker panels are kept clear and
clean.
Insects, tar, tree sap, bird droppings,
industrial pollution and similar
deposits can damage your vehicle’s
finish if not removed immediately.
Even prompt washing with plain
water may not completely remove all
these deposits. A mild soap, safe for
use on painted surfaces, should be
used.
After washing, rinse the vehicle thor-
oughly with lukewarm or cold water.
Do not allow soap to dry on the finish.
APPEARANCE CARE
After washing the vehicle, test
the brakes while driving slowly
to see if they have been affected
by water before getting on the
road. If braking performance is
impaired, dry the brakes by
applying them lightly while
maintaining a slow forward
speed.
WARNING
Page 517 of 538

7-77
07
Underbody maintenance
Corrosive materials used for ice and
snow removal and dust control may
collect on the underbody. If these
materials are not removed, acceler-
ated rusting can occur on underbody
parts such as the fuel lines, frame,
floor pan and exhaust system, even
though they have been treated with
rust protection.
Thoroughly flush the vehicle under-
body and wheel openings with luke-
warm or cold water once a month,
after off-road driving and at the end
of each winter. Pay special attention
to these areas because it is difficult
to see all the mud and dirt. It will do
more harm than good to wet down
the road grime without removing it.
The lower edges of doors, rocker
panels, and frame members have
drain holes that should not be
allowed to clog with dirt; trapped
water in these areas can cause rust-
ing.
Aluminum wheel maintenance
The aluminum wheels are coated
with a clear protective finish.
• Do not use abrasive cleaner, pol-
ishing compound, solvent, or wire
brushes on aluminum wheels.
• Clean the wheel when it has
cooled.
• Use only a mild soap or neutral
detergent, and rinse thoroughly
with water. Also, clean the wheels
after driving on salted roads.
• Do not wash the wheels with high-
speed car wash brushes.
• Do not use cleaners containing
acid or alkaline detergents.
After washing the vehicle, test
the brakes while driving slowly
to see if they have been affected
by water. If braking performance
is impaired, dry the brakes by
applying them lightly while
maintaining a slow forward
speed.
WARNING