2020 Hyundai Elantra media
[x] Cancel search: mediaPage 432 of 535

7-10
Maintenance
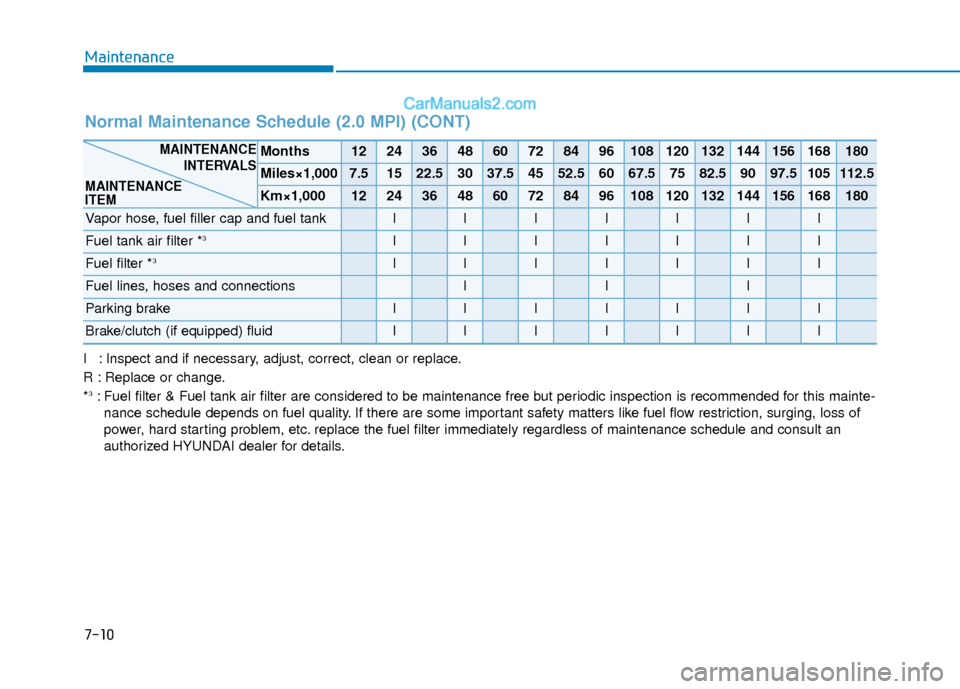
I : Inspect and if necessary, adjust, correct, clean or replace.
R : Replace or change.
*
3: Fuel filter & Fuel tank air filter are considered to be maintenance free\
but periodic inspection is recommended for this mainte-nance schedule depends on fuel quality. If there are some important safety matters like fuel flow restriction, surging, loss of
power, hard starting problem, etc. replace the fuel filter immediately regardless of maintenance schedule a\
nd consult an
authorized HYUNDAI dealer for details.
Normal Maintenance Schedule (2.0 MPI) (CONT)
Months1224364860728496108120132144156168180
Miles×1,0007.51522.53037.54552.56067.57582.59097.5105112.5
Km×1,0001224364860728496108120132144156168180
Vapor hose, fuel filler cap and fuel tankIIIIIII
Fuel tank air filter *3IIIIIII
Fuel filter *3IIIIIII
Fuel lines, hoses and connectionsIII
Parking brakeIIIIIII
Brake/clutch (if equipped) fluidIIIIIII
MAINTENANCE INTERVALS
MAINTENANCE
ITEM
Page 437 of 535

7-15
7
Maintenance
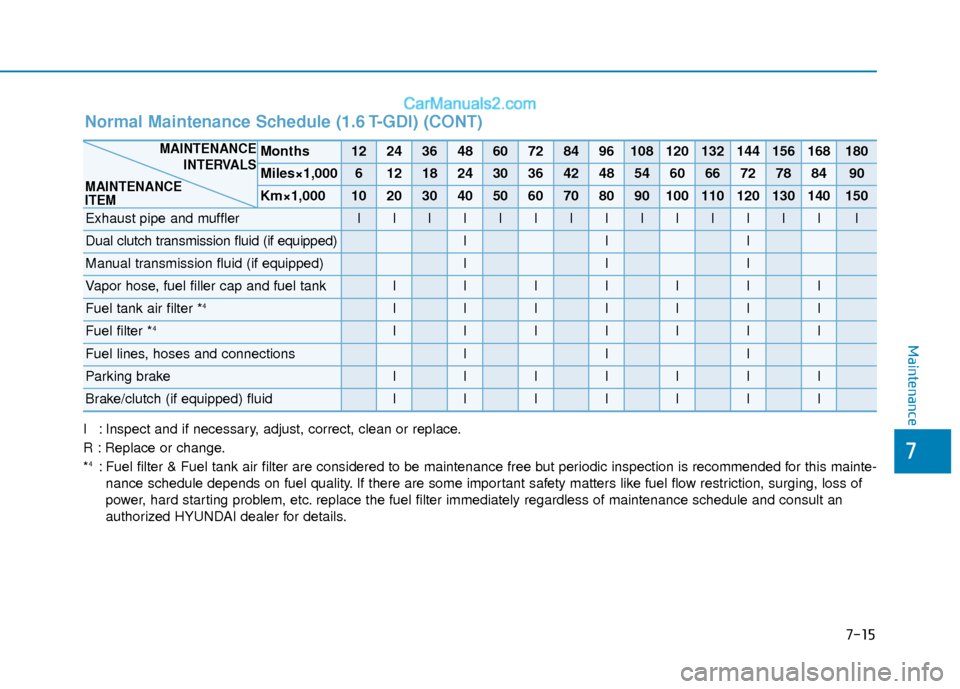
I : Inspect and if necessary, adjust, correct, clean or replace.
R : Replace or change.
*
4: Fuel filter & Fuel tank air filter are considered to be maintenance free\
but periodic inspection is recommended for this mainte-nance schedule depends on fuel quality. If there are some important safety matters like fuel flow restriction, surging, loss of
power, hard starting problem, etc. replace the fuel filter immediately regardless of maintenance schedule a\
nd consult an
authorized HYUNDAI dealer for details.
Normal Maintenance Schedule (1.6 T-GDI) (CONT)
Months1224364860728496108120132144156168180
Miles×1,00061218243036424854606672788490
Km×1,000102030405060708090100110120130140150
Exhaust pipe and mufflerIIIIIIIIIIIIIII
Dual clutch transmission fluid (if equipped)III
Manual transmission fluid (if equipped)III
Vapor hose, fuel filler cap and fuel tankIIIIIII
Fuel tank air filter *4IIIIIII
Fuel filter *4IIIIIII
Fuel lines, hoses and connectionsIII
Parking brakeIIIIIII
Brake/clutch (if equipped) fluidIIIIIII
MAINTENANCE INTERVALS
MAINTENANCE
ITEM
Page 440 of 535

7-18
Maintenance
E
EX
X P
PL
LA
A N
N A
AT
TI
IO
O N
N
O
O F
F
S
S C
C H
H E
ED
D U
U L
LE
E D
D
M
M A
AI
IN
N T
TE
EN
N A
AN
N C
CE
E
I
IT
T E
EM
M S
S
Engine Oil and Filter
The engine oil and filter should be
changed at the intervals specified in
the maintenance schedule. If the car
is being driven in severe conditions,
more frequent oil and filter changes
are required.
Drive Belts
Inspect all drive belts for evidence of
cuts, cracks, excessive wear or oil
saturation and replace if necessary.
Drive belts should be checked peri-
odically for proper tension and
adjusted as necessary.
Fuel Filter
A clogged-up fuel filter may limit the
vehicle driving speed, damage the
emission system, and cause the
hard starting. When a considerable
amount of foreign substances are
accumulated in the fuel tank, the fuel
filter should be replaced. Upon installing a new fuel filter, oper-
ate the engine for several minutes,
and check the connections for any
leakages. Fuel filters should be
installed by an authorized HYUNDAI
dealer.
Fuel Lines, Fuel Hoses and
Connections
Check the fuel lines, fuel hoses and
connections for leakage and dam-
age. Have an authorized HYUNDAI
dealer replace any damaged or leak-
ing parts immediately.
Vapor Hose and Fuel Filler
Cap
The vapor hose and fuel filler cap
should be inspected at those inter-
vals specified in the maintenance
schedule. Make sure a new vapor
hose or fuel filler cap is correctly
replaced.
Vacuum Crankcase Ventilation
Hoses (if equipped)
Inspect the surface of hoses for evi-
dence of heat and/or mechanical
damage. Hard and brittle rubber,
cracking, tears, cuts, abrasions, and
excessive swelling indicate deterio-
ration. Particular attention should be
paid to examine those hose surfaces
nearest to high heat sources, such
as the exhaust manifold.
Inspect the hose routing to assure
that the hoses do not come in con-
tact with any heat source, sharp
edges or moving component which
might cause heat damage or
mechanical wear.
Inspect all hose connections, such
as clamps and couplings, to make
sure they are secure, and that no
leaks are present. Hoses should be
replaced immediately if there is any
evidence of deterioration or damage.
Page 442 of 535

7-20
Maintenance
Dual Clutch Transmission
Fluid (if equipped)
Inspect the dual clutch transmission
fluid according to the maintenance
schedule.
Manual Transmission Fluid
(if equipped)
Inspect the manual transmission
fluid according to the maintenance
schedule.
Brake Hoses and Lines
Visually check for proper installation,
chafing, cracks, deterioration and
any leakage. Replace any deteriorat-
ed or damaged parts immediately.
Brake/Clutch Fluid
Check brake/clutch fluid level in the
brake/clutch fluid reservoir. The level
should be between the MIN and the
MAX marks on the side of the reser-
voir. Use only hydraulic brake/clutch
fluid conforming to DOT 3 or DOT 4
specification.
Parking Brake
Inspect the parking brake system
including the parking brake pedal
and cables.
Brake Discs, Pads, Calipers
and Rotors
Check the pads for excessive wear,
discs for run out and wear, and
calipers for fluid leakage.
Exhaust Pipe and Muffler
Visually inspect the exhaust pipes,
muffler and hangers for cracks, dete-
rioration, or damage. Start the
engine and listen carefully for any
exhaust gas leakage. Tighten con-
nections or replace parts as neces-
sary.
Suspension Mounting Bolts
Check the suspension connections
for looseness or damage. Retighten
to the specified torque.
Steering Gear Box, Linkage &
Boots/Lower Arm Ball Joint
With the vehicle stopped and the
engine off, check for excessive free-
play in the steering wheel. Check the
linkage for bends or damage. Check
the dust boots and ball joints for
deterioration, cracks, or damage.
Replace any damaged parts.
Drive Shafts and Boots
Check the drive shafts, boots and
clamps for cracks, deterioration, or
damage. Replace any damaged
parts and, if necessary, repack the
grease.
Air Conditioning Refrigerant
Check the air conditioning lines and
connections for leakage and dam-
age.
Page 443 of 535

7-21
7
Maintenance
E
EN
N G
GI
IN
N E
E
O
O I
IL
L
Checking the Engine Oil Level
1. Follow all of the oil manufacturer’s
precautions.
2. Be sure the vehicle is on the level ground in P (Park) with the park-
ing brake set. If possible, block the
wheels.
3. Turn the engine on and allow the engine to reach normal operating
temperature.
4. Turn the engine off and wait about five minutes for the oil to return to
the oil pan.
5. Pull the dipstick out, wipe it clean, and re-insert it fully.
6. Pull the dipstick out again andcheck the level. The level should
be between F and L.
7. If it is near or at L, add enough oil to bring the level to F. To prevent damage to your
engine:
Do not overfill with engine oil.
Add oil in small quantities and
recheck level to ensure engine
is not overfilled.
Do not spill engine oil when adding or changing engine oil.
Use a funnel to help prevent oil
from being spilled on engine
components. Wipe off spilled oil
immediately.
NOTICE
OAD076121
■ 1.6 T-GDI
OAD075062L
■2.0 MPI
Page 457 of 535

7-35
7
Maintenance
B
BA
A T
TT
TE
ER
R Y
Y
To prevent SERIOUS INJURY or
DEATH to you or bystanders,
always follow these precautions
when working near or handling
the battery:
Always read and follow
instructions carefully
when handling a battery.Wear eye protection
designed to protect the
eyes from acid splashes.
Keep all flames, sparks,
or smoking materials
away from the battery.
Hydrogen is always present in battery cells,
is highly combustible,
and may explode if ignit-
ed.
Keep batteries out of
reach of children.
WARNING Batteries contain sulfu-
ric acid which is highly
corrosive. Do not allow
acid to contact your
eyes, skin or clothing.
If acid gets into your eyes, flush
your eyes with clean water for at
least 15 minutes and get imme-
diate medical attention. If acid
gets on your skin, thoroughly
wash the area. If you feel pain or
a burning sensation, get med-
ical attention immediately.
When lifting a plastic-cased
battery, excessive pressure
on the case may cause battery
acid to leak. Lift with a battery
carrier or with your hands on
opposite corners.
Do not attempt to jump start
your vehicle if your battery is
frozen.
NEVER attempt to recharge
the battery when the vehicle’s
battery cables are connected
to the battery.
The electrical ignition system
works with high voltage.
NEVER touch these compo-
nents with the engine running
or when the Engine Start/Stop
button is in the ON position.
Leaked battery electrolyte due
to repeated driving on sharp
curves (e.g. on circuits) may
cause safety problem. Avoid
repeated driving on sharp
curves.
CALIFORNIA PROPOSITION 65
WARNING
Battery posts, terminals, and
related accessories contain
lead and lead compounds,
chemicals known to the State of
California to cause cancer, birth
defects and reproductive harm.
Batteries also contain other
chemicals known to the State of
California to cause cancer.
Wash hands after handling.
WARNING
Page 458 of 535

7-36
Maintenance
When you do not use the vehicle for a long time in a low tempera-
ture area, disconnect the battery
and keep it indoors.
Always charge the battery fully to prevent battery case damage
in low temperature areas.
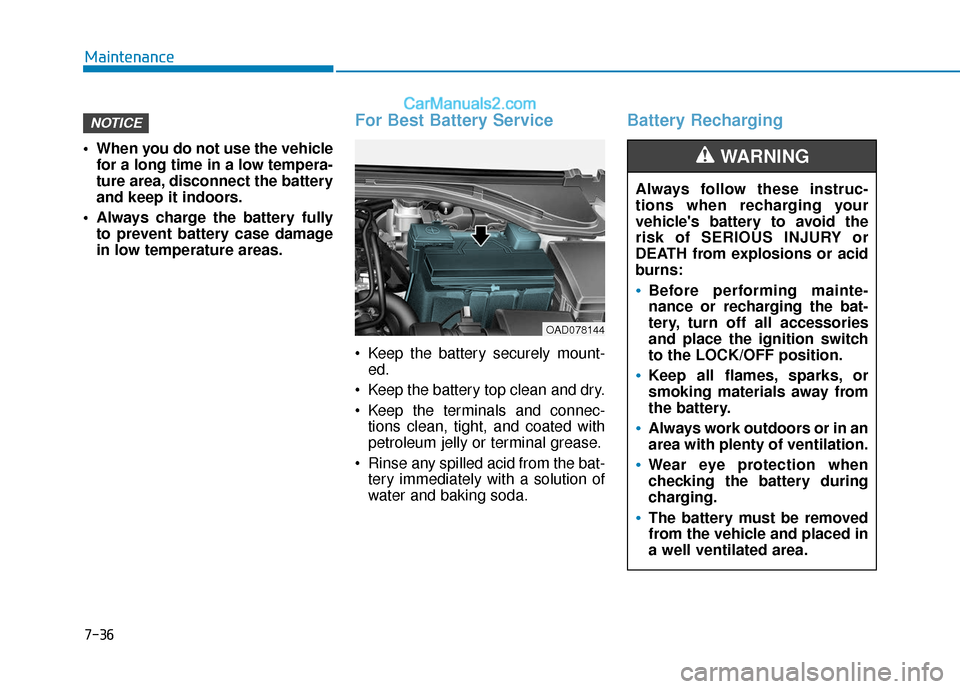
For Best Battery Service
Keep the battery securely mount-ed.
Keep the battery top clean and dry.
Keep the terminals and connec- tions clean, tight, and coated with
petroleum jelly or terminal grease.
Rinse any spilled acid from the bat- tery immediately with a solution of
water and baking soda.
Battery RechargingNOTICE
Always follow these instruc-
tions when recharging your
vehicle's battery to avoid the
risk of SERIOUS INJURY or
DEATH from explosions or acid
burns:
Before performing mainte-
nance or recharging the bat-
tery, turn off all accessories
and place the ignition switch
to the LOCK/OFF position.
Keep all flames, sparks, or
smoking materials away from
the battery.
Always work outdoors or in an
area with plenty of ventilation.
Wear eye protection when
checking the battery during
charging.
The battery must be removed
from the vehicle and placed in
a well ventilated area.
WARNING
OAD078144
Page 481 of 535

7-59
7
Maintenance
Fuse Name Fuse rating Protected Component
HEATED MIRROR 10A Driver/Passenger Power Outside Mirror, A/C Control Module
WIPER 2 10A PCM, BCM
P/WINDOW RH 25A Power Window RH Relay
P/WINDOW LH 25A Power Window LH Relay, Driver Safety Power Window Module
CLUSTER 10A CLUSTER
DR LOCK 20A Door Lock/Unlock Relay, E/R Junction Block (Two Turn Unlock Relay)
MEMORY 1 10A Driver/Passenger Door Module, Driver IMS Module, A/C Control Module, Instrument Cluster,
Electro Chromic Mirror, Data Link Connector, Blind Spot Detection Radar LH/RH, Digital Clock
S/HEATER RR 15A Rear Seat Warmer Control Module
TRUNK 10A Trunk Relay
INTERIOR LAMP 10A Room Lamp, Front Vanity Lamp LH/RH, Overhead Console Lamp, Ignition Key ILL. & Door Warning
Switch, Trunk Room Lamp
A/BAG IND 7.5A Instrument Cluster, A/C Control Module
MULTI MEDIA 15A CD Player, Audio, A/V & Navigation Head Unit
MEMORY 2 7.5A Not Used
AMP 25A AMP
P/SEAT DRV 30A Driver Seat Manual Switch, Driver IMS Module
MDPS 7.5A MDPS Unit
MODULE 1 7.5A Key Interlock, Driver/Passenger Smart Key Outside Handle, Driver/Passenger Door Module, BCM,
Driver/Passenger Outside Mirror Switch/Motor
SUNROOF 20A Sunroof Motor
SPARE 1 10A -
S/HEATER FRT 20A Front Seat Warmer Control Module
MODULE 7 7.5A Front Seat Warmer Control Module, Rear Seat Warmer Control Module, Sunroof Motor, BCM
PDM 3 7.5A Smart Key Control Module, Immobilizer Module
BRAKE SWITCH 7.5A Stop Lamp Switch, Smart Key Control Module