Page 271 of 675

Continued269
uuAudio System Basic Operation uAudio/Information Screen
Features
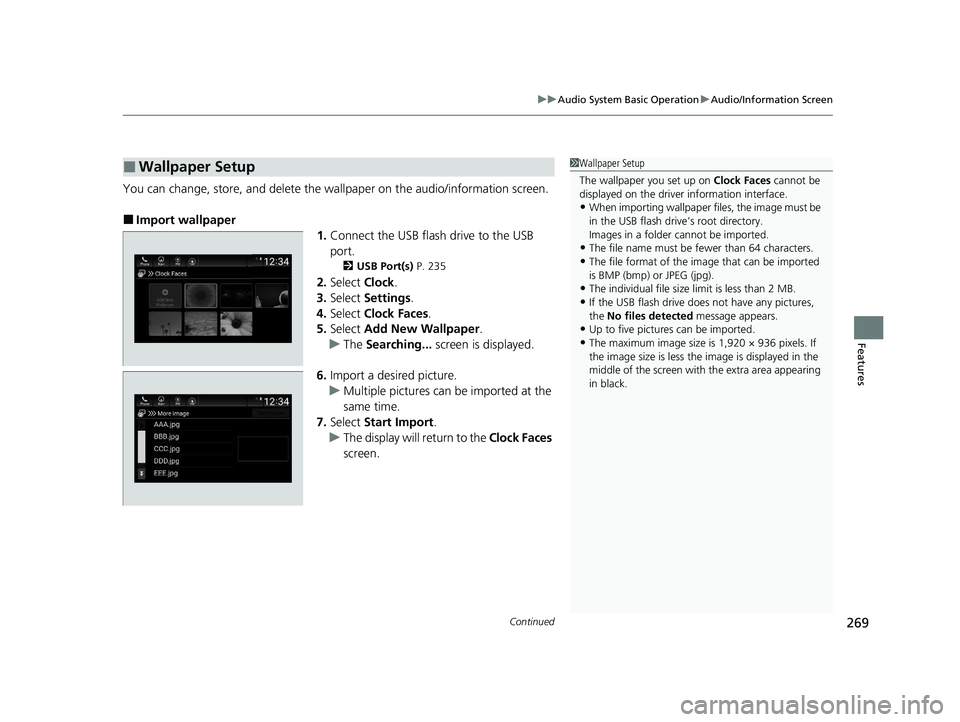
You can change, store, and delete the wa llpaper on the audio/information screen.
■Import wallpaper
1.Connect the USB flash drive to the USB
port.
2 USB Port(s) P. 235
2.Select Clock.
3. Select Settings .
4. Select Clock Faces .
5. Select Add New Wallpaper .
u The Searching... screen is displayed.
6. Import a desired picture.
u Multiple pictures can be imported at the
same time.
7. Select Start Import .
u The display will return to the Clock Faces
screen.
■Wallpaper Setup1 Wallpaper Setup
The wallpaper you set up on Clock Faces cannot be
displayed on the driver information interface.
•When importing wallpaper files, the image must be
in the USB flash drive’s root directory.
Images in a folder cannot be imported.
•The file name must be fewer than 64 characters.
•The file format of the im age that can be imported
is BMP (bmp) or JPEG (jpg).
•The individual file size limit is less than 2 MB.
•If the USB flash drive doe s not have any pictures,
the No files detected message appears.
•Up to five pictur es can be imported.
•The maximum image size is 1,920 × 936 pixels. If
the image size is less the image is displayed in the
middle of the screen with the extra area appearing
in black.
20 INSIGHT-31TXM6100.book 269 ページ 2019年4月24日 水曜日 午後2時2分
Page 272 of 675
uuAudio System Basic Operation uAudio/Information Screen
270
Features
■Select wallpaper
1. Select Clock.
2. Select Settings .
3. Select Clock Faces .
4. Select a desired wallpaper.
5. Select Set.
u The display will return to the Clock Faces screen.
■To view wallpaper once it is set
1. Press the button.
2. Select Clock.
■Delete wallpaper
1. Select Clock.
2. Select Settings .
3. Select Clock Faces .
4. Select a desired wallpaper.
5. Select Delete.
6. Select Yes.
u The display will return to the Clock Faces screen.
1Wallpaper Setup
You cannot delete the in itial imported wallpapers.
20 INSIGHT-31TXM6100.book 270 ページ 2019年4月24日 水曜日 午後2時2分
Page 279 of 675

277
uuAudio System Basic Operation uAudio/Information Screen
Features
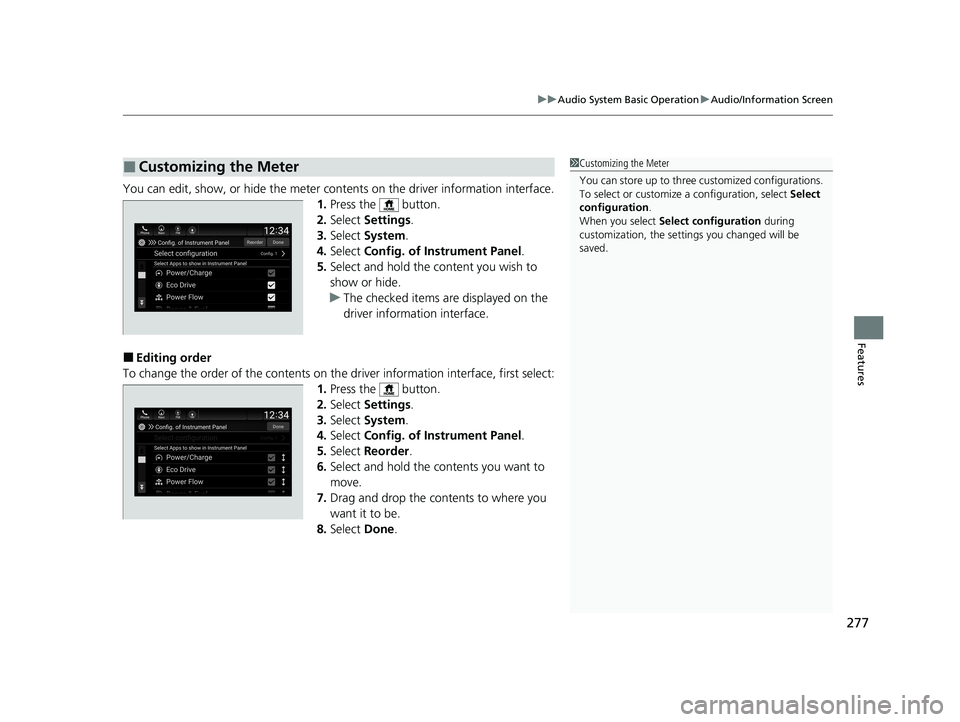
You can edit, show, or hide the meter cont ents on the driver information interface.
1. Press the button.
2. Select Settings .
3. Select System.
4. Select Config. of Instrument Panel .
5. Select and hold the content you wish to
show or hide.
u The checked items are displayed on the
driver information interface.
■Editing order
To change the order of the contents on th e driver information interface, first select:
1. Press the button.
2. Select Settings .
3. Select System.
4. Select Config. of Instrument Panel .
5. Select Reorder .
6. Select and hold the contents you want to
move.
7. Drag and drop the contents to where you
want it to be.
8. Select Done.
■Customizing the Meter1Customizing the Meter
You can store up to three customized configurations.
To select or customize a configuration, select Select
configuration .
When you select Select configuration during
customization, the settings you changed will be
saved.
20 INSIGHT-31TXM6100.book 277 ページ 2019年4月24日 水曜日 午後2時2分
Page 280 of 675
278
uuAudio System Basic Operation uSystem Updates
Features
System Updates
The audio system’s firmware can be update d with a Wi-Fi connection, or with a USB
device.
■Wireless connecti on mode setup
1.Press the button.
2. Select System Updates .
3. Select Settings .
4. Select Connection Setup .
5. Select Change Mode .
6. Select Network, then Confirm.
u The display returns to the network list.
7. Select an access point from the network list,
then Save.
u If the audio system requires a password,
enter a password.
■How to Update Wirelessly
1Wireless connection mode setup
If your vehicle has a telema tics control unit (TCU), you
do not need the wireless connection mode setup.
20 INSIGHT-31TXM6100.book 278 ページ 2019年4月24日 水曜日 午後2時2分
Page 281 of 675
Continued279
uuAudio System Basic Operation uSystem Updates
Features
■How to update
When the audio system update is available, the notification is shown on the audio/
information screen. Use the following procedure to update the system.
1. Press the button.
2. Select System Updates .
3. Select via Wireless .
u If a notification is displayed on the
screen, the screen of step 5 will be
displayed.
4. Select Download Now .
u A notification appears on the screen.1How to update
You can update the system vi a Wi-Fi, but cannot use
the captive portal that require login or agreement the
terms of use on the browser.
Your download will be canceled if:
•Your Wi-Fi connection is severed.
•You turn off the power system when the 12-volt
battery is low on power.
Your download will recomme nce the next time a Wi-
Fi connection is established.
Notification
20 INSIGHT-31TXM6100.book 279 ページ 2019年4月24日 水曜日 午後2時2分
Page 287 of 675
285
uuAudio System Basic Operation uDisplay Setup
Continued
Features
Display Setup
You can change the brightness of the audio/information screen.
1.Press the button.
2. Select Settings .
3. Select Display .
4. Select Day Mode or Night Mode .
5. Select the setting you want.
6. Select Save.
■Changing the Screen Brightness1Changing the Screen Brightness
You can change the Contrast and Black Level
settings in the same manner.
To reset the settings, select Default.
20 INSIGHT-31TXM6100.book 285 ページ 2019年4月24日 水曜日 午後2時2分
Page 288 of 675
286
uuAudio System Basic Operation uDisplay Setup
Features
Select the current source icon, then select an icon on the source list.
Certain manual functions are disabled or inoperable while the vehicle is in motion.
You cannot select a grayed-out option until the vehicle is stopped.
■Selecting an Audio Source
■Limitations for Manual Operation*
Select the source icon Source Select Screen
Source List Icons
* Not available on all models
20 INSIGHT-31TXM6100.book 286 ページ 2019年4月24日 水曜日 午後2時2分
Page 292 of 675

290
uuAudio System Basic Operation uPlaying AM/FM Radio
Features
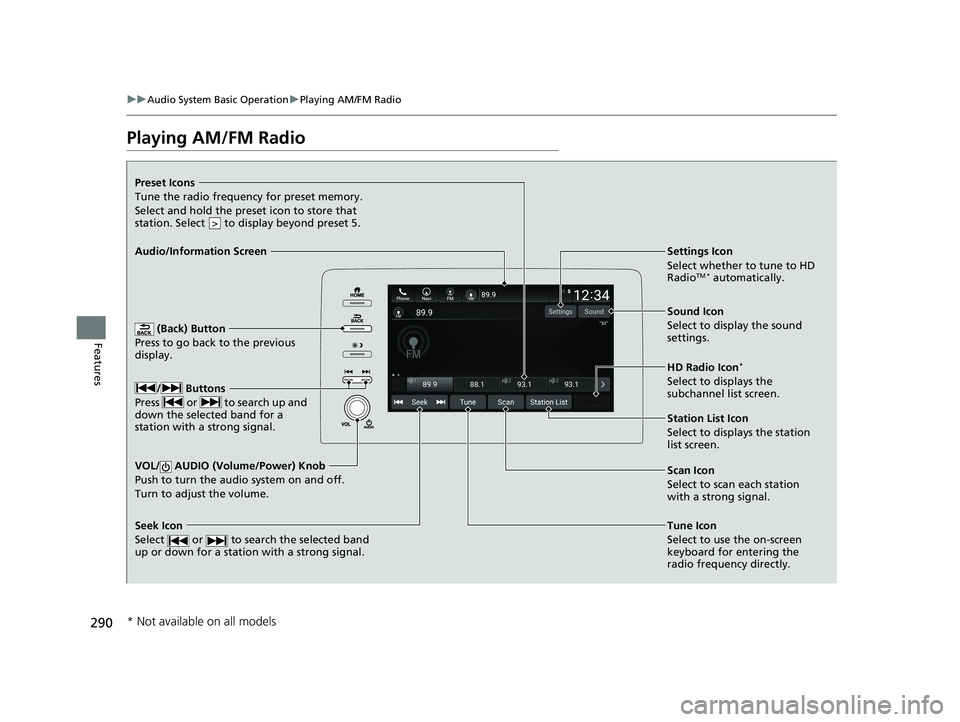
Playing AM/FM Radio
(Back) Button
Press to go back to the previous
display.
/ Buttons
Press or to search up and
down the selected band for a
station with a strong signal.
VOL/ AUDIO (Volume/Power) Knob
Push to turn the audi o system on and off.
Turn to adjust the volume.
Tune Icon
Select to use the on-screen
keyboard for entering the
radio frequency directly.
Audio/Information Screen
Scan Icon
Select to scan eac
h station
with a strong signal.
Preset Icons
Tune the radio frequency for preset memory.
Select and hold the preset icon to store that
station. Select to display beyond preset 5.
>
Settings Icon
Select whether to tune to HD
Radio
TM * automatically.
Seek Icon
Select or to search the selected band
up or down for a station with a strong signal.
Sound Icon
Select to display the sound
settings.
HD Radio Icon
*
Select to displays the
subchannel list screen.
Station List Icon
Select to displays the station
list screen.
* Not available on all models
20 INSIGHT-31TXM6100.book 290 ページ 2019年4月24日 水曜日 午後2時2分