Page 446 of 671

uuBluetooth ® HandsFreeLink ®u HFL Menus
444
Features
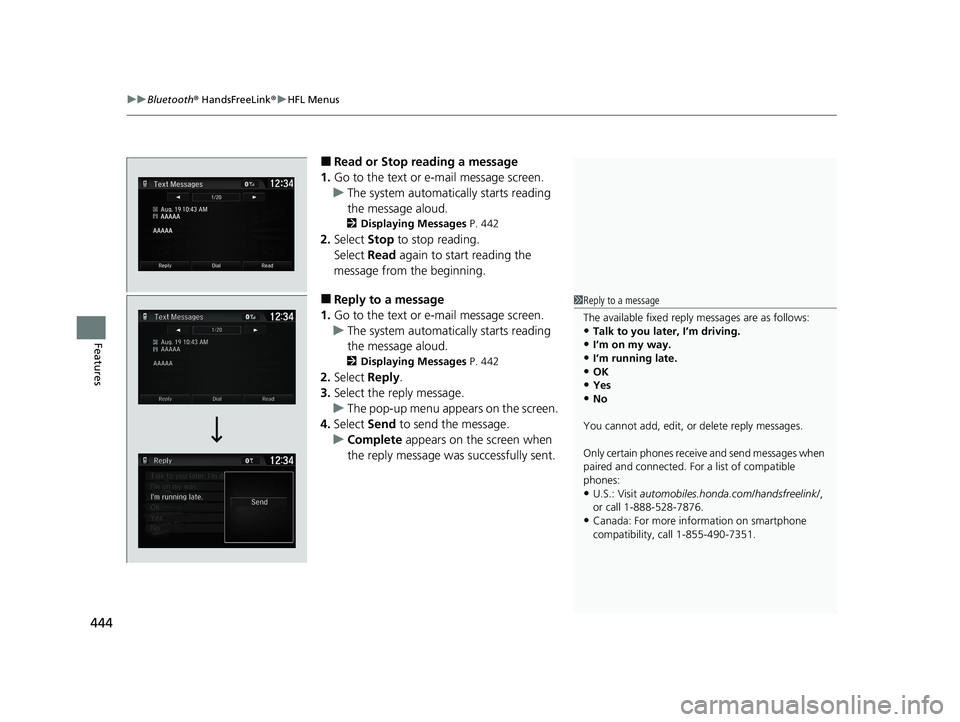
■Read or Stop reading a message
1. Go to the text or e-mail message screen.
u The system automatically starts reading
the message aloud.
2 Displaying Messages P. 442
2.Select Stop to stop reading.
Select Read again to start reading the
message from the beginning.
■Reply to a message
1. Go to the text or e-mail message screen.
u The system automatically starts reading
the message aloud.
2 Displaying Messages P. 442
2.Select Reply.
3. Select the reply message.
u The pop-up menu appears on the screen.
4. Select Send to send the message.
u Complete appears on the screen when
the reply message was successfully sent.
1 Reply to a message
The available fixed reply messages are as follows:
•Talk to you later, I’m driving.•I’m on my way.
•I’m running late.
•OK•Yes
•No
You cannot add, edit, or delete reply messages.
Only certain phones receive and send messages when
paired and connected. For a list of compatible
phones:
•U.S.: Visit automobiles.honda.com /handsfreelink/,
or call 1-888-528-7876.
•Canada: For more info rmation on smartphone
compatibility, call 1-855-490-7351.
20 CR-V PET ELP_MAP_HMIN_HCM_J-31TLA6310.book 444 ページ 2019年10月3日 木曜日 午後4時55分
Page 450 of 671

448
Features
Compass*
When you turn the ignition switch to ON (w, the compass self-calibrates, and the
compass display appears.
Compass Calibration
If the compass indicates the wrong direction, or the CAL indicator blinks, you need
to manually calibrate the system.
1.Turn the ignition switch to ON
(w.
2. Press and hold the (day/night) button
until the display shows the compass setting
menu.
3. Rotate to select Calibration, then press
.
4. When the display changes to Push CAL
Start, press .
5. Drive the vehicle slowly in two circles.
u The compass starts to show a direction
after the calibration. The CAL indicator
goes off.
1 Compass*
Compass operation can be affected under the
following conditions:
•Driving near power lines or stations
•Crossing a bridge•Passing a large vehicle, or driving near a large
object that can cause a magnetic disturbance
•When accessories such as antennas and roof racks
are mounted by magnets
1 Compass Calibration
Calibrate the compass in an open area.
While setting the compass:
•The (Back) button returns to the previous
screen.
Compass Setting Menu Items
* Not available on all models
20 CR-V PET ELP_MAP_HMIN_HCM_J-31TLA6310.book 448 ページ 2019年10月3日 木曜日 午後4時55分
Page 451 of 671
449
uuCompass*uCompass Zone Selection
Features
Compass Zone Selection
1. Turn the ignition switch to ON (w.
2. Press and hold the (day/night) button
until the display shows the compass setting
menu.
3. Rotate to select Zone, then press .
The display shows the current zone
number.
4. Rotate to select the zone number of
your area (See Zone Map), then press .1Compass Zone Selection
The zone selection is done to compensate the
variation between magneti c north and true north.
If the calibration starts while the audio system is in
use, the display returns to normal after the calibration
is completed.
Zone Number
Zone Map
Guam Island: Zone 8
Puerto Rico: Zone 11
20 CR-V PET ELP_MAP_HMIN_HCM_J-31TLA6310.book 449 ページ 2019年10月3日 木曜日 午後4時55分
Page 453 of 671

451
Driving
This chapter discusses driving and refueling.
Before Driving................................... 452
Towing a Trailer Towing Preparation .......................... 457
Driving Safely with a Trailer .............. 460
Towing Your Vehicle ........................ 462
Off-Highway Driving Guidelines
General Information ......................... 463
Important Safety Precautions............ 463
Avoiding Trouble ............................. 464
When Driving Starting the Engine .................. 465, 467
Precautions While Driving................. 472
Continuously Variable Transmission ... 473 Shifting ............................................ 474
Auto Idle Stop.................................. 476
ECON Button ................................... 482
Front Sensor Camera ....................... 483
Adaptive Cruise Control (ACC) with Low
Speed Follow ................................. 485
Road Departure Mitigation (RDM) System ... 501Lane Keeping Assist System (LKAS) .. 505Vehicle Stability AssistTM (VSA®), aka Electronic
Stability Control (ESC), System ............. 513
LaneWatchTM*.................................. 519
Real Time AWD with Intelligent Control System
TM*...................................... 521Tire Pressure Monitoring System (TPMS) .. 522
Tire Pressure Monitoring System (TPMS) -
Required Federal Explanation ......... 526
Braking Brake System ................................... 528
Anti-lock Brake System (ABS) ........... 534
Brake Assist System ......................... 535
Collision Mitigation Braking System
TM
(CMBSTM) ....................................... 536
Parking Your Vehicle When Stopped ................................ 546
Multi-View Rear Camera .................. 552
Refueling ........................................... 554
Fuel Economy and CO
2 Emissions .... 557
Turbo Engine Vehicle ....................... 558
* Not available on all models
20 CR-V PET ELP_MAP_HMIN_HCM_J-31TLA6310.book 451 ページ 2019年10月3日 木曜日 午後4時55分
Page 460 of 671

uuTowing a Trailer uTowing Preparation
458
Driving
Towing equipment varies by the size of your trailer, how much load you are towing,
and where you are towing.
■Hitches
The hitch must be of an approved type and properly bolted to the underbody.
■Safety chains
Always use safety chains when you tow a trailer. Leave enough slack to allow the
trailer to turn corners easily, but do not allow the chains to drag on the ground.
■Trailer brakes
Recommended for any trailer with a total weight of 1,000 lbs (450 kg) or more:
There are two common types of trailer brake s: surge and electric. Surge brakes are
common for boat trailers, since the brakes will get wet. If you choose electric brakes,
be sure they are electronically actuated. Do not attempt to attach trailer brakes to
your vehicle's hydraulic system, as it w ill lower braking effectiveness and create a
potential hazard.
■Additional towing equipment
Many states and provinces/territories requi re special outside mirrors when towing a
trailer. Even if mirrors are not required in your locale, you should install special
mirrors if visibility is restricted in any way.
■Towing Equipment and Accessories1Towing Equipment and Accessories
Make sure that all equipmen t is properly installed and
maintained, and that it meets federal, state, province/
territory, and lo cal regulations.
Consult your trai ler maker for prope r installation and
setup of the equipment.
Improper installation and setup can affect the
handling, stability, and br aking performance of your
vehicle.
Consult your traile r sales or rental agency if any other
items are recommended or required for your towing
situation.
The lighting and wiring of tra ilers can vary by type
and brand. If a connector is required, it should only
be installed by a qua lified technician.
Trailer packages and products:
•Ball mount, hitch plug, hitch pin etc.•Wiring harness kit
•Trailer hitch kit
2Trailer brakes P. 458
Are available at a dealer.
20 CR-V PET ELP_MAP_HMIN_HCM_J-31TLA6310.book 458 ページ 2019年10月3日 木曜日 午後4時55分
Page 463 of 671
461
uuTowing a Trailer uDriving Safely with a Trailer
Driving
• Monitor your temperature gauge. If it nears the white (H) mark, turn off the
climate control system and reduce speed. Pull to the side of the road safely to cool
down the engine if necessary.
■Driving in Hilly Terrain
20 CR-V PET ELP_MAP_HMIN_HCM_J-31TLA6310.book 461 ページ 2019年10月3日 木曜日 午後4時55分
Page 467 of 671

465Continued
Driving
When Driving
Starting the Engine
1.Make sure the parkin g brake is applied.
u The parking brake and brake system
indicator comes on for 15 seconds when
you pull up the electric parking brake
switch.
2. Check that the shift lever is in
(P, then
depress the brake pedal.
u Although it is possible to start the vehicle
in
(N, it is safer to start it in (P.
3. Turn the ignition switch to START
(e
without depressing the accelerator pedal.
Models without smart entry system
1 Starting the Engine
Keep your foot firmly on the brake pedal when
starting the engine.
The engine is harder to st art in cold weather and in
thinner air found at altit udes above 8,000 feet (2,400
meters).
When starting the engine in cold weather, turn off all
electrical accessories such as the lights, climate
control system, and rear de fogger in order to reduce
battery drain.
If you live in a region where winter is extremely cold,
an engine block heater will improve starting and
warming of the engine. Cons ult a dealer for details.
If the exhaust system sounds abnormal or you can
smell exhaust gas inside the vehicle, have your vehicle
checked by a dealer. There may be a problem with
the engine or exhaust system.
Do not hold the key in START
( e for more than 10
seconds.
•If the engine does not start right away, wait for at
least 30 seconds before trying again.
•If the engine starts, but then immediately stops,
wait at least 30 seconds before repeating step 3
while gently depressing the accelerator pedal.
Release the accelerator pedal once the engine
starts.
Electric Parking Brake Switch
Brake Pedal
20 CR-V PET ELP_MAP_HMIN_HCM_J-31TLA6310.book 465 ページ 2019年10月3日 木曜日 午後4時55分
Page 468 of 671

uuWhen Driving uStarting the Engine
466
Driving
1. Keeping your right foot on the br ake pedal, put the shift lever in (D. Select (R
when reversing.
2. With the parking brake applied, release the brake pedal and gently depress the
accelerator pedal.
u Make sure the parking brake and brake system indicator goes off.
2 Parking Brake P. 528
■Hill start assist system
Hill start assist keeps the brake engaged br iefly to help prevent the vehicle from
rolling on inclines as you move your fo ot from the brake pedal to the accelerator.
Move the shift lever to
(D, (S, or (L when facing uphill, or (R when facing
downhill, then release the brake pedal.
■Starting to Drive1 Starting the Engine
The immobilizer system pr otects your vehicle from
theft. If an improperly code d key (or other device) is
used, the engine's fuel system is disabled.
2 Immobilizer System P. 160
You can also release the parking brake by pressing
the electric parking brake sw itch while depressing the
brake pedal. When facing downhill, you can start
your vehicle more smoothly by manually releasing it
with the electric parki ng brake switch than by
releasing it with th e accelerator pedal.
1Hill start assist system
Hill start assist may not prevent the vehicle from
rolling downhill on a very st eep or slippery slope, and
does not operate on small inclines.
Hill start assist is not a replacement for the parking
brake.
Hill start assist will operate even when VSA ® is
switched off.
20 CR-V PET ELP_MAP_HMIN_HCM_J-31TLA6310.book 466 ページ 2019年10月3日 木曜日 午後4時55分