2020 GMC TERRAIN lift gate
[x] Cancel search: lift gatePage 306 of 425

GMC Terrain/Terrain Denali Owner Manual (GMNA-Localizing-U.S./Canada/
Mexico-13556230) - 2020 - CRC - 9/5/19
Vehicle Care 303
Liftgate
Headlamp Aiming
Front Headlamp Aiming
Headlamp aim has been preset and
should need no further adjustment.
If the vehicle is damaged in a crash,
the headlamp aim may be affected.
If adjustment to the headlamps is
necessary, see your dealer.
Bulb Replacement
For the proper type of replacement
bulbs, or any bulb changing
procedure not listed in this section,
contact your dealer.
Caution
Do not replace incandescent
bulbs with aftermarket LED
replacement bulbs. This can
cause damage to the vehicle
electrical system.
Halogen Bulbs
{Warning
Halogen bulbs have pressurized
gas inside and can burst if you
drop or scratch the bulb. You or
others could be injured. Be sure
to read and follow the instructions
on the bulb package.
Page 307 of 425

GMC Terrain/Terrain Denali Owner Manual (GMNA-Localizing-U.S./Canada/
Mexico-13556230) - 2020 - CRC - 9/5/19
304 Vehicle Care
High Intensity Discharge
(HID) Lighting
{Warning
The High Intensity Discharge
(HID) lighting system operates at
a very high voltage. If you try to
service any of the system
components, you could be
seriously injured. Have your
dealer or a qualified technician
service them.
After an HID headlamp bulb has
been replaced, the beam might be a
slightly different shade than it was
originally. This is normal.
LED Lighting
This vehicle has several LED lamps.
For replacement of any LED lighting
assembly, contact your dealer.
Front Turn Signal Lamps
To replace one of these bulbs: 1. Open the hood. See Hood
0 276.
2. Remove the bulb access cap
from the top of the headlamp
assembly by turning it
counterclockwise.
3. Remove the bulb from the bulb
socket by pinching the tabs on
either side of the bulb and pull
straight out.
4. Install the new bulb in the bulb socket.
5. Install the bulb access cap onto the headlamp assembly by
turning clockwise.
Taillamps
To replace one of these lamps:
1. Open the liftgate. See Liftgate
0 21.
Page 309 of 425

GMC Terrain/Terrain Denali Owner Manual (GMNA-Localizing-U.S./Canada/
Mexico-13556230) - 2020 - CRC - 9/5/19
306 Vehicle Care
1. Bulb Socket
2. Bulb
3. Lamp Assembly
To replace one of these bulbs:1. Open the liftgate partway. See Liftgate 021.
2. Push the lamp assembly outboard to remove.
3. Pull the lamp assembly down to remove it from the liftgate.
4. Turn the bulb socket (1) counterclockwise to remove it
from the lamp assembly (3).
5. Pull the bulb (2) straight out of the bulb socket (1).
6. Push the replacement bulb straight into the bulb socket
and turn the bulb socket
clockwise to install it into the
lamp assembly.
7. Push the lamp assembly into the liftgate engaging the clip
side first.
8. Push on the lamp side opposite the clip until the lamp assembly
snaps into place.
Electrical System
Electrical System
Overload
The vehicle has fuses and circuit
breakers to protect against an
electrical system overload.
When the electrical load current is
too heavy, the circuit breaker opens
and closes, protecting the circuit
until the current load returns to
normal or the problem is fixed. This
greatly reduces the chance of circuit
overload and fire caused by
electrical problems.
Replace a bad fuse with a new one
of the identical size and rating.
If there is a problem on the road and
a fuse needs to be replaced, the
same amperage fuse can be
borrowed. Choose some feature of
the vehicle that is not needed to use
and replace it as soon as possible.
Headlamp Wiring
An electrical overload may cause
the lamps to go on and off, or in
some cases to remain off. Have the
headlamp wiring checked right away
if the lamps go on and off or
remain off.
Windshield Wipers
If the wiper motor overheats due to
heavy snow or ice, the windshield
wipers will stop until the motor cools
and will then restart.
Although the circuit is protected
from electrical overload, overload
due to heavy snow or ice may
cause wiper linkage damage.
Always clear ice and heavy snow
from the windshield before using the
windshield wipers.
If the overload is caused by an
electrical problem and not snow or
ice, be sure to get it fixed.
Page 315 of 425
GMC Terrain/Terrain Denali Owner Manual (GMNA-Localizing-U.S./Canada/
Mexico-13556230) - 2020 - CRC - 9/5/19
312 Vehicle Care
FusesUsage
F32 Body control module 8
F33 Heating, ventilation, and air conditioning
F34 Passive entry, passive start
F35 Liftgate latch
F36 Wireless charger module/USB
accessory
F37 Cigarette lighter
F38 OnStar
F39 Instrument panel USB
F40 Camera module/ Liftgate module
F41 Park assist module
F42 Radio
Relays Usage
K01 –
K02 Retained accessory power Relays
Usage
K03 Liftgate
K04 –
K05 Logistics
Circuit
Breakers Usage
CB1 –
CB2 Auxiliary power outlet console
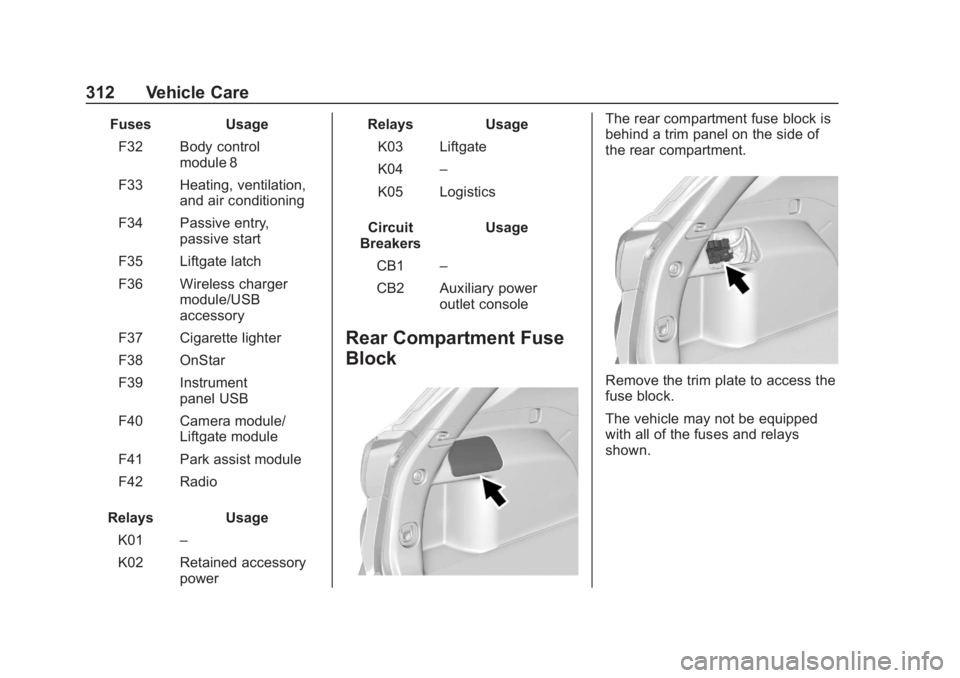
Rear Compartment Fuse
Block
The rear compartment fuse block is
behind a trim panel on the side of
the rear compartment.
Remove the trim plate to access the
fuse block.
The vehicle may not be equipped
with all of the fuses and relays
shown.
Page 316 of 425

GMC Terrain/Terrain Denali Owner Manual (GMNA-Localizing-U.S./Canada/
Mexico-13556230) - 2020 - CRC - 9/5/19
Vehicle Care 313
FusesUsage
F1 Exhaust fuel heater/Selective
catalytic reduction
power module
(diesel only)
F2 Liftgate
F3 Trailer auxiliary power
F4 Passenger Power Seat
F5 Memory seat module
F6 Sunroof
F7 Side blind zone alert
F8 Trailer reverse lamps
F9 Rear heated seat 1
F10 Park Lamps F11 Rear heated seat 2
F12 –
F13 Trailer parking lamp Fuses
Usage
F14 Right trailer stoplamp/Turn
signal lamp
F15 Left parking lamp
F16 Right parking lamp
F17 Video processing module
F18 Left trailer stoplamp/Turn
signal lamp
F19 All-wheel drive
F20 Lumbar
F21 Rear auxiliary power outlet
F22 Rear drive unit
Relays Usage
K1 Right trailer stoplamp/Turn
signal lamp
K2 Trailer reverse lamps
Page 345 of 425

GMC Terrain/Terrain Denali Owner Manual (GMNA-Localizing-U.S./Canada/
Mexico-13556230) - 2020 - CRC - 9/5/19
342 Vehicle Care
If the vehicle only has a
cigarette lighter, use the
cigarette lighter.
Do not pinch the power plug
cord in the door or window.
7. Start the vehicle. The vehicle must be running while using
the air compressor.
8. Press the on/off button (5) to turn the tire sealant and
compressor kit on.
The compressor will inflate the
tire with air only.
9. Inflate the tire to the recommended inflation
pressure using the pressure
gauge (8). The recommended
inflation pressure can be found
on the Tire and Loading
Information label. See Tire
Pressure 0321.
The pressure gauge (8) may
read higher than the actual tire
pressure while the compressor
is on. Turn the compressor off
to get an accurate pressure reading. The compressor may
be turned on/off until the
correct pressure is reached.
Caution
If the recommended pressure
cannot be reached after
approximately 25 minutes, the
vehicle should not be driven
farther. The tire is too severely
damaged and the tire sealant and
compressor kit cannot inflate the
tire. Remove the power plug from
the accessory power outlet and
unscrew the inflating hose from
the tire valve. See
Roadside
Assistance Program 0389.
10. Press the on/off button (5) to turn the tire sealant and
compressor kit off.
Be careful while handling the
compressor as it could be
warm after usage.
11. Unplug the power plug (9) from the accessory power outlet in
the vehicle. 12. Turn the air only hose (10)
counterclockwise to remove it
from the tire valve stem.
13. Replace the tire valve stem cap.
14. Return the air only hose (10) and power plug (9) back to
their original storage location.
15. Return the equipment to its original storage location in the
vehicle.
The tire sealant and compressor kit
has accessory adapters located in a
compartment on the bottom of its
housing that can be used to inflate
air mattresses, balls, etc.
Storing the Tire Sealant
and Compressor Kit
The tire sealant and compressor kit
is in a bag in the rear compartment
storage area. 1. Open the liftgate. See Liftgate
0 21.
2. Fold the rear part of the load floor to the front.
Page 346 of 425

GMC Terrain/Terrain Denali Owner Manual (GMNA-Localizing-U.S./Canada/
Mexico-13556230) - 2020 - CRC - 9/5/19
Vehicle Care 343
3. Turn the retainer nutcounterclockwise to remove the
tire sealant and compressor
kit bag.
4. Remove the tire sealant and compressor kit from the bag.
To store the tire sealant and
compressor kit, reverse the steps.
Tire Changing
Removing the Spare Tire and
Tools
1. Tow Eye (If Equipped)
2. Capless Funnel Adapter (If Equipped)
3. Wheel Wrench
4. Strap
5. Jack
6. Screwdriver (If Equipped)
To access the spare tire and tools:
1. Open the liftgate. See Liftgate
0 21. 2. Fold the rear part of the load
floor to the front, pull it
rearward to disengage the
clips, then pull upward to
remove it.
3. Pull the spare tire cover forward and upward to
remove it.
4. Turn the retainer nut counterclockwise to remove the
spare tire. Place the spare tire
next to the tire being changed.
5. The jack and tools are stored below the spare tire. Remove
them from their container and
place them near the tire being
changed.
Removing the Flat Tire and
Installing the Spare Tire
1. Do a safety check beforeproceeding. See If a Tire Goes
Flat 0335 for more information.
2. For vehicles with a wheel cover or center cap, pull the cover or
center cap away from the
wheel to remove it. Store the
Page 363 of 425

GMC Terrain/Terrain Denali Owner Manual (GMNA-Localizing-U.S./Canada/
Mexico-13556230) - 2020 - CRC - 9/5/19
360 Vehicle Care
Caution (Continued)
dust and ice. Always wash the
chrome with soap and water after
exposure.
Caution
To avoid surface damage on
wheels and wheel trim, do not
use strong soaps, chemicals,
abrasive polishes, cleaners,
or brushes. Use only GM
approved cleaners. Do not drive
the vehicle through an automatic
car wash that uses silicon carbide
tire/wheel cleaning brushes.
Damage could occur and the
repairs would not be covered by
the vehicle warranty.
Brake System
Visually inspect brake lines and
hoses for proper attachment,
connections, binding, leaks, cracks,
chafing, etc. Inspect disc brakepads for wear and rotors for surface
condition. Inspect all other brake
parts for cracks and leaks.
Steering, Suspension, and
Chassis Components
Visually inspect steering,
suspension, and chassis
components for damaged, loose,
or missing parts or signs of wear at
least once a year.
Inspect power steering for proper
attachment, connections, binding,
leaks, cracks, chafing, etc.
Visually check constant velocity joint
boots and axle seals for leaks.
Body Component Lubrication
Lubricate all key lock cylinders,
hood hinges, liftgate hinges, steel
fuel door hinge, and power assist
step hinges, unless the components
are plastic. Applying silicone grease
on weatherstrips with a clean cloth
will make them last longer, seal
better, and not stick or squeak.
Underbody Maintenance
At least twice a year, spring and fall,
use plain water to flush any
corrosive materials from the
underbody. Take care to thoroughly
clean any areas where mud and
other debris can collect.
Do not directly power wash the
transfer case and/or front/rear axle
output seals. High pressure water
can overcome the seals and
contaminate the fluid. Contaminated
fluid will decrease the life of the
transfer case and/or axles and
should be replaced.
Sheet Metal Damage
If the vehicle is damaged and
requires sheet metal repair or
replacement, make sure the body
repair shop applies anti-corrosion
material to parts repaired or
replaced to restore corrosion
protection.
Original manufacturer replacement
parts will provide the corrosion
protection while maintaining the
vehicle warranty.