2020 GMC SIERRA spare tire location
[x] Cancel search: spare tire locationPage 314 of 502

GMC Sierra/Sierra Denali Owner Manual (GMNA-Localizing-U.S./Canada/
Mexico-13337776) - 2020 - CRC - 4/4/19
Driving and Operating 313
3. Activate the tool near the valvestem or adjust the air pressure
of this tire until the horn chirps
and all working vehicle and
trailer lights flash.
The process stops without
saving the sensor locations if
this step takes more than
two minutes.
4. Move to the next tire and repeat Step 3 for each sensor.
The horn chirps twice when all
sensors are completed.
5. Return to the vehicle to complete the setup.
Maintenance Reminders
To set up maintenance reminders,
touch the Trailer Maintenance icon.
Select Yes to set up the
maintenance reminders for the
Trailer Profile. Follow the on-screen
prompts. The maximum number of
reminders is 50. Select No to return
to the previous screen.
Towing Assistance
If the Transparent Trailer feature is
available, touch the Towing
Assistance icon to set up
transparent trailer.
Touch Yes to begin set up or touch
No to return to the previous screen.
Follow the on-screen instructions.
A rear trailer camera must be
mounted on the trailer and
electrically connected to the vehicle
before transparent trailer feature
can be used. See Assistance
Systems for Parking or Backing
0 257.
Trailer dimensions must be in range
and transparent trailer must be
calibrated prior to use.
Transparent Trailer Setup
To complete setup for transparent
trailer: 1. Select the number of axles on the trailer. 2. Enter trailer dimensions
.Trailer Length: 300 cm
(118.1 in) 970 cm (381.8
in). Measure from center of
coupler to furthest rear
point on the trailer.
. Trailer Width: 120 cm (47.2
in) 260 cm (102.3 in).
Measure from left edge to
right edge.
. Trailer Height: 1 cm
(.39 in) –450 cm (177.1 in).
Measure from ground to
tallest point.
. Hitching Point Length: 180
cm (70.8 in) –970
cm (381.8 in). Measure from
center of coupler to middle
of tires.
. Trailer Tongue Length: 50
cm (119.6 in) –220
cm (86.6 in). Measure from
center of coupler to trailer
front wall.
Page 320 of 502

GMC Sierra/Sierra Denali Owner Manual (GMNA-Localizing-U.S./Canada/
Mexico-13337776) - 2020 - CRC - 4/4/19
Driving and Operating 319
.Average Fuel Economy
. Reverse Lights Alert
. Electric Brakes Alert
Touch Save to save the new value
to the Trailer Profile. Touching Back
will still save the previously entered
information.
Trailer Name
Touch to edit the Trailer Profile’s
name. Use at least one character
and no spaces. Touch Save.
Towing Assistance Setup
A trailer should be connected to
complete this portion of profile
setup.
Touch to set up the Transparent
Trailer feature for the Trailer Profile.
See "Transparent Trailer Setup"
under "Towing Assistance" for
details on the setup.
Tire Pressure Setup
Touch to set up the Trailer Tire
Pressure Monitoring System
(TTPMS) for the Trailer Profile. See
“Trailer Tire Pressure Setup” previously in this section for details
on the setup. Also, touch Tire
Pressure Setup if the trailer tires
were rotated or if the tire pressure
sensors in the tires were replaced
for this Trailer Profile. The vehicle
will need to relearn the tire sensors
and their locations.
If TTPMS had been set up
previously, the Select Number of
Sensors screen will appear after
touching Tire Pressure Setup. If the
number of sensors has changed,
select the number and touch Next.
If a new number of sensors is
selected, the Relearn Sensors
pop-up will appear. Touch Cancel to
go back or touch Relearn to
overwrite the current sensors and
begin the relearning process. See
“Trailer Tire Pressure Setup”
previously in this section.
If number of sensors has not
changed, touch Next and the Learn
sensors screen will appear.
On the Learn Sensors screen.
Touch Relearn to overwrite the
current sensors and begin therelearning process. See
“Trailer Tire
Pressure Setup” previously in this
section.
On the Learn Sensors screen, touch
Next to go to the Edit
Recommended Tire Pressure
screen.
On the Edit Recommended Tire
Pressure screen, touch a number on
the keypad to change the
Recommended Tire Pressure for the
trailer ’s tires. This will change the
number at which the vehicle
displays alerts related to trailer tire
pressure. Touch Done to return to
the Trailer Profile view.
Trailer Maintenance
Touch to view a list of maintenance
reminders for the Trailer Profile.
Touch a reminder to view, reset,
delete, or edit it.
Reset Reminder
Touch Maintenance Complete in the
reminder view to reset the reminder.
On the pop-up, touch Reset to reset
the time and mileage values for the
Page 392 of 502

GMC Sierra/Sierra Denali Owner Manual (GMNA-Localizing-U.S./Canada/
Mexico-13337776) - 2020 - CRC - 4/10/19
Vehicle Care 391
inflation pressure for the tires when
they are cold. SeeVehicle Load
Limits 0200, for an example of the
Tire and Loading Information label
and its location. Also see Tire
Pressure 0387.
The TPMS can warn about a low
tire pressure condition but it does
not replace normal tire
maintenance. See Tire Inspection
0 396, Tire Rotation 0396 and
Tires 0379.
Caution
Tire sealant materials are not all
the same. A non-approved tire
sealant could damage the TPMS
sensors. TPMS sensor damage
caused by using an incorrect tire
sealant is not covered by the
vehicle warranty. Always use only
the GM approved tire sealant
available through your dealer or
included in the vehicle.
TPMS Malfunction Light and
Message
The TPMS will not function properly
if one or more of the TPMS sensors
are missing or inoperable. When the
system detects a malfunction, the
low tire pressure warning light
flashes for about one minute and
then stays on for the remainder of
the ignition cycle. A DIC warning
message also displays. The
malfunction light and DIC warning
message come on at each ignition
cycle until the problem is corrected.
Some of the conditions that can
cause these to come on are:
.
One of the road tires has been
replaced with the spare tire. The
spare tire does not have a
TPMS sensor. The malfunction
light and the DIC message
should go off after the road tire
is replaced and the sensor
matching process is performed
successfully. See "TPMS Sensor
Matching Process" later in this
section. .
The TPMS sensor matching
process was not done or not
completed successfully after
rotating the tires. The
malfunction light and the DIC
message should go off after
successfully completing the
sensor matching process. See
"TPMS Sensor Matching
Process" later in this section.
. One or more TPMS sensors are
missing or damaged. The
malfunction light and the DIC
message should go off when the
TPMS sensors are installed and
the sensor matching process is
performed successfully. See
your dealer for service.
. Replacement tires or wheels do
not match the original equipment
tires or wheels. Tires and wheels
other than those recommended
could prevent the TPMS from
functioning properly. See Buying
New Tires 0399.
Page 397 of 502

GMC Sierra/Sierra Denali Owner Manual (GMNA-Localizing-U.S./Canada/
Mexico-13337776) - 2020 - CRC - 4/10/19
396 Vehicle Care
.If the system does not receive
the signal from an individual
sensor, an error message may
not occur until the vehicle has
been driver for a period of time.
If the TTPMS is not functioning
properly, it cannot detect or signal a
low tire condition. See your dealer
for service if the DIC message
comes on and stays on when the
trailer tire pressures have been
checked and determined to be
correct.
Tire Inspection
We recommend that the tires,
including the spare tire, if the
vehicle has one, be inspected
for signs of wear or damage at
least once a month.
Replace the tire if:
.The indicators at three or
more places around the tire
can be seen.
.There is cord or fabric
showing through the tire's
rubber.
.The tread or sidewall is
cracked, cut, or snagged
deep enough to show cord or
fabric.
.The tire has a bump, bulge,
or split.
.The tire has a puncture, cut,
or other damage that cannot
be repaired well because of
the size or location of the
damage.
Tire Rotation
Tires should be rotated every
12 000 km (7,500 mi). See
Maintenance Schedule 0442.
Tires are rotated to achieve a
more uniform wear for all tires.
The first rotation is the most
important. Anytime unusual wear is
noticed, rotate the tires as soon
as possible, check for proper tire
inflation pressure, and check for
damaged tires or wheels. If the
unusual wear continues after the
rotation, check the wheel
alignment. See
When It Is Time
for New Tires 0398 and
Wheel Replacement 0403.
Use this rotation pattern when
rotating the tires if the vehicle
has single rear wheels.
Page 413 of 502

GMC Sierra/Sierra Denali Owner Manual (GMNA-Localizing-U.S./Canada/
Mexico-13337776) - 2020 - CRC - 4/10/19
412 Vehicle Care
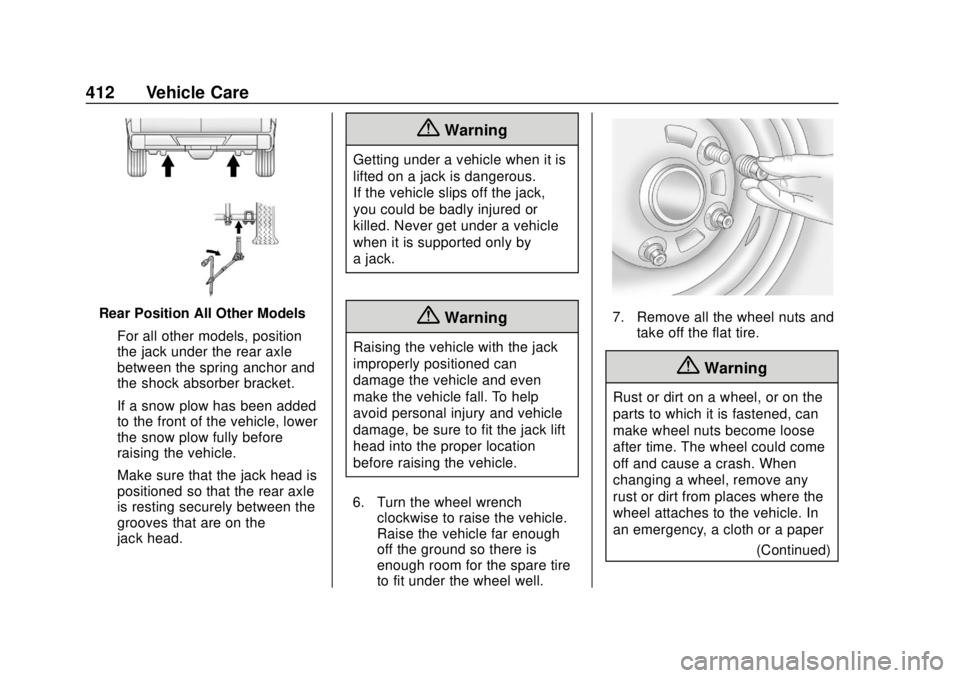
Rear Position All Other ModelsFor all other models, position
the jack under the rear axle
between the spring anchor and
the shock absorber bracket.
If a snow plow has been added
to the front of the vehicle, lower
the snow plow fully before
raising the vehicle.
Make sure that the jack head is
positioned so that the rear axle
is resting securely between the
grooves that are on the
jack head.
{Warning
Getting under a vehicle when it is
lifted on a jack is dangerous.
If the vehicle slips off the jack,
you could be badly injured or
killed. Never get under a vehicle
when it is supported only by
a jack.
{Warning
Raising the vehicle with the jack
improperly positioned can
damage the vehicle and even
make the vehicle fall. To help
avoid personal injury and vehicle
damage, be sure to fit the jack lift
head into the proper location
before raising the vehicle.
6. Turn the wheel wrench clockwise to raise the vehicle.
Raise the vehicle far enough
off the ground so there is
enough room for the spare tire
to fit under the wheel well.
7. Remove all the wheel nuts andtake off the flat tire.
{Warning
Rust or dirt on a wheel, or on the
parts to which it is fastened, can
make wheel nuts become loose
after time. The wheel could come
off and cause a crash. When
changing a wheel, remove any
rust or dirt from places where the
wheel attaches to the vehicle. In
an emergency, a cloth or a paper
(Continued)
Page 418 of 502

GMC Sierra/Sierra Denali Owner Manual (GMNA-Localizing-U.S./Canada/
Mexico-13337776) - 2020 - CRC - 4/10/19
Vehicle Care 417
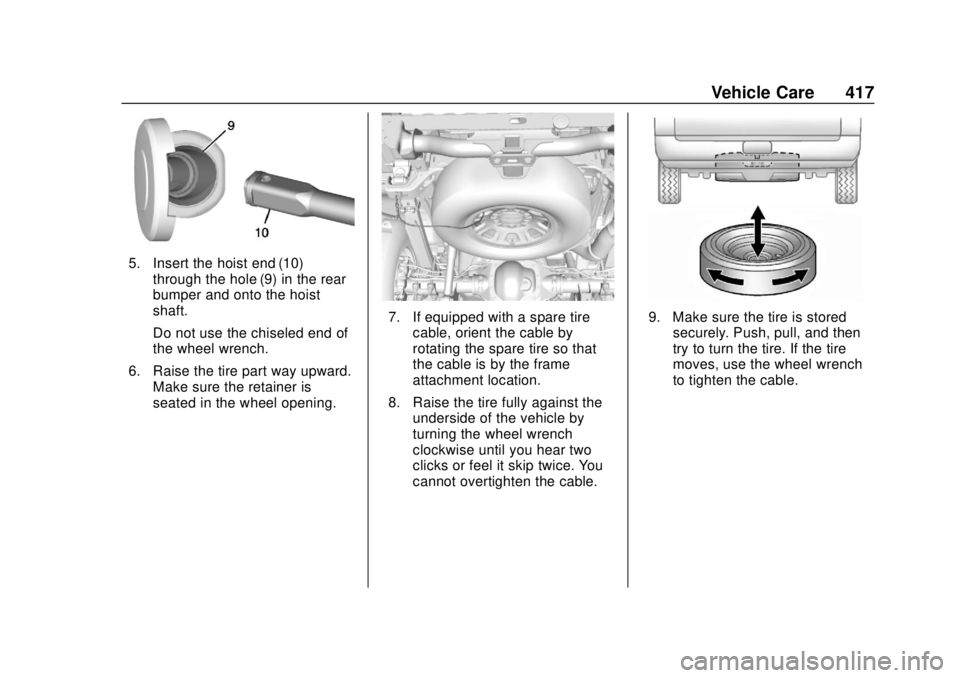
5. Insert the hoist end (10)through the hole (9) in the rear
bumper and onto the hoist
shaft.
Do not use the chiseled end of
the wheel wrench.
6. Raise the tire part way upward. Make sure the retainer is
seated in the wheel opening.
7. If equipped with a spare tirecable, orient the cable by
rotating the spare tire so that
the cable is by the frame
attachment location.
8. Raise the tire fully against the underside of the vehicle by
turning the wheel wrench
clockwise until you hear two
clicks or feel it skip twice. You
cannot overtighten the cable.9. Make sure the tire is storedsecurely. Push, pull, and then
try to turn the tire. If the tire
moves, use the wheel wrench
to tighten the cable.
Page 419 of 502

GMC Sierra/Sierra Denali Owner Manual (GMNA-Localizing-U.S./Canada/
Mexico-13337776) - 2020 - CRC - 4/10/19
418 Vehicle Care
If equipped with a spare tire
cable, reattach the clip to the
frame attachment bracket. Note
that there may be slack in the
cable.
Repeat this tightness check
procedure when checking the
spare tire pressure according
to the scheduled maintenance
information or any time the
spare tire is handled due to
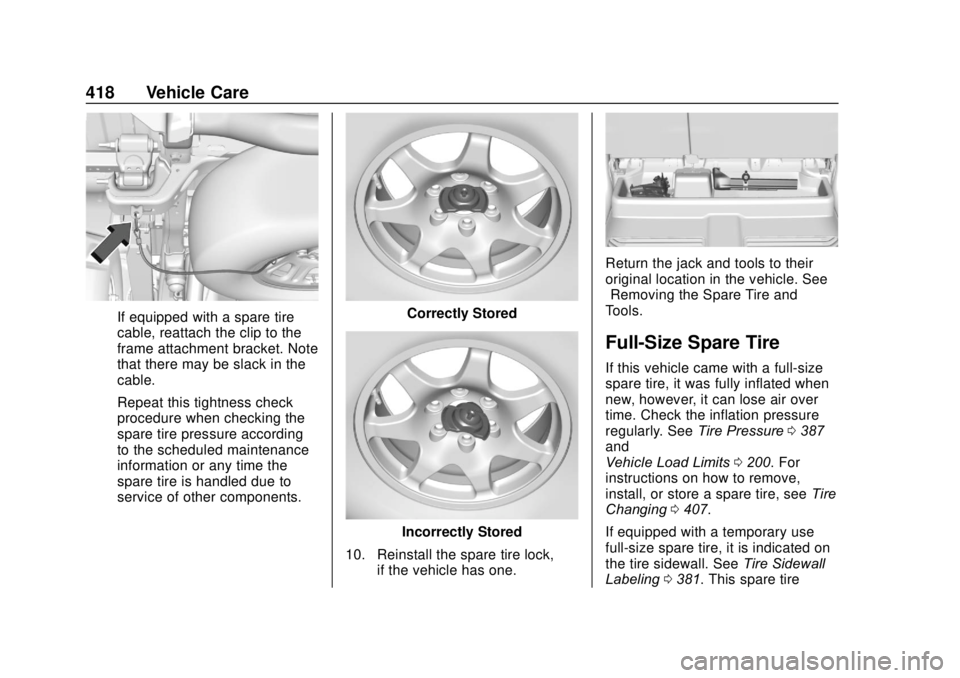
service of other components.Correctly Stored
Incorrectly Stored
10. Reinstall the spare tire lock, if the vehicle has one.
Return the jack and tools to their
original location in the vehicle. See
“Removing the Spare Tire and
Tools.”
Full-Size Spare Tire
If this vehicle came with a full-size
spare tire, it was fully inflated when
new, however, it can lose air over
time. Check the inflation pressure
regularly. See Tire Pressure0387
and
Vehicle Load Limits 0200. For
instructions on how to remove,
install, or store a spare tire, see Tire
Changing 0407.
If equipped with a temporary use
full-size spare tire, it is indicated on
the tire sidewall. See Tire Sidewall
Labeling 0381. This spare tire
Page 468 of 502

GMC Sierra/Sierra Denali Owner Manual (GMNA-Localizing-U.S./Canada/
Mexico-13337776) - 2020 - CRC - 4/4/19
Customer Information 467
Center at 1-800-323-9935. Text
Telephone (TTY) users, call
1-800-833-9935.
General Motors of Canada also has
a Mobility program. See www.gm.ca
or call 1-800-GM-DRIVE
(800-463-7483) for details. TTY
users call 1-800-263-3830.
Roadside Assistance
Program
For U.S.-purchased vehicles, call
1-888-881-3302; (Text Telephone
(TTY): 1-888-889-2438).
For Canadian-purchased vehicles,
call 1-800-268-6800.
Service is available 24 hours a day,
365 days a year.
Calling for Assistance
When calling Roadside Assistance,
have the following information
ready:
.Your name, home address, and
home telephone number
. Telephone number of your
location .
Location of the vehicle
. Model, year, color, and license
plate number of the vehicle
. Odometer reading, Vehicle
Identification Number (VIN), and
delivery date of the vehicle
. Description of the problem
Coverage
Services are provided for the
duration of the vehicle's powertrain
warranty.
In the U.S., anyone driving the
vehicle is covered. In Canada, a
person driving the vehicle without
permission from the owner is not
covered.
Roadside Assistance is not a part of
the New Vehicle Limited Warranty.
General Motors North America and
GMC reserve the right to make any
changes or discontinue the
Roadside Assistance program at
any time without notification.
General Motors North America and
GMC reserve the right to limit
services or payment to an owner or driver if they decide the claims are
made too often, or the same type of
claim is made many times.
Services Provided
.
Emergency Fuel Delivery:
Delivery of enough fuel for the
vehicle to get to the nearest
service station.
. Lock-Out Service: Service to
unlock the vehicle if you are
locked out. A remote unlock may
be available if you have OnStar.
For security reasons, the driver
must present identification
before this service is given.
. Emergency Tow from a Public
Road or Highway: Tow to the
nearest GMC dealer for warranty
service, or if the vehicle was in a
crash and cannot be driven.
Assistance is not given when the
vehicle is stuck in the sand,
mud, or snow.
. Flat Tire Change: Service to
change a flat tire with the spare
tire. The spare tire, if equipped,
must be in good condition and
properly inflated. It is the owner's