2020 GMC SIERRA Driving
[x] Cancel search: DrivingPage 2 of 502

GMC Sierra/Sierra Denali Owner Manual (GMNA-Localizing-U.S./Canada/
Mexico-13337776) - 2020 - CRC - 4/10/19
ContentsIntroduction . . . . . . . . . . . . . . . . . . . . . . 2
Keys, Doors, and Windows . . . . . . 9
Seats and Restraints . . . . . . . . . . . 53
Storage . . . . . . . . . . . . . . . . . . . . . . . 113
Instruments and Controls . . . . . . 118
Lighting . . . . . . . . . . . . . . . . . . . . . . . 165
Infotainment System . . . . . . . . . . 176
Climate Controls . . . . . . . . . . . . . . 177
Driving and Operating . . . . . . . . . 185
Vehicle Care . . . . . . . . . . . . . . . . . . 327
Service and Maintenance . . . . . 440
Technical Data . . . . . . . . . . . . . . . . 458
Customer Information . . . . . . . . . 463
Reporting Safety Defects . . . . . . 473
OnStar . . . . . . . . . . . . . . . . . . . . . . . . 477
Connected Services . . . . . . . . . . . 485
Index . . . . . . . . . . . . . . . . . . . . 488
Page 32 of 502

GMC Sierra/Sierra Denali Owner Manual (GMNA-Localizing-U.S./Canada/
Mexico-13337776) - 2020 - CRC - 4/4/19
Keys, Doors, and Windows 31
power close. Power opening is still
enabled. See your dealer for
service.
The power tailgate may be
temporarily disabled after repeated
power cycling over a short period of
time. If this occurs, the tailgate can
still be operated manually.
The vehicle must be in P (Park) to
operate the power tailgate. If the
vehicle is shifted out of P (Park)
while the power function is in
progress, the tailgate will continue
to completion. If the vehicle is
accelerated while the tailgate is still
closing, the tailgate may stop and
reverse direction. Make sure the
tailgate is closed and latched before
driving.Lift-to-Close Operation
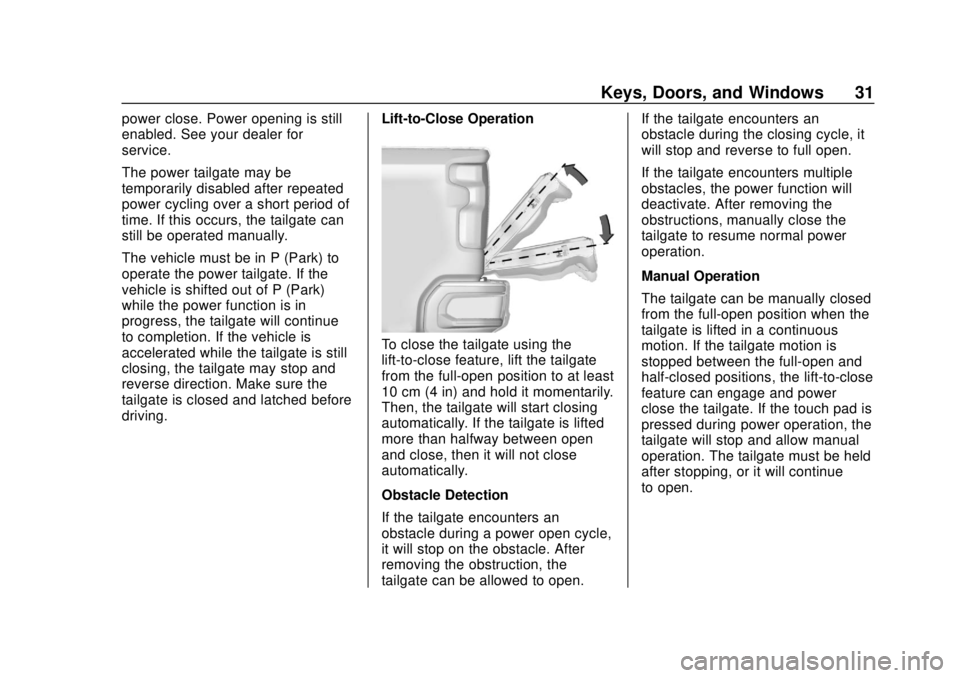
To close the tailgate using the
lift-to-close feature, lift the tailgate
from the full-open position to at least
10 cm (4 in) and hold it momentarily.
Then, the tailgate will start closing
automatically. If the tailgate is lifted
more than halfway between open
and close, then it will not close
automatically.
Obstacle Detection
If the tailgate encounters an
obstacle during a power open cycle,
it will stop on the obstacle. After
removing the obstruction, the
tailgate can be allowed to open.If the tailgate encounters an
obstacle during the closing cycle, it
will stop and reverse to full open.
If the tailgate encounters multiple
obstacles, the power function will
deactivate. After removing the
obstructions, manually close the
tailgate to resume normal power
operation.
Manual Operation
The tailgate can be manually closed
from the full-open position when the
tailgate is lifted in a continuous
motion. If the tailgate motion is
stopped between the full-open and
half-closed positions, the lift-to-close
feature can engage and power
close the tailgate. If the touch pad is
pressed during power operation, the
tailgate will stop and allow manual
operation. The tailgate must be held
after stopping, or it will continue
to open.
Page 43 of 502

GMC Sierra/Sierra Denali Owner Manual (GMNA-Localizing-U.S./Canada/
Mexico-13337776) - 2020 - CRC - 4/4/19
42 Keys, Doors, and Windows
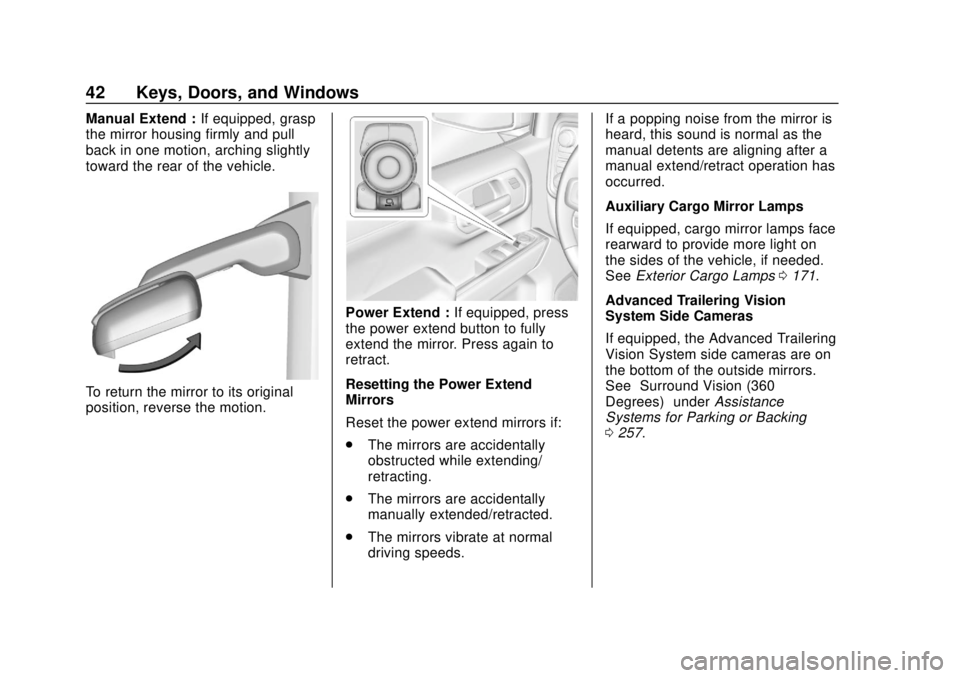
Manual Extend :If equipped, grasp
the mirror housing firmly and pull
back in one motion, arching slightly
toward the rear of the vehicle.
To return the mirror to its original
position, reverse the motion.
Power Extend : If equipped, press
the power extend button to fully
extend the mirror. Press again to
retract.
Resetting the Power Extend
Mirrors
Reset the power extend mirrors if:
. The mirrors are accidentally
obstructed while extending/
retracting.
. The mirrors are accidentally
manually extended/retracted.
. The mirrors vibrate at normal
driving speeds. If a popping noise from the mirror is
heard, this sound is normal as the
manual detents are aligning after a
manual extend/retract operation has
occurred.
Auxiliary Cargo Mirror Lamps
If equipped, cargo mirror lamps face
rearward to provide more light on
the sides of the vehicle, if needed.
See
Exterior Cargo Lamps 0171.
Advanced Trailering Vision
System Side Cameras
If equipped, the Advanced Trailering
Vision System side cameras are on
the bottom of the outside mirrors.
See “Surround Vision (360
Degrees)” underAssistance
Systems for Parking or Backing
0 257.
Page 45 of 502

GMC Sierra/Sierra Denali Owner Manual (GMNA-Localizing-U.S./Canada/
Mexico-13337776) - 2020 - CRC - 4/4/19
44 Keys, Doors, and Windows
1. Pressgto fold the mirrors in
to the folded position.
2. Press
gagain to fold the
mirrors out to the driving
position.
Resetting the Power Folding
Mirrors
Reset the power folding mirrors if:
. The mirrors are accidentally
obstructed while folding.
. The mirrors are accidentally
manually folded/unfolded.
. The mirrors will not stay in the
unfolded position.
. The mirrors vibrate at normal
driving speeds.
Manually fold both mirrors if they
are out of sync. Fold and unfold the
mirrors three times using the mirror
controls to reset them to their
normal position. A popping noise
may be heard. This sound is normal
after a manual folding operation.
Remote Mirror Folding
If equipped, press and holdQon
the RKE transmitter for
approximately one second to
remotely fold the exterior mirrors.
Press and hold
Kon the RKE
transmitter for approximately
one second to unfold. See Remote
Keyless Entry (RKE) System
Operation (Key Access) 013 or
Remote Keyless Entry (RKE)
System Operation (Keyless Access)
0 15.
This feature can be turned on or off.
See Vehicle Personalization 0157.
Heated Mirrors
If equipped with heated mirrors:
1REAR : Press to heat the
outside mirrors.
See “Rear Window Defogger” under
Dual Automatic Climate Control
System 0179.
Automatic Dimming
Mirror
If equipped, the driver outside mirror
automatically adjusts for the glare of
the headlamps from behind. This
feature comes on when the vehicle
is started.
Blind Spot Mirrors
If equipped, there is a small convex
mirror built into the upper and outer
corner of the driver outside mirror.
It can show objects that may be in
the vehicle's blind zone.
Page 46 of 502

GMC Sierra/Sierra Denali Owner Manual (GMNA-Localizing-U.S./Canada/
Mexico-13337776) - 2020 - CRC - 4/4/19
Keys, Doors, and Windows 45
Driving with the Blind Spot
Mirror
Actual Mirror View1. When the approaching vehicle
is a long distance away, the
image in the main mirror is
small and near the inboard
edge of the mirror.
2. As the vehicle gets closer, the image in the main mirror gets
larger and moves outboard.
3. As the vehicle enters the blind zone, the image transitions
from the main mirror to the
blind spot mirror.
4. When the vehicle is in the blind zone, the image only appears
in the blind spot mirror.
Using the Outside Mirror with
the Blind Spot Mirror
1. Set the main mirror so that theside of the vehicle can just be
seen and the blind spot mirror
has an unobstructed view.
2. When checking for traffic or before changing a lane, look at
the main driver/passenger side
mirror to observe traffic in the
adjacent lane, behind your
vehicle. Check the blind spot mirror for a vehicle in the blind
zone. Then, glance over your
shoulder to double check
before moving slowly into the
adjacent lane.
Reverse Tilt Mirrors
If equipped with memory seats, the
passenger and/or driver mirror tilts
to a preselected position when the
vehicle is in R (Reverse). This
allows the curb to be seen when
parallel parking.
The mirror(s) return to the original
position when:
.
The vehicle is shifted out of
R (Reverse), or remains in
R (Reverse) for about
30 seconds.
. The ignition is turned off.
. The vehicle is driven in
R (Reverse) above a set speed.
To turn this feature on or off, see
Vehicle Personalization 0157.
Page 60 of 502

GMC Sierra/Sierra Denali Owner Manual (GMNA-Localizing-U.S./Canada/
Mexico-13337776) - 2020 - CRC - 4/4/19
Seats and Restraints 59
Memory Seats
If equipped, memory seats allow two
drivers to save and recall their
unique seat positions for driving the
vehicle, and a shared exit position
for getting out of the vehicle. Other
feature positions may also be
saved, such as power mirrors,
if equipped. Memory positions are
linked to RKE transmitter 1 or 2 for
automatic memory recalls.
Before saving, adjust all available
memory feature positions. Turn the
vehicle on and then press and
release SET; a beep will sound.
Then immediately press and hold 1,2, or
B(Exit) until two beeps
sound. To manually recall these
positions, press and hold 1, 2, or
B
until the saved position is reached.
Follow the instructions under
“Saving Memory Positions.”
The vehicle identifies the current
driver ’s RKE transmitter number (1–
8). See Remote Keyless Entry
(RKE) System Operation (Key
Access) 013 or
Remote Keyless Entry (RKE)
System Operation (Keyless Access)
0 15. Only RKE transmitters 1 and 2
can be used for automatic memory
recalls. A Driver Information Center
(DIC) welcome message indicating
the transmitter number may display
for the first few ignition cycles
following a transmitter change. For
Seat Entry Memory to work properly,
save the positions to the memory
button (1 or 2) matching the RKE
transmitter number displayed in the
DIC welcome message. Carry the
linked RKE transmitter when
entering the vehicle. Vehicle Personalization Settings
.
To have the Seat Entry Memory
movement begin when the
vehicle is started, select the
Settings menu, then Vehicle,
then Seating Position, and then
Seat Entry Memory. Select On or
Off. See “Seat Entry Memory”
later in this section.
. To begin Seat Exit Memory
movement when the vehicle is
turned off and the driver door is
opened, or when the vehicle is
turned off with the driver door
already opened, select the
Settings menu, then Vehicle,
then Seating Position, and then
Seat Exit Memory. Select On or
Off. See “Seat Exit Memory”
later in this section.
. See Vehicle Personalization
0 157 for additional setting
information.
Identifying Driver Number
To identify the driver number: 1. Move your RKE transmitter away from the vehicle.
Page 61 of 502

GMC Sierra/Sierra Denali Owner Manual (GMNA-Localizing-U.S./Canada/
Mexico-13337776) - 2020 - CRC - 4/4/19
60 Seats and Restraints
2. Start the vehicle with anotherkey or RKE transmitter. The
DIC should display the driver
number for the other RKE
transmitter. Turn the vehicle off
and remove the key or RKE
transmitter from the vehicle.
3. Start the vehicle with the initial key or RKE transmitter. The
DIC should display the driver
number of your RKE
transmitter.
Saving Memory Positions
Read these instructions completely
before saving memory positions.
To save preferred driving positions
1 and 2: 1. Turn the vehicle on or to ACC/ ACCESSORY.
A DIC welcome message may
indicate driver number 1 or 2.
2. Adjust all available memory features to the desired driving
position.
3. Press and release SET; a beep will sound. 4. Immediately press and hold the
1 or 2 memory button matching
the above DIC welcome
message until two beeps
sound.
If too much time passes
between releasing SET and
pressing 1, the memory
position will not be saved and
two beeps will not sound.
Repeat Steps 3 and 4.
1 or 2 corresponds to the driver
number. See “Identifying Driver
Number” previously in this
section.
5. Repeat Steps 1–4 for a second driver using 1 or 2. RKE
transmitters 3–8 will not save
memory positions.
To save the position for
Band
Seat Exit Memory features, repeat
Steps 1–4 using
B. This saves the
position for getting out of the
vehicle.
Save preferred memory feature
positions to both 1 and 2 if you are
the only driver. Manually Recalling Memory
Positions
Press and hold 1, 2, or
Bto recall
the previously saved memory
positions if you are driver 1 or 2
identified in the DIC welcome
message.
To stop Manual Memory recall
movement, release 1, 2, or
Bor
press any of the following controls:
. Power seat
. Memory SET
. Power mirror, with the driver or
passenger side mirror selected
Seat Entry Memory
The vehicle identifies the number of
the current driver ’s RKE transmitter
(1–8). See Remote Keyless Entry
(RKE) System Operation (Key
Access) 013 or
Remote Keyless Entry (RKE)
System Operation (Keyless Access)
0 15. If the RKE transmitter is 1 or
2, and Seat Entry Memory is
enabled in vehicle personalization,
the positions saved to the same
Page 73 of 502

GMC Sierra/Sierra Denali Owner Manual (GMNA-Localizing-U.S./Canada/
Mexico-13337776) - 2020 - CRC - 4/4/19
72 Seats and Restraints
{Warning
Do not bleach or dye seat belt
webbing. It may severely weaken
the webbing. In a crash, they
might not be able to provide
adequate protection. Clean and
rinse seat belt webbing only with
mild soap and lukewarm water.
Allow the webbing to dry.
Replacing Seat Belt
System Parts after a
Crash
{Warning
A crash can damage the seat belt
system in the vehicle. A damaged
seat belt system may not properly
protect the person using it,
resulting in serious injury or even
death in a crash. To help make
sure the seat belt systems are
working properly after a crash,(Continued)
Warning (Continued)
have them inspected and any
necessary replacements made as
soon as possible.
After a minor crash, replacement of
seat belts may not be necessary.
But the seat belt assemblies that
were used during any crash may
have been stressed or damaged.
See your dealer to have the seat
belt assemblies inspected or
replaced.
New parts and repairs may be
necessary even if the seat belt
system was not being used at the
time of the crash.
Have the seat belt pretensioners
checked if the vehicle has been in a
crash, or if the airbag readiness light
stays on after you start the vehicle
or while you are driving. See Airbag
Readiness Light 0136.
Airbag System
The vehicle has the following
airbags:
.
A frontal airbag for the driver
. A frontal airbag for the front
outboard passenger
. A seat-mounted side impact
airbag for the driver
. A seat-mounted side impact
airbag for the front outboard
passenger
. A roof-rail airbag for the driver
and the passenger seated
directly behind the driver
. A roof-rail airbag for the front
outboard passenger and the
passenger seated directly
behind the front outboard
passenger
All vehicle airbags have the word
AIRBAG on the trim or on a label
near the deployment opening.