2020 GMC SIERRA ECU
[x] Cancel search: ECUPage 322 of 502
GMC Sierra/Sierra Denali Owner Manual (GMNA-Localizing-U.S./Canada/
Mexico-13337776) - 2020 - CRC - 4/4/19
Driving and Operating 321
Trailer Detection Alert
The Trailer Detection Alert setting
will be on by default. Turn it off to
disable the Trailer Detection pop-up
from displaying when a trailer is
connected. The Guest Trailer Profile
will become the active Trailer
Profile, unless another Trailer Profile
is selected manually through the
Trailering App. If this setting is
disabled while a Custom Trailer
Profile is active, that Trailer Profile
will remain the active profile until the
trailer is disconnected.
Maintenance Alerts
Touch Maintenance Alerts to view
the Maintenance Alerts settings
page. These alerts are based on the
Trailer Profile, so the settings for
each Trailer Profile must be turned
on or off. Touch a profile to view
more information or adjust the
setting for that profile.
The setting will be on by default for
each profile. All Maintenance Alerts
for that active Trailer Profile will be
received.Turn a setting off to not receive any
of the Maintenance Alerts when that
Trailer Profile is active.
Theft Alert
A theft alert can be set if a trailer is
connected and the alert is enabled.
When the trailer is disconnected
and the vehicle is off, an alarm will
sound.
Touch Theft Alert in Settings to view
the Theft Alert settings page. These
alerts are based on the Trailer
Profile, so the settings for each
Trailer Profile must be turned on or
off. Touch a profile to view more
information or adjust the setting for
that profile.
This setting will be off by default for
each Trailer Profile, including the
Guest Trailer Profile.
A smartphone will receive a
notification that the trailer related to
the selected Trailer Profile is
disconnected from the vehicle, if the
setting is on for the active Trailer
Profile, the vehicle has an OnStar or
connected service plan and thesmartphone number has been
added to the account for this
notification.
If the setting is turned off for a given
Trailer Profile, the smartphone will
not receive this security notification
even if the Trailer Profile is active.
Tow/Haul Mode Reminder
This is a reminder to turn on the
Tow/Haul Mode when towing a
trailer. See
Tow/Haul Mode 0226.
Touch Tow/Haul Mode Reminder in
Settings to view the Tow/Haul Mode
Reminder settings page. These
alerts are based on the Trailer
Profile, so the settings for each
Trailer Profile must be turned on or
off. Touch a profile to view more
information or to adjust the setting
for that profile.
This setting will default to OFF for
each Trailer Profile, including the
Guest Trailer Profile.
If Tow/Haul Mode is off and this
setting is on for a Trailer Profile,
each time the ignition is turned on a
Page 325 of 502
GMC Sierra/Sierra Denali Owner Manual (GMNA-Localizing-U.S./Canada/
Mexico-13337776) - 2020 - CRC - 4/4/19
324 Driving and Operating
.Make sure the weight on the
front and rear axles does not
exceed the axle rating for each.
. For the front axle, if more cargo
or passengers must be carried,
appropriate counter ballast must
be installed rear of the rear axle.
Counter ballast must be properly
secured so it will not move
during driving.
. Rear ballast may be required to
ensure a proper front and rear
weight distribution ratio, even
though the actual weight at the
front axle may be less than the
front axle rating.
. The snow plow manufacturer or
installer can assist in
determining the amount of rear
ballast required, to help make
sure the snow plow/vehicle
combination does not exceed
the GVW rating, the front and
rear axle ratings, and the front
and rear weight distribution ratio.
. The total vehicle must not
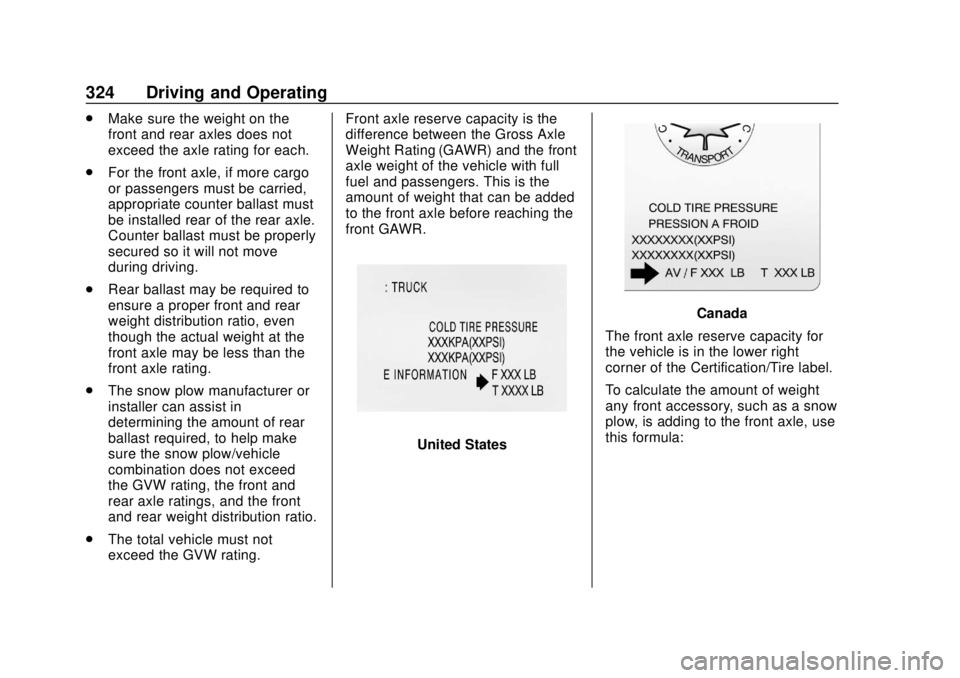
exceed the GVW rating. Front axle reserve capacity is the
difference between the Gross Axle
Weight Rating (GAWR) and the front
axle weight of the vehicle with full
fuel and passengers. This is the
amount of weight that can be added
to the front axle before reaching the
front GAWR.
United States
Canada
The front axle reserve capacity for
the vehicle is in the lower right
corner of the Certification/Tire label.
To calculate the amount of weight
any front accessory, such as a snow
plow, is adding to the front axle, use
this formula:
Page 352 of 502

GMC Sierra/Sierra Denali Owner Manual (GMNA-Localizing-U.S./Canada/
Mexico-13337776) - 2020 - CRC - 4/10/19
Vehicle Care 351
6. Verify coolant level after theengine is shut off and the
coolant is cold. If necessary,
repeat coolant fill procedure
Steps 1–6.
Caution
If the pressure cap is not tightly
installed, coolant loss and engine
damage may occur. Be sure the
cap is properly and tightly
secured.
Engine Overheating
If the vehicle has the Duramax
diesel engine, see the Duramax
diesel supplement.
Caution
Do not run the engine if there is a
leak in the engine cooling system.
This can cause a loss of all
coolant and can damage the
system and vehicle. Have any
leaks fixed right away. The vehicle has several indicators
to warn of engine overheating.
There is a coolant temperature
gauge in the vehicle's instrument
cluster. See
Engine Coolant
Temperature Gauge 0134.
In addition, there are ENGINE
OVERHEATED STOP ENGINE,
ENGINE OVERHEATED IDLE
ENGINE, and ENGINE POWER IS
REDUCED messages in the Driver
Information Center (DIC).
If the decision is made not to lift the
hood when this warning appears,
get service help right away. See
Roadside Assistance Program
0 467.
If the decision is made to lift the
hood, make sure the vehicle is
parked on a level surface.
2.7L L4, 4.3L V6, 5.3L V8, and 6.2L
V8 Engines
Check to see if the engine cooling
fans are running. If the engine is
overheating, the fans should be running. If they are not, do not
continue to run the engine and have
the vehicle serviced.
If the engine or transmission detects
an impending hot fluid condition,
then the transmission may force
upshifts to limit temperatures.
Downshifts may also be prevented
in this instance. Normal operation
may continue unless the display
indicates there is a hot condition
and engine should be idled.
If Steam is Coming from the
Engine Compartment
{Warning
Steam and scalding liquids from a
hot cooling system are under
pressure. Turning the pressure
cap, even a little, can cause them
to come out at high speed and
you could be burned. Never turn
the cap when the cooling system,
including the pressure cap, is hot.
Wait for the cooling system and
pressure cap to cool.
Page 361 of 502

GMC Sierra/Sierra Denali Owner Manual (GMNA-Localizing-U.S./Canada/
Mexico-13337776) - 2020 - CRC - 4/10/19
360 Vehicle Care
1. Loosen and remove thenegative battery cable nut (1)
at the battery sensor
connection.
2. Remove the negative battery cable (2) from the battery
sensor stud.
3. Cover the negative battery cable terminal, battery sensor
stud, and negative battery post
with a non-conductive material
to prevent any contact with the
negative battery cable.
For vehicles not equipped with the
Stop/Start system:1. Loosen the negative battery cable nut (1).
2. Remove the negative battery cable clamp (2) from the
negative battery post.
3. Cover the negative battery cable clamp, and negative
battery post with a
non-conductive material to
prevent any contact with the
negative battery cable.
Negative Battery Cable
Reconnection
Caution
When reconnecting the battery:. Use the original nut from the
vehicle to secure the
negative battery cable. Do
not use a different nut.
If you need a replacement
nut, see your dealer.
. Tighten the nut with a hand
tool. Do not use an impact
wrench or power tools to
tighten the nut.
The vehicle could be damaged if
these guidelines are not followed.
Caution
Do not use paints, lubricants,
or corrosion inhibitors on the nut
that secures the negative battery
cable to the vehicle. This could
damage the vehicle.
Page 399 of 502

GMC Sierra/Sierra Denali Owner Manual (GMNA-Localizing-U.S./Canada/
Mexico-13337776) - 2020 - CRC - 4/10/19
398 Vehicle Care
Use this rotation pattern when
rotating the tires if the vehicle
has polished forged aluminum
dual rear wheels. The spare
wheel can be used in any
position in the event of a flat tire,
and can be rotated with the rear
inner wheels. After the flat tire is
repaired, if the spare is not on
one of the inner rear positions, it
must be replaced by the correct
wheel in the front or rear outer
positions.
When installing dual wheels,
check that the vent holes in the
inner and outer wheels on each
side are lined up.
Adjust the front and rear tires to
the recommended inflation
pressure on the Tire and
Loading Information label after
the tires have been rotated. See
Tire Pressure0387 and
Vehicle Load Limits 0200. Check that all wheel nuts are
properly tightened. See
“Wheel
Nut Torque” underCapacities
and Specifications 0459, and
“Removing the Flat Tire and
Installing the Spare Tire” under
Tire Changing 0407.
{Warning
Rust or dirt on a wheel, or on the
parts to which it is fastened, can
make wheel nuts become loose
after time. The wheel could come
off and cause a crash. When
changing a wheel, remove any
rust or dirt from places where the
wheel attaches to the vehicle. In
an emergency, a cloth or a paper
towel can be used; however, use
a scraper or wire brush later to
remove all rust or dirt.
Lightly coat the inner diameter of
the wheel hub opening with
wheel bearing grease after a
wheel change or tire rotation to
prevent corrosion or rust build-up. Do not get grease on
the flat wheel mounting surface
or on the wheel nuts or bolts.
Reset the Tire Pressure Monitor
System (TPMS), if the vehicle
has one. See
Tire Pressure
Monitor Operation 0390.
If the full-size tire is part of the
tire rotation, make sure the tire
rotated into the spare position is
stored securely. Push, pull, and
then try to rotate or turn the tire.
If it moves, use the wheel
wrench/hoist shaft to tighten the
cable. See Tire Changing 0407.
When It Is Time for New
Tires
Factors, such as maintenance,
temperatures, driving speeds,
vehicle loading, and road conditions
affect the wear rate of the tires.
Page 406 of 502
GMC Sierra/Sierra Denali Owner Manual (GMNA-Localizing-U.S./Canada/
Mexico-13337776) - 2020 - CRC - 4/10/19
Vehicle Care 405
Caution
Use tire chains only where legal
and only when necessary. Use
chains that are the proper size for
the tires. If the vehicle has 265/
70R17 or 265/65R18 size tires,
they may be installed on the tires
of the rear axle only. If the vehicle
is a dual rear wheel model and
has LT235/80R17 tires, chains
may be installed on the tires of
the rear axle only. If the vehicle
has 255/70R17, LT245/75R17,
or LT275/70R18 size tires, they
may be installed on the tires of
the front and rear axle. If the
vehicle is a 2500 Series with
LT265/70R17 size tires, chains
may be installed on the tires of
both the front and rear axle.
Tighten them as tightly as
possible with the ends securely
fastened. Drive slowly and follow
the chain manufacturer's
instructions. If you can hear the(Continued)
Caution (Continued)
chains contacting the vehicle,
stop and retighten them. If the
contact continues, slow down
until it stops. Driving too fast or
spinning the wheels with chains
on will damage the vehicle.
If a Tire Goes Flat
It is unusual for a tire to blowout
while driving, especially if the tires
are maintained properly. If air goes
out of a tire, it is much more likely to
leak out slowly. But if there ever is a
blowout, here are a few tips about
what to expect and what to do:
If a front tire fails, the flat tire
creates a drag that pulls the vehicle
toward that side. Take your foot off
the accelerator pedal and grip the
steering wheel firmly. Steer to
maintain lane position, and then
gently brake to a stop, well off the
road, if possible. A rear blowout, particularly on a
curve, acts much like a skid and
may require the same correction as
used in a skid. Stop pressing the
accelerator pedal and steer to
straighten the vehicle. It may be
very bumpy and noisy. Gently brake
to a stop, well off the road,
if possible.
{Warning
Driving on a flat tire will cause
permanent damage to the tire.
Re-inflating a tire after it has been
driven on while severely
underinflated or flat may cause a
blowout and a serious crash.
Never attempt to re-inflate a tire
that has been driven on while
severely underinflated or flat.
Have your dealer or an authorized
tire service center repair or
replace the flat tire as soon as
possible.
Page 413 of 502
GMC Sierra/Sierra Denali Owner Manual (GMNA-Localizing-U.S./Canada/
Mexico-13337776) - 2020 - CRC - 4/10/19
412 Vehicle Care
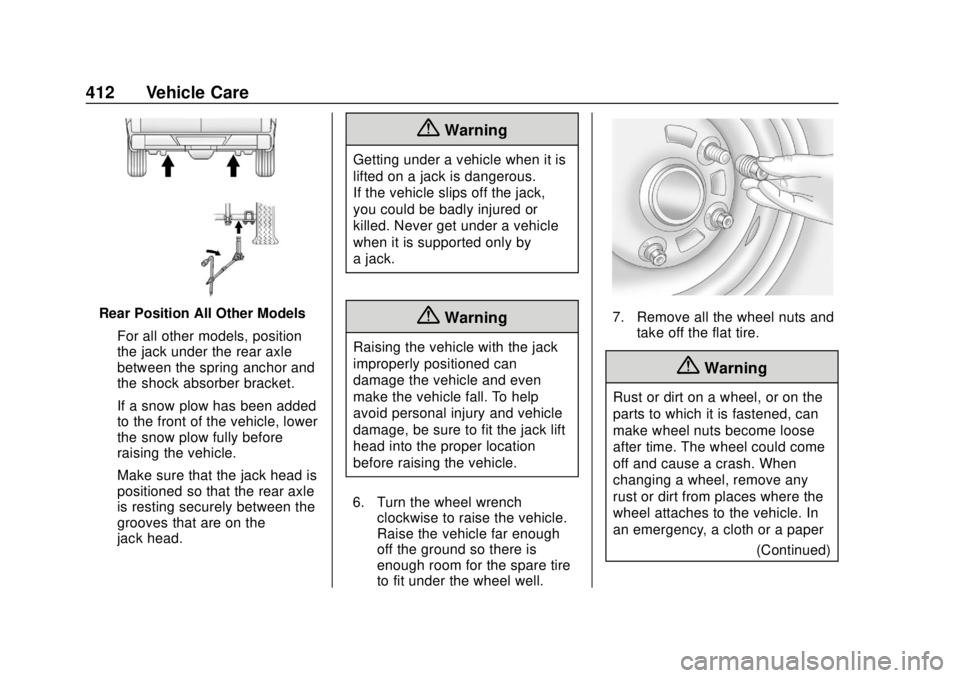
Rear Position All Other ModelsFor all other models, position
the jack under the rear axle
between the spring anchor and
the shock absorber bracket.
If a snow plow has been added
to the front of the vehicle, lower
the snow plow fully before
raising the vehicle.
Make sure that the jack head is
positioned so that the rear axle
is resting securely between the
grooves that are on the
jack head.
{Warning
Getting under a vehicle when it is
lifted on a jack is dangerous.
If the vehicle slips off the jack,
you could be badly injured or
killed. Never get under a vehicle
when it is supported only by
a jack.
{Warning
Raising the vehicle with the jack
improperly positioned can
damage the vehicle and even
make the vehicle fall. To help
avoid personal injury and vehicle
damage, be sure to fit the jack lift
head into the proper location
before raising the vehicle.
6. Turn the wheel wrench clockwise to raise the vehicle.
Raise the vehicle far enough
off the ground so there is
enough room for the spare tire
to fit under the wheel well.
7. Remove all the wheel nuts andtake off the flat tire.
{Warning
Rust or dirt on a wheel, or on the
parts to which it is fastened, can
make wheel nuts become loose
after time. The wheel could come
off and cause a crash. When
changing a wheel, remove any
rust or dirt from places where the
wheel attaches to the vehicle. In
an emergency, a cloth or a paper
(Continued)
Page 416 of 502
GMC Sierra/Sierra Denali Owner Manual (GMNA-Localizing-U.S./Canada/
Mexico-13337776) - 2020 - CRC - 4/10/19
Vehicle Care 415
Warning (Continued)
collision, loose equipment could
strike someone. Store all these in
the proper place.
{Warning
Failure to follow these tire storage
instructions carefully could result
in personal injury or property
damage if the hoist cable fails or
if the tire comes loose. Make sure
the tire is stored securely before
driving.
Caution
Storing an aluminum wheel with a
flat tire under your vehicle for an
extended period of time or with
the valve stem pointing up can
damage the wheel. Always stow
the wheel with the valve stem(Continued)
Caution (Continued)
pointing down and have the
wheel/tire repaired as soon as
possible.
Caution
The tire hoist can be damaged if
there is no tension on the cable
when using it. To have the
necessary tension, the spare or
road tire and wheel assembly
must be installed on the tire hoist
to use it.
{Warning
An improperly stored spare tire
could come loose and cause a
crash. To avoid personal injury or
property damage, always store
the spare tire when the vehicle is
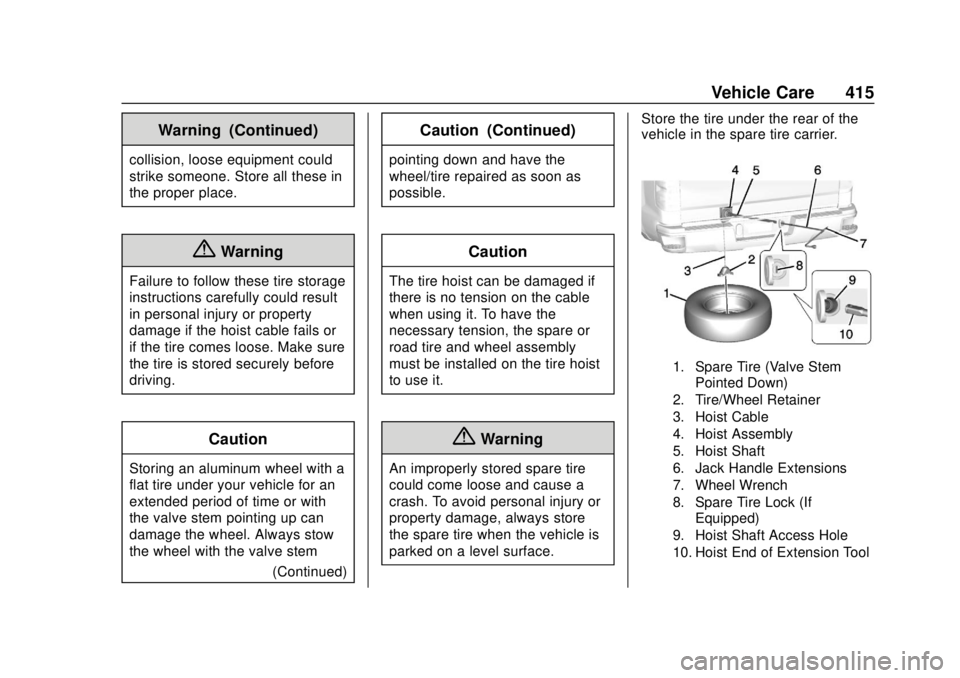
parked on a level surface. Store the tire under the rear of the
vehicle in the spare tire carrier.
1. Spare Tire (Valve Stem
Pointed Down)
2. Tire/Wheel Retainer
3. Hoist Cable
4. Hoist Assembly
5. Hoist Shaft
6. Jack Handle Extensions
7. Wheel Wrench
8. Spare Tire Lock (If Equipped)
9. Hoist Shaft Access Hole
10. Hoist End of Extension Tool