2020 GMC SIERRA Driving
[x] Cancel search: DrivingPage 323 of 502

GMC Sierra/Sierra Denali Owner Manual (GMNA-Localizing-U.S./Canada/
Mexico-13337776) - 2020 - CRC - 4/4/19
322 Driving and Operating
reminder will appear to turn on Tow/
Haul Mode when the Trailer Profile
is active.
If Tow/Haul Mode is on and this
setting is on for a Trailer Profile, the
reminder will not appear when the
Trailer Profile is active.Conversions and
Add-Ons
Add-On Electrical
Equipment
{Warning
The Data Link Connector (DLC) is
used for vehicle service and
Emission Inspection/Maintenance
testing. SeeMalfunction Indicator
Lamp (Check Engine Light) 0138
. A device connected to the DLC
— such as an aftermarket fleet or
driver-behavior tracking device —
may interfere with vehicle
systems. This could affect vehicle
operation and cause a crash.
Such devices may also access
information stored in the vehicle’s
systems.
Caution
Some electrical equipment can
damage the vehicle or cause
components to not work and
would not be covered by the
vehicle warranty. Always check
with your dealer before adding
electrical equipment.
Add-on equipment can drain the
vehicle's 12-volt battery, even if the
vehicle is not operating.
The vehicle has an airbag system.
Before attempting to add anything
electrical to the vehicle, see
Servicing the Airbag-Equipped
Vehicle 083 and
Adding Equipment to the
Airbag-Equipped Vehicle 083.
For information on wiring auxiliary
switches, see www.gmupfitter.com
or contact your dealer.
Page 324 of 502

GMC Sierra/Sierra Denali Owner Manual (GMNA-Localizing-U.S./Canada/
Mexico-13337776) - 2020 - CRC - 4/4/19
Driving and Operating 323
Adding a Snow Plow or
Similar Equipment
Caution
Do not exceed 72 km/h (45 mph)
with a snow plow mounted to the
vehicle. The vehicle could
overheat and be damaged.
Before installing a snow plow on the
vehicle, follow these guidelines:
Caution
If the vehicle does not have the
snow plow prep package, RPO
VYU, adding a plow can damage
the vehicle, and the repairs would
not be covered by the vehicle
warranty. Unless the vehicle was
built to carry a snow plow, do not
add one to the vehicle. If the
vehicle has RPO VYU, then the
payload the vehicle can carry will
be reduced when a snow plow is (Continued)
Caution (Continued)
installed. The vehicle can be
damaged if either the front or rear
axle ratings or the Gross Vehicle
Weight Rating (GVWR) are
exceeded.
The plow the vehicle can carry
depends on many things, such as:
. The options the vehicle came
with, and the weight of those
options.
. The weight and number of
passengers to be carried.
. The weight of items added to the
vehicle, like a tool box or
truck cap.
. The total weight of any
additional cargo to be carried.
For example, if the snow plow
weighs 318 kg (700 lb), the total
weight of all occupants and cargo
inside the cab should not exceed
135 kg (300 lb). This means that you
may only be able to carry one
passenger. Even this may be too much if there is other equipment
already adding to the weight of the
vehicle.
To safely carry a snow plow on the
vehicle:
.
Follow all aftermarket snow plow
manufacturer ’s instructions for
the operation and transportation
of the snow plow.
. With a snow plow attached, the
engine coolant temperature
gauge may show a higher
temperature than while driving
without one. The snow plow
could block the airflow to the
radiator. This could be more
noticeable as vehicle speed
increases. At speeds above
72 km (45 mph), this may cause
the engine coolant to overheat.
. To increase the airflow, move the
snow plow blade postion.
. If driving more than 24 km
(15 mi), angle the plow blade
position.
Page 325 of 502
GMC Sierra/Sierra Denali Owner Manual (GMNA-Localizing-U.S./Canada/
Mexico-13337776) - 2020 - CRC - 4/4/19
324 Driving and Operating
.Make sure the weight on the
front and rear axles does not
exceed the axle rating for each.
. For the front axle, if more cargo
or passengers must be carried,
appropriate counter ballast must
be installed rear of the rear axle.
Counter ballast must be properly
secured so it will not move
during driving.
. Rear ballast may be required to
ensure a proper front and rear
weight distribution ratio, even
though the actual weight at the
front axle may be less than the
front axle rating.
. The snow plow manufacturer or
installer can assist in
determining the amount of rear
ballast required, to help make
sure the snow plow/vehicle
combination does not exceed
the GVW rating, the front and
rear axle ratings, and the front
and rear weight distribution ratio.
. The total vehicle must not
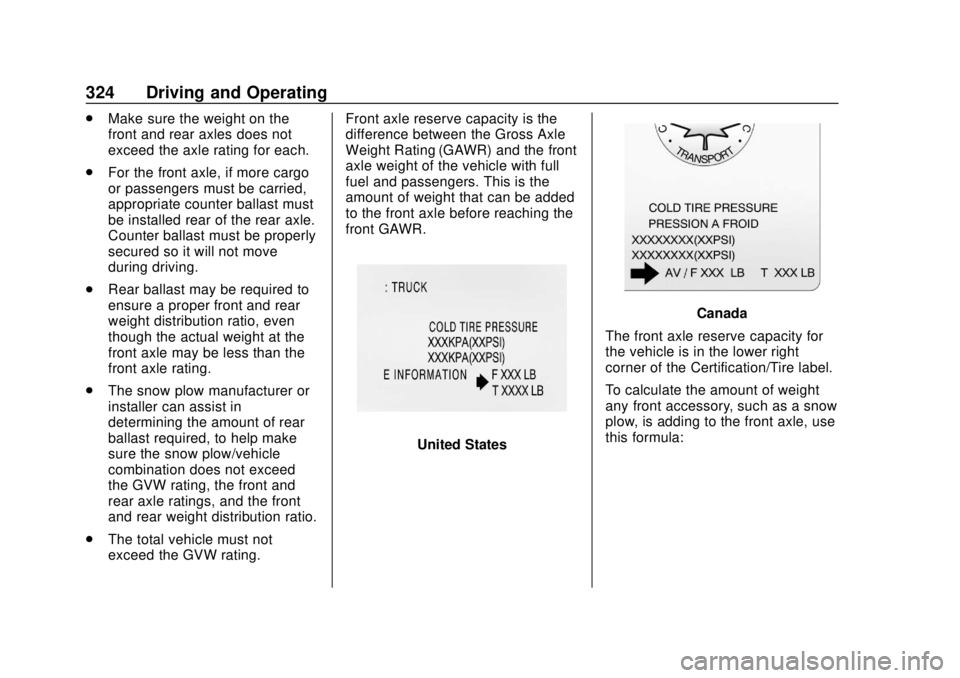
exceed the GVW rating. Front axle reserve capacity is the
difference between the Gross Axle
Weight Rating (GAWR) and the front
axle weight of the vehicle with full
fuel and passengers. This is the
amount of weight that can be added
to the front axle before reaching the
front GAWR.
United States
Canada
The front axle reserve capacity for
the vehicle is in the lower right
corner of the Certification/Tire label.
To calculate the amount of weight
any front accessory, such as a snow
plow, is adding to the front axle, use
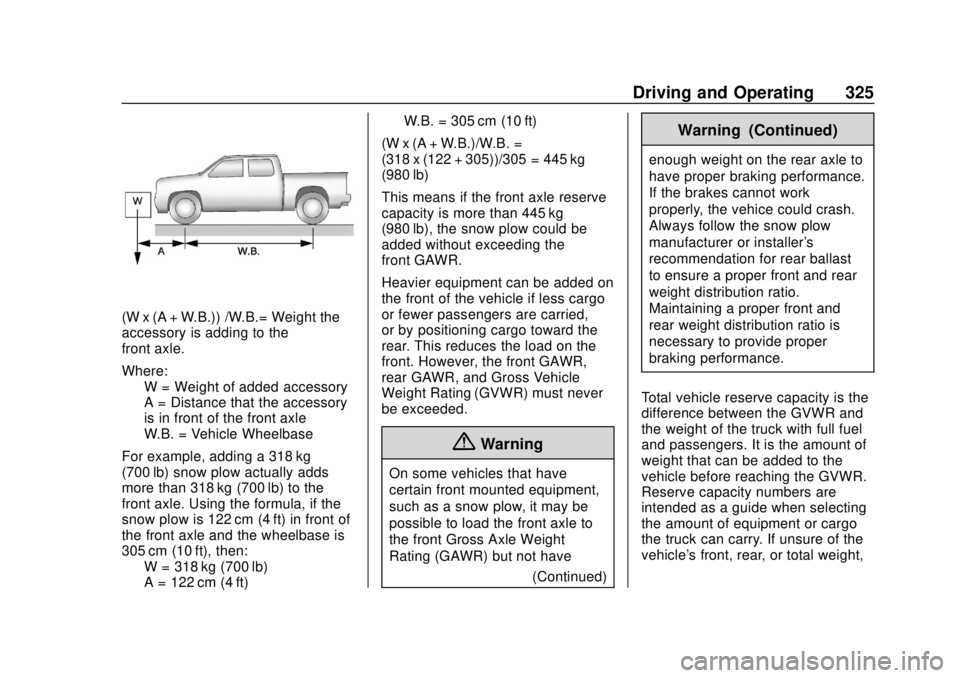
this formula:
Page 326 of 502
GMC Sierra/Sierra Denali Owner Manual (GMNA-Localizing-U.S./Canada/
Mexico-13337776) - 2020 - CRC - 4/4/19
Driving and Operating 325
(W x (A + W.B.)) /W.B.= Weight the
accessory is adding to the
front axle.
Where:W = Weight of added accessory
A = Distance that the accessory
is in front of the front axle
W.B. = Vehicle Wheelbase
For example, adding a 318 kg
(700 lb) snow plow actually adds
more than 318 kg (700 lb) to the
front axle. Using the formula, if the
snow plow is 122 cm (4 ft) in front of
the front axle and the wheelbase is
305 cm (10 ft), then: W = 318 kg (700 lb)
A = 122 cm (4 ft) W.B. = 305 cm (10 ft)
(W x (A + W.B.)/W.B. =
(318 x (122 + 305))/305 = 445 kg
(980 lb)
This means if the front axle reserve
capacity is more than 445 kg
(980 lb), the snow plow could be
added without exceeding the
front GAWR.
Heavier equipment can be added on
the front of the vehicle if less cargo
or fewer passengers are carried,
or by positioning cargo toward the
rear. This reduces the load on the
front. However, the front GAWR,
rear GAWR, and Gross Vehicle
Weight Rating (GVWR) must never
be exceeded.
{Warning
On some vehicles that have
certain front mounted equipment,
such as a snow plow, it may be
possible to load the front axle to
the front Gross Axle Weight
Rating (GAWR) but not have (Continued)
Warning (Continued)
enough weight on the rear axle to
have proper braking performance.
If the brakes cannot work
properly, the vehice could crash.
Always follow the snow plow
manufacturer or installer's
recommendation for rear ballast
to ensure a proper front and rear
weight distribution ratio.
Maintaining a proper front and
rear weight distribution ratio is
necessary to provide proper
braking performance.
Total vehicle reserve capacity is the
difference between the GVWR and
the weight of the truck with full fuel
and passengers. It is the amount of
weight that can be added to the
vehicle before reaching the GVWR.
Reserve capacity numbers are
intended as a guide when selecting
the amount of equipment or cargo
the truck can carry. If unsure of the
vehicle's front, rear, or total weight,
Page 327 of 502
GMC Sierra/Sierra Denali Owner Manual (GMNA-Localizing-U.S./Canada/
Mexico-13337776) - 2020 - CRC - 4/4/19
326 Driving and Operating
go to a weigh station and weigh the
vehicle. Your dealer can also help
with this.
The total vehicle reserve capacity
for the vehicle is in the lower right
corner of the Certification/Tire label
as shown previously.
See your dealer for additional
advice and information about using
a snow plow on the vehicle. Also,
seeVehicle Load Limits 0200.Pickup Conversion to
Chassis Cab
We are aware that some vehicle
owners might consider having the
pickup box removed and a
commercial or recreational body
installed. Owners should be aware
that, as manufactured, there are
differences between a chassis cab
and a pickup with the box removed
which could affect vehicle safety.
The components necessary to adapt
a pickup to permit its safe use with
a specialized body should be
installed by the body builder.
Page 332 of 502
GMC Sierra/Sierra Denali Owner Manual (GMNA-Localizing-U.S./Canada/
Mexico-13337776) - 2020 - CRC - 4/10/19
Vehicle Care 331
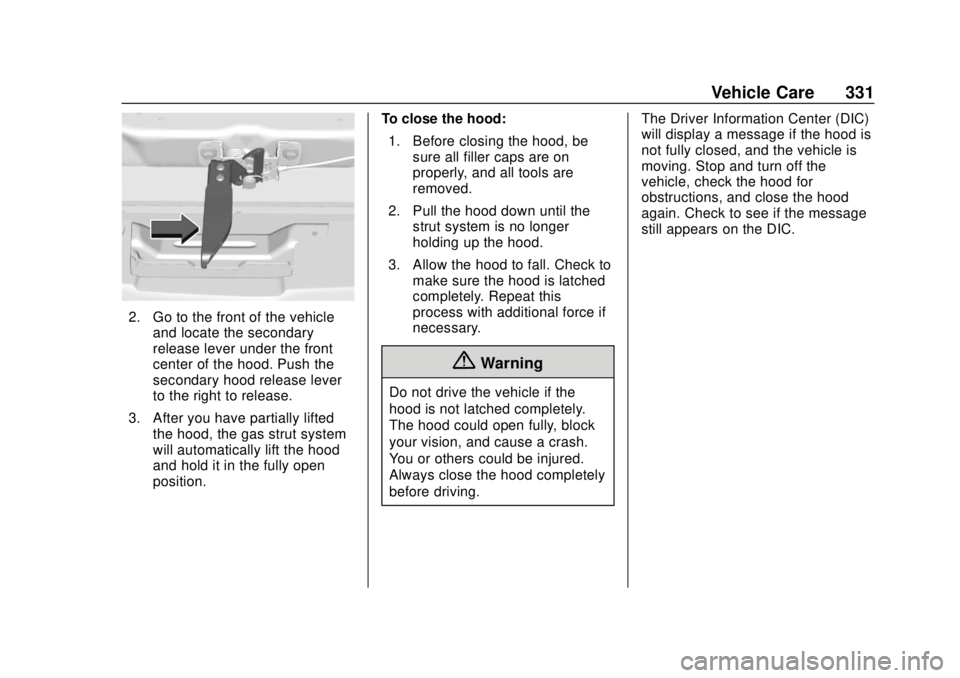
2. Go to the front of the vehicleand locate the secondary
release lever under the front
center of the hood. Push the
secondary hood release lever
to the right to release.
3. After you have partially lifted the hood, the gas strut system
will automatically lift the hood
and hold it in the fully open
position. To close the hood:
1. Before closing the hood, be sure all filler caps are on
properly, and all tools are
removed.
2. Pull the hood down until the strut system is no longer
holding up the hood.
3. Allow the hood to fall. Check to make sure the hood is latched
completely. Repeat this
process with additional force if
necessary.
{Warning
Do not drive the vehicle if the
hood is not latched completely.
The hood could open fully, block
your vision, and cause a crash.
You or others could be injured.
Always close the hood completely
before driving. The Driver Information Center (DIC)
will display a message if the hood is
not fully closed, and the vehicle is
moving. Stop and turn off the
vehicle, check the hood for
obstructions, and close the hood
again. Check to see if the message
still appears on the DIC.
Page 341 of 502
GMC Sierra/Sierra Denali Owner Manual (GMNA-Localizing-U.S./Canada/
Mexico-13337776) - 2020 - CRC - 4/10/19
340 Vehicle Care
If a low oil Driver Information Center
(DIC) message displays, check the
oil level.
Follow these guidelines:
.To get an accurate reading, park
the vehicle on level ground.
Check the engine oil level after
the engine has been off for at
least two hours. Checking the
engine oil level on steep grades
or too soon after engine shutoff
can result in incorrect readings.
Accuracy improves when
checking a cold engine prior to
starting. Remove the dipstick
and check the level.
. If unable to wait two hours, the
engine must be off for at least
15 minutes if the engine is
warm, or at least 30 minutes if
the engine is not warm. Pull out
the dipstick, wipe it with a clean
paper towel or cloth, then push it
back in all the way. Remove it
again, keeping the tip down, and
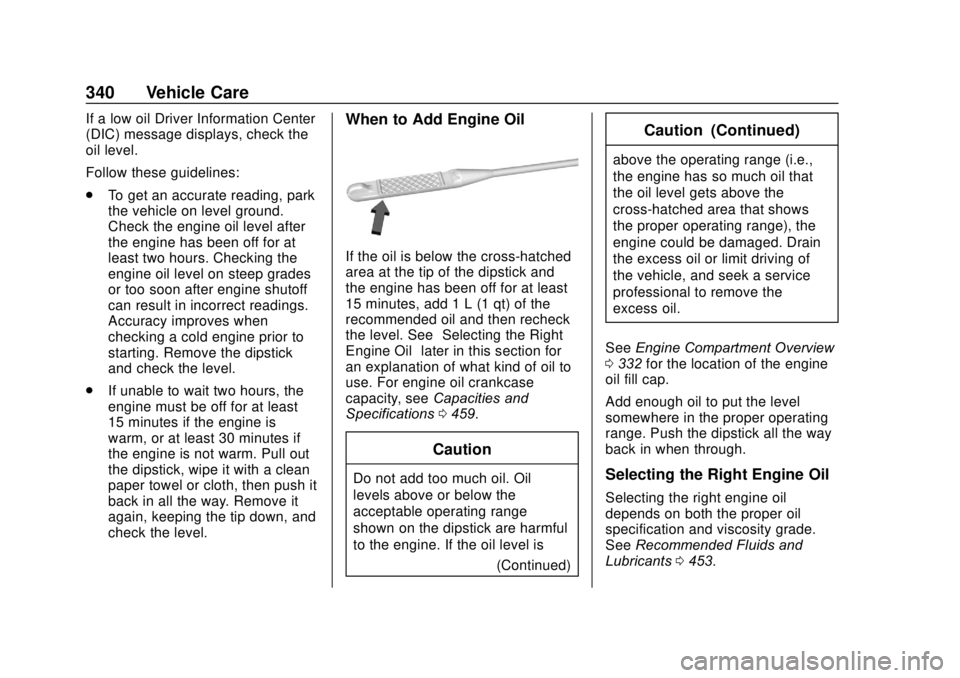
check the level.When to Add Engine Oil
If the oil is below the cross-hatched
area at the tip of the dipstick and
the engine has been off for at least
15 minutes, add 1 L (1 qt) of the
recommended oil and then recheck
the level. See “Selecting the Right
Engine Oil” later in this section for
an explanation of what kind of oil to
use. For engine oil crankcase
capacity, see Capacities and
Specifications 0459.
Caution
Do not add too much oil. Oil
levels above or below the
acceptable operating range
shown on the dipstick are harmful
to the engine. If the oil level is
(Continued)
Caution (Continued)
above the operating range (i.e.,
the engine has so much oil that
the oil level gets above the
cross-hatched area that shows
the proper operating range), the
engine could be damaged. Drain
the excess oil or limit driving of
the vehicle, and seek a service
professional to remove the
excess oil.
See Engine Compartment Overview
0 332 for the location of the engine
oil fill cap.
Add enough oil to put the level
somewhere in the proper operating
range. Push the dipstick all the way
back in when through.
Selecting the Right Engine Oil
Selecting the right engine oil
depends on both the proper oil
specification and viscosity grade.
See Recommended Fluids and
Lubricants 0453.
Page 343 of 502

GMC Sierra/Sierra Denali Owner Manual (GMNA-Localizing-U.S./Canada/
Mexico-13337776) - 2020 - CRC - 4/10/19
342 Vehicle Care
include engine revolutions, engine
temperature, and miles driven.
Based on driving conditions, the
mileage at which an oil change is
indicated can vary considerably. For
the oil life system to work properly,
the system must be reset every time
the oil is changed.
On some vehicles, when the system
has calculated that oil life has been
diminished, a CHANGE ENGINE
OIL SOON message comes on to
indicate that an oil change is
necessary. Change the oil as soon
as possible within the next 1 000 km
(600 mi). It is possible that, if driving
under the best conditions, the oil life
system might indicate that an oil
change is not necessary for up to a
year. The engine oil and filter must
be changed at least once a year
and, at this time, the system must
be reset. For vehicles without the
CHANGE ENGINE OIL SOON
message, an oil change is needed
when the REMAINING OIL LIFE
percentage is near 0%. Your dealer
has trained service people who will
perform this work and reset the
system. It is also important to checkthe oil regularly over the course of
an oil drain interval and keep it at
the proper level.
If the system is ever reset
accidentally, the oil must be
changed at 5 000 km (3,000 mi)
since the last oil change.
Remember to reset the oil life
system whenever the oil is changed.
How to Reset the Engine Oil
Life System
Reset the system whenever the
engine oil is changed so that the
system can calculate the next
engine oil change. Always reset the
engine oil life to 100% after every oil
change. It will not reset itself. To
reset the engine oil life system:
1. Display the oil life percentage on the DIC. See Driver
Information Center (DIC) (Base
Level) 0148 or
Driver Information Center (DIC)
(Midlevel and Uplevel) 0149.
2. Press the thumbwheel on the steering wheel, or the trip
odometer reset stem if the
vehicle does not have DIC controls, for several seconds.
When the confirmation
message displays, select YES.
The oil life will change
to 100%.
The oil life system can also be reset
as follows:
1. Display the oil life percentage on the DIC. See Driver
Information Center (DIC) (Base
Level) 0148 or
Driver Information Center (DIC)
(Midlevel and Uplevel) 0149.
2. Fully press the accelerator pedal slowly three times within
five seconds.
3. If the display changes to 100%, the system is reset.
If the vehicle has a CHANGE
ENGINE OIL SOON message and it
comes back on when the vehicle is
started and/or the oil life percentage
is near 0%, the engine oil life
system has not been reset. Repeat
the procedure.