2020 GMC SIERRA DENALI warning
[x] Cancel search: warningPage 332 of 501
GMC Sierra/Sierra Denali Owner Manual (GMNA-Localizing-U.S./Canada/
Mexico-13337776) - 2020 - CRC - 8/27/19
Vehicle Care 331
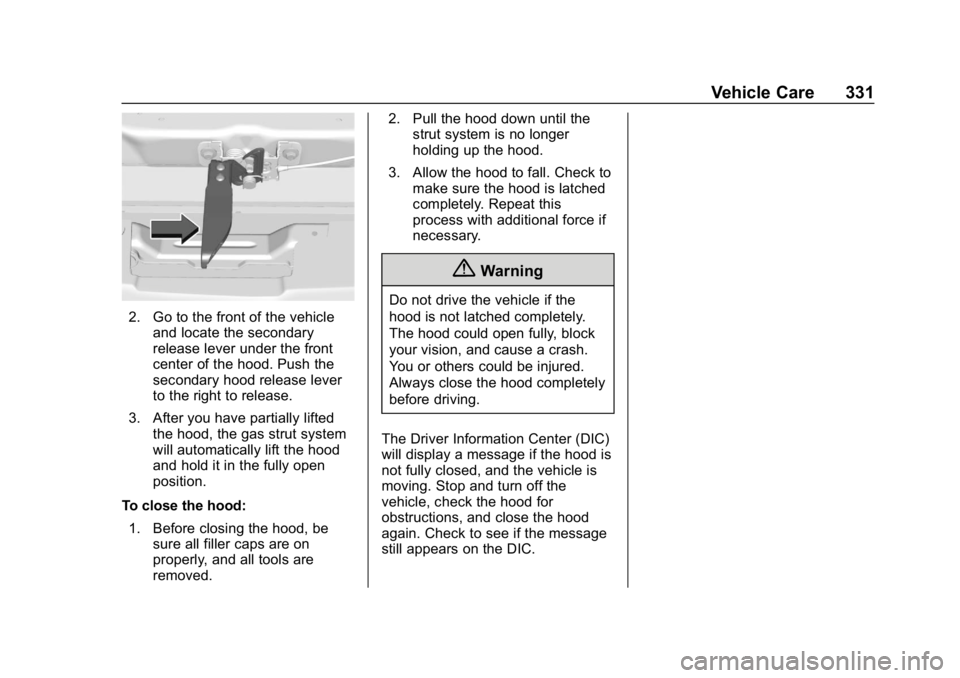
2. Go to the front of the vehicleand locate the secondary
release lever under the front
center of the hood. Push the
secondary hood release lever
to the right to release.
3. After you have partially lifted the hood, the gas strut system
will automatically lift the hood
and hold it in the fully open
position.
To close the hood: 1. Before closing the hood, be sure all filler caps are on
properly, and all tools are
removed. 2. Pull the hood down until the
strut system is no longer
holding up the hood.
3. Allow the hood to fall. Check to make sure the hood is latched
completely. Repeat this
process with additional force if
necessary.
{Warning
Do not drive the vehicle if the
hood is not latched completely.
The hood could open fully, block
your vision, and cause a crash.
You or others could be injured.
Always close the hood completely
before driving.
The Driver Information Center (DIC)
will display a message if the hood is
not fully closed, and the vehicle is
moving. Stop and turn off the
vehicle, check the hood for
obstructions, and close the hood
again. Check to see if the message
still appears on the DIC.
Page 340 of 501
GMC Sierra/Sierra Denali Owner Manual (GMNA-Localizing-U.S./Canada/
Mexico-13337776) - 2020 - CRC - 8/27/19
Vehicle Care 339
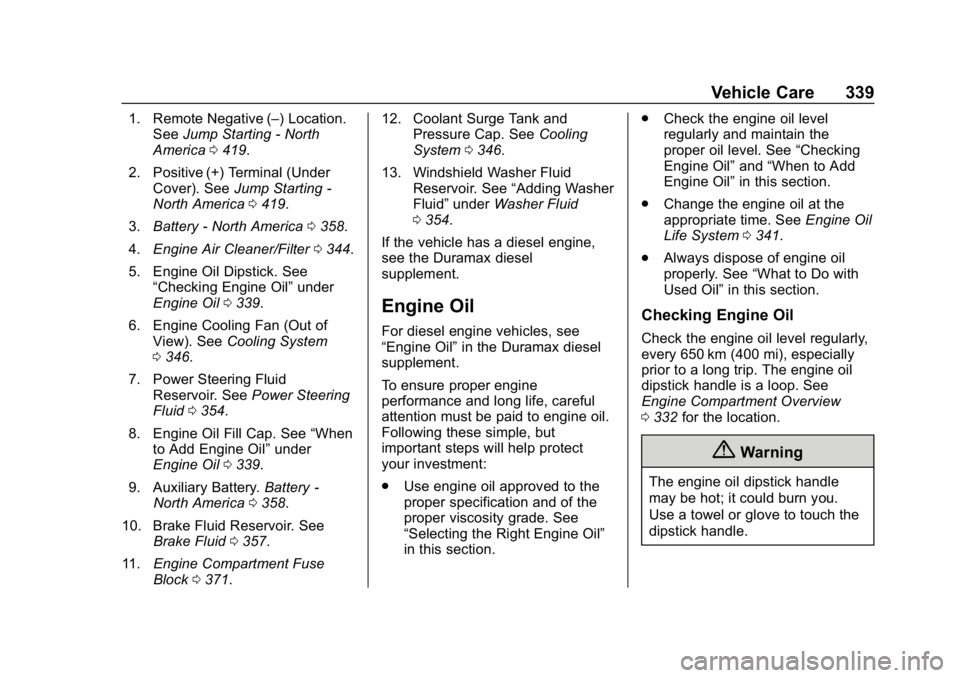
1. Remote Negative (–) Location.See Jump Starting - North
America 0419.
2. Positive (+) Terminal (Under Cover). See Jump Starting -
North America 0419.
3. Battery - North America 0358.
4. Engine Air Cleaner/Filter 0344.
5. Engine Oil Dipstick. See “Checking Engine Oil” under
Engine Oil 0339.
6. Engine Cooling Fan (Out of View). See Cooling System
0 346.
7. Power Steering Fluid Reservoir. See Power Steering
Fluid 0354.
8. Engine Oil Fill Cap. See “When
to Add Engine Oil” under
Engine Oil 0339.
9. Auxiliary Battery. Battery -
North America 0358.
10. Brake Fluid Reservoir. See Brake Fluid 0357.
11. Engine Compartment Fuse
Block 0371. 12. Coolant Surge Tank and
Pressure Cap. See Cooling
System 0346.
13. Windshield Washer Fluid Reservoir. See “Adding Washer
Fluid” under Washer Fluid
0 354.
If the vehicle has a diesel engine,
see the Duramax diesel
supplement.
Engine Oil
For diesel engine vehicles, see
“Engine Oil” in the Duramax diesel
supplement.
To ensure proper engine
performance and long life, careful
attention must be paid to engine oil.
Following these simple, but
important steps will help protect
your investment:
. Use engine oil approved to the
proper specification and of the
proper viscosity grade. See
“Selecting the Right Engine Oil”
in this section. .
Check the engine oil level
regularly and maintain the
proper oil level. See “Checking
Engine Oil” and“When to Add
Engine Oil” in this section.
. Change the engine oil at the
appropriate time. See Engine Oil
Life System 0341.
. Always dispose of engine oil
properly. See “What to Do with
Used Oil” in this section.Checking Engine Oil
Check the engine oil level regularly,
every 650 km (400 mi), especially
prior to a long trip. The engine oil
dipstick handle is a loop. See
Engine Compartment Overview
0332 for the location.
{Warning
The engine oil dipstick handle
may be hot; it could burn you.
Use a towel or glove to touch the
dipstick handle.
Page 342 of 501
GMC Sierra/Sierra Denali Owner Manual (GMNA-Localizing-U.S./Canada/
Mexico-13337776) - 2020 - CRC - 8/27/19
Vehicle Care 341
Specification
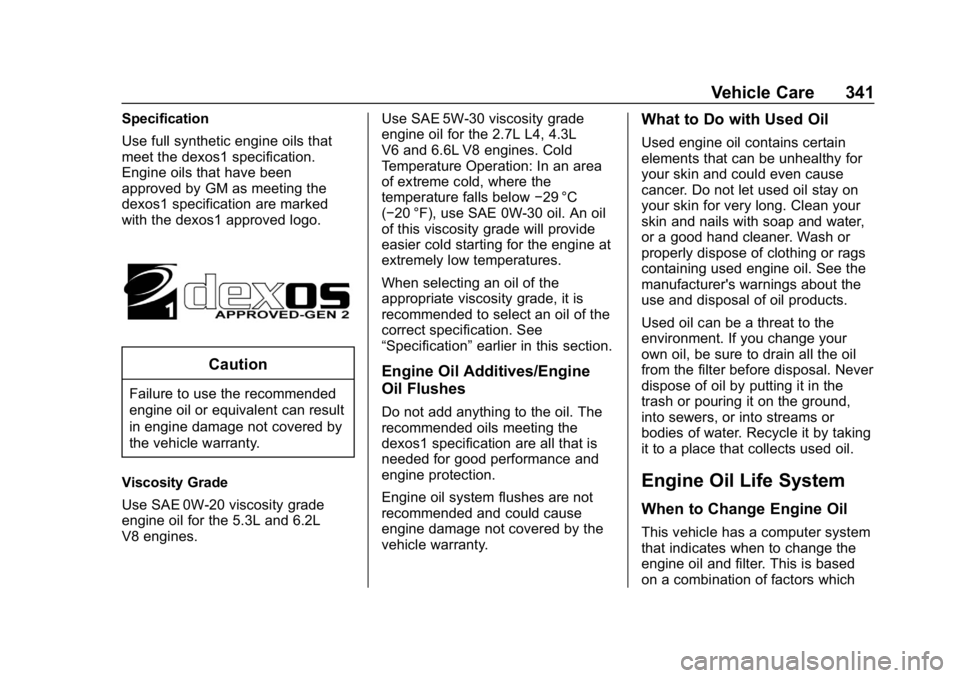
Use full synthetic engine oils that
meet the dexos1 specification.
Engine oils that have been
approved by GM as meeting the
dexos1 specification are marked
with the dexos1 approved logo.
Caution
Failure to use the recommended
engine oil or equivalent can result
in engine damage not covered by
the vehicle warranty.
Viscosity Grade
Use SAE 0W-20 viscosity grade
engine oil for the 5.3L and 6.2L
V8 engines. Use SAE 5W-30 viscosity grade
engine oil for the 2.7L L4, 4.3L
V6 and 6.6L V8 engines. Cold
Temperature Operation: In an area
of extreme cold, where the
temperature falls below
−29 °C
(−20 °F), use SAE 0W-30 oil. An oil
of this viscosity grade will provide
easier cold starting for the engine at
extremely low temperatures.
When selecting an oil of the
appropriate viscosity grade, it is
recommended to select an oil of the
correct specification. See
“Specification” earlier in this section.
Engine Oil Additives/Engine
Oil Flushes
Do not add anything to the oil. The
recommended oils meeting the
dexos1 specification are all that is
needed for good performance and
engine protection.
Engine oil system flushes are not
recommended and could cause
engine damage not covered by the
vehicle warranty.
What to Do with Used Oil
Used engine oil contains certain
elements that can be unhealthy for
your skin and could even cause
cancer. Do not let used oil stay on
your skin for very long. Clean your
skin and nails with soap and water,
or a good hand cleaner. Wash or
properly dispose of clothing or rags
containing used engine oil. See the
manufacturer's warnings about the
use and disposal of oil products.
Used oil can be a threat to the
environment. If you change your
own oil, be sure to drain all the oil
from the filter before disposal. Never
dispose of oil by putting it in the
trash or pouring it on the ground,
into sewers, or into streams or
bodies of water. Recycle it by taking
it to a place that collects used oil.
Engine Oil Life System
When to Change Engine Oil
This vehicle has a computer system
that indicates when to change the
engine oil and filter. This is based
on a combination of factors which
Page 346 of 501
GMC Sierra/Sierra Denali Owner Manual (GMNA-Localizing-U.S./Canada/
Mexico-13337776) - 2020 - CRC - 8/27/19
Vehicle Care 345
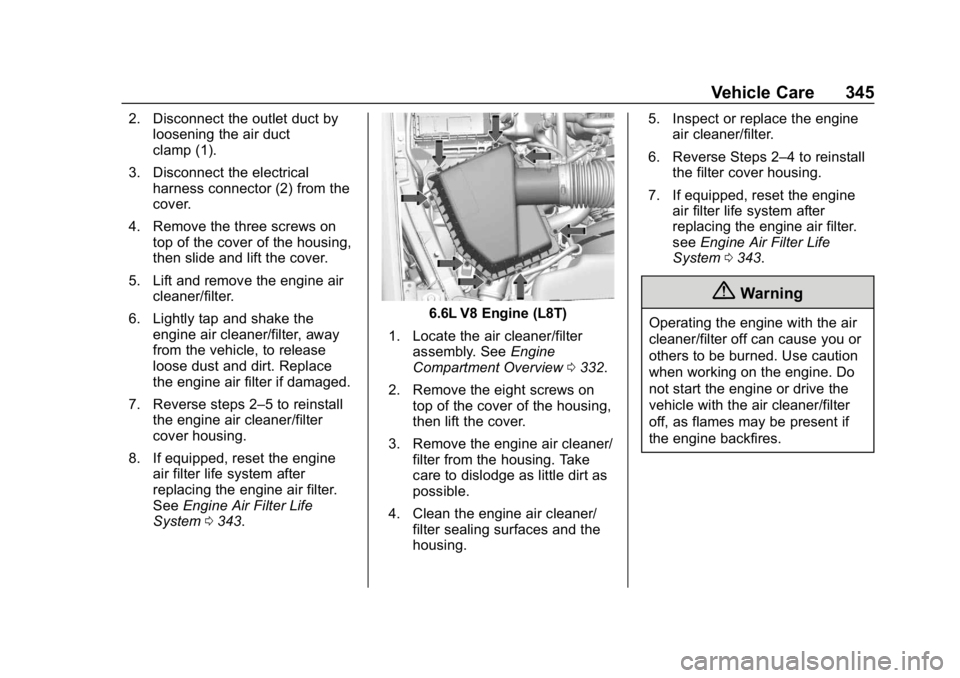
2. Disconnect the outlet duct byloosening the air duct
clamp (1).
3. Disconnect the electrical harness connector (2) from the
cover.
4. Remove the three screws on top of the cover of the housing,
then slide and lift the cover.
5. Lift and remove the engine air cleaner/filter.
6. Lightly tap and shake the engine air cleaner/filter, away
from the vehicle, to release
loose dust and dirt. Replace
the engine air filter if damaged.
7. Reverse steps 2–5 to reinstall the engine air cleaner/filter
cover housing.
8. If equipped, reset the engine air filter life system after
replacing the engine air filter.
See Engine Air Filter Life
System 0343.
6.6L V8 Engine (L8T)
1. Locate the air cleaner/filter assembly. See Engine
Compartment Overview 0332.
2. Remove the eight screws on top of the cover of the housing,
then lift the cover.
3. Remove the engine air cleaner/ filter from the housing. Take
care to dislodge as little dirt as
possible.
4. Clean the engine air cleaner/ filter sealing surfaces and the
housing. 5. Inspect or replace the engine
air cleaner/filter.
6. Reverse Steps 2–4 to reinstall the filter cover housing.
7. If equipped, reset the engine air filter life system after
replacing the engine air filter.
see Engine Air Filter Life
System 0343.
{Warning
Operating the engine with the air
cleaner/filter off can cause you or
others to be burned. Use caution
when working on the engine. Do
not start the engine or drive the
vehicle with the air cleaner/filter
off, as flames may be present if
the engine backfires.
Page 347 of 501
GMC Sierra/Sierra Denali Owner Manual (GMNA-Localizing-U.S./Canada/
Mexico-13337776) - 2020 - CRC - 8/27/19
346 Vehicle Care
Caution
If the air cleaner/filter is off, dirt
can easily get into the engine,
which could damage it. Always
have the air cleaner/filter in place
when driving.
Cooling System
If the vehicle has the Duramax
diesel engine, see the Duramax
diesel supplement.
The cooling system allows the
engine to maintain the correct
working temperature.
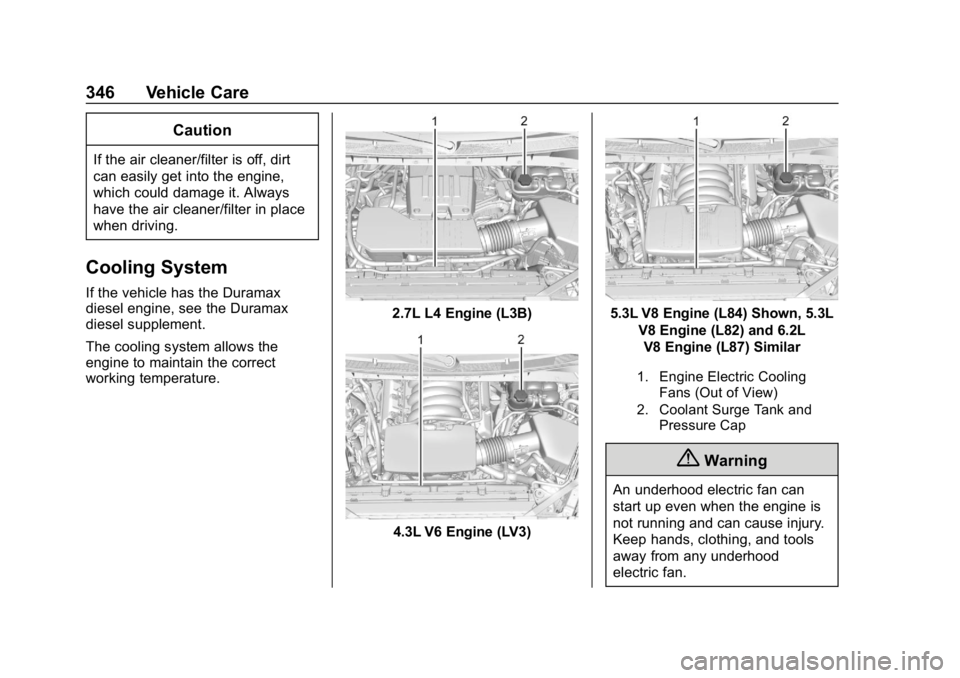
2.7L L4 Engine (L3B)
4.3L V6 Engine (LV3)
5.3L V8 Engine (L84) Shown, 5.3LV8 Engine (L82) and 6.2LV8 Engine (L87) Similar
1. Engine Electric Cooling Fans (Out of View)
2. Coolant Surge Tank and Pressure Cap
{Warning
An underhood electric fan can
start up even when the engine is
not running and can cause injury.
Keep hands, clothing, and tools
away from any underhood
electric fan.
Page 348 of 501
GMC Sierra/Sierra Denali Owner Manual (GMNA-Localizing-U.S./Canada/
Mexico-13337776) - 2020 - CRC - 8/27/19
Vehicle Care 347
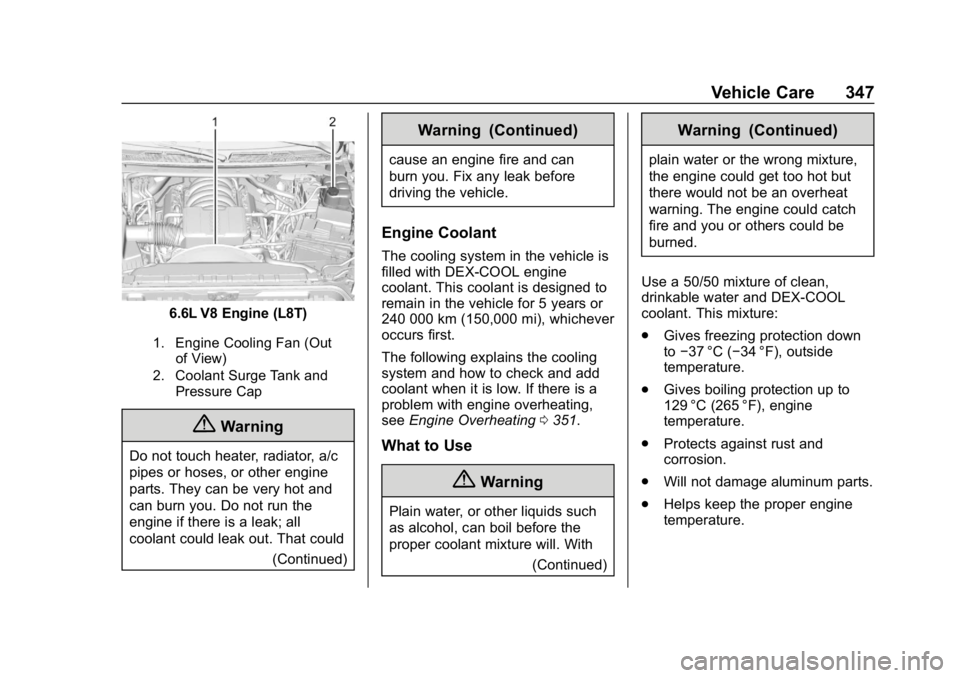
6.6L V8 Engine (L8T)
1. Engine Cooling Fan (Outof View)
2. Coolant Surge Tank and Pressure Cap
{Warning
Do not touch heater, radiator, a/c
pipes or hoses, or other engine
parts. They can be very hot and
can burn you. Do not run the
engine if there is a leak; all
coolant could leak out. That could
(Continued)
Warning (Continued)
cause an engine fire and can
burn you. Fix any leak before
driving the vehicle.
Engine Coolant
The cooling system in the vehicle is
filled with DEX-COOL engine
coolant. This coolant is designed to
remain in the vehicle for 5 years or
240 000 km (150,000 mi), whichever
occurs first.
The following explains the cooling
system and how to check and add
coolant when it is low. If there is a
problem with engine overheating,
seeEngine Overheating 0351.
What to Use
{Warning
Plain water, or other liquids such
as alcohol, can boil before the
proper coolant mixture will. With
(Continued)
Warning (Continued)
plain water or the wrong mixture,
the engine could get too hot but
there would not be an overheat
warning. The engine could catch
fire and you or others could be
burned.
Use a 50/50 mixture of clean,
drinkable water and DEX-COOL
coolant. This mixture:
. Gives freezing protection down
to−37 °C (−34 °F), outside
temperature.
. Gives boiling protection up to
129 °C (265 °F), engine
temperature.
. Protects against rust and
corrosion.
. Will not damage aluminum parts.
. Helps keep the proper engine
temperature.
Page 350 of 501
GMC Sierra/Sierra Denali Owner Manual (GMNA-Localizing-U.S./Canada/
Mexico-13337776) - 2020 - CRC - 8/27/19
Vehicle Care 349
Automatic Coolant Service Fill
Instructions (L3B Engine)
See 3.0L Duramax Diesel
supplement for the diesel engine
procedure.
If equipped, this feature assists in
filling and removing air from the
cooling system after service of
components or when coolant is
added after being too low.
To activate the fill and air removal
process:1. With a cold system, add coolant to the indicated mark
on the surge tank.
2. Replace the cap on the surge tank.
3. Connect the vehicle to a battery charger.
4. Set the ignition to Service or Accessory Mode. See Ignition
Positions (Keyless Access)
0 208 or
Ignition Positions (Key Access)
0 210.
5. Turn off the air conditioning. 6. Set the parking brake.
7. At the same time, press the
accelerator and the brake for
automatic transmission
vehicles for two seconds, then
release.
At the end of the cycle, check the
coolant level in the surge tank and
add coolant if it is low. Turn off the
vehicle, allow the Electronic Control
Module (ECM) to go to sleep, about
two minutes, and repeat Steps 3–7.
Listen for pump activation and
movement of the control valves
while watching the level of the
coolant in the surge tank. If the tank
empties, turn the ignition off,
carefully remove the surge tank cap,
refill to the indicated mark, and
repeat Steps 3–6. The fill and air
removal process will run for
approximately 10 minutes.
How to Add Coolant to the
Coolant Surge Tank for
Gasoline Engines Except L3B
If the vehicle has a diesel engine,
see “Cooling System” in the
Duramax diesel supplement for the
proper coolant fill procedure.
{Warning
Spilling coolant on hot engine
parts can burn you. Coolant
contains ethylene glycol and it will
burn if the engine parts are hot
enough.
{Warning
Plain water, or other liquids such
as alcohol, can boil before the
proper coolant mixture will. With
plain water or the wrong mixture,
the engine could get too hot but
there would not be an overheat
(Continued)
Page 351 of 501

GMC Sierra/Sierra Denali Owner Manual (GMNA-Localizing-U.S./Canada/
Mexico-13337776) - 2020 - CRC - 8/27/19
350 Vehicle Care
Warning (Continued)
warning. The engine could catch
fire and you or others could be
burned.
{Warning
Steam and scalding liquids from a
hot cooling system are under
pressure. Turning the pressure
cap, even a little, can cause them
to come out at high speed and
you could be burned. Never turn
the cap when the cooling system,
including the pressure cap, is hot.
Wait for the cooling system and
pressure cap to cool.
Caution
Failure to follow the specific
coolant fill procedure could cause
the engine to overheat and could(Continued)
Caution (Continued)
cause system damage. If coolant
is not visible in the surge tank,
contact your dealer.
If no coolant is visible in the surge
tank, add coolant.
1. Remove the coolant surge tank pressure cap when the cooling
system, including the coolant
surge tank pressure cap and
upper radiator hose, is no
longer hot.
Turn the pressure cap slowly
counterclockwise about one full
turn. If a hiss is heard, wait for
that to stop. A hiss means
there is still some pressure left.
2. Keep turning the pressure cap slowly, and remove it. 3. Fill the coolant surge tank with
the proper mixture to the full
cold mark.
4. With the coolant surge tank pressure cap off, start the
engine and let it run until the
engine coolant temperature
gauge indicates approximately
90 °C (195 °F).
By this time, the coolant level
inside the coolant surge tank
may be lower. If the level is
lower, add more of the proper
mixture to the coolant surge
tank until the level reaches the
indicated mark.
5. Replace the pressure cap tightly.
6. Verify coolant level after the engine is shut off and the
coolant is cold. If necessary,
repeat coolant fill procedure
Steps 1–6.