2020 GMC SIERRA DENALI weight
[x] Cancel search: weightPage 107 of 501
GMC Sierra/Sierra Denali Owner Manual (GMNA-Localizing-U.S./Canada/
Mexico-13337776) - 2020 - CRC - 8/27/19
106 Seats and Restraints
7. For forward-facing childrestraints, attach and tighten
the top tether to the top tether
anchor (loop). Refer to the child
restraint instructions, the
vehicle LATCH anchor weight
limits, and instructions listed in
Lower Anchors and Tethers for
Children (LATCH System) 091.
8. Before placing a child in the child restraint, make sure it is
securely held in place. To
check, grasp the child restraint
at the seat belt path and
attempt to move it side to side
and back and forth. When the
child restraint is properly
installed, there should be no
more than 2.5 cm (1 in) of
movement.
To remove the child restraint,
unbuckle the vehicle seat belt and
let it return to the stowed position.
If the top tether is attached to a top
tether anchor, disconnect it.
Reinstall the head restraint or
headrest before the seating position
is used. See “Head Restraint or
Headrest Removal and Reinstallation”
underLower Anchors
and Tethers for Children (LATCH
System) 091 for additional
information on installing the
headrest properly.
Crew Cab
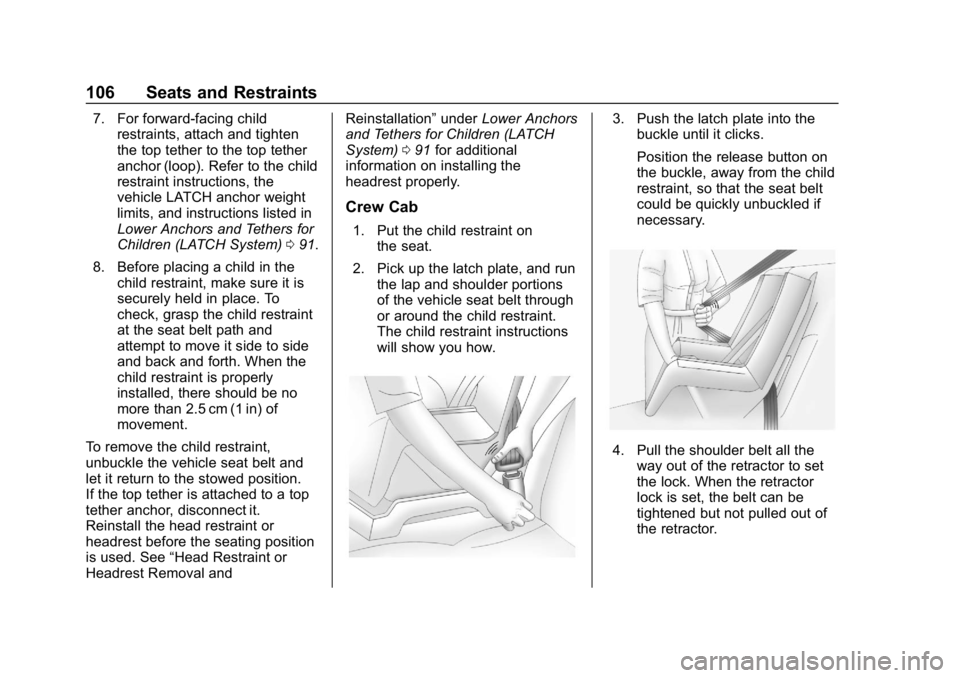
1. Put the child restraint on the seat.
2. Pick up the latch plate, and run the lap and shoulder portions
of the vehicle seat belt through
or around the child restraint.
The child restraint instructions
will show you how.
3. Push the latch plate into thebuckle until it clicks.
Position the release button on
the buckle, away from the child
restraint, so that the seat belt
could be quickly unbuckled if
necessary.
4. Pull the shoulder belt all the
way out of the retractor to set
the lock. When the retractor
lock is set, the belt can be
tightened but not pulled out of
the retractor.
Page 195 of 501
GMC Sierra/Sierra Denali Owner Manual (GMNA-Localizing-U.S./Canada/
Mexico-13337776) - 2020 - CRC - 8/27/19
194 Driving and Operating
Warning (Continued)
descending a hill and use a low
gear to keep vehicle speed under
control.
If a brake fade condition is detected,
a DIC warning message is
displayed. Adjust brake pedal use
and shift to a lower transmission
gear to reduce braking.
If the brakes continue to fade to a
severe condition, additional DIC
messages are displayed. The brake
system warning light will illuminate,
and the vehicle speed may be
limited. See Brake System Warning
Light 0139.
If the vehicle stalls on a hill:
1. Apply the brakes to stop the vehicle, and then apply the
parking brake. 2. Shift into P (Park) and then
restart the engine.
.If driving uphill when the
vehicle stalls, shift to
R (Reverse), release the
parking brake, and back
straight down.
. Never try to turn the vehicle
around. If the hill is steep
enough to stall the vehicle,
it is steep enough to cause
it to roll over.
. If you cannot make it up the
hill, back straight down
the hill.
. Never back down a hill in
N (Neutral) using only the
brake. The vehicle can roll
backward quickly and you
could lose control.
. If driving downhill when the
vehicle stalls, shift to a
lower gear, release the
parking brake, and drive
straight down the hill. 3. If the vehicle cannot be
restarted after stalling, set the
parking brake, shift into
P (Park), and turn the
vehicle off.
3.1. Leave the vehicle and
seek help.
3.2. Stay clear of the path the vehicle would take if it
rolled downhill.
. Avoid turns that take the vehicle
across the incline of the hill.
A hill that can be driven straight
up or down might be too steep to
drive across. Driving across an
incline puts more weight on the
downhill wheels, which could
cause a downhill slide or a
rollover.
. Surface conditions can be a
problem. Loose gravel, muddy
spots, or even wet grass can
cause the tires to slip sideways,
downhill. If the vehicle slips
sideways, it can hit something
that will trip it —a rock, a rut,
etc. —and roll over.
Page 201 of 501
GMC Sierra/Sierra Denali Owner Manual (GMNA-Localizing-U.S./Canada/
Mexico-13337776) - 2020 - CRC - 8/27/19
200 Driving and Operating
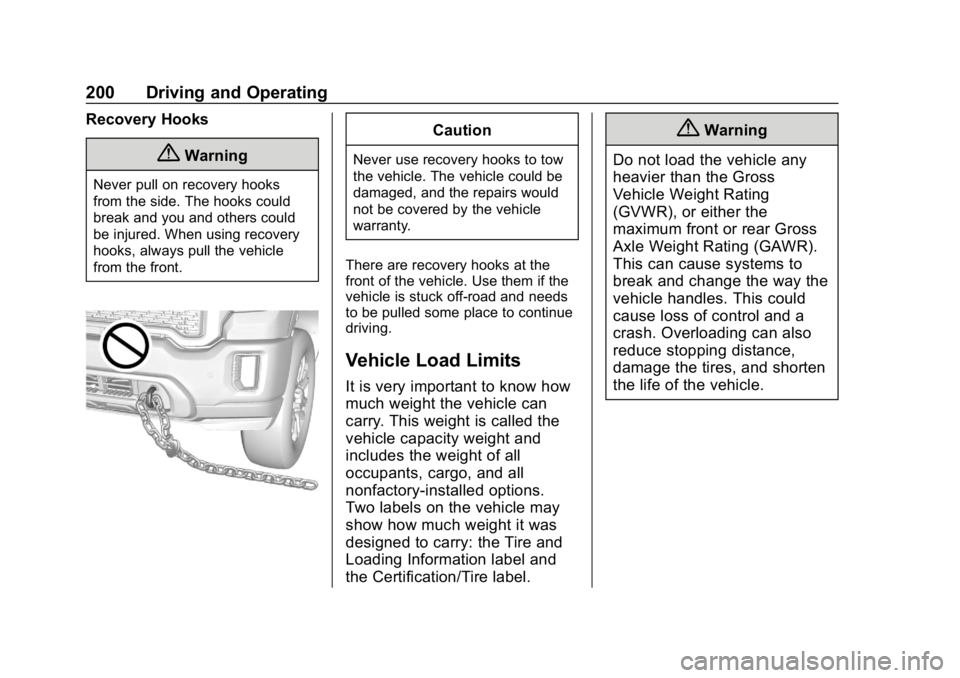
Recovery Hooks
{Warning
Never pull on recovery hooks
from the side. The hooks could
break and you and others could
be injured. When using recovery
hooks, always pull the vehicle
from the front.
Caution
Never use recovery hooks to tow
the vehicle. The vehicle could be
damaged, and the repairs would
not be covered by the vehicle
warranty.
There are recovery hooks at the
front of the vehicle. Use them if the
vehicle is stuck off-road and needs
to be pulled some place to continue
driving.
Vehicle Load Limits
It is very important to know how
much weight the vehicle can
carry. This weight is called the
vehicle capacity weight and
includes the weight of all
occupants, cargo, and all
nonfactory-installed options.
Two labels on the vehicle may
show how much weight it was
designed to carry: the Tire and
Loading Information label and
the Certification/Tire label.
{Warning
Do not load the vehicle any
heavier than the Gross
Vehicle Weight Rating
(GVWR), or either the
maximum front or rear Gross
Axle Weight Rating (GAWR).
This can cause systems to
break and change the way the
vehicle handles. This could
cause loss of control and a
crash. Overloading can also
reduce stopping distance,
damage the tires, and shorten
the life of the vehicle.
Page 202 of 501
GMC Sierra/Sierra Denali Owner Manual (GMNA-Localizing-U.S./Canada/
Mexico-13337776) - 2020 - CRC - 8/27/19
Driving and Operating 201
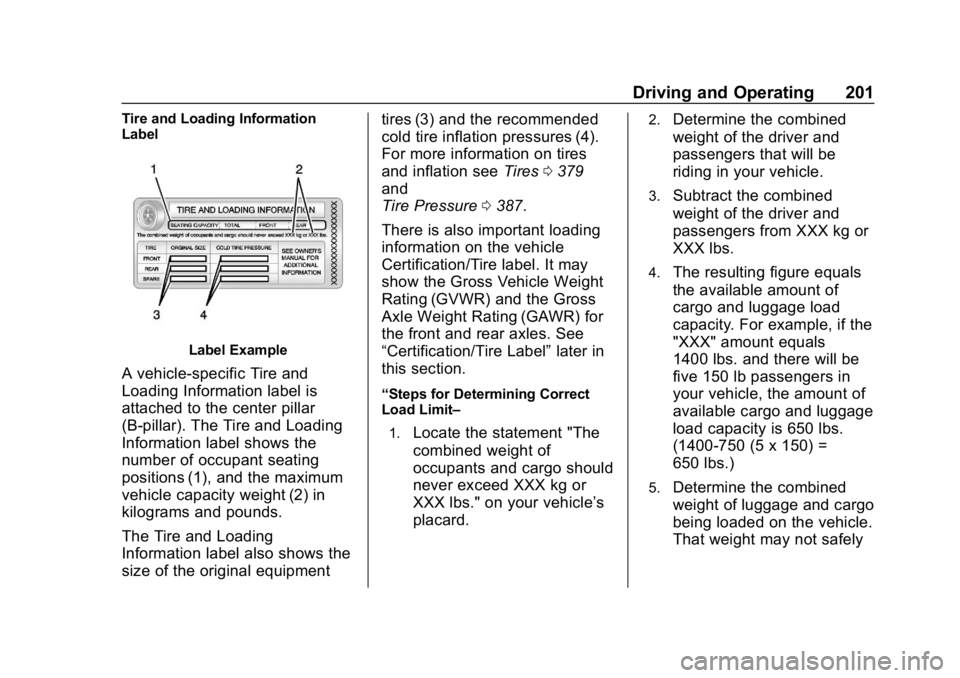
Tire and Loading Information
Label
Label Example
A vehicle-specific Tire and
Loading Information label is
attached to the center pillar
(B-pillar). The Tire and Loading
Information label shows the
number of occupant seating
positions (1), and the maximum
vehicle capacity weight (2) in
kilograms and pounds.
The Tire and Loading
Information label also shows the
size of the original equipmenttires (3) and the recommended
cold tire inflation pressures (4).
For more information on tires
and inflation see
Tires0379
and
Tire Pressure 0387.
There is also important loading
information on the vehicle
Certification/Tire label. It may
show the Gross Vehicle Weight
Rating (GVWR) and the Gross
Axle Weight Rating (GAWR) for
the front and rear axles. See
“Certification/Tire Label” later in
this section.
“Steps for Determining Correct
Load Limit–
1.
Locate the statement "The
combined weight of
occupants and cargo should
never exceed XXX kg or
XXX lbs." on your vehicle’s
placard.
2.Determine the combined
weight of the driver and
passengers that will be
riding in your vehicle.
3.Subtract the combined
weight of the driver and
passengers from XXX kg or
XXX lbs.
4.The resulting figure equals
the available amount of
cargo and luggage load
capacity. For example, if the
"XXX" amount equals
1400 lbs. and there will be
five 150 lb passengers in
your vehicle, the amount of
available cargo and luggage
load capacity is 650 lbs.
(1400-750 (5 x 150) =
650 lbs.)
5.Determine the combined
weight of luggage and cargo
being loaded on the vehicle.
That weight may not safely
Page 203 of 501
GMC Sierra/Sierra Denali Owner Manual (GMNA-Localizing-U.S./Canada/
Mexico-13337776) - 2020 - CRC - 8/27/19
202 Driving and Operating
exceed the available cargo
and luggage load capacity
calculated in Step 4.
6.If your vehicle will be towing
a trailer, load from your
trailer will be transferred to
your vehicle. Consult this
manual to determine how
this reduces the available
cargo and luggage load
capacity of your vehicle.”
See Trailer Towing 0292 for
important information on towing
a trailer, towing safety rules, and
trailering tips.
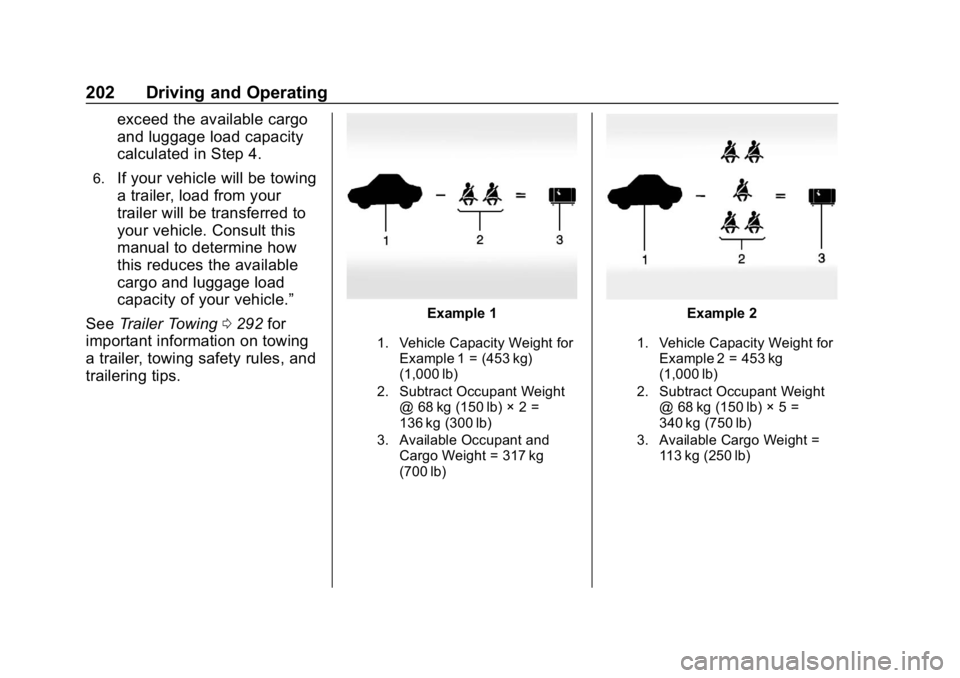
Example 1
1. Vehicle Capacity Weight for
Example 1 = (453 kg)
(1,000 lb)
2. Subtract Occupant Weight @ 68 kg (150 lb) × 2 =
136 kg (300 lb)
3. Available Occupant and Cargo Weight = 317 kg
(700 lb)
Example 2
1. Vehicle Capacity Weight forExample 2 = 453 kg
(1,000 lb)
2. Subtract Occupant Weight @ 68 kg (150 lb) × 5 =
340 kg (750 lb)
3. Available Cargo Weight = 113 kg (250 lb)
Page 204 of 501
GMC Sierra/Sierra Denali Owner Manual (GMNA-Localizing-U.S./Canada/
Mexico-13337776) - 2020 - CRC - 8/27/19
Driving and Operating 203
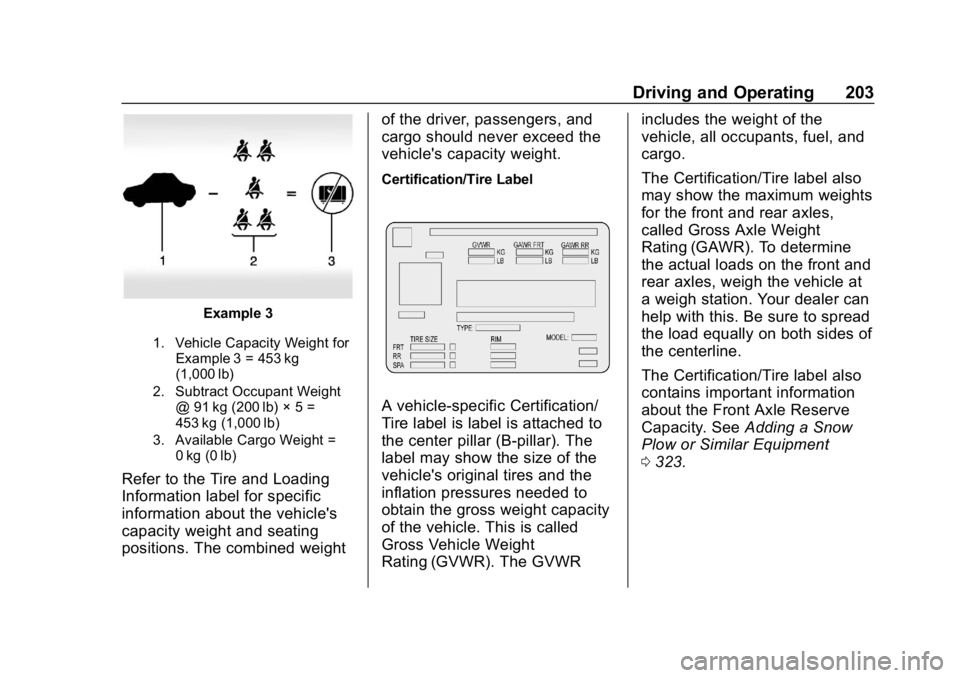
Example 3
1. Vehicle Capacity Weight forExample 3 = 453 kg
(1,000 lb)
2. Subtract Occupant Weight @ 91 kg (200 lb) × 5 =
453 kg (1,000 lb)
3. Available Cargo Weight = 0 kg (0 lb)
Refer to the Tire and Loading
Information label for specific
information about the vehicle's
capacity weight and seating
positions. The combined weight of the driver, passengers, and
cargo should never exceed the
vehicle's capacity weight.
Certification/Tire Label
A vehicle-specific Certification/
Tire label is label is attached to
the center pillar (B-pillar). The
label may show the size of the
vehicle's original tires and the
inflation pressures needed to
obtain the gross weight capacity
of the vehicle. This is called
Gross Vehicle Weight
Rating (GVWR). The GVWRincludes the weight of the
vehicle, all occupants, fuel, and
cargo.
The Certification/Tire label also
may show the maximum weights
for the front and rear axles,
called Gross Axle Weight
Rating (GAWR). To determine
the actual loads on the front and
rear axles, weigh the vehicle at
a weigh station. Your dealer can
help with this. Be sure to spread
the load equally on both sides of
the centerline.
The Certification/Tire label also
contains important information
about the Front Axle Reserve
Capacity. See
Adding a Snow
Plow or Similar Equipment
0 323.
Page 205 of 501

GMC Sierra/Sierra Denali Owner Manual (GMNA-Localizing-U.S./Canada/
Mexico-13337776) - 2020 - CRC - 8/27/19
204 Driving and Operating
{Warning
In the case of a sudden stop
or collision, things carried in
the bed of your truck could
shift forward and come into
the passenger area, injuring
you and others. If you put
things in the bed of your truck,
you should make sure they
are properly secured.
Caution
Overloading the vehicle may
cause damage. Repairs would not
be covered by the vehicle
warranty. Do not overload the
vehicle.
Using heavier suspension
components to get added
durability might not change the
weight ratings. Ask your dealer
to help load the vehicle the
right way.
{Warning
Things you put inside the
vehicle can strike and injure
people in a sudden stop or
turn, or in a crash.
.Put things in the cargo
area of the vehicle. Try to
spread the weight evenly.
.Never stack heavier
things, like suitcases,
inside the vehicle so that
some of them are above
the tops of the seats.
.Do not leave an
unsecured child restraint
in the vehicle.
.When you carry
something inside the
vehicle, secure it
whenever you can.
.Do not leave a seat
folded down unless you
need to. There is also important loading
information for off-road driving in
this manual. See
“Loading the
Vehicle for Off-Road Driving“
under Off-Road Driving 0191.
Two-Tiered Loading
Depending on the model of the
pickup, an upper load platform
can be created by positioning
three or four 5 cm (2 in) by
15 cm (6 in) wooden planks
across the width of the pickup
box. The planks must be
inserted in the pickup box
depressions.
When using this upper load
platform, be sure the load is
securely tied down to prevent it
from shifting. The load's center
of gravity should be positioned
in a zone over the rear axle. The
zone is located in the area
between the front of each wheel
well and the rear of each wheel
Page 206 of 501
GMC Sierra/Sierra Denali Owner Manual (GMNA-Localizing-U.S./Canada/
Mexico-13337776) - 2020 - CRC - 8/27/19
Driving and Operating 205
well. The center of gravity height
must not extend above the top
of the pickup box flareboard.
Any load that extends beyond
the vehicle's taillamp area must
be properly marked according to
local laws and regulations.
Remember not to exceed the
Gross Axle Weight
Rating (GAWR) of the front or
rear axle.
Add-On Equipment
When carrying removable items,
a limit on how many people
carried inside the vehicle may
be necessary. Be sure to weigh
the vehicle before buying and
installing the new equipment.Caution
Overloading the vehicle may
cause damage. Repairs would not
be covered by the vehicle
warranty. Do not overload the
vehicle.
Remember not to exceed the
Gross Axle Weight
Rating (GAWR) of the front or
rear axle.
* Equipment Maximum
Weight
Ladder Rack
and Cargo 340 kg (750 lb)
Cross Toolbox
and Cargo 181 kg (400 lb)
Side Boxes
and Cargo 113 kg per
side (250 lb
per side)
* The combined weight for all
rail-mounted equipment should
not exceed 454 kg (1,000 lb).
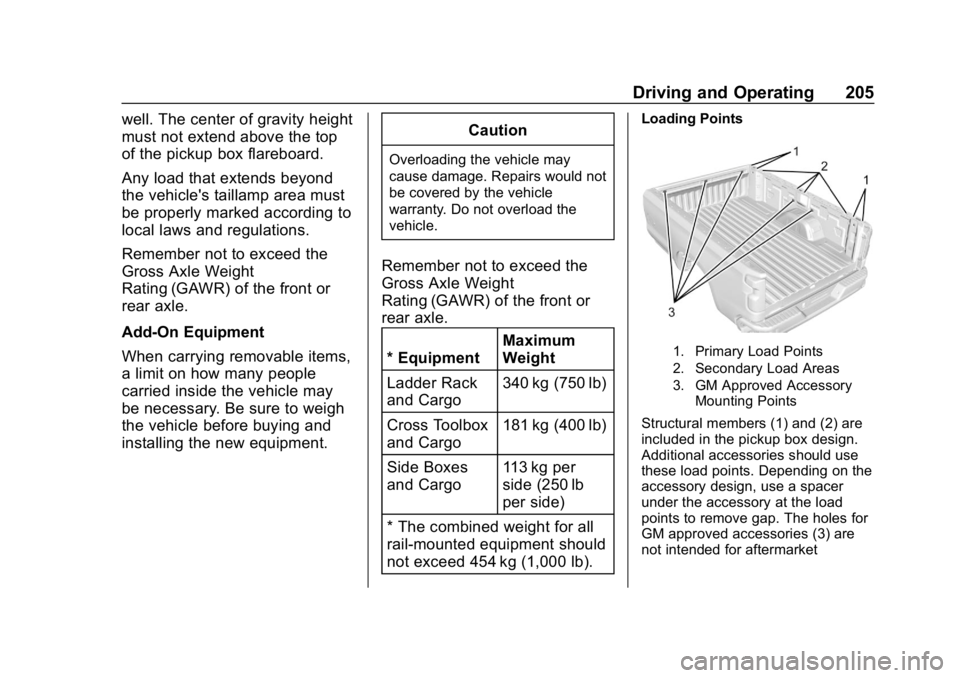
Loading Points
1. Primary Load Points
2. Secondary Load Areas
3. GM Approved Accessory Mounting Points
Structural members (1) and (2) are
included in the pickup box design.
Additional accessories should use
these load points. Depending on the
accessory design, use a spacer
under the accessory at the load
points to remove gap. The holes for
GM approved accessories (3) are
not intended for aftermarket