2020 GENESIS G90 display
[x] Cancel search: displayPage 3 of 30

126 3
9
AIRBAG
GENESIS12
6 3
9
AIRBAG
GENESIS
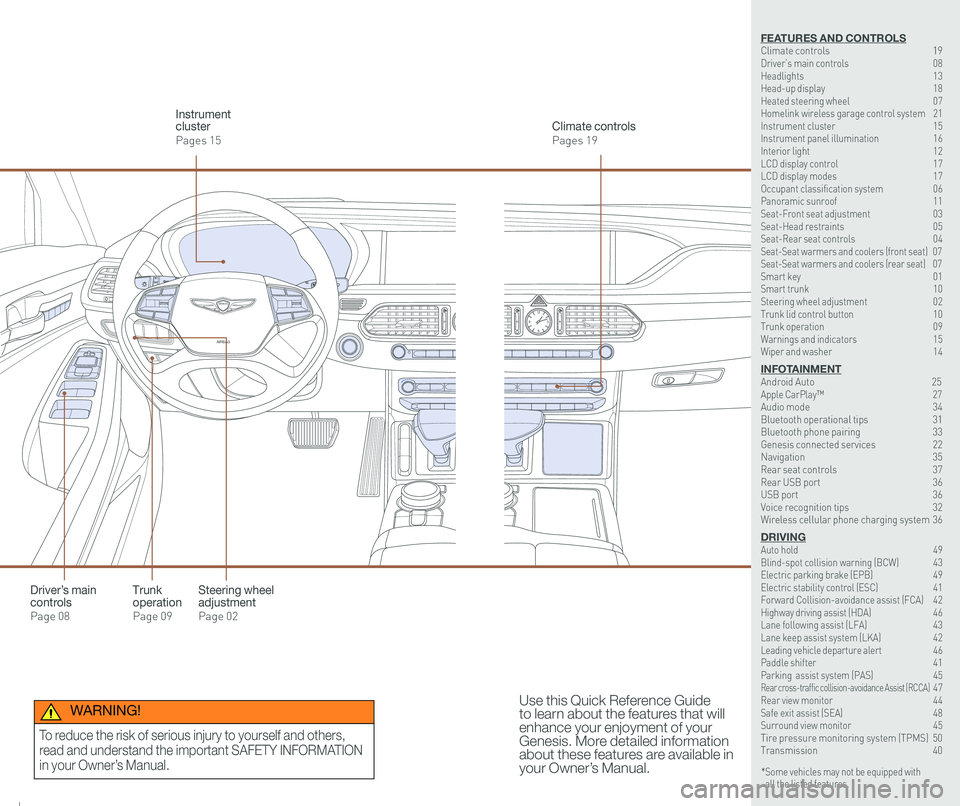
Steering wheel adjustment
Page 02
Climate controls
Pages 19
Instrument cluster
Pages 15
Use this Quick Reference Guide to learn about the features that will enhance your enjoyment of your Genesis. More detailed information about these features are available in your Owner’s Manual.
Trunk operation
Page 09
Driver’s main controls
Page 08
* Some vehicles may not be equipped with all the listed features.
WARNING!
To reduce the risk of serious injury to yourself and others,
read and understand the important SAFETY INFORMATION
in your Owner’s Manual.
FEATURES AND CONTROLSClimate controls 19Driver’s main controls 08Headlights 13Head-up display 18Heated steering wheel 07Homelink wireless garage control system 21Instrument cluster 15Instrument panel illumination 16Interior light 12LCD display control 17LCD display modes 17Occupant classification system 06 Panoramic sunroof 11Seat-Front seat adjustment 03Seat-Head restraints 05Seat-Rear seat controls 04Seat-Seat warmers and coolers (front seat) 07Seat-Seat warmers and coolers (rear seat) 07Smart key 01 Smart trunk 10Steering wheel adjustment 02Trunk lid control button 10Trunk operation 09Warnings and indicators 15Wiper and washer 14
INFOTAINMENTAndroid Auto \
25Apple CarPlay™ \
27Audio mode 34Bluetooth operational tips 31Bluetooth phone pairing 33Genesis connected services 22Navigation 35Rear seat controls 37Rear USB port 36USB port 36Voice recognition tips 32Wireless cellular phone charging system 36
DRIVINGAuto hold 49 Blind-spot collision warning (BCW) 43 Electric parking brake (EPB) 49 Electric stability control (ESC) 41Forward Collision-avoidance assist (FCA) 42Highway driving assist (HDA) 46Lane following assist (LFA) 43 Lane keep assist system (LKA) 42Leading vehicle departure alert 46 Paddle shifter 41Parking assist system (PAS) 45Rear cross-traffic collision-avoidance Assist (RCCA) 47 Rear view monitor 44 Safe exit assist (SEA) 48 Surround view monitor 45 Tire pressure monitoring system (TPMS) 50Transmission 40
Page 11 of 30

Quick Reference Guide I 1615 I Quick Reference Guide
INSTRUMENT CLUSTER
1 Tachometer
2 Speedometer
3 Engine coolant temperature gauge
4 Fuel gauge
5 Warning and indicator lights
6 LCD display (including trip computer)
12
34
6
55
5
5
INSTRUMENT PANEL ILLUMINATION
Press the illumination control button
to adjust the brightness.
WARNINGS AND INDICATORS
Light ON indicator
Seat belt warning light
Charging system warning light
Electronic Brake Force Distribution (EBD) System warning light
High beam indicator
SPORT mode drive indicatorSMART mode drive indicatorECO mode drive indicator
Smart high beam indicator
Electronic Stability Control (ESC) indicatorMaster warning light
Adaptive Front Lighting System (AFLS) warning light
Motor-Driven Power Steering (MDPS) warning light
Immobilizer indicator
Air bag warning light
ABS warning light
Low Tire Pressurewarning lightEngine oil pressurewarning lightLow fuel level warning light
Malfunction IndicatorLamp (MIL)
Turn signal indicatorElectronic Stability Control (ESC ) OFF indicator
Electric Parking Brake (EPB) warning light
Forward Collision-Avoidance Assist (FCA) Warning Light
All Wheel Drive (AWD) warning light
INDIVIDUAL mode indicatorAUTO HOLD indicatorLane Keeping Assist System (LKAS) indicator
Parking brake & brake fluid warning light
GENESIS G90
FEATURES AND CONTROLS
Page 12 of 30

Quick Reference Guide I 1817 I Quick Reference Guide
ModesSymbol Description
Trip ComputerThis mode displays driving information such as tripmeter, fuel economy, etc.
Turn By Turn (TBT)(if equipped)
This mode displays the state of
the navigation.
Assist
This mode displays the state of the Smart Cruise Control (SCC) and Lane Keeping Assist System (LKAS), Driver Attention Alert (DAA), and Tire Pressure Monitoring System (TPMS).
WarningDisplays warning messages.
LCD DISPLAY MODES
GENESIS
1 : MODE button
Press to change modes.
2 : MOVE switch
Rotate to change items.
3 : OK button
Push button for setting or
resetting the selected item.
LCD DISPLAY CONTROL
GENESIS
HEAD-UP DISPLAY
5575
55
MPH
The Head-Up Display is a transparent
display which projects a shadow of
information of the instrument cluster
and navigation on the windshield
glass.
The Head-up display can be activated
by selecting “Enable Head-Up Display”
from the settings menu in the AVN
system screen:
Setup > Vehicle Settings > Head-Up
Display > Enable Head-Up Display
Head-Up Display information
1. Turn-by-turn (TBT) navigation
information
2. Road information
3. Speedometer
4. Cruise system set speed
5. Smart Cruise Control (SCC)
information
6. Lane Following Assist (LFA)
system information
7. Lane Keeping Assist (LKA) system
information
8. Blind-spot Collision Warning
(BCW)system information
9. Highway Driving Assist (HDA)
system information
23
1
Scan to view a video of: Head-Up Display
NOTE: If you wear polarizing-
filter sunglasses, it may be
difficult to read the Head Up
Display information.
GENESIS G90
FEATURES AND CONTROLS
Page 13 of 30

Quick Reference Guide I 2019 I Quick Reference Guide
CLIMATE CONTROLS
1 Driver’s temperature control knob
2 Driver’s AUTO button
3 Driver’s mode selection button
4 Front windshield defroster button
5 Rear window defroster button
11 Passenger’s AUTO button
12 Driver’s fan speed control button
13 OFF button
14 Climate control information screen selection button
15 Air conditioning button
6 SYNC button
7 AQS (Air quality system) button
8 Air intake control button
9 Passenger’s mode selection button
10 Passenger’s temperature control knob
16 Passenger’s fan speed control button
17 Rear fan speed control knob
18 Rear mode selection button
19 Rear OFF button
20 Rear AUTO butto
21 Rear temperature control knob
22 LCD display
1
1616
23
15
764910
17111818
1212
22
21
13
19
85
20
FrontRear
SYSTEM OFF
Pressing the OFF button will
place the system to the OFF
mode.
• Blower will turn off.
• Outside (fresh) air position will
be selected.
• Vented air will be at last set
temperature.
NOTE: Smart Vent, Auto Defog,
and Carbon Dioxide Monitor
features are available in the
Climate Control display. Please
refer to your Owner’s Manual for
further information.
AIR INTAKE CONTROL
SYNC BUTTON
Press the SYNC
button to adjust the
driver and front/rear
passenger side
temperature and air
flow direction with
the same settings.”
REAR WINDOW DEFROSTER
Press to activate/
deactivate the rear
window and outside
mirrors defroster.
1. Press the AUTO
button.
2. Set the temeprature
control to the
desired setting.
The modes, fan speeds, air
intake, and air-conditioning will
adjust automatically according
to the temperature setting.
AUTOMATIC HEATING /
AIR CONDITIONING
MODE SELECTION
Changes the
direction of air flow.
FaceLevelFloorLevelFloor &Defrost
Passenger/Rear
Front
Bi-Level
Scan to view a video of: Climate Control
Recirculated
air position
Outside (fresh)
air position
AQS activated
(auto air intake control)
DEFOGGING / DEFROSTING
2. Set the temperature to the warmest desired setting.
1. Press the front
windshield defrost
button.
3. Set the fan speed to
the highest setting.
NOTE: Outside (fresh) air position will
be selected when front defrost
button is selected.
GENESIS G90
FEATURES AND CONTROLS
Page 19 of 30

Quick Reference Guide I 3231 I Quick Reference Guide
GENESIS
GENESIS23
1
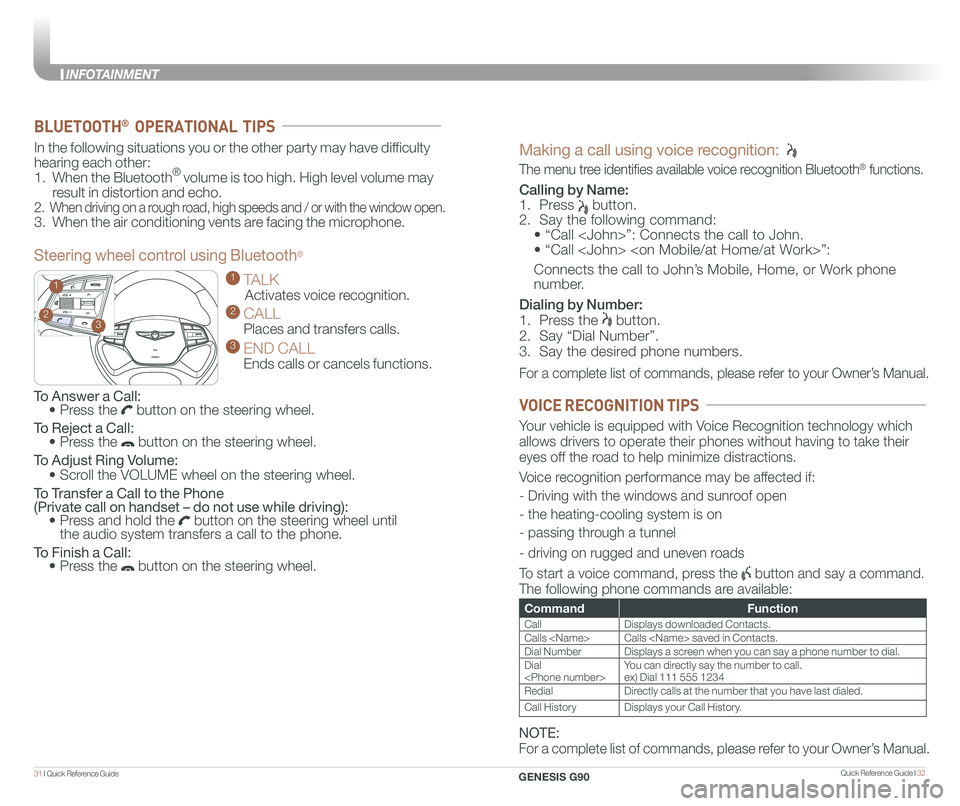
To Answer a Call: • Press the button on the steering wheel.
To Reject a Call: • Press the button on the steering wheel.
To Adjust Ring Volume:
• Scroll the VOLUME wheel on the steering wheel.
To Transfer a Call to the Phone (Private call on handset – do not use while driving): • Press and hold the button on the steering wheel until the audio system transfers a call to the phone.
To Finish a Call: • Press the button on the steering wheel.
In the following situations you or the other party may have difficulty
hearing each other:
1. When the Bluetooth® volume is too high. High level volume may
result in distortion and echo.
2. When driving on a rough road, high speeds and / or with the window open.
3. When the air conditioning vents are facing the microphone.
Steering wheel control using Bluetooth®
1 TALK
Activates voice recognition.
2 CALL
Places and transfers calls.
3 END CALL
Ends calls or cancels functions.
BLUETOOTH® OPERATIONAL TIPS
Making a call using voice recognition:
The menu tree identifies available voice recognition Bluetooth® functions.
Calling by Name:
1. Press button.
2. Say the following command:
• “Call
• “ Call
Connects the call to John’s Mobile, Home, or Work phone
number.
Dialing by Number:
1. Press the button.
2. Say “Dial Number”.
3. Say the desired phone numbers.
For a complete list of commands, please refer to your Owner’s Manual.
CommandFunction
CallDisplays downloaded Contacts.
Calls
Dial NumberDisplays a screen when you can say a phone number to dial.
Dial
RedialDirectly calls at the number that you have last dialed.
Call HistoryDisplays your Call History.
Your vehicle is equipped with Voice Recognition technology which
allows drivers to operate their phones without having to take their
eyes off the road to help minimize distractions.
Voice recognition performance may be affected if:
- Driving with the windows and sunroof open
- the heating-cooling system is on
- passing through a tunnel
- driving on rugged and uneven roads
To start a voice command, press the button and say a command.
The following phone commands are available:
VOICE RECOGNITION TIPS
NOTE:
For a complete list of commands, please refer to your Owner’s Manual.
GENESIS G90
INFOTAINMENT
Page 21 of 30

Quick Reference Guide I 3635 I Quick Reference Guide
NAVIGATION
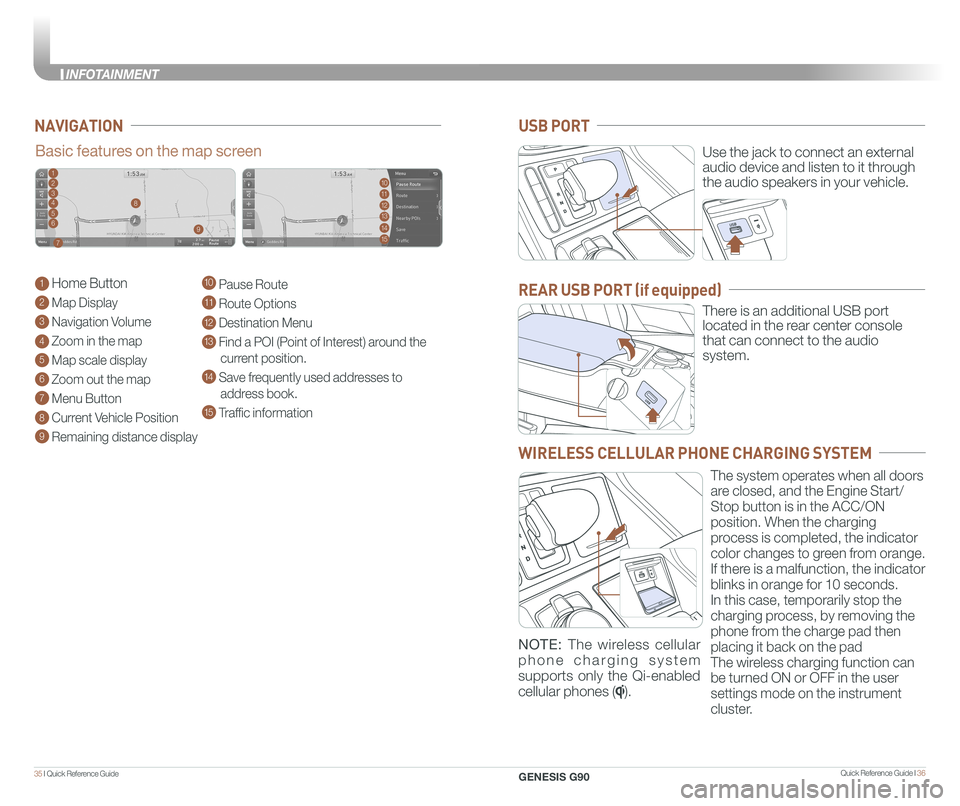
Basic features on the map screen
1 Home Button
2 Map Display
3 Navigation Volume
4 Zoom in the map
5 Map scale display
6 Zoom out the map
7 Menu Button
8 Current Vehicle Position
9 Remaining distance display
10 Pause Route
11 Route Options
12 Destination Menu
13 Find a POI (Point of Interest) around the
current position.
14 Save frequently used addresses to
address book.
15 Traffic information
1102113124135
146
157
8
9
Use the jack to connect an external
audio device and listen to it through
the audio speakers in your vehicle.
There is an additional USB port
located in the rear center console
that can connect to the audio
system.
USB PORT
REAR USB PORT (if equipped)
WIRELESS CELLULAR PHONE CHARGING SYSTEM
The system operates when all doors
are closed, and the Engine Start/
Stop button is in the ACC/ON
position. When the charging
process is completed, the indicator
color changes to green from orange.
If there is a malfunction, the indicator
blinks in orange for 10 seconds.
In this case, temporarily stop the
charging process, by removing the
phone from the charge pad then
placing it back on the pad
The wireless charging function can
be turned ON or OFF in the user
settings mode on the instrument
cluster.
NOTE: The wireless cellular
phone charging system
supports only the Qi-enabled
cellular phones ().
GENESIS G90
INFOTAINMENT
Page 22 of 30

Quick Reference Guide I 3837 I Quick Reference Guide
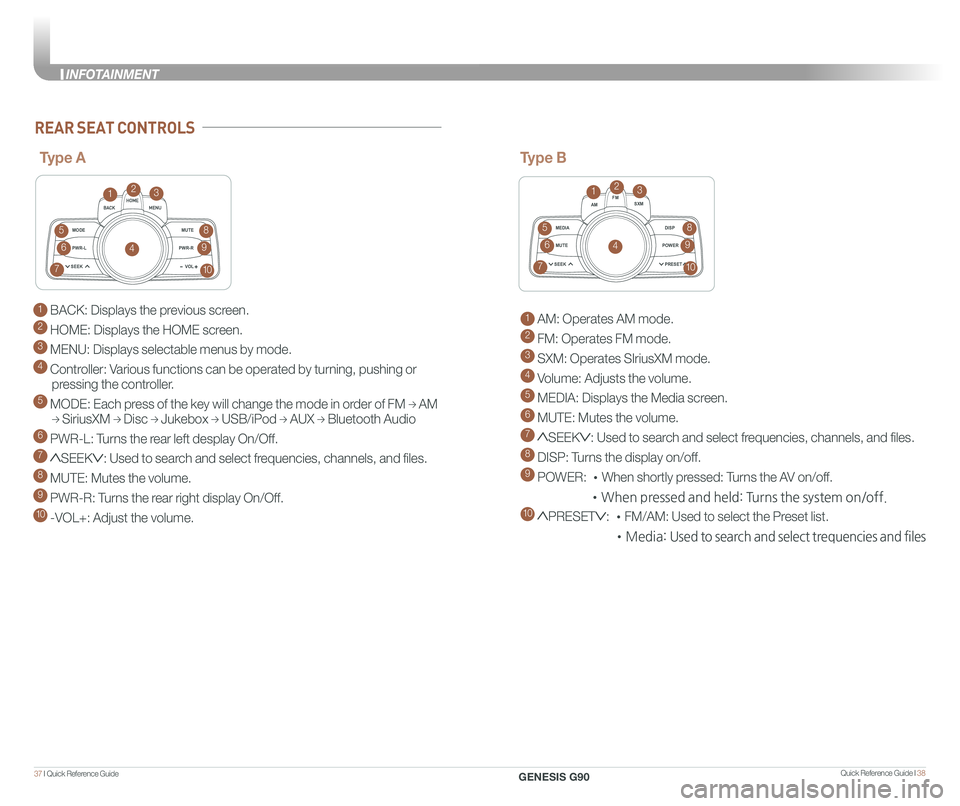
1 BACK: Displays the previous screen.
2 HOME: Displays the HOME screen.
3 MENU: Displays selectable menus by mode.
4 Controller: Various functions can be operated by turning, pushing or
pressing the controller.
5 MODE: Each press of the key will change the mode in order of FM → AM
→ SiriusXM → Disc → Jukebox → USB/iPod → AUX → Bluetooth Audio
6 PWR-L: Turns the rear left desplay On/Off.
7 SEEK: Used to search and select frequencies, channels, and files.
8 MUTE: Mutes the volume.
9 PWR-R: Turns the rear right display On/Off.
10 -VOL+: Adjust the volume.
MODEMUTE
PWR-L
SEEK VOL
PWR-R
MEDIA AM
FM
SXM
DISP
MUTE
SEEK PRESET
POWER
REAR SEAT CONTROLS
Type A
123
4
5
6
7
8
9
10
MODE
MUTE
PWR-L
SEEK VOL
PWR-R
MEDIA AM
FM
SXM
DISP
MUTE
SEEK PRESET
POWER
Type B
1 AM: Operates AM mode.
2 FM: Operates FM mode.
3 SXM: Operates SIriusXM mode.
4 Volume: Adjusts the volume.
5 MEDIA: Displays the Media screen.
6 MUTE: Mutes the volume.
7 SEEK: Used to search and select frequencies, channels, and files.
8 DISP: Turns the display on/off.
9 POWER: •When shortly pressed: Turns the AV on/off.
•When pressed and held: Turns the system on/off.
10 PRESET: •FM/AM: Used to select the Preset list.
•Media: Used to search and select trequencies and files
123
4
5
6
7
8
9
10
GENESIS G90
INFOTAINMENT
Page 25 of 30

Quick Reference Guide I 4443 I Quick Reference Guide
The BCW system monitors
the rear area of the vehicle
and provides information to
the driver.
Press the BCW switch. If
vehicle speed exceeds 20
mph the system will activate.
Press the switch again to
deactivate the system.
A BCW (Blind-Spot Collision Warning )
Warning range is dependent on your vehicle speed.
If your vehicle speed is much faster than other
vehicles, the warning is not active.
B LCA (Lane Change Assist)
When the vehicle is approaching at high speed, the
warning is active.
C RCTA (Rear Cross-Traffic Alert)
When your vehicle moves (below 6 mph) in Reverse,
the sensor detects the approaching vehicles and the
warning is active.
A
B
C
BLIND-SPOT COLLISION WARNING (BCW)
Scan to view a video of:Blind-Spot CollisionWarning (BCW)
REAR VIEW MONITOR
The rearview camera will activate
when the engine is running and
the shift lever is in the R (Reverse)
position.
Rearview display
NOTE: Rearview display is selectable, see Owner’s Manual for further
details.
The image displayed on the screen may become difficult to see under
the following conditions:
- In the dark or at night.
- When it is raining, or when water droplets are on the camera.
- When the sun or the beam of headlights are shining into the camera lens.
Use care to keep the camera lens clean and avoid applying any type
of solvents, car wax, or window cleaners to the camera lens.
If the lens becomes dirty, wipe the lens with a clean, soft cloth.
The Lane Following Assist (LFA)
system helps detect lane markers on
the road with a front view camera and
assists the driver’s steering to help
keep the vehicle between lanes.
With the ignition switch in the ON
position, the Lane Following Assist
can be activated in the Vehicle
Settings menu on the head unit by
selecting the following:
Vehicle Settings > Driver Assistance >
Driving Assist > Lane Following Assist
Deselect the setting to turn off the
system.
LANE FOLLOWING ASSIST (LFA)
GENESIS G90
DRIVING