2020 GENESIS G80 steering
[x] Cancel search: steeringPage 1 of 23

Looking For more detailed information? This Quick Reference Guide does not replace your vehicle’sOwner’s Manual. If you require additional information or are unsure of a specific issue, we recommend that you always refer to the vehicle’s Owner’s Manual or contact your authorized retailer of Genesis Branded Products. The information contained in this Quick Reference Guide is correct at the time of printing; however, specifications and equipment can change without notice. No warranty or guarantee is being extended in this Quick Reference Guide, and Genesis Brand reserves the right to change product specifications and equipment at any time without incurring obligations. Some vehicles are shown with optional equipment.
MAINTENANCE
Low tire pressure indicator /
TPMS malfunction indicator
Scheduled Maintenance(Normal Usage)3.8L / 5.0L3.3T
Engine Oil And FilterReplace7,500 or 12 mos.Replace6,000 or 12 mos.
Fuel AdditivesAdd7,500 or 12 mos.Add6,000 or 12 mos.
Tire RotationPerform7,500 or 12 mos.Perform6,000 or 12 mos.
Vacuum Hose
Inspect7,500 or 12 mos.Inspect6,000 or 12 mos.
Air Conditioning Refrigerant
Brake Hoses & Lines
Drive Shafts & Boots
Exhaust Pipe & Muffler
Front Brake Disc/Pads, Calipers
Rear Brake Disc/Pads
Steering Gear Box, Linkage & Boots/ Lower Arm Ball Joint, Upper Arm Ball Joint
Suspension Mounting Bolts
Propeller Shaft
Air Cleaner FilerInspect7,500 or 12 mos.Inspect6,000 or 12 mos.
Replace22,500 or 36 mos.Replace18,000 or 36 mos.
Climate Control Air Filter (For Evaporator And Blower Unit)ReplaceEvery 12 mos.ReplaceEvery 12 mos.
Fuel Tank Air Filter
Inspect15,000 or 24 mos.Inspect12,000 or 24 mos.
Vapor Hose & Fuel Filler Cap, Fuel tank
Brake Fluid
Parking Brake
Fuel Filter
Fuel Lines, Fuel Hoses And ConnectionsInspect30,000 or 48 mos.Inspect24,000 or 48 mos.Front(AWD)/Rear Differential Oil
Valve Clearance (3.3T and 3.8L)Inspect60,000 or 72 mos.Inspect60,000 or 72 mos.
Drive BeltInspect
First 60,000 or 72 mos.InspectFirst 60,000 or 72 mos.
Subsequent, every 15,000 or 24 mos.InspectSubsequent, every 12,000 or 24 mos.
Spark Plugs (Iridium Coated)Replace105,000Replace42,000
CoolantReplace
First 120,000 or 120 mos.Replace
First 120,000 or 120 mos.
Subsequent, every 30,000 or 24 mos.Subsequent, every 30,000 or 24 mos.
Automatic Transmission FluidNo checks or services required for Normal Usage driving.
*Check the engine oil regularly between recommended oil change. Genesis Branded Vehicle recommend Quaker State oil.
*See Owner’s Manual for details.
☐ TIRE PRESSURE MONITORING SYSTEM (TPMS)- page 36
NOTE: Tire pressure may vary in colder temperatures causing the
low tire pressure indicator to illuminate. Inflate tires according to
the Tire Pressure Label located on the driver’s side door pillar.
☐ HOW TO DEFROST
1 Press the front defrost button.
2 Set to warmest temperature setting.
3 Set to highest fan speed.
☐ DEMONSTRATE AUTOMATIC CLIMATE CONTROL - page 15
☐ DEMONSTRATE HOW TO OPERATE WINDSHIELD WIPER AND
WASHER – page 10
☐DEMONSTRATE HOW TO SET CLOCK – page 29
NP150-G2020-AQ(Rev 08/18/20)Printing 08/21/20
GENESIS
G80
QUICK REFERENCE GUIDE
VOICE
RE COGNITION TIPS
Command ExampleBL UET OOTH®
Dial
Call
7 -1-4- 0-0-0- 8-8-8-8”
“Call John Smith ”
Command ExampleNA VIG ATION
Find Addr ess
2-3-4-5 1s t Stree t,
F oun tain Valle y”
C ommand Example
Loca ted on R earview Mirr or L OC AL SEAR CH
Find
ow e’s ® near me”
“S tarbuck s®”
Impr oving ho w you s tor e your con tacts can op timize your
Blue too th® Voic e R ecognition perf ormance:
• U se full names ins tead o f short or single-s yllable names
(“ John or Dad”)
• Avoid using special char acters/emojis or abbrevia tions
(“Dr .”) when sa ving contacts
Find
Sales Consultant Date Sales Manager Date
New Owner Date
Email
@
☐ INTRODUCTION AND LOCATION OF THE SERVICE
DEPARTMENT
☐ SET FIRST SERVICE VALET APPOINTMENT
☐ REVIEW FACTORY RECOMMENDED MAINTENANCE
SCHEDULE
☐ WAS THE CONDITION OF YOUR VEHICLE (AT DELIVERY)
TO YOUR SATISFACTION?
☐ GENESIS CONNECTED SERVICES
- Assist with creating a Genesis Owners account
- Assist with Genesis Connected Services enrollment
- Show Genesis Connected Services Users Manual
- Encourage customer to download the Genesis Intelligent
Assistant App
Page 5 of 23

Quick Reference Guide I 0403 I Quick Reference Guide
HEADREST ADJUSTMENT
To Raise Headrest:
Pull headrest up.
To Lower Headrest:
Press lock button while pressing
down on headrest.
To adjust headrest forward
(front seats only):
Pull forward to 1 of 3 positions.
To adjust headrest rearward
(front seats only):
Pull it fully forward to the farthest
position and release it.
To Raise Center Headrest:
Rotate headrest forward.
Lift headrest up.
To Lower Center Headrest:
Press lock button while pressing
down on headrest.
Press button to rotate headrest
down.
A
A
Rear center headrest
To Store Settings 1. Adjust the driver’s seat, outside
rearview mirrors, steering wheel,
instrument panel illumination and
head up display.
2. Press the SET button. The
system will beep once.
3. Press one of the memory buttons
(1 or 2) within 5 seconds.
The system will beep twice.
To Recall Press the desired memory button
(1 or 2). The system will beep once.
DRIVER POSITION MEMORY SYSTEM
NOTE: Transmission must be in P (Park).
NOTE: To reset the system,
please refer to the Owner’s
Manual.
SEAT WARMER (front seats)
To turn off immediately, press and
hold the button.
SEAT WARMER/ COOLER (front seats)
To turn off immediately, press and
hold the button.
Each time you push the button,
the setting is changed as follows:
– Heat
– Air Ventilation
Each time you push the button,
the setting is changed as follows:
OFF
OFF
HIGH
HIGH
MEDIUM
MEDIUM
LOW
LOW
Type A
Type B
Type A
Type B
FEATURES AND CONTROLS
GENESIS G80
Page 10 of 23
Quick Reference Guide I 1413 I Quick Reference Guide
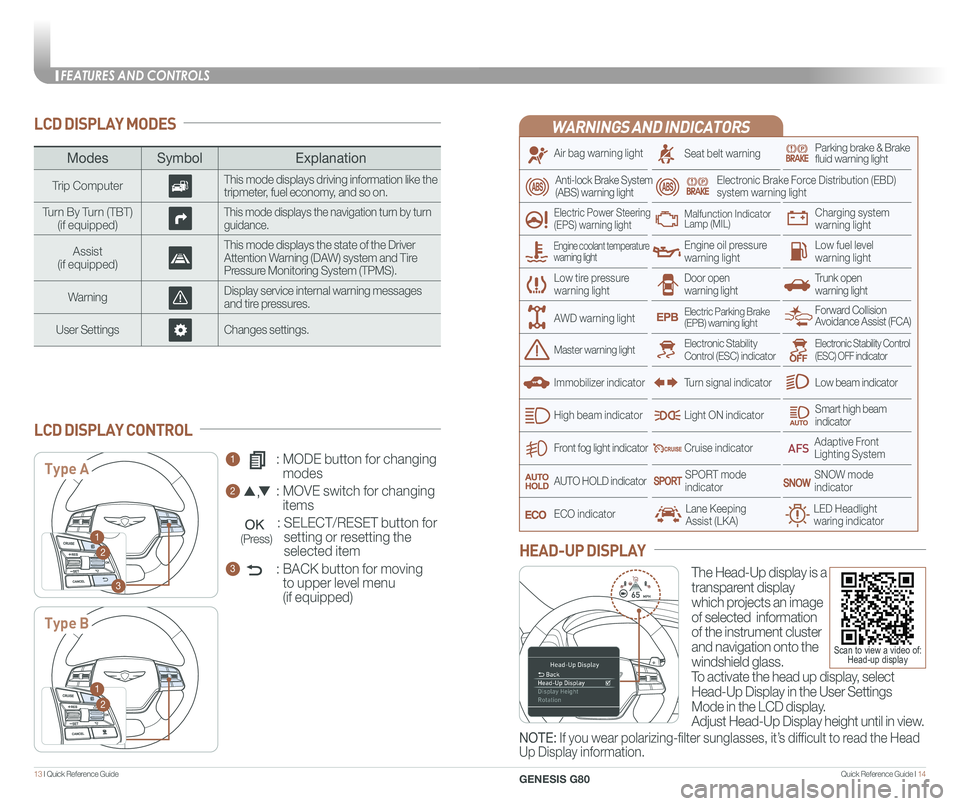
LCD DISPLAY MODES
ModesSymbol Explanation
Trip ComputerThis mode displays driving information like the tripmeter, fuel economy, and so on.
Turn By Turn (TBT)(if equipped)This mode displays the navigation turn by turn guidance.
Assist(if equipped)
This mode displays the state of the Driver Attention Warning (DAW) system and Tire Pressure Monitoring System (TPMS).
WarningDisplay service internal warning messages and tire pressures.
User SettingsChanges settings.
1 : MODE button for changing
modes
2 : MOVE switch for changing
items
: SELECT/RESET button for
setting or resetting the
selected item
3 : BACK button for moving
to upper level menu
(if equipped)
LCD DISPLAY CONTROL
Type A
Type B
1
2
3
1
2
(Press)
WARNINGS AND INDICATORS
Air bag warning light
Electric Power Steering (EPS) warning light
Seat belt warningParking brake & Brake fluid warning light
Electronic Brake Force Distribution (EBD) system warning light
Low tire pressurewarning lightTrunk open warning light
Low fuel level warning light
Front fog light indicator
Low beam indicator
Smart high beam indicator
SNOW modeindicator
Light ON indicator
ECO indicator
SPORT modeindicator
Anti-lock Brake System(ABS) warning light
High beam indicator
Door open warning light
Electronic Stability Control (ESC) indicatorMaster warning light
Forward Collision Avoidance Assist (FCA)Electric Parking Brake(EPB) warning light
Engine oil pressure warning light
Charging system warning light
Immobilizer indicator
Malfunction IndicatorLamp (MIL)
Electronic Stability Control (ESC) OFF indicator
Cruise indicator
Lane Keeping Assist (LKA)LED Headlight waring indicator
Adaptive Front Lighting System
AUTO HOLD indicator
Turn signal indicator
The Head-Up display is a
transparent display
which projects an image
of selected information
of the instrument cluster
and navigation onto the
windshield glass.
To activate the head up display, select
Head-Up Display in the User Settings
Mode in the LCD display.
Adjust Head-Up Display height until in view.
HEAD-UP DISPLAY
Engine coolant temperature warning light
AWD warning light
NOTE: If you wear polarizing-filter sunglasses, it’s difficult to read the Head
Up Display information.
Scan to view a video of: Head-up display
FEATURES AND CONTROLS
GENESIS G80
Page 12 of 23
Quick Reference Guide I 1817 I Quick Reference Guide
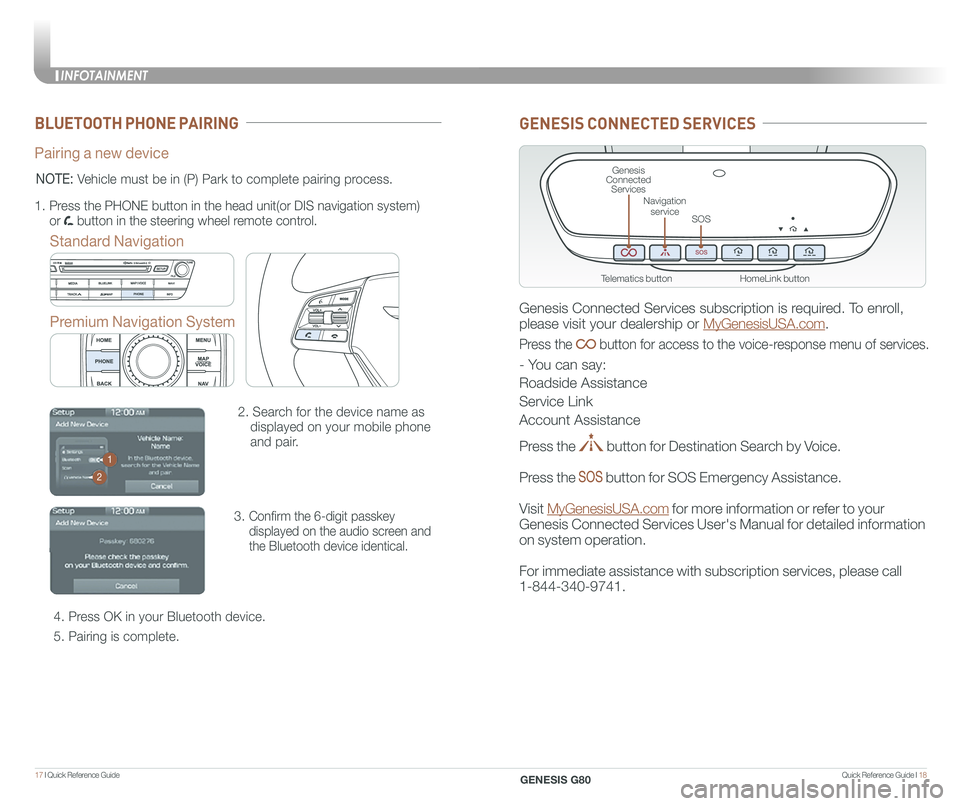
BLUETOOTH PHONE PAIRING
Pairing a new device
Standard Navigation
Premium Navigation System
2. Search for the device name as
displayed on your mobile phone
and pair.
3. Confirm the 6-digit passkey
displayed on the audio screen and
the Bluetooth device identical.
4. Press OK in your Bluetooth device.
5. Pairing is complete.
1.
Press the PHONE button in the head unit(or DIS navigation system)
or button in the steering wheel remote control.
NOTE: Vehicle must be in (P) Park to complete pairing process.
1
2
GENESIS CONNECTED SERVICES
Genesis Connected Services subscription is required. To enroll,
please visit your dealership or MyGenesisUSA.com.
Press the button for access to the voice-response menu of services.
- You can say:
Roadside Assistance
Service Link
Account Assistance
Press the button for Destination Search by Voice.
Press the button for SOS Emergency Assistance.
Visit MyGenesisUSA.com for more information or refer to your
Genesis Connected Services User's Manual for detailed information
on system operation.
For immediate assistance with subscription services, please call
1-844-340-9741.
HomeLink button
Genesis Connected Services
SOS
Navigation service
Telematics button
INFOTAINMENT
GENESIS G80
Page 16 of 23
Quick Reference Guide I 2625 I Quick Reference Guide
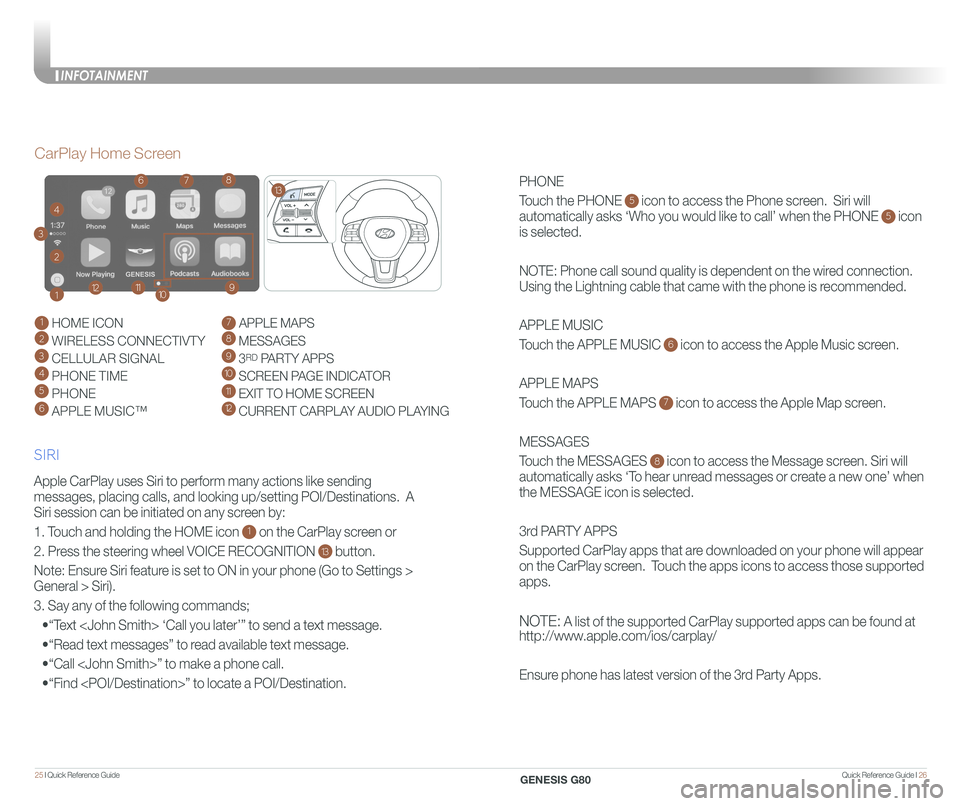
PHONE
Touch the PHONE 5 icon to access the Phone screen. Siri will
automatically asks ‘Who you would like to call’ when the PHONE 5 icon
is selected.
NOTE: Phone call sound quality is dependent on the wired connection.
Using the Lightning cable that came with the phone is recommended.
APPLE MUSIC
Touch the APPLE MUSIC 6 icon to access the Apple Music screen.
APPLE MAPS
Touch the APPLE MAPS 7 icon to access the Apple Map screen.
MESSAGES
Touch the MESSAGES 8 icon to access the Message screen. Siri will
automatically asks ‘To hear unread messages or create a new one’ when
the MESSAGE icon is selected.
3rd PARTY APPS
Supported CarPlay apps that are downloaded on your phone will appear
on the CarPlay screen. Touch the apps icons to access those supported
apps.
NOTE: A list of the supported CarPlay supported apps can be found at
http://www.apple.com/ios/carplay/
Ensure phone has latest version of the 3rd Party Apps.
Apple CarPlay uses Siri to perform many actions like sending
messages, placing calls, and looking up/setting POI/Destinations. A
Siri session can be initiated on any screen by:
1. Touch and holding the HOME icon 1 on the CarPlay screen or
2. Press the steering wheel VOICE RECOGNITION 13 button.
Note: Ensure Siri feature is set to ON in your phone (Go to Settings >
General > Siri).
3. Say any of the following commands;
•“Text
•“Read text messages” to read available text message.
•“Call
•“Find
CarPlay Home Screen
SIRI
1 HOME ICON
2 WIRELESS CONNECTIVTY
3 CELLULAR SIGNAL
4 PHONE TIME5 PHONE
6 APPLE MUSIC™
7 APPLE MAPS
8 MESSAGES
9 3RD PARTY APPS
10 SCREEN PAGE INDICATOR
11 EXIT TO HOME SCREEN12 CURRENT CARPLAY AUDIO PLAYING
2
3
4
1
678
9101112
13
INFOTAINMENT
GENESIS G80
Page 19 of 23
Quick Reference Guide I 3231 I Quick Reference Guide
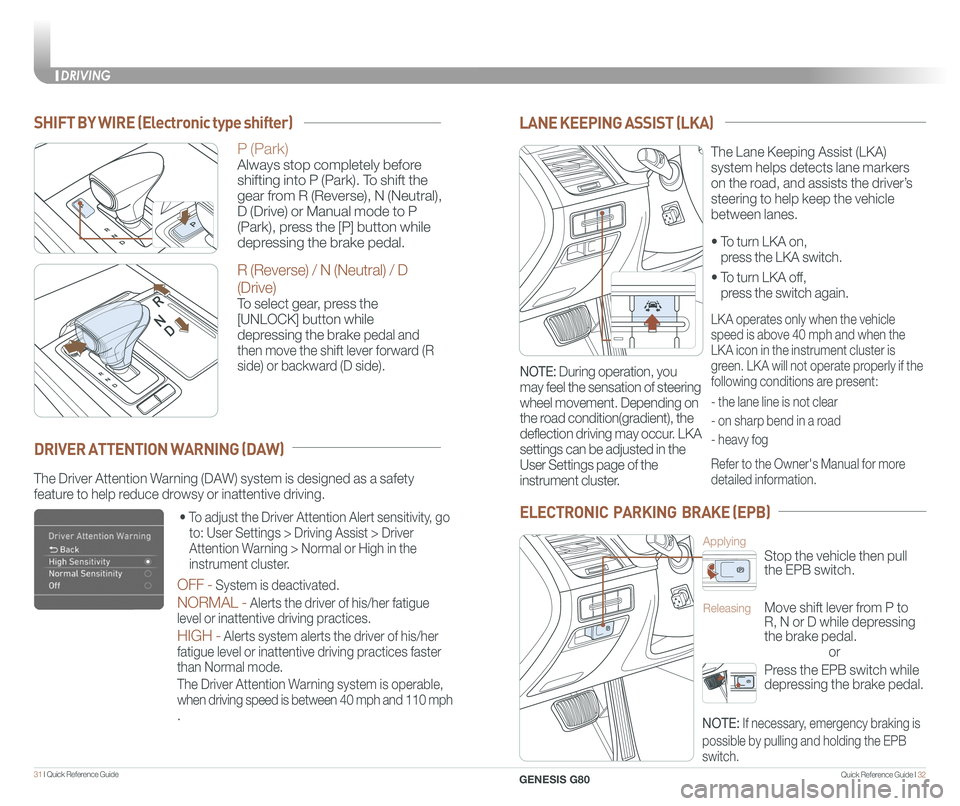
• To turn LKA on,
press the LKA switch.
• To turn LKA off,
press the switch again.
The Lane Keeping Assist (LKA)
system helps detects lane markers
on the road, and assists the driver’s
steering to help keep the vehicle
between lanes.
LANE KEEPING ASSIST (LKA)
LKA operates only when the vehicle
speed is above 40 mph and when the
LKA icon in the instrument cluster is
green. LKA will not operate properly if the
following conditions are present:
- the lane line is not clear
- on sharp bend in a road
- heavy fog
Refer to the Owner's Manual for more
detailed information.
NOTE: During operation, you
may feel the sensation of steering
wheel movement. Depending on
the road condition(gradient), the
deflection driving may occur. LKA
settings can be adjusted in the
User Settings page of the
instrument cluster.
ELECTRONIC PARKING BRAKE (EPB)
or
Stop the vehicle then pull
the EPB switch.
Applying
Move shift lever from P to
R, N or D while depressing
the brake pedal.
Releasing
Press the EPB switch while
depressing the brake pedal.
NOTE: If necessary, emergency braking is
possible by pulling and holding the EPB
switch.
The Driver Attention Warning (DAW) system is designed as a safety
feature to help reduce drowsy or inattentive driving.
• To adjust the Driver Attention Alert sensitivity, go
to: User Settings > Driving Assist > Driver
Attention Warning > Normal or High in the
instrument cluster.
OFF - System is deactivated.
NORMAL - Alerts the driver of his/her fatigue
level or inattentive driving practices.
HIGH - Alerts system alerts the driver of his/her
fatigue level or inattentive driving practices faster
than Normal mode.
The Driver Attention Warning system is operable,
when driving speed is between 40 mph and 110 mph
.
DRIVER ATTENTION WARNING (DAW)
SHIFT BY WIRE (Electronic type shifter)
P (Park)
Always stop completely before
shifting into P (Park). To shift the
gear from R (Reverse), N (Neutral),
D (Drive) or Manual mode to P
(Park), press the [P] button while
depressing the brake pedal.
R (Reverse) / N (Neutral) / D
(Drive)
To select gear, press the
[UNLOCK] button while
depressing the brake pedal and
then move the shift lever forward (R
side) or backward (D side).
DRIVING
GENESIS G80
Page 21 of 23
Quick Reference Guide I 3635 I Quick Reference Guide
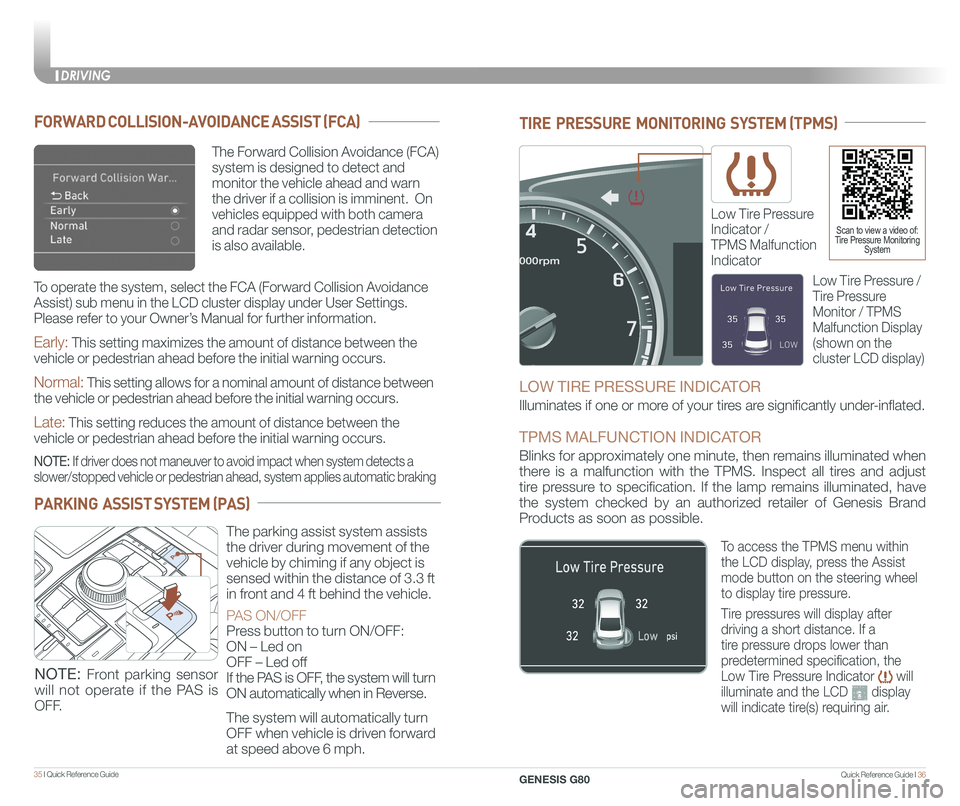
TIRE PRESSURE MONITORING SYSTEM (TPMS)
Low Tire Pressure
Indicator /
TPMS Malfunction
Indicator
Scan to view a video of: Tire Pressure Monitoring System
LOW TIRE PRESSURE INDICATOR
Illuminates if one or more of your tires are significantly under-inflated.
TPMS MALFUNCTION INDICATOR
Blinks for approximately one minute, then remains illuminated when
there is a malfunction with the TPMS. Inspect all tires and adjust
tire pressure to specification. If the lamp remains illuminated, have
the system checked by an authorized retailer of Genesis Brand
Products as soon as possible.
Low Tire Pressure /
Tire Pressure
Monitor / TPMS
Malfunction Display
(shown on the
cluster LCD display)
To access the TPMS menu within
the LCD display, press the Assist
mode button on the steering wheel
to display tire pressure.
Tire pressures will display after
driving a short distance. If a
tire pressure drops lower than
predetermined specification, the
Low Tire Pressure Indicator will
illuminate and the LCD display
will indicate tire(s) requiring air.
The Forward Collision Avoidance (FCA)
system is designed to detect and
monitor the vehicle ahead and warn
the driver if a collision is imminent. On
vehicles equipped with both camera
and radar sensor, pedestrian detection
is also available.
FORWARD COLLISION-AVOIDANCE ASSIST (FCA)
Early: This setting maximizes the amount of distance between the
vehicle or pedestrian ahead before the initial warning occurs.
Normal: This setting allows for a nominal amount of distance between
the vehicle or pedestrian ahead before the initial warning occurs.
Late: This setting reduces the amount of distance between the
vehicle or pedestrian ahead before the initial warning occurs.
NOTE: If driver does not maneuver to avoid impact when system detects a
slower/stopped vehicle or pedestrian ahead, system applies automatic bra\
king
To operate the system, select the FCA (Forward Collision Avoidance
Assist) sub menu in the LCD cluster display under User Settings.
Please refer to your Owner’s Manual for further information.
PARKING ASSIST SYSTEM (PAS)
The parking assist system assists
the driver during movement of the
vehicle by chiming if any object is
sensed within the distance of 3.3 ft
in front and 4 ft behind the vehicle.
PAS ON/OFF
Press button to turn ON/OFF:
ON – Led on
OFF – Led off
If the PAS is OFF, the system will turn
ON automatically when in Reverse.
The system will automatically turn
OFF when vehicle is driven forward
at speed above 6 mph.
NOTE: Front parking sensor
will not operate if the PAS is
OFF.
DRIVING
GENESIS G80
Page 23 of 23
39 I Quick Reference Guide
GENESIS BRAND OWNER RETAILER NAME
SALES CONSULTANT DATE
VIN PREVIOUS VEHICLE
GENESIS GUEST DELIVERY CHECKLIST
BEFORE DELIVERY
☐ SET TIRE PRESURE LF RF RR LR
☐ VERIFY VEHICLE IS CLEAN, IN GOOD CONDITION, FREE OF CHIPS AND SCRATCHES · CLEAN WINDSHIELD AND BACK WINDOW
☐ ENSURE FLOORMATS ARE SNAPPED INTO PLACE
Quick Reference Guide I 40
GENESIS SERVICE VALET PROGRAM TERMS AND CONDITIONS
GENESIS G80
WALK THE CUSTOMER THROUGH EACH OF
THE FOLLOWING KEY DELIVERY FEATURES
☐ REVIEW QUICK REFERENCE GUIDE
☐ PAIR CUSTOMER'S PHONE TO THE BLUETOOTH SYSTEM
☐ OPERATION OF THE NAVIAGATION SYSTEM - page 27
☐ REVIEW AND TEAR OFF VOICE COMMAND / QUICK TIP CARD
☐ OPERATION OF THE AUDIO SYSTEM
NOTES
Guest Date
Exclusions from Coverage
The following items, without limitations, are not covered :
• Gasoline and gasoline additives
• State inspections
• Wear and tear of soft trim, including seats, carpets, door casings, wood veneer, headliner, and all chrome trim
• Wear and tear or damage to exterior body panels, trim, and glass
• Damage due to poor fuel quality, misuse, abuse, neglect, fire, accident, flood, or installation of unapproved parts and accessories
• Vehicles used in competitive events
• Vehicles with an unreadable/tampered VIN, or where true mileage cannot be determined
• Repairs and maintenance not performed at at an Authorized retailer of Genesis.
• Repairs covered under the New Vehicle Limited Warranty
• Required maintenance and covered wear parts replacement on United States specification vehicles operating outside the United States\
Transfer of Coverage
The described coverage only applies to the original retail purchaser or original lessee of a Genesis Brand vehicle. The coverage is not transferable to s\
ubsequent owners, with the exception of immediate family members. Immediate family members include the following:
• Spouses or registered domestic partners
• Parents
• Children or stepchildren
Dealerships will verify that the owner/customer is the original owner/le\
ssee. Certain limitations and exclusions apply to this program. Please refer to your New Vehicle Limited Warranty guide for warranty details.
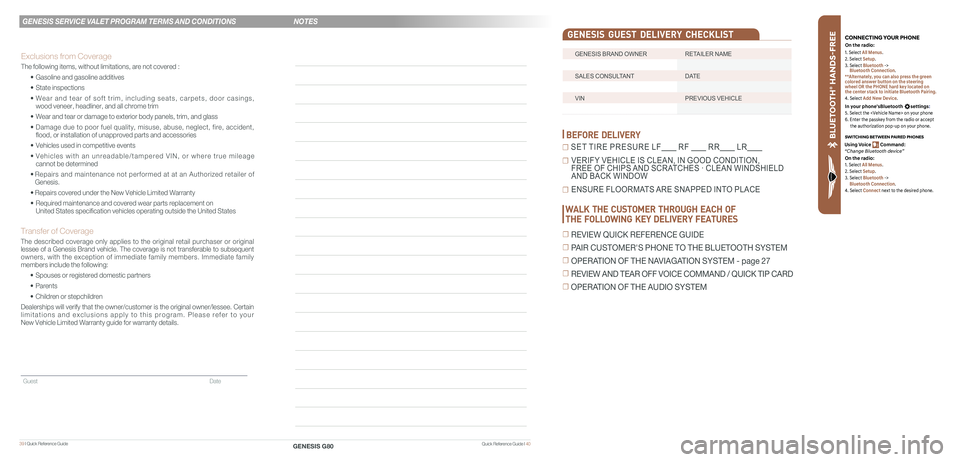
BLU ETO OTH
®
SWIT CHING BETWEEN P AIRED PHONES
On the r adio:
CONNE CTING \fOUR PHONEOn the r adio:
U sing Voic e Command:
“Change Blue too th de vice”1. Select All Menus.
2. Select Setup.
3. Select Bluetooth ->
Bluetooth Connection.
**Alternately, you can also press the green
colored answer button on the steering
wheel OR the PHONE hard key located on
the center stack to initiate Bluetooth Pairing.
4. Select Add New Device.
In your phone’sBluetooth settings:
5. Select the
6. Enter the passkey from the radio or accept
the authorization pop-up on your phone.
1. Select All Menus.
2. Select Setup.
3. Select Bluetooth ->
Bluetooth Connection.
4. Select Connect next to the desired phone.