2020 FORD POLICE INTERCEPTOR ECU
[x] Cancel search: ECUPage 240 of 395

CHANGING THE ENGINE AIR
FILTER - 3.0L
WARNING: To reduce the risk of
vehicle damage and personal burn
injuries, do not start your engine with the
air cleaner removed and do not remove
it while the engine is running.
When changing the engine air filter, do not
allow debris or foreign material to enter
the air induction system. Engine
components are susceptible to damage
not covered by the vehicle Warranty.
Change the air filter element at the correct
interval. See
Scheduled Maintenance
(page 330).
Incorrect component use can cause
damage not covered by the vehicle
Warranty.
See Motorcraft Parts (page
279).
To replace the air filter element do the
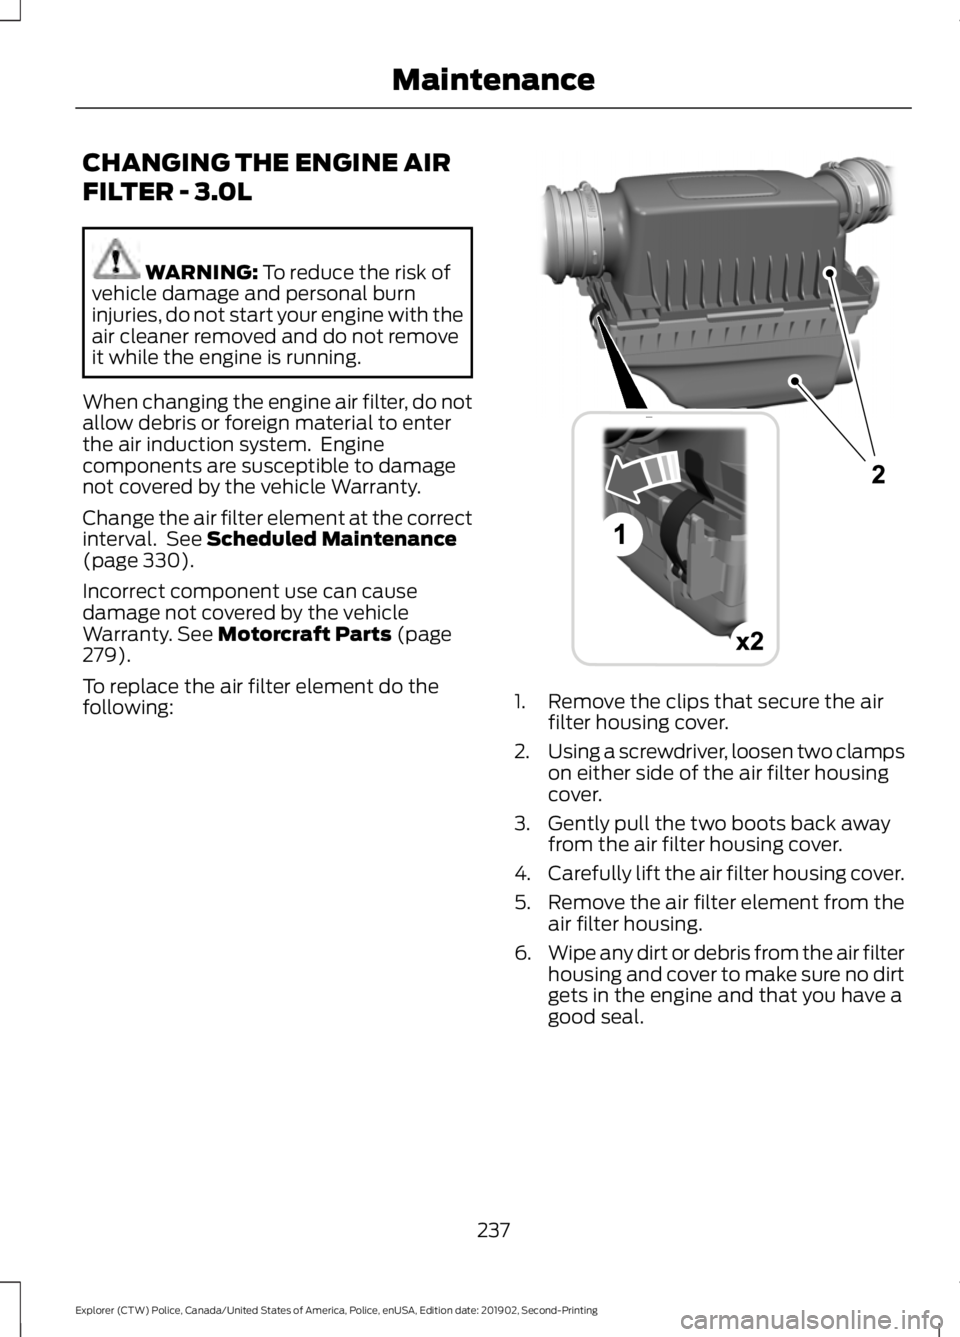
following: 1. Remove the clips that secure the air
filter housing cover.
2. Using a screwdriver, loosen two clamps
on either side of the air filter housing
cover.
3. Gently pull the two boots back away from the air filter housing cover.
4. Carefully lift the air filter housing cover.
5. Remove the air filter element from the
air filter housing.
6. Wipe any dirt or debris from the air filter
housing and cover to make sure no dirt
gets in the engine and that you have a
good seal.
237
Explorer (CTW) Police, Canada/United States of America, Police, enUSA, Edition date: 201902, Second-Printing MaintenanceE294778
Page 241 of 395

7. Install a new air filter element. Be
careful not to crimp the filter element
edges between the air filter housing
and cover. This could cause filter
damage and allow unfiltered air to
enter the engine if it is not properly
seated.
8. Install the air filter housing cover.
9. Engage the clips to secure the air filter housing cover to the air filter housing.
10. Reconnect the two boots on the air filter housing cover and torque to
3.69 lb.ft (5 Nm).
CHANGING THE ENGINE AIR
FILTER - 3.3L WARNING:
To reduce the risk of
vehicle damage and personal burn
injuries, do not start your engine with the
air cleaner removed and do not remove
it while the engine is running.
Note: Failure to use the correct air filter
element may result in severe engine
damage. Resulting component damage
may not be covered by the vehicle Warranty.
Note: When servicing the air cleaner, do
not allow foreign material to enter the air
induction system. The engine is susceptible
to damage from even small particles.
When changing the air filter element, use
only the air filter element listed.
Change the air filter element at the proper
intervals. See
Scheduled Maintenance
(page 330). 1.
Release the clamps that secure the air
filter cover to the housing.
2. Using a screwdriver, loosen the clamp on the air filter housing cover.
3. Gently pull the boot back away from the air filter housing cover.
4. Carefully lift the air filter housing cover.
5. Remove the air filter element from the
air filter housing.
6. Wipe any dirt or debris from the air filter
housing and cover to make sure no dirt
gets in the engine and that you have a
good seal.
7. Install a new air filter element. Be careful not to crimp the filter element
edges between the air filter housing
and cover. This could cause filter
damage and allow unfiltered air to
enter the engine if it is not properly
seated.
238
Explorer (CTW) Police, Canada/United States of America, Police, enUSA, Edition date: 201902, Second-Printing MaintenanceE295061
x2
Page 242 of 395

8. Install the air filter housing cover.
9. Engage the clips to secure the air filter
housing cover to the air filter housing.
10. Reconnect the boot to the air filter housing cover and torque to 3.69 lb.ft
(5 Nm).
239
Explorer (CTW) Police, Canada/United States of America, Police, enUSA, Edition date: 201902, Second-Printing Maintenance
Page 274 of 395

When driving with the full-size dissimilar
spare wheel and tire assembly additional
caution should be given to:
•
Towing a trailer.
• Driving vehicles equipped with a
camper body.
• Driving vehicles with a load on the
cargo rack.
Drive cautiously when using a full-size
dissimilar spare wheel and tire assembly
and seek service as soon as possible.
Tire Change Procedure WARNING: To reduce the risk of
possible serious injury or death, do not
remove the full size spare tire from the
factory secured location. This location
is necessary to achieve police-rated
75 mph (120 km/h)
rear impact
crash-test performance. Removal
increases the risk of fuel leak in
high-speed rear impacts. WARNING: The jack supplied with
this vehicle is only intended for changing
wheels. Do not use the vehicle jack other
than when you are changing a wheel in
an emergency. WARNING:
Check that the vehicle
jack is not damaged or deformed and
the thread is lubricated and clean. WARNING:
To help prevent your
vehicle from moving when changing a
wheel, shift the transmission into park
(P), set the parking brake and use an
appropriate block or wheel chock to
secure the wheel diagonally opposite to
the wheel being changed. For example,
when changing the front left wheel,
place an appropriate block or wheel
chock on the right rear wheel. WARNING:
Always use the jack
provided as original equipment with your
vehicle. If using a jack other than the one
provided, make sure the jack capacity is
adequate for the vehicle weight,
including any vehicle cargo or
modifications. If you are unsure if the jack
capacity is adequate, contact the
authorized dealer. WARNING:
Failure to follow these
guidelines could result in an increased
risk of loss of vehicle control, injury or
death. WARNING:
Use only the specified
jacking points. If you use other positions,
you may damage the body, steering,
suspension, engine, braking system or
the fuel lines. WARNING:
Never place anything
between the vehicle jack and your
vehicle. WARNING:
Never place anything
between the vehicle jack and the ground. WARNING:
Park your vehicle so
that you do not obstruct the flow of
traffic or place yourself in any danger and
set up a warning triangle. WARNING:
Do not attempt to
change a tire on the side of the vehicle
close to moving traffic. Pull far enough
off the road to avoid the danger of being
hit when operating the jack or changing
the wheel.
Note: Passengers should not remain in your
vehicle when the vehicle is being jacked.
Note: Jack at the specified locations to
avoid damage to the vehicle.
271
Explorer (CTW) Police, Canada/United States of America, Police, enUSA, Edition date: 201902, Second-Printing Wheels and Tires
Page 275 of 395

Note:
No maintenance or additional
lubrication of your jack is required over the
service life of your vehicle.
1. Park on a level surface, set the parking
brake and switch on the hazard
flashers.
2. Apply the parking brake, place the transmission in park (P) or reverse (R)
for manual transmission. Turn the
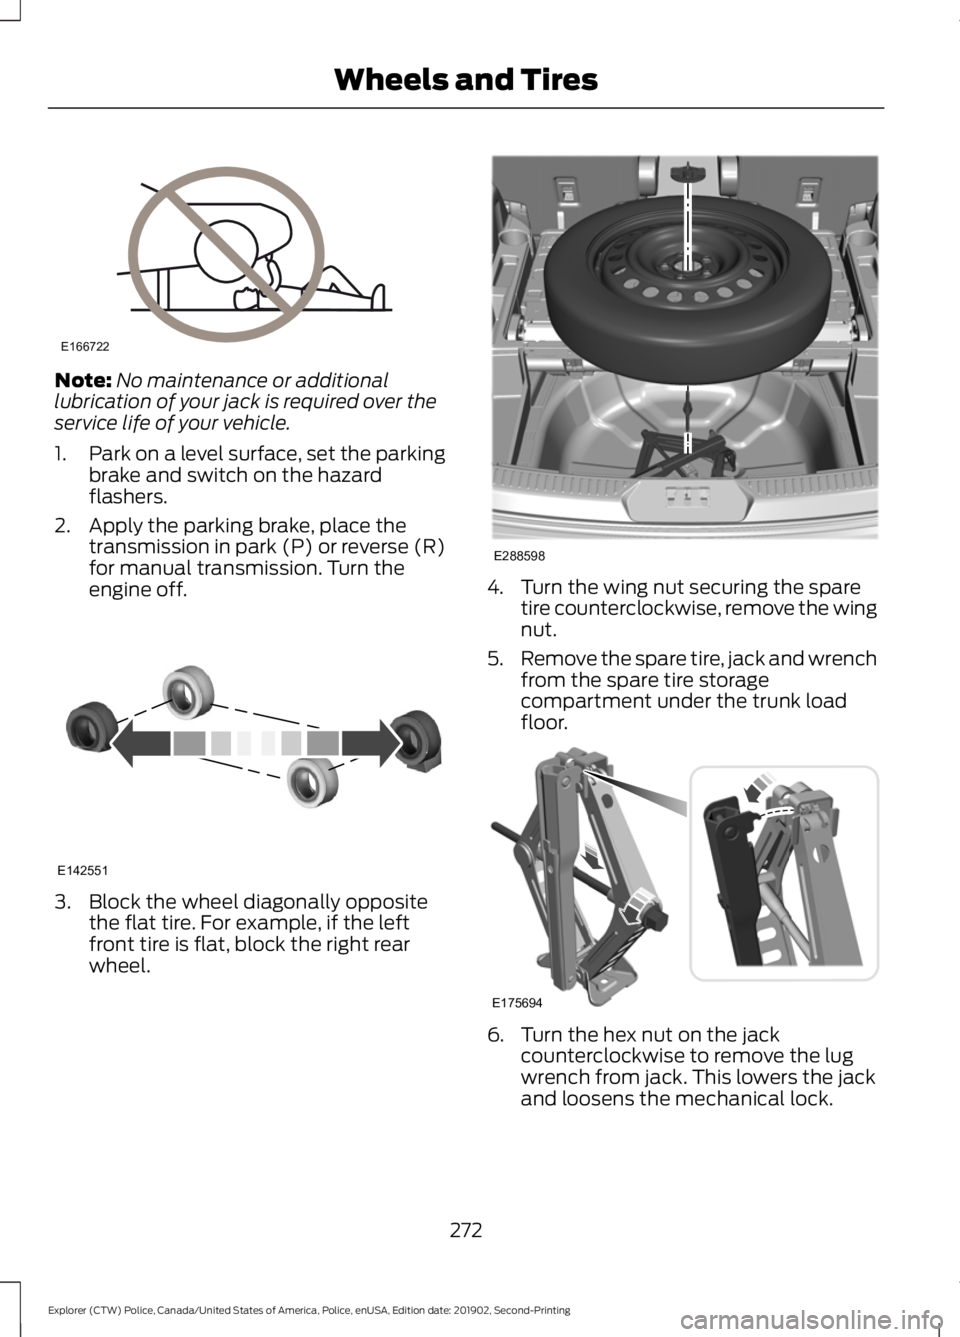
engine off. 3. Block the wheel diagonally opposite
the flat tire. For example, if the left
front tire is flat, block the right rear
wheel. 4. Turn the wing nut securing the spare
tire counterclockwise, remove the wing
nut.
5. Remove the spare tire, jack and wrench
from the spare tire storage
compartment under the trunk load
floor. 6. Turn the hex nut on the jack
counterclockwise to remove the lug
wrench from jack. This lowers the jack
and loosens the mechanical lock.
272
Explorer (CTW) Police, Canada/United States of America, Police, enUSA, Edition date: 201902, Second-Printing Wheels and TiresE166722 E142551 E288598 E175694
Page 277 of 395

15. Turn the wrench handle
counterclockwise to lower the vehicle
completely.16.
Remove the jack and fully tighten the
lug nuts in the order shown. See
Technical Specifications (page
275).
17. Remove the wheel blocks.
Stowing the jack 1.
To store the folded wrench on the jack,
engage the bracket of the jack base
and the lug wrench pin, swing the
wrench upwards, adjust jack height
until the wrench hook engages the hole
on jack. Tighten the hex nut clockwise
by hand until secure.
2. Place the jack in the spare tire compartment, install the wing nut and
tighten clockwise by hand until secure. Stowing the flat tire
You cannot store the full-sized aluminum
road wheel in the temporary spare tire well.
1. Find the flat tire retainer strap tucked
inside the jack channel. Lower the
carpeted load floor.
2. Stow the flat tire in the cargo area on the load floor with the wheel facing up.
Secure the flat tire with the retainer
strap by following the next steps. 3. Locate the rear left side and right side
cargo tie-down rings. Push the loop end
of the retainer strap through one cargo
tie-down ring. Thread the non-loop end
through the loop.
4. Weave the retainer strap through the wheel openings. 274
Explorer (CTW) Police, Canada/United States of America, Police, enUSA, Edition date: 201902, Second-Printing Wheels and Tires12
3
4
5
E75442 E176165 E142906 E294325
Page 278 of 395

5. Locate the front cargo tie-down in the
opposite rear corner of the cargo area.
Thread the retainer strap through the
tie-down and pull tight. 6. Secure by tying a 2-half hitch knot.
TECHNICAL SPECIFICATIONS
Wheel Lug Nut Torque Specifications WARNING: When you install a wheel, always remove any corrosion, dirt or foreign
materials present on the mounting surfaces of the wheel or the surface of the wheel
hub, brake drum or brake disc that contacts the wheel. Make sure to secure any fasteners
that attach the rotor to the hub so they do not interfere with the mounting surfaces of
the wheel. Installing wheels without correct metal-to-metal contact at the wheel
mounting surfaces can cause the wheel nuts to loosen and the wheel to come off while
your vehicle is in motion, resulting in loss of vehicle control, personal injury or death. lb.ft (Nm)
1
Bolt Size
150 lb.ft (204 Nm)
M14 x 1.5
1 Torque specifications are for nut and bolt threads free of dirt and rust. Use only our
recommended replacement fasteners.
Retighten the lug nuts to the specified torque within 100 miles (160 kilometers) after any
wheel disturbance, such as tire rotation, changing a flat tire or wheel removal.
275
Explorer (CTW) Police, Canada/United States of America, Police, enUSA, Edition date: 201902, Second-Printing Wheels and TiresE143746
Page 319 of 395

WARNING: Always place your
phone in a secure location in your vehicle
so it does not become a projectile or get
damaged in a crash. Failure to do so may
cause serious injury to someone or
damage the phone which could prevent
911 Assist from working properly.
Note: The SYNC 911 Assist feature must be
set on before the incident.
Note: The SYNC 911 Assist feature only
operates in the U.S., Canada or in a territory
in which 911 is the emergency number.
Note: Before setting this feature on, make
sure that you read the 911 Assist Privacy
Notice later in this section for important
information.
Note: If any user switches 911 Assist to on
or off, that setting applies for all paired
phones. If 911 Assist is switched off, either
a voice message plays or a display message
or an icon comes on when your vehicle is
started and after a previously paired phone
connects.
Note: Every phone operates differently.
While SYNC 911 Assist works with most
cellular phones, some may have trouble
using this feature.
If a crash deploys an airbag (excluding
knee airbags and rear inflatable safety
belts [if equipped]) or activates the fuel
pump shut-off, your SYNC-equipped
vehicle may be able to contact emergency
services by dialing 911 through a paired and
connected Bluetooth-enabled phone.
See
Supplementary Restraints System
(page 41). Important information about
airbag deployment is in this chapter.
See
Roadside Emergencies (page 194).
Important information about the fuel pump
shut-off is in this chapter. Setting 911 Assist On or Off
Press the Settings button then select: Action and Description
Menu
Item
Select the desired option, on
or off.
911 Assist
To make sure that 911 Assist works
properly:
• SYNC must be powered and working
properly at the time of the incident and
throughout feature activation and use.
• The 911 Assist feature must be set on
before the incident.
• You must pair and connect a Bluetooth
enabled and compatible cell phone to
SYNC.
• A connected Bluetooth enabled phone
must have the ability to make and
maintain an outgoing call at the time
of the incident.
• A connected Bluetooth enabled phone
must have adequate network coverage,
battery power and signal strength.
• The vehicle must have battery power
and be located in the U.S., Canada or
in a territory in which 911 is the
emergency number.
In the Event of a Crash
Not all crashes deploy an airbag or activate
the fuel pump shut-off (the triggers for 911
Assist). If a connected cell phone sustains
damage or loses its connection to SYNC
during a crash, SYNC searches for and tries
to connect to a previously paired cell
phone; SYNC then attempts to call the
emergency services.
316
Explorer (CTW) Police, Canada/United States of America, Police, enUSA, Edition date: 201902, Second-Printing SYNC™