2020 FORD POLICE INTERCEPTOR instrument panel
[x] Cancel search: instrument panelPage 73 of 395

GENERAL INFORMATION
Condensation in Lamp Assemblies
Exterior lamps have vents to
accommodate normal changes in air
pressure.
Condensation can be a natural by-product
of this design. When moist air enters the
lamp assembly through the vents, there is
a possibility that condensation can occur
when the temperature is cold. When
normal condensation occurs, a fine mist
can form on the interior of the lens. The
fine mist eventually clears and exits
through the vents during normal operation.
Clearing time may take as long as 48 hours
under dry weather conditions.
Examples of acceptable condensation are:
•
The presence of a fine mist (no streaks,
drip marks or large droplets).
• A fine mist covers less than 50% of the
lens.
Examples of unacceptable condensation
are:
• A water puddle inside the lamp.
• Streaks, drip marks or large droplets
present on the interior of the lens.
If you see any unacceptable condensation,
have your vehicle checked by an authorized
dealer.
Dark Car Feature (If Equipped)
The Dark Car feature may disable the
following features:
• Welcome/farewell strategy.
• Courtesy lighting.
• Daytime running lamps.
Note: In markets where daytime running
lamps are mandated by law, the Dark Car
feature does not disable the daytime
running lamps. Switching the Backlighting Off
The Dark Car feature allows you to switch
the cabin backlighting off, this state can
be reached by:
1.
Switch the lighting control to the lamps
off position.
2. Use the instrument lighting dimmer switch to lower the brightness to off.
LIGHTING CONTROL
Lighting Control Selections Turn the dial to make a selection.
Note:
The indicator illuminates next to the
active selection. Lamps off.
Parking lamps, instrument panel
lamps, license plate lamps and
rear lamps.
Autolamps.
Headlamps on.
Note: The lighting control defaults to the
last known state every time you switch your
vehicle on.
70
Explorer (CTW) Police, Canada/United States of America, Police, enUSA, Edition date: 201902, Second-Printing LightingE281337 E265031 E281240 E270968
Page 105 of 395
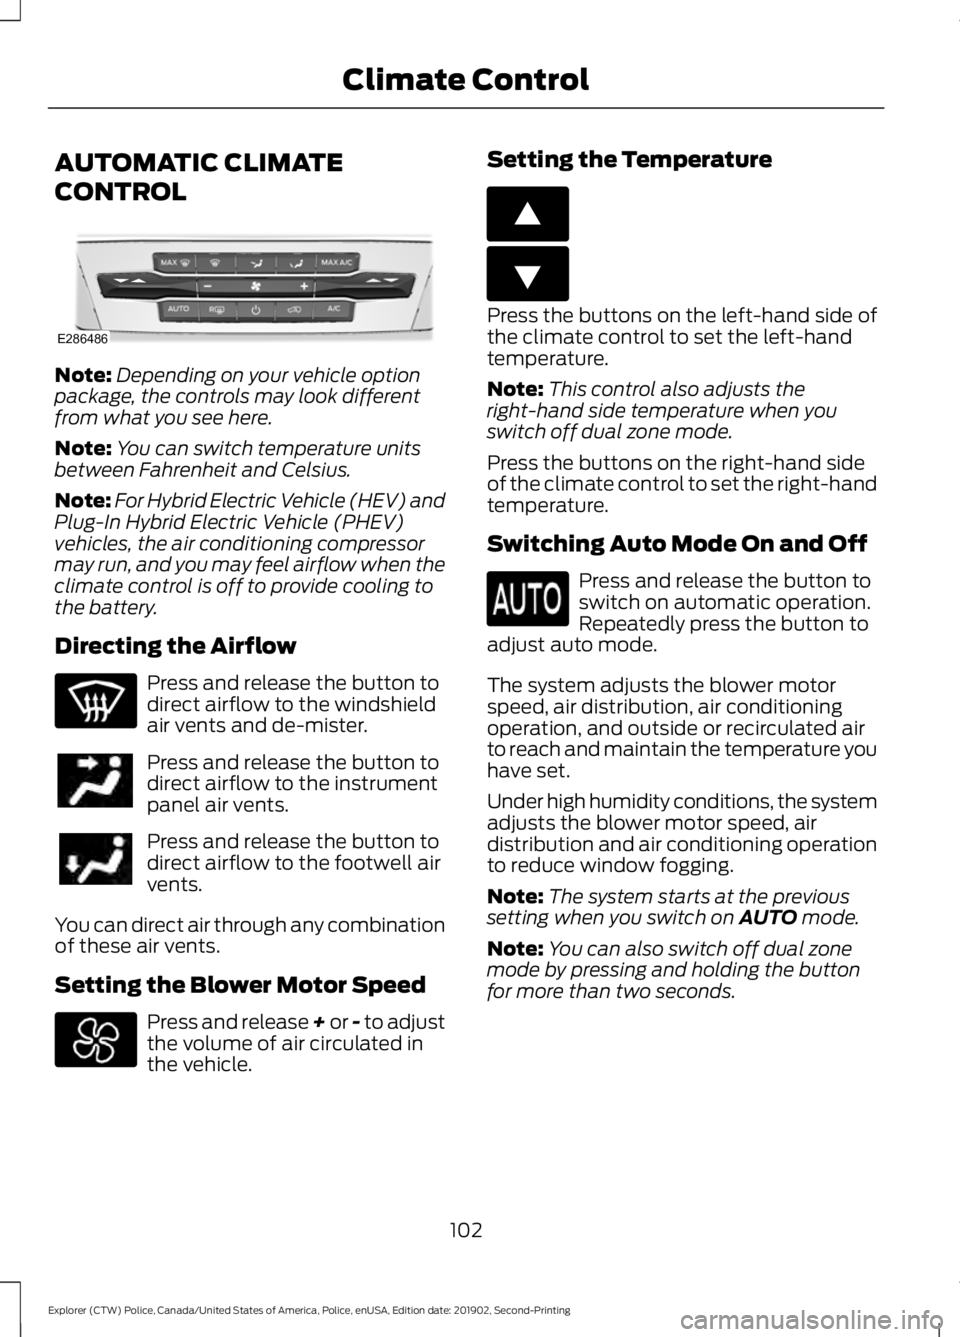
AUTOMATIC CLIMATE
CONTROL
Note:
Depending on your vehicle option
package, the controls may look different
from what you see here.
Note: You can switch temperature units
between Fahrenheit and Celsius.
Note: For Hybrid Electric Vehicle (HEV) and
Plug-In Hybrid Electric Vehicle (PHEV)
vehicles, the air conditioning compressor
may run, and you may feel airflow when the
climate control is off to provide cooling to
the battery.
Directing the Airflow Press and release the button to
direct airflow to the windshield
air vents and de-mister.
Press and release the button to
direct airflow to the instrument
panel air vents.
Press and release the button to
direct airflow to the footwell air
vents.
You can direct air through any combination
of these air vents.
Setting the Blower Motor Speed Press and release + or - to adjust
the volume of air circulated in
the vehicle. Setting the Temperature Press the buttons on the left-hand side of
the climate control to set the left-hand
temperature.
Note:
This control also adjusts the
right-hand side temperature when you
switch off dual zone mode.
Press the buttons on the right-hand side
of the climate control to set the right-hand
temperature.
Switching Auto Mode On and Off Press and release the button to
switch on automatic operation.
Repeatedly press the button to
adjust auto mode.
The system adjusts the blower motor
speed, air distribution, air conditioning
operation, and outside or recirculated air
to reach and maintain the temperature you
have set.
Under high humidity conditions, the system
adjusts the blower motor speed, air
distribution and air conditioning operation
to reduce window fogging.
Note: The system starts at the previous
setting when you switch on AUTO mode.
Note: You can also switch off dual zone
mode by pressing and holding the button
for more than two seconds.
102
Explorer (CTW) Police, Canada/United States of America, Police, enUSA, Edition date: 201902, Second-Printing Climate ControlE286486 E266187 E266186
Page 107 of 395
Switching Maximum Air
Conditioning On and Off
Press and release the button for
maximum cooling.
The driver and passenger temperatures
are set to LO, recirculated air flows through
the instrument panel air vents, air
conditioning turns on and the blower motor
adjusts to the highest speed.
Switching Maximum Defrost On
and Off Press and release the button for
maximum defrosting.
The driver and passenger temperatures
are set to HI, air flows through the
windshield air vents, and the blower motor
adjusts to the highest speed.
Note: Depending on your region, air
conditioning turns on.
You can also use this setting to defog and
clear the windshield of a thin covering of
ice.
Note: To prevent window fogging, you
cannot select recirculated air when
maximum defrost is on.
Note: The heated rear window also turns
on when you select maximum defrost.
Switching Recirculated Air On and
Off Press and release the button to
switch between outside air and
recirculated air.
The air currently in the passenger
compartment recirculates. This may
reduce the time needed to cool the interior,
when used with A/C, and reduce unwanted
odors from entering your vehicle. Note:
Recirculated air may turn off, or
prevent you from switching on, in all air flow
modes except MAX A/C to reduce the risk
of fogging. Recirculation may also turn on
and off in various air distribution control
combinations during hot weather to improve
cooling efficiency.
HINTS ON CONTROLLING THE
INTERIOR CLIMATE
General Hints
Note: Prolonged use of recirculated air may
cause the windows to fog up.
Note: You may feel a small amount of air
from the footwell air vents regardless of the
air distribution setting.
Note: To reduce humidity build-up inside
your vehicle, do not drive with the system
switched off or with recirculated air always
switched on.
Note: Do not place objects under the front
seats as this may interfere with the airflow
to the rear seats.
Note: Remove any snow, ice or leaves from
the air intake area at the base of the
windshield.
Note: To improve the time to reach a
comfortable temperature in hot weather,
drive with the windows open until you feel
cold air through the air vents.
Automatic Climate Control
Note: Adjusting the settings when your
vehicle interior is extremely hot or cold is
not necessary. Automatic mode is best
recommended to maintain set temperature.
Note: The system adjusts to heat or cool
the interior to the temperature you select
as quickly as possible.
Note: For the system to function efficiently,
the instrument panel and side air vents
should be fully open.
104
Explorer (CTW) Police, Canada/United States of America, Police, enUSA, Edition date: 201902, Second-Printing Climate Control
Page 118 of 395
12 Volt DC Power Point
WARNING: Do not plug optional
electrical accessories into the cigar
lighter socket. Incorrect use of the cigar
lighter can cause damage not covered
by the vehicle warranty, and can result
in fire or serious injury.
Note: When you switch the ignition on, you
can use the socket to power 12 volt
appliances with a maximum current rating
of 15 amps.
Note: If the power supply does not work
after you switch the ignition off, switch the
ignition on.
Note: Do not hang any accessory from the
accessory plug.
Note: Do not use the power point over the
vehicle capacity of 12 volt DC 180 watts or
a fuse may blow.
Note: Always keep the power point caps
closed when not in use.
Do not insert objects other than an
accessory plug into the power point. This
damages the power point and may blow
the fuse.
Run the vehicle for full capacity use of the
power point.
To prevent the battery from running out of
charge:
• Do not use the power point longer than
necessary when the vehicle is not
running.
• Do not leave devices plugged in
overnight or when you park your vehicle
for extended periods. USB Port and Power Point
Locations
USB Ports and Power Points may be in the
following locations:
•
On the lower instrument panel.
• Inside the center console.
• On the front of the center console.
• On the rear of the center console.
• In the cargo area.
• On the passenger side floor panel.
• 3rd row on the quarter trim panels.
Note: Some of the USB ports may not have
data transfer capabilities.
Note: Incorrect use of the USB ports can
cause damage not covered by the vehicle
warranty.
110 Volt AC Power Point WARNING: Do not keep electrical
devices plugged in the power point
whenever the device is not in use. Do not
use any extension cord with the 110 volt
AC power point, since it will defeat the
safety protection design. Doing so may
cause the power point to overload due
to powering multiple devices that can
reach beyond the 150 watt load limit and
could result in fire or serious injury.
Note: The power point turns off when you
switch off the ignition, when the vehicle is
not in accessory mode or when the battery
voltage drops below 11 volts.
You can use the power point for electric
devices that require up to 150 watts. It is
on the rear of the center console.
115
Explorer (CTW) Police, Canada/United States of America, Police, enUSA, Edition date: 201902, Second-Printing Auxiliary Power Points
Page 120 of 395
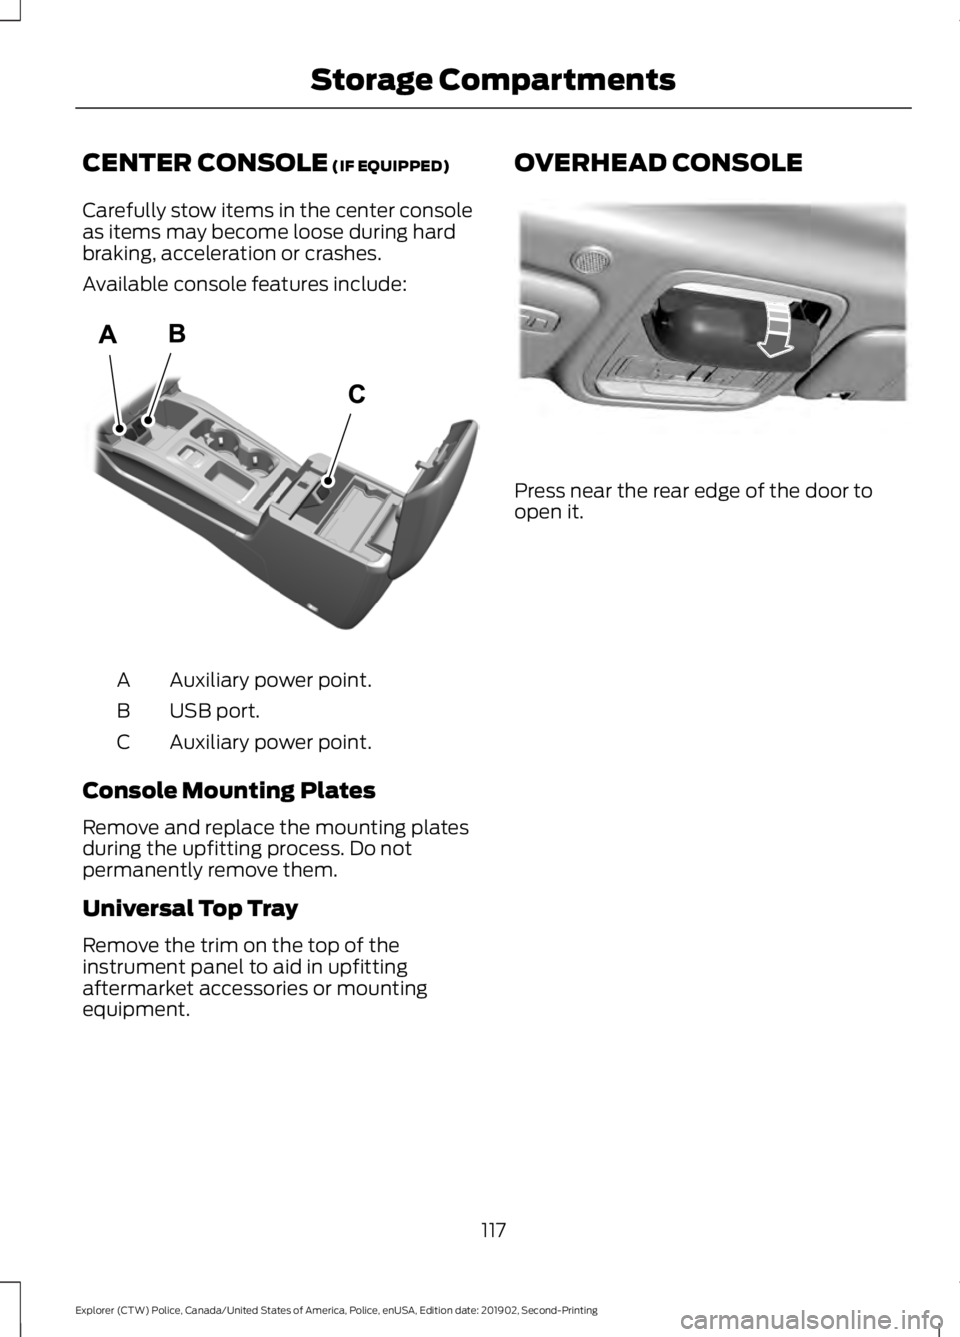
CENTER CONSOLE (IF EQUIPPED)
Carefully stow items in the center console
as items may become loose during hard
braking, acceleration or crashes.
Available console features include: Auxiliary power point.
A
USB port.
B
Auxiliary power point.
C
Console Mounting Plates
Remove and replace the mounting plates
during the upfitting process. Do not
permanently remove them.
Universal Top Tray
Remove the trim on the top of the
instrument panel to aid in upfitting
aftermarket accessories or mounting
equipment. OVERHEAD CONSOLE
Press near the rear edge of the door to
open it.
117
Explorer (CTW) Police, Canada/United States of America, Police, enUSA, Edition date: 201902, Second-Printing Storage CompartmentsE297321 E307323
Page 124 of 395

Using the Engine Block Heater
Make sure the receptacle terminals are
clean and dry prior to use. Clean them with
a dry cloth if necessary.
The heater uses 0.4 to 1.0 kilowatt-hours
of energy per hour of use. The system does
not have a thermostat. It achieves
maximum temperature after
approximately three hours of operation.
Using the heater longer than three hours
does not improve system performance and
unnecessarily uses electricity.
POLICE ENGINE IDLE FEATURE
(IF EQUIPPED)
The system allows you to leave the engine
running and prevents your vehicle from
unauthorized use when you are outside of
your vehicle. When you remove the key
from the ignition, the engine remains idling.
Switching the System On
1. With your vehicle running and the
transmission in park (P), press the
button on the instrument panel. See
Instrument Panel (page 18). A
warning lamp illuminates to confirm
the system is on. See Warning Lamps
and Indicators
(page 80). 2.
Switch the ignition off and remove the
key.
When the system is on:
• The power window switches turn off
and the windows remain in their current
state.
• The luggage compartment or liftgate
unlock switch turns off.
Note: When the system is on, you can use
the key blade or the remote control to lock
and unlock your vehicle.
Switching the System Off
• Turn the key to the run position.
• Press the button on the instrument
panel.
Note: If you switch the system off before
switching the ignition to the run position,
your vehicle shuts down.
121
Explorer (CTW) Police, Canada/United States of America, Police, enUSA, Edition date: 201902, Second-Printing Starting and Stopping the EngineE227967
Page 137 of 395
WARNING: When refueling always
shut the engine off and never allow
sparks or open flames near the fuel tank
filler valve. Never smoke or use a cell
phone while refueling. Fuel vapor is
extremely hazardous under certain
conditions. Avoid inhaling excess fumes. WARNING: Stop refueling when
the fuel pump nozzle automatically
shuts off for the first time. Failure to
follow this will fill the expansion space
in the fuel tank and could lead to fuel
overflowing. WARNING:
Wait at least five
seconds before removing the fuel pump
nozzle to allow any residual fuel to drain
into the fuel tank. WARNING:
The fuel system may
be under pressure. If you hear a hissing
sound near the fuel filler inlet, do not
refuel until the sound stops. Otherwise,
fuel may spray out, which could cause
serious personal injury. WARNING:
Read and follow all
the instructions on the pump island.
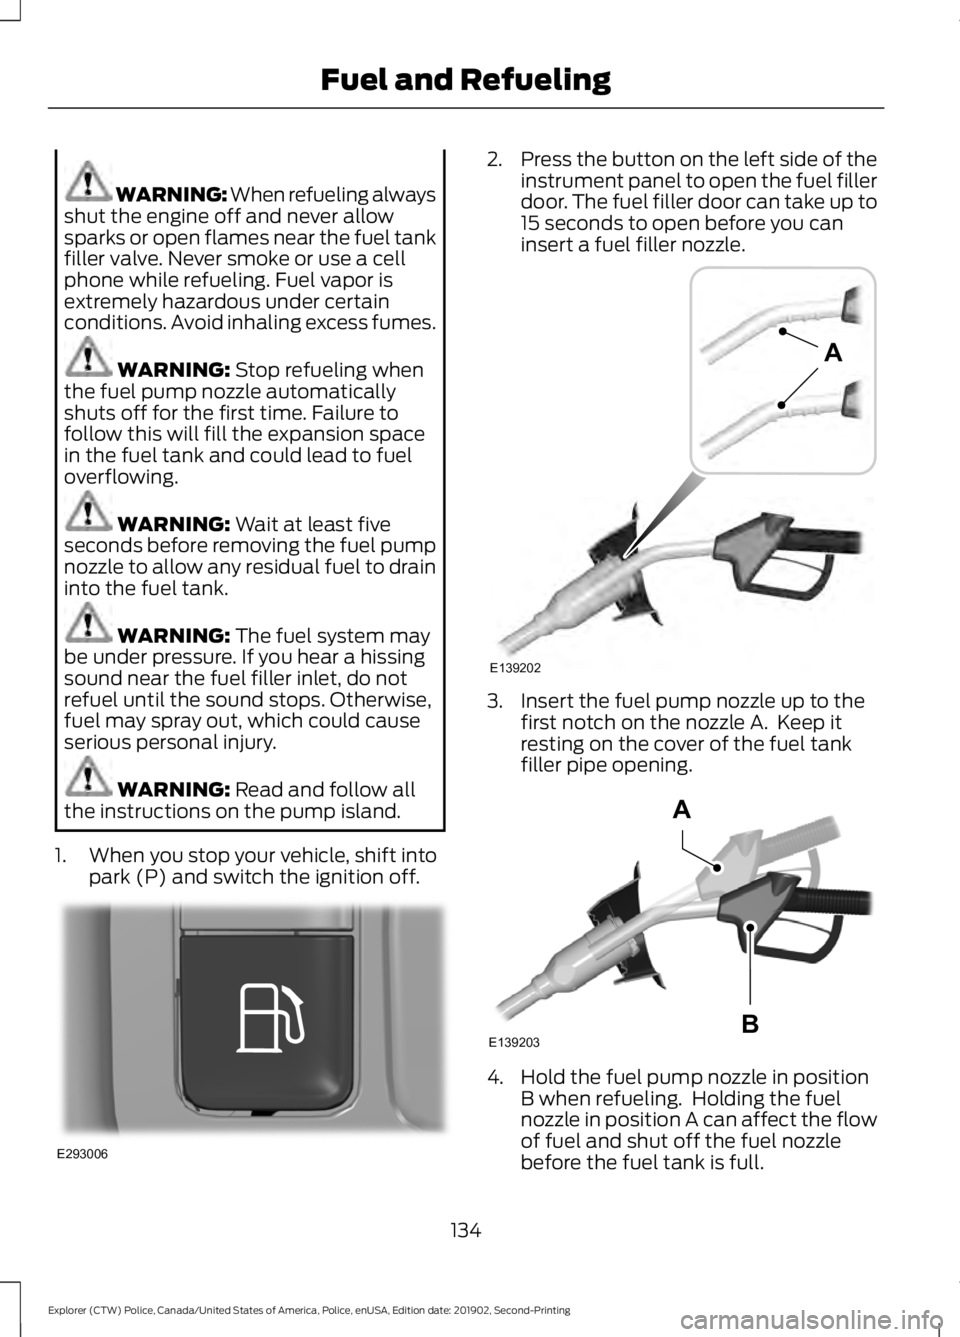
1. When you stop your vehicle, shift into park (P) and switch the ignition off. 2.
Press the button on the left side of the
instrument panel to open the fuel filler
door. The fuel filler door can take up to
15 seconds to open before you can
insert a fuel filler nozzle. 3. Insert the fuel pump nozzle up to the
first notch on the nozzle A. Keep it
resting on the cover of the fuel tank
filler pipe opening. 4. Hold the fuel pump nozzle in position
B when refueling. Holding the fuel
nozzle in position A can affect the flow
of fuel and shut off the fuel nozzle
before the fuel tank is full.
134
Explorer (CTW) Police, Canada/United States of America, Police, enUSA, Edition date: 201902, Second-Printing Fuel and RefuelingE293006 E139202
A E139203
A
B
Page 138 of 395
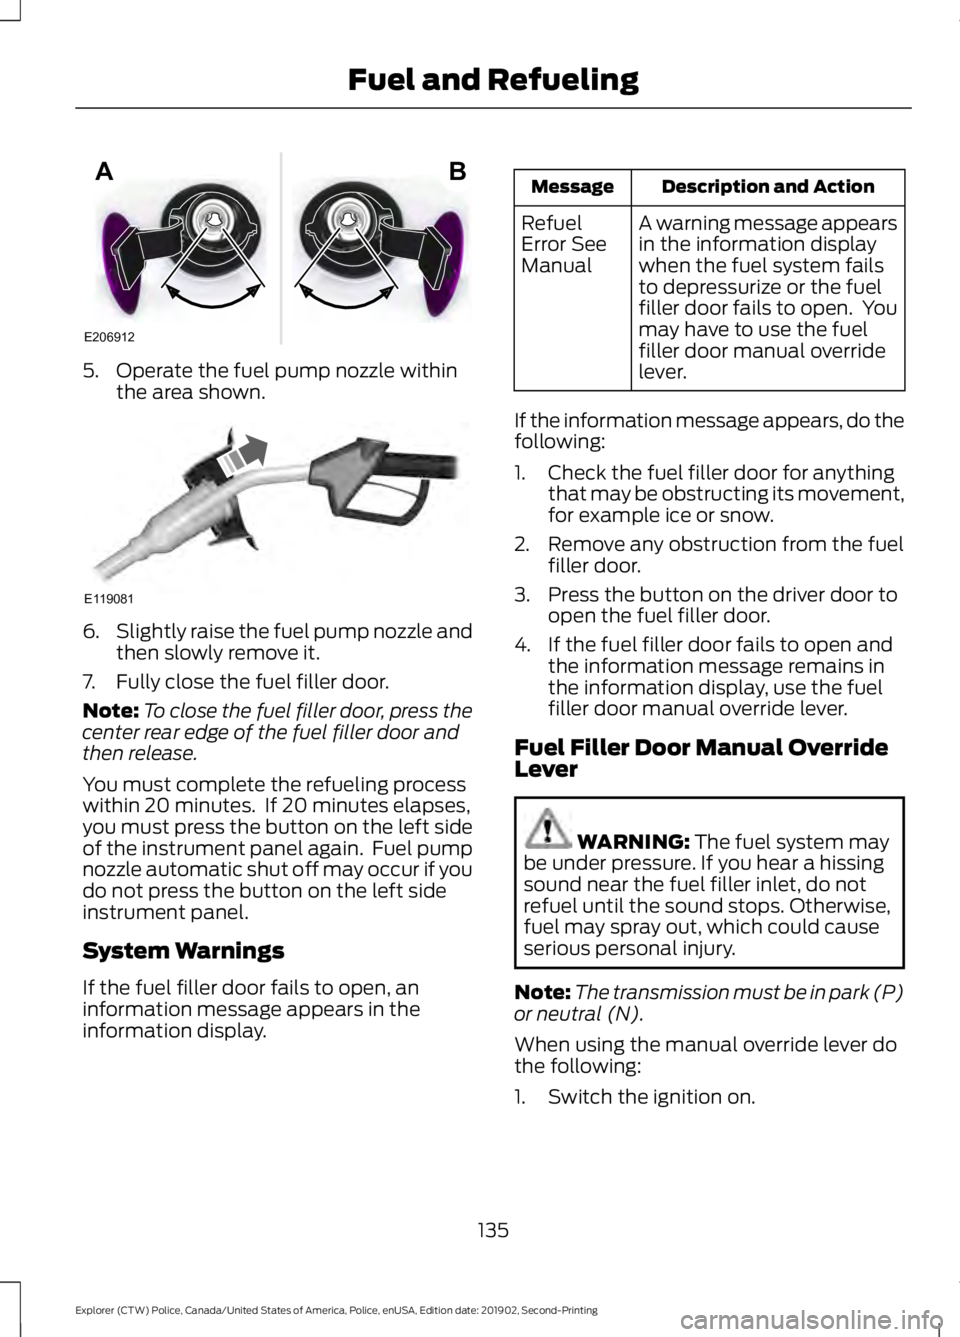
5. Operate the fuel pump nozzle within
the area shown. 6.
Slightly raise the fuel pump nozzle and
then slowly remove it.
7. Fully close the fuel filler door.
Note: To close the fuel filler door, press the
center rear edge of the fuel filler door and
then release.
You must complete the refueling process
within 20 minutes. If 20 minutes elapses,
you must press the button on the left side
of the instrument panel again. Fuel pump
nozzle automatic shut off may occur if you
do not press the button on the left side
instrument panel.
System Warnings
If the fuel filler door fails to open, an
information message appears in the
information display. Description and Action
Message
A warning message appears
in the information display
when the fuel system fails
to depressurize or the fuel
filler door fails to open. You
may have to use the fuel
filler door manual override
lever.
Refuel
Error See
Manual
If the information message appears, do the
following:
1. Check the fuel filler door for anything that may be obstructing its movement,
for example ice or snow.
2. Remove any obstruction from the fuel filler door.
3. Press the button on the driver door to open the fuel filler door.
4. If the fuel filler door fails to open and the information message remains in
the information display, use the fuel
filler door manual override lever.
Fuel Filler Door Manual Override
Lever WARNING: The fuel system may
be under pressure. If you hear a hissing
sound near the fuel filler inlet, do not
refuel until the sound stops. Otherwise,
fuel may spray out, which could cause
serious personal injury.
Note: The transmission must be in park (P)
or neutral (N).
When using the manual override lever do
the following:
1. Switch the ignition on.
135
Explorer (CTW) Police, Canada/United States of America, Police, enUSA, Edition date: 201902, Second-Printing Fuel and RefuelingE206912
AB E119081