2020 FORD F250 SUPER DUTY steering wheel
[x] Cancel search: steering wheelPage 317 of 633
•
When negotiating low speed obstacles,
applying light brake pressure in
conjunction with the throttle will help
prevent the vehicle from lurching and
will allow you to negotiate the obstacle
in a more controlled manner. Using 4L
also assists with this.
• Use and equip supplemental safety
equipment.
• Please consult your local off-road
group for other helpful tips.
• Off-roading requires a high degree of
concentration. Even if your local law
does not prohibit alcohol use while
driving off-road, Ford strongly
recommends against drinking alcohol
if you plan to off-road.
Crossing Obstacles
• Review the path ahead before
attempting to cross any obstacles. It is
best if the obstacles are reviewed from
outside the vehicle so that there is a
good understanding of the terrains
condition both in front of and behind
the obstacles.
• Approach obstacles slowly and slowly
creep the vehicle over.
• If a large obstacle such as a rock
cannot be avoided, choose a path that
places the rock directly under the tire
rather than the undercarriage of the
vehicle. This helps prevent damage to
the vehicle.
• Ditches and washouts should be
crossed at a 45 degree angle, allowing
each wheel to independently cross the
obstacle. Hill Climbing WARNING: Extreme care should
be used when steering the vehicle in
reverse down a slope so as not to cause
the vehicle to swerve out of control.
• Always attempt to climb a steep hill
along the fall line of the slope and not
diagonally.
• If the vehicle is unable to make it up
the hill, DO NOT attempt to turn back
down the slope. Place the vehicle in
low range and slowly back down in
reverse.
• When descending a steep slope, select
low gear and engage trail control. Use
the throttle and brake pedals to control
your descent speed as described earlier
in this section using trail control. Note
that trail control is functional in reverse
and should be used in this situation.
After Off-Road Driving
It is important to complete a full vehicle
inspection after off-road driving. Some
items to check include:
• Make sure that tires are inflated to
proper tire pressure as indicated on the
tire placard.
• Check the wheels and undercarriage
for built up mud or debris which can
cause vehicle vibration.
• Make sure that the grille and radiator
are clear of any obstructions that may
affect cooling.
• Make sure that the brakes are in proper
working order and free of any mud,
stones and debris, which can become
trapped around the brake rotor,
backing plate and caliper.
• Check that the air filter is clean and dry.
• Inspect for torn or punctured boots on
ball joints, half shafts, steering gears.
314
Super Duty (TFE) Canada/United States of America, enUSA, Edition date: 201909, Second-Printing Driving Hints
Page 318 of 633
•
Inspect exhaust system for damage or
looseness.
• Inspect undercarriage fasteners. If any
are loose or damaged, tighten or
replace ensuring that the proper torque
specification is used.
• Inspect the tires for any cuts in the
tread or sidewall area. Also inspect the
sidewall for any bulge indicating
damage to the tire.
• Inspect the wheels for dents, cracks,
or other damage.
• Refit the front license plate if removed
previously.
BREAKING-IN
You need to break in new tires for
approximately 300 mi (480 km). During
this time, your vehicle may exhibit some
unusual driving characteristics.
Avoid driving too fast during the first
1,000 mi (1,600 km)
. Vary your speed
frequently and change up through the
gears early. Do not labor the engine.
Drive your new vehicle at least
1,000 mi
(1,600 km) before towing a trailer. Make
sure you use the specified engine oil. See
Capacities and Specifications
(page
441).
Do not add friction modifier compounds
or special break-in oils during the first few
thousand miles (kilometers) of operation.
These additives may prevent piston ring
seating.
DRIVING THROUGH WATER WARNING:
Do not drive through
flowing or deep water as you may lose
control of your vehicle. Note:
Engine damage can occur if water
enters the air filter.
For Vehicles without Tremor Off-
Road Package
Note: Driving through standing water can
cause vehicle damage.
Note: Drive through water in an emergency
only and not as part of normal driving.
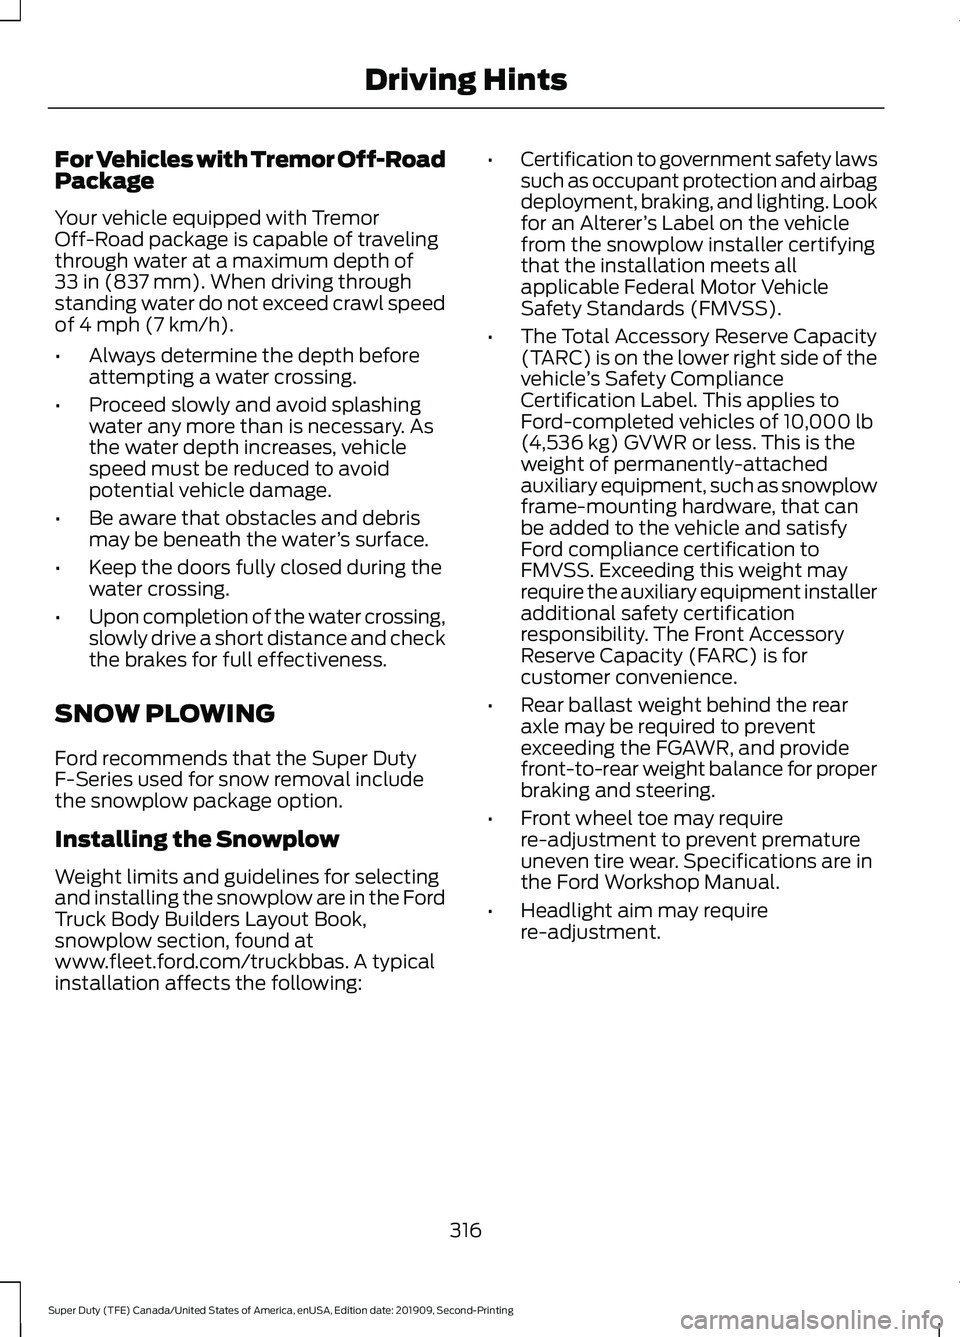
Before driving through standing water,
check the depth. Never drive through water
that is higher than the bottom of the wheel
hubs. When driving through standing water, drive
very slowly and do not stop your vehicle.
Your brake performance and traction may
be limited. After driving through water and
as soon as it is safe to do so:
•
Lightly press the brake pedal to dry the
brakes and to check that they work.
• Check that the horn works.
• Check that the exterior lights work.
• Turn the steering wheel to check that
the steering power assist works.
315
Super Duty (TFE) Canada/United States of America, enUSA, Edition date: 201909, Second-Printing Driving HintsE176913
Page 319 of 633
For Vehicles with Tremor Off-Road
Package
Your vehicle equipped with Tremor
Off-Road package is capable of traveling
through water at a maximum depth of
33 in (837 mm). When driving through
standing water do not exceed crawl speed
of
4 mph (7 km/h).
• Always determine the depth before
attempting a water crossing.
• Proceed slowly and avoid splashing
water any more than is necessary. As
the water depth increases, vehicle
speed must be reduced to avoid
potential vehicle damage.
• Be aware that obstacles and debris
may be beneath the water ’s surface.
• Keep the doors fully closed during the
water crossing.
• Upon completion of the water crossing,
slowly drive a short distance and check
the brakes for full effectiveness.
SNOW PLOWING
Ford recommends that the Super Duty
F-Series used for snow removal include
the snowplow package option.
Installing the Snowplow
Weight limits and guidelines for selecting
and installing the snowplow are in the Ford
Truck Body Builders Layout Book,
snowplow section, found at
www.fleet.ford.com/truckbbas. A typical
installation affects the following: •
Certification to government safety laws
such as occupant protection and airbag
deployment, braking, and lighting. Look
for an Alterer ’s Label on the vehicle
from the snowplow installer certifying
that the installation meets all
applicable Federal Motor Vehicle
Safety Standards (FMVSS).
• The Total Accessory Reserve Capacity
(TARC) is on the lower right side of the
vehicle ’s Safety Compliance
Certification Label. This applies to
Ford-completed vehicles of
10,000 lb
(4,536 kg) GVWR or less. This is the
weight of permanently-attached
auxiliary equipment, such as snowplow
frame-mounting hardware, that can
be added to the vehicle and satisfy
Ford compliance certification to
FMVSS. Exceeding this weight may
require the auxiliary equipment installer
additional safety certification
responsibility. The Front Accessory
Reserve Capacity (FARC) is for
customer convenience.
• Rear ballast weight behind the rear
axle may be required to prevent
exceeding the FGAWR, and provide
front-to-rear weight balance for proper
braking and steering.
• Front wheel toe may require
re-adjustment to prevent premature
uneven tire wear. Specifications are in
the Ford Workshop Manual.
• Headlight aim may require
re-adjustment.
316
Super Duty (TFE) Canada/United States of America, enUSA, Edition date: 201909, Second-Printing Driving Hints
Page 338 of 633
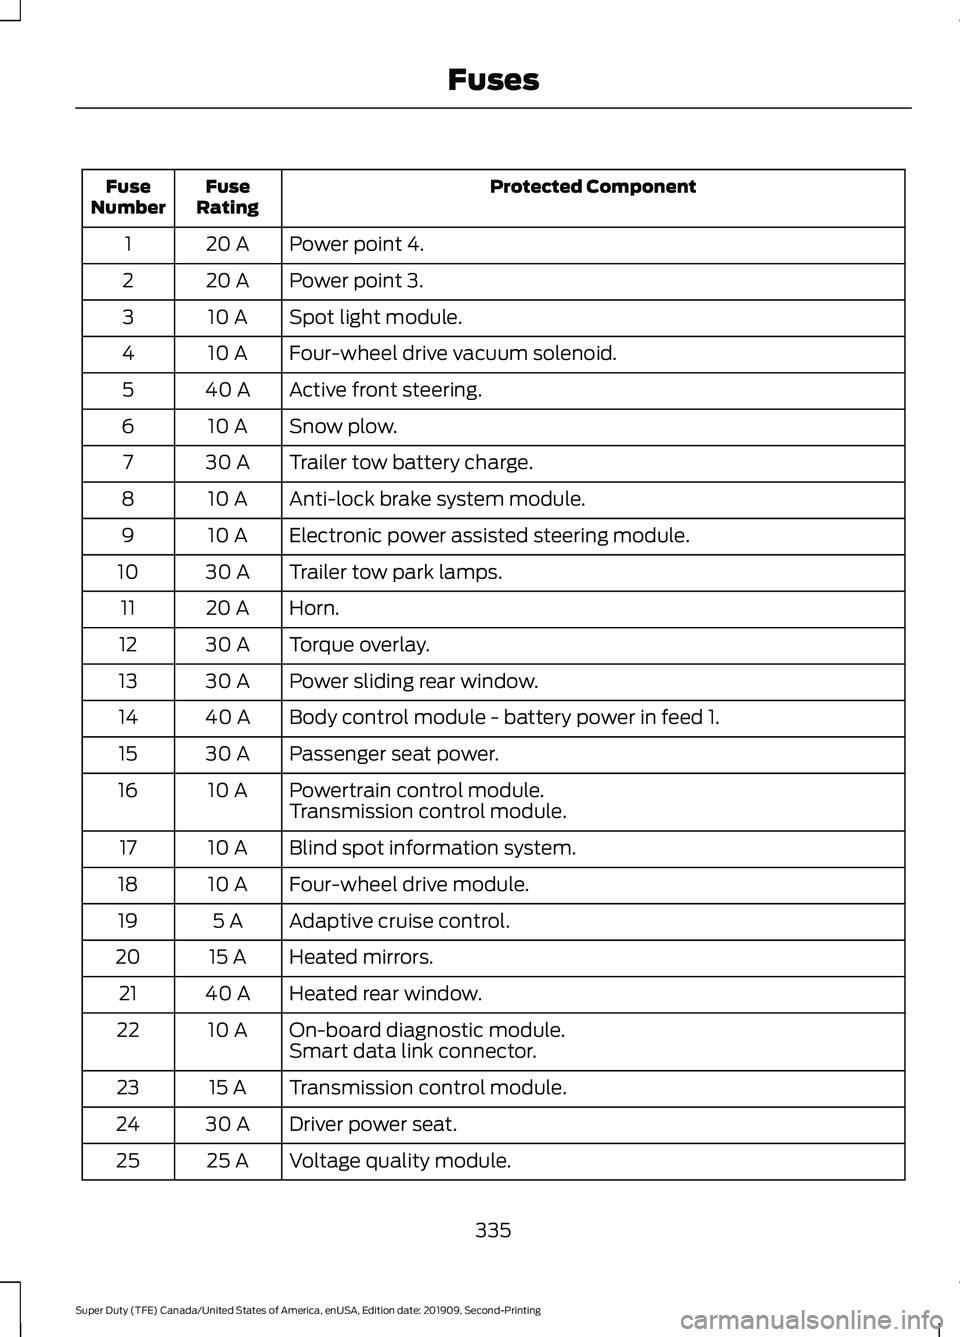
Protected Component
Fuse
Rating
Fuse
Number
Power point 4.
20 A
1
Power point 3.
20 A
2
Spot light module.
10 A
3
Four-wheel drive vacuum solenoid.
10 A
4
Active front steering.
40 A
5
Snow plow.
10 A
6
Trailer tow battery charge.
30 A
7
Anti-lock brake system module.
10 A
8
Electronic power assisted steering module.
10 A
9
Trailer tow park lamps.
30 A
10
Horn.
20 A
11
Torque overlay.
30 A
12
Power sliding rear window.
30 A
13
Body control module - battery power in feed 1.
40 A
14
Passenger seat power.
30 A
15
Powertrain control module.
10 A
16
Transmission control module.
Blind spot information system.
10 A
17
Four-wheel drive module.
10 A
18
Adaptive cruise control.
5 A
19
Heated mirrors.
15 A
20
Heated rear window.
40 A
21
On-board diagnostic module.
10 A
22
Smart data link connector.
Transmission control module.
15 A
23
Driver power seat.
30 A
24
Voltage quality module.
25 A
25
335
Super Duty (TFE) Canada/United States of America, enUSA, Edition date: 201909, Second-Printing Fuses
Page 339 of 633
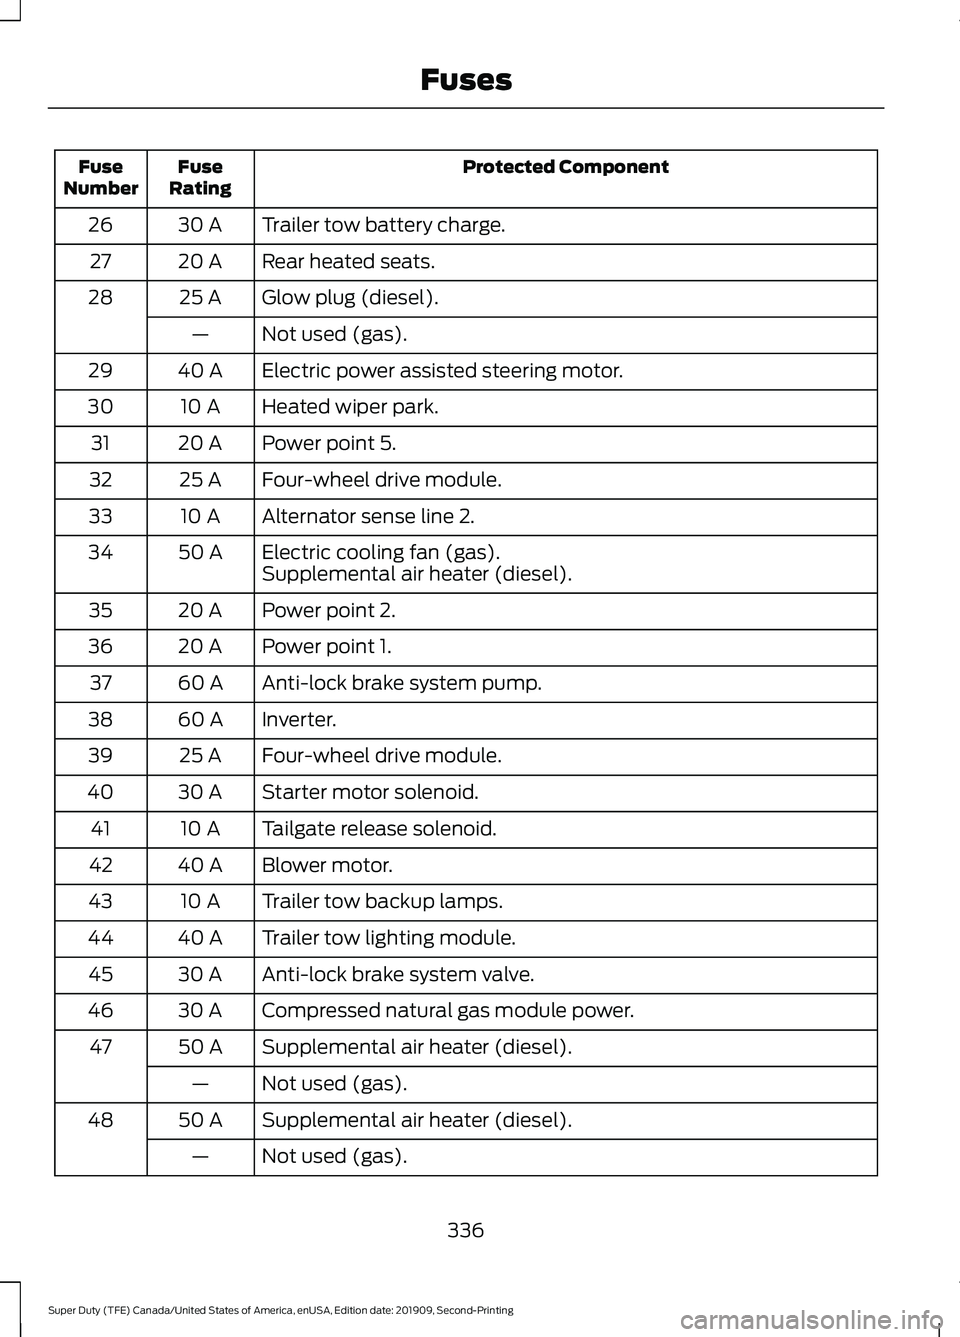
Protected Component
Fuse
Rating
Fuse
Number
Trailer tow battery charge.
30 A
26
Rear heated seats.
20 A
27
Glow plug (diesel).
25 A
28
Not used (gas).
—
Electric power assisted steering motor.
40 A
29
Heated wiper park.
10 A
30
Power point 5.
20 A
31
Four-wheel drive module.
25 A
32
Alternator sense line 2.
10 A
33
Electric cooling fan (gas).
50 A
34
Supplemental air heater (diesel).
Power point 2.
20 A
35
Power point 1.
20 A
36
Anti-lock brake system pump.
60 A
37
Inverter.
60 A
38
Four-wheel drive module.
25 A
39
Starter motor solenoid.
30 A
40
Tailgate release solenoid.
10 A
41
Blower motor.
40 A
42
Trailer tow backup lamps.
10 A
43
Trailer tow lighting module.
40 A
44
Anti-lock brake system valve.
30 A
45
Compressed natural gas module power.
30 A
46
Supplemental air heater (diesel).
50 A
47
Not used (gas).
—
Supplemental air heater (diesel).
50 A
48
Not used (gas).
—
336
Super Duty (TFE) Canada/United States of America, enUSA, Edition date: 201909, Second-Printing Fuses
Page 343 of 633
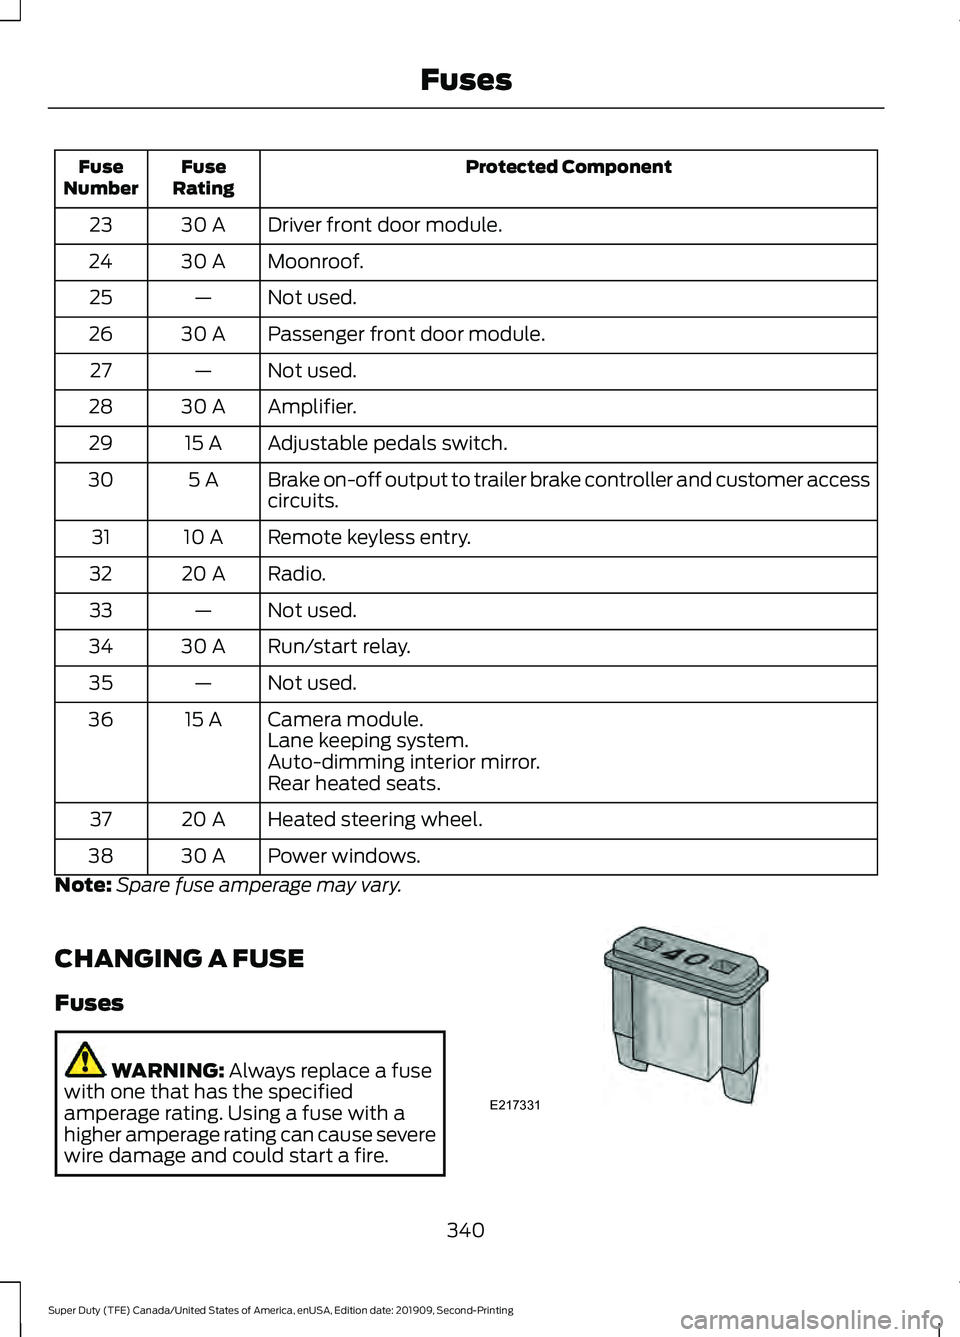
Protected Component
Fuse
Rating
Fuse
Number
Driver front door module.
30 A
23
Moonroof.
30 A
24
Not used.
—
25
Passenger front door module.
30 A
26
Not used.
—
27
Amplifier.
30 A
28
Adjustable pedals switch.
15 A
29
Brake on-off output to trailer brake controller and customer access
circuits.
5 A
30
Remote keyless entry.
10 A
31
Radio.
20 A
32
Not used.
—
33
Run/start relay.
30 A
34
Not used.
—
35
Camera module.
15 A
36
Lane keeping system.
Auto-dimming interior mirror.
Rear heated seats.
Heated steering wheel.
20 A
37
Power windows.
30 A
38
Note: Spare fuse amperage may vary.
CHANGING A FUSE
Fuses WARNING: Always replace a fuse
with one that has the specified
amperage rating. Using a fuse with a
higher amperage rating can cause severe
wire damage and could start a fire. 340
Super Duty (TFE) Canada/United States of America, enUSA, Edition date: 201909, Second-Printing FusesE217331
Page 353 of 633

Note:
Soak up any spillage with an
absorbent cloth immediately.
CHANGING THE ENGINE OIL
AND OIL FILTER WARNING: Do not handle a hot oil
filter with bare hands. WARNING: Continuous contact
with used motor oil has caused cancer
in laboratory mice. Protect your skin by
washing with soap and water.
If your vehicle is equipped with a diesel
engine, an Intelligent Oil Life Monitor™
calculates the proper oil change service
interval. When the information display
indicates: OIL CHANGE REQUIRED, change
the engine oil and oil filter. See
Information Displays
(page 112).
The engine oil filter protects your engine
by filtering harmful, abrasive or sludge
particles and particles significantly smaller
than most available will-fit filters. See
Motorcraft Parts
(page 435).
1. Unscrew the oil filter and oil pan drain plug and wait for the oil to drain.
2. Replace the filter.
3. Reinstall the oil pan drain plug.
4. Refill the engine with new oil. See Engine Specifications
(page 433).
5. For diesel engines, you need to reset the Intelligent Oil Life Monitor™. See
Information Displays
(page 112). Engine lubrication for severe
service operation
The following conditions define severe
operation for which engine operation with
SAE 5W-40 API CJ-4 is recommended. Oil
and oil filter change intervals will be
determined by the Intelligent Oil Life
Monitor™ as noted previously.
•
Frequent or extended idling (over 10
minutes per hour of normal driving).
• Low-speed operation/stationary use.
• If vehicle is operated in sustained
ambient temperatures below
-9°F
(-23°C) or above 100°F (38°C).
• Frequent low-speed operation,
consistent heavy traffic less than
25 mph (40 km/h)
.
• Operating in severe dust conditions.
• Operating the vehicle off road.
• Towing a trailer over
1,000 mi
(1,600 km).
• Sustained, high-speed driving at Gross
Vehicle Weight Rating (maximum
loaded weight for vehicle operation).
• Use of fuels with sulfur content other
than ultra-low sulfur diesel (ULSD).
• Use of high-sulfur diesel fuel.
OIL CHANGE INDICATOR
RESET
Use the information display controls on
the steering wheel to reset the oil change
indicator.
350
Super Duty (TFE) Canada/United States of America, enUSA, Edition date: 201909, Second-Printing Maintenance
Page 375 of 633
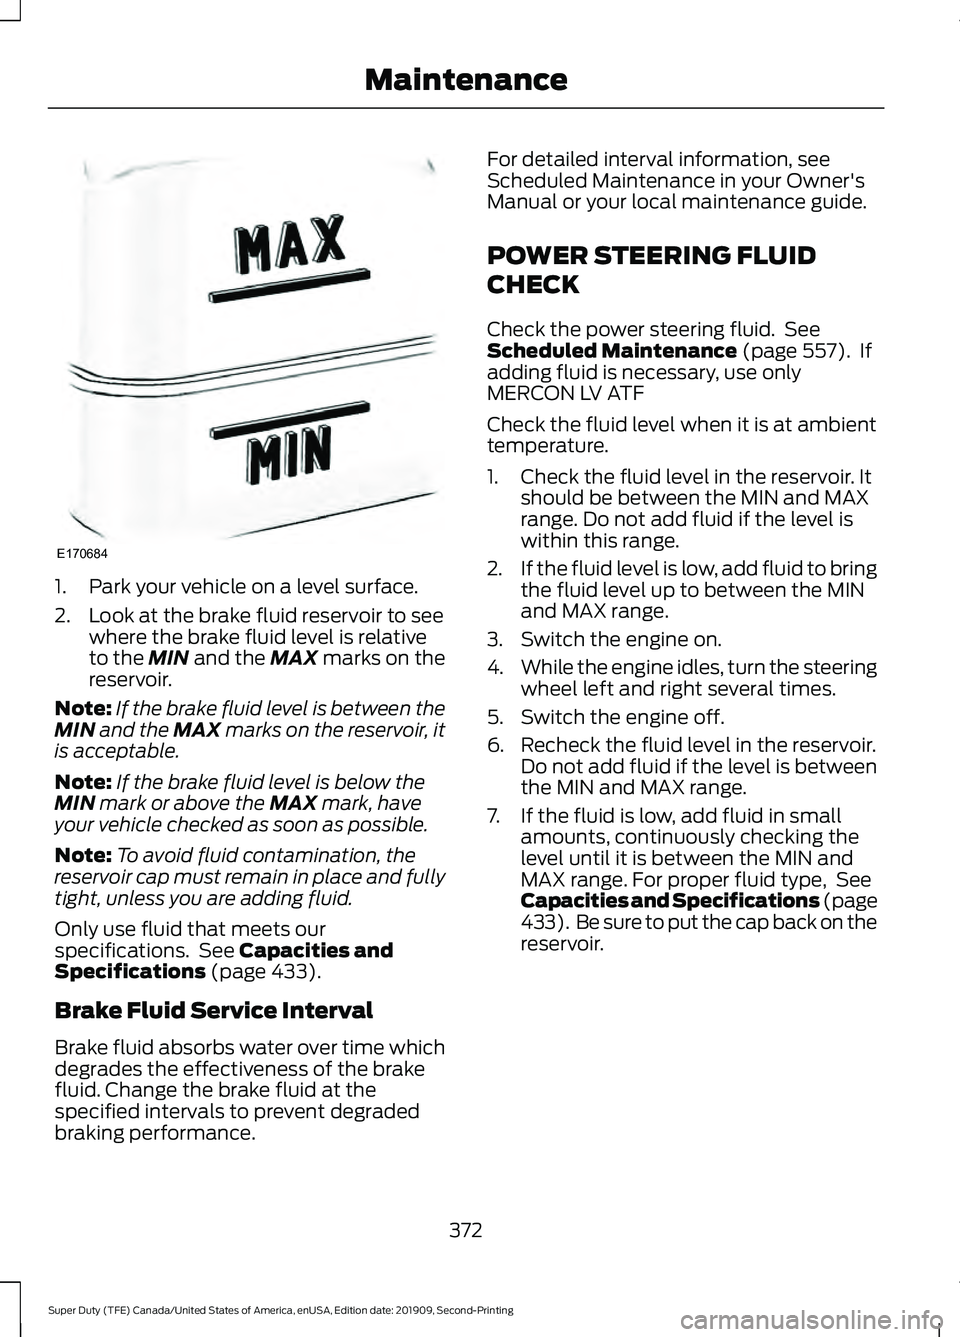
1. Park your vehicle on a level surface.
2. Look at the brake fluid reservoir to see
where the brake fluid level is relative
to the MIN and the MAX marks on the
reservoir.
Note: If the brake fluid level is between the
MIN
and the MAX marks on the reservoir, it
is acceptable.
Note: If the brake fluid level is below the
MIN
mark or above the MAX mark, have
your vehicle checked as soon as possible.
Note: To avoid fluid contamination, the
reservoir cap must remain in place and fully
tight, unless you are adding fluid.
Only use fluid that meets our
specifications. See
Capacities and
Specifications (page 433).
Brake Fluid Service Interval
Brake fluid absorbs water over time which
degrades the effectiveness of the brake
fluid. Change the brake fluid at the
specified intervals to prevent degraded
braking performance. For detailed interval information, see
Scheduled Maintenance in your Owner's
Manual or your local maintenance guide.
POWER STEERING FLUID
CHECK
Check the power steering fluid. See
Scheduled Maintenance
(page 557). If
adding fluid is necessary, use only
MERCON LV ATF
Check the fluid level when it is at ambient
temperature.
1. Check the fluid level in the reservoir. It should be between the MIN and MAX
range. Do not add fluid if the level is
within this range.
2. If the fluid level is low, add fluid to bring
the fluid level up to between the MIN
and MAX range.
3. Switch the engine on.
4. While the engine idles, turn the steering
wheel left and right several times.
5. Switch the engine off.
6. Recheck the fluid level in the reservoir. Do not add fluid if the level is between
the MIN and MAX range.
7. If the fluid is low, add fluid in small amounts, continuously checking the
level until it is between the MIN and
MAX range. For proper fluid type, See
Capacities and Specifications (page
433
). Be sure to put the cap back on the
reservoir.
372
Super Duty (TFE) Canada/United States of America, enUSA, Edition date: 201909, Second-Printing MaintenanceE170684