Page 124 of 633
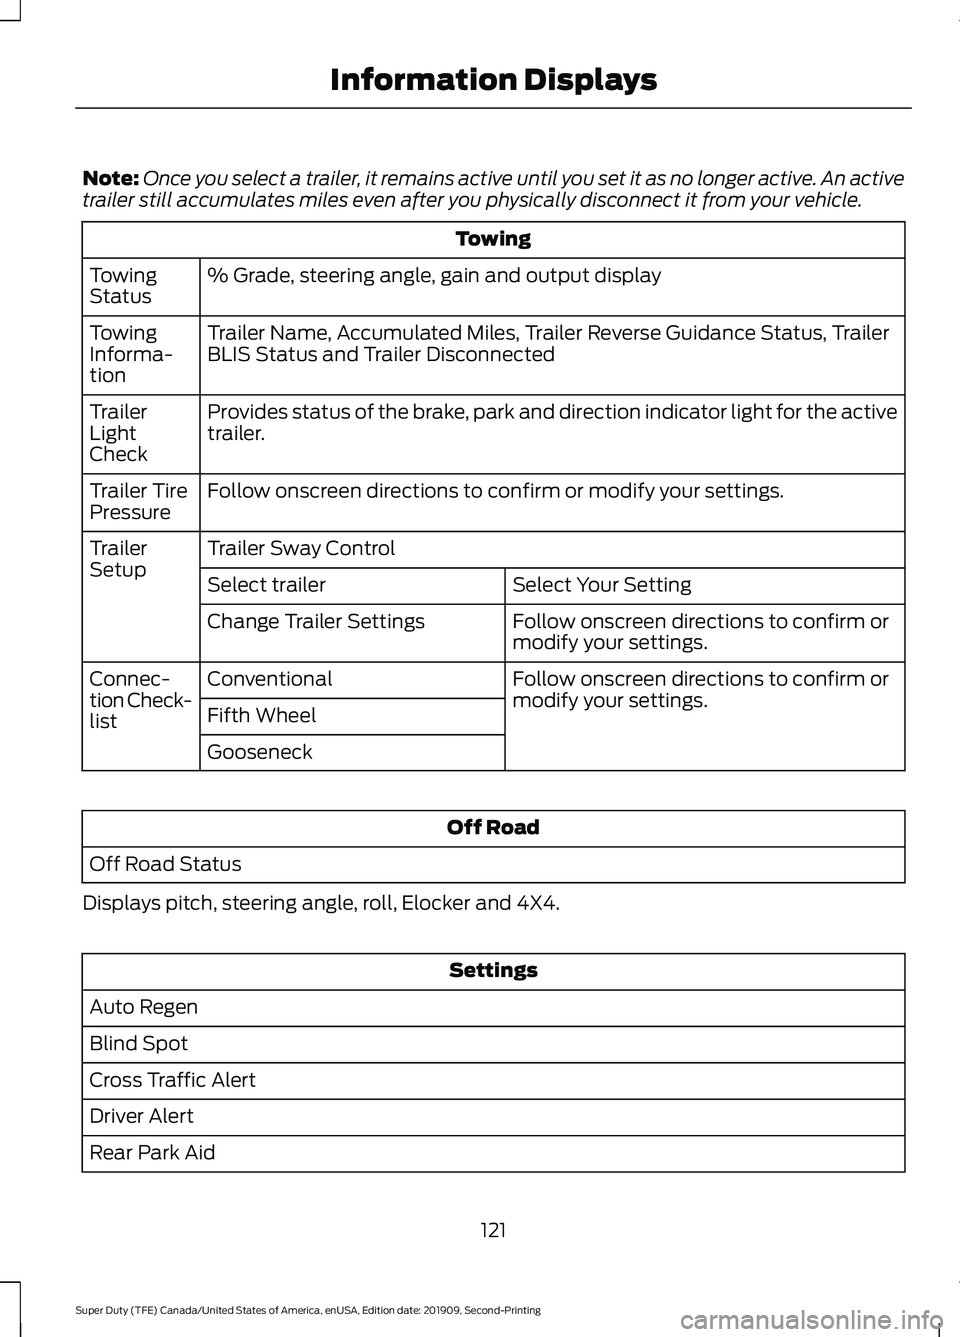
Note:
Once you select a trailer, it remains active until you set it as no longer active. An active
trailer still accumulates miles even after you physically disconnect it from your vehicle. Towing
% Grade, steering angle, gain and output display
Towing
Status
Trailer Name, Accumulated Miles, Trailer Reverse Guidance Status, Trailer
BLIS Status and Trailer Disconnected
Towing
Informa-
tion
Provides status of the brake, park and direction indicator light for the active
trailer.
Trailer
Light
Check
Follow onscreen directions to confirm or modify your settings.
Trailer Tire
Pressure
Trailer Sway Control
Trailer
Setup
Select Your Setting
Select trailer
Follow onscreen directions to confirm or
modify your settings.
Change Trailer Settings
Follow onscreen directions to confirm or
modify your settings.
Conventional
Connec-
tion Check-
list Fifth Wheel
Gooseneck Off Road
Off Road Status
Displays pitch, steering angle, roll, Elocker and 4X4. Settings
Auto Regen
Blind Spot
Cross Traffic Alert
Driver Alert
Rear Park Aid
121
Super Duty (TFE) Canada/United States of America, enUSA, Edition date: 201909, Second-Printing Information Displays
Page 125 of 633
Settings
Select Your Setting
Pre-Collision
Cruise
Control
Gauge Selec-
tion
Lane
Keeping
System
Auto Engine Off
Vehicle
Advanced
Settings
Easy Entry/Exit
Select Your Setting
Lighting
Locks
Neutral Tow
Alarm
Power Running
Boards
Remote Start
Windows
Wiper Controls
Shows information related to the
configured MyKey(s)
MyKey Status
MyKey
Follow onscreen directions to confirm
or modify your settings.
Create MyKey
Select Your Setting
911 Assist
Do Not Disturb
AdvanceTrac
Max Speed
Speed Minder
Volume Limiter
122
Super Duty (TFE) Canada/United States of America, enUSA, Edition date: 201909, Second-Printing Information Displays
Page 134 of 633
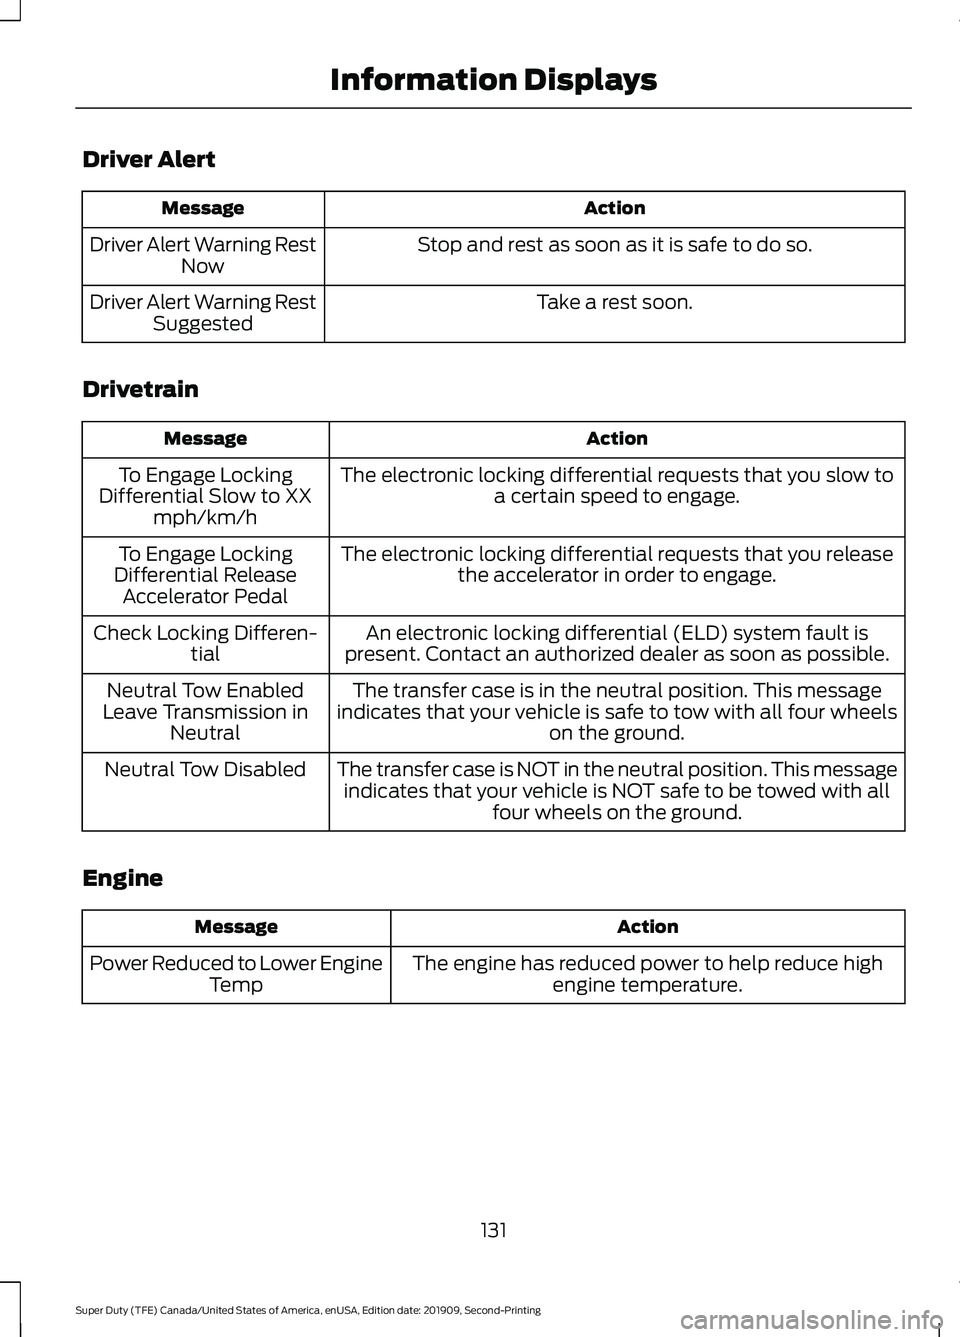
Driver Alert
Action
Message
Stop and rest as soon as it is safe to do so.
Driver Alert Warning Rest
Now
Take a rest soon.
Driver Alert Warning Rest
Suggested
Drivetrain Action
Message
The electronic locking differential requests that you slow toa certain speed to engage.
To Engage Locking
Differential Slow to XX mph/km/h
The electronic locking differential requests that you releasethe accelerator in order to engage.
To Engage Locking
Differential Release Accelerator Pedal
An electronic locking differential (ELD) system fault is
present. Contact an authorized dealer as soon as possible.
Check Locking Differen-
tial
The transfer case is in the neutral position. This message
indicates that your vehicle is safe to tow with all four wheels on the ground.
Neutral Tow Enabled
Leave Transmission in Neutral
The transfer case is NOT in the neutral position. This messageindicates that your vehicle is NOT safe to be towed with all four wheels on the ground.
Neutral Tow Disabled
Engine Action
Message
The engine has reduced power to help reduce highengine temperature.
Power Reduced to Lower Engine
Temp
131
Super Duty (TFE) Canada/United States of America, enUSA, Edition date: 201909, Second-Printing Information Displays
Page 142 of 633
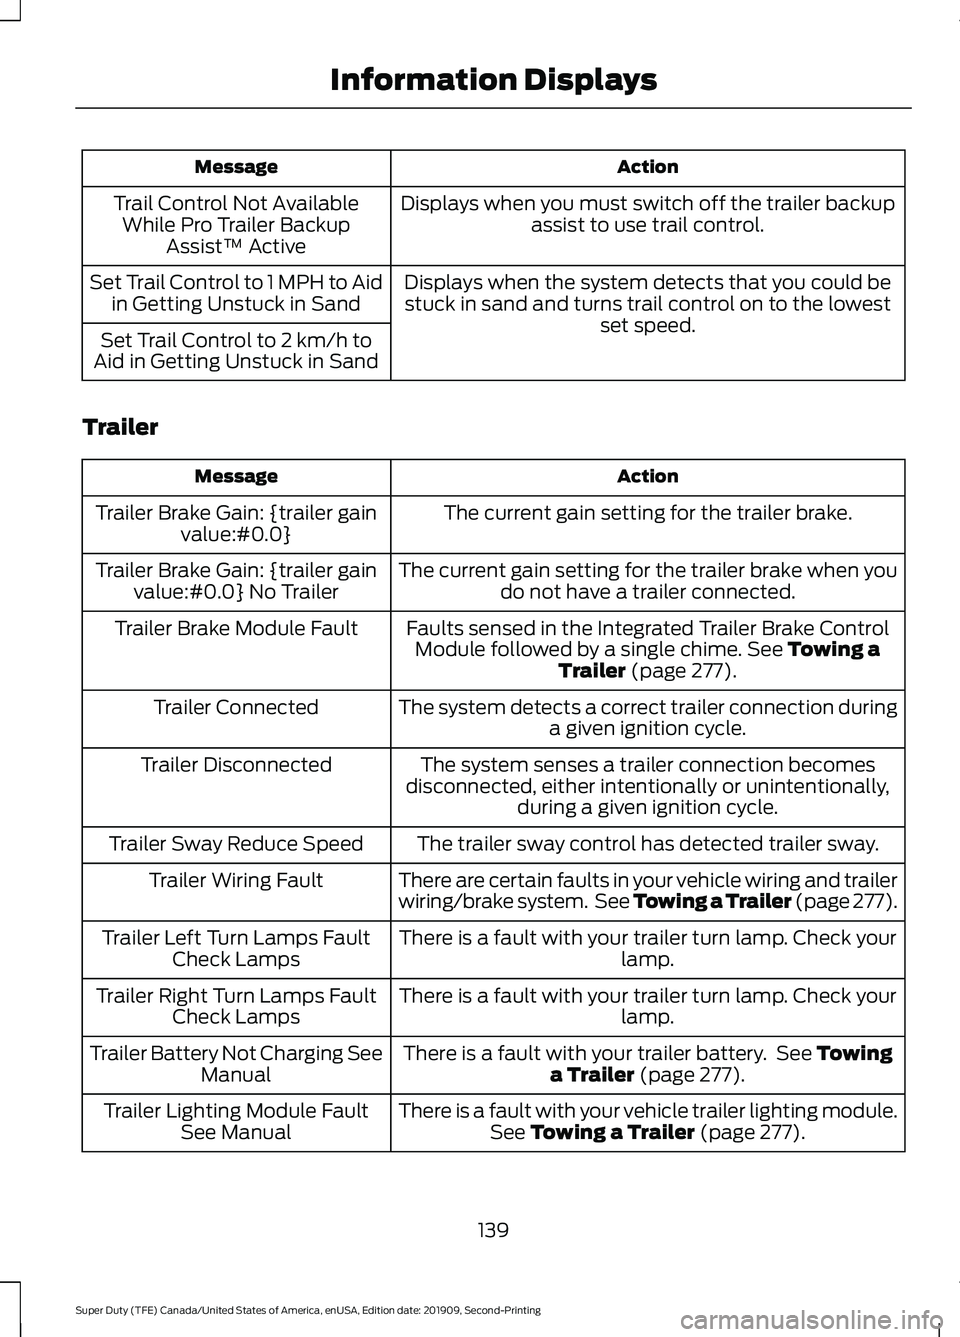
Action
Message
Displays when you must switch off the trailer backupassist to use trail control.
Trail Control Not Available
While Pro Trailer Backup Assist™ Active
Displays when the system detects that you could bestuck in sand and turns trail control on to the lowest set speed.
Set Trail Control to 1 MPH to Aid
in Getting Unstuck in Sand
Set Trail Control to 2 km/h to
Aid in Getting Unstuck in Sand
Trailer Action
Message
The current gain setting for the trailer brake.
Trailer Brake Gain: {trailer gain
value:#0.0}
The current gain setting for the trailer brake when youdo not have a trailer connected.
Trailer Brake Gain: {trailer gain
value:#0.0} No Trailer
Faults sensed in the Integrated Trailer Brake ControlModule followed by a single chime. See Towing a
Trailer (page 277).
Trailer Brake Module Fault
The system detects a correct trailer connection duringa given ignition cycle.
Trailer Connected
The system senses a trailer connection becomes
disconnected, either intentionally or unintentionally, during a given ignition cycle.
Trailer Disconnected
The trailer sway control has detected trailer sway.
Trailer Sway Reduce Speed
There are certain faults in your vehicle wiring and trailer
wiring/brake system. See
Towing a Trailer (page 277).
Trailer Wiring Fault
There is a fault with your trailer turn lamp. Check yourlamp.
Trailer Left Turn Lamps Fault
Check Lamps
There is a fault with your trailer turn lamp. Check yourlamp.
Trailer Right Turn Lamps Fault
Check Lamps
There is a fault with your trailer battery. See
Towing
a Trailer (page 277).
Trailer Battery Not Charging See
Manual
There is a fault with your vehicle trailer lighting module.See
Towing a Trailer (page 277).
Trailer Lighting Module Fault
See Manual
139
Super Duty (TFE) Canada/United States of America, enUSA, Edition date: 201909, Second-Printing Information Displays
Page 150 of 633
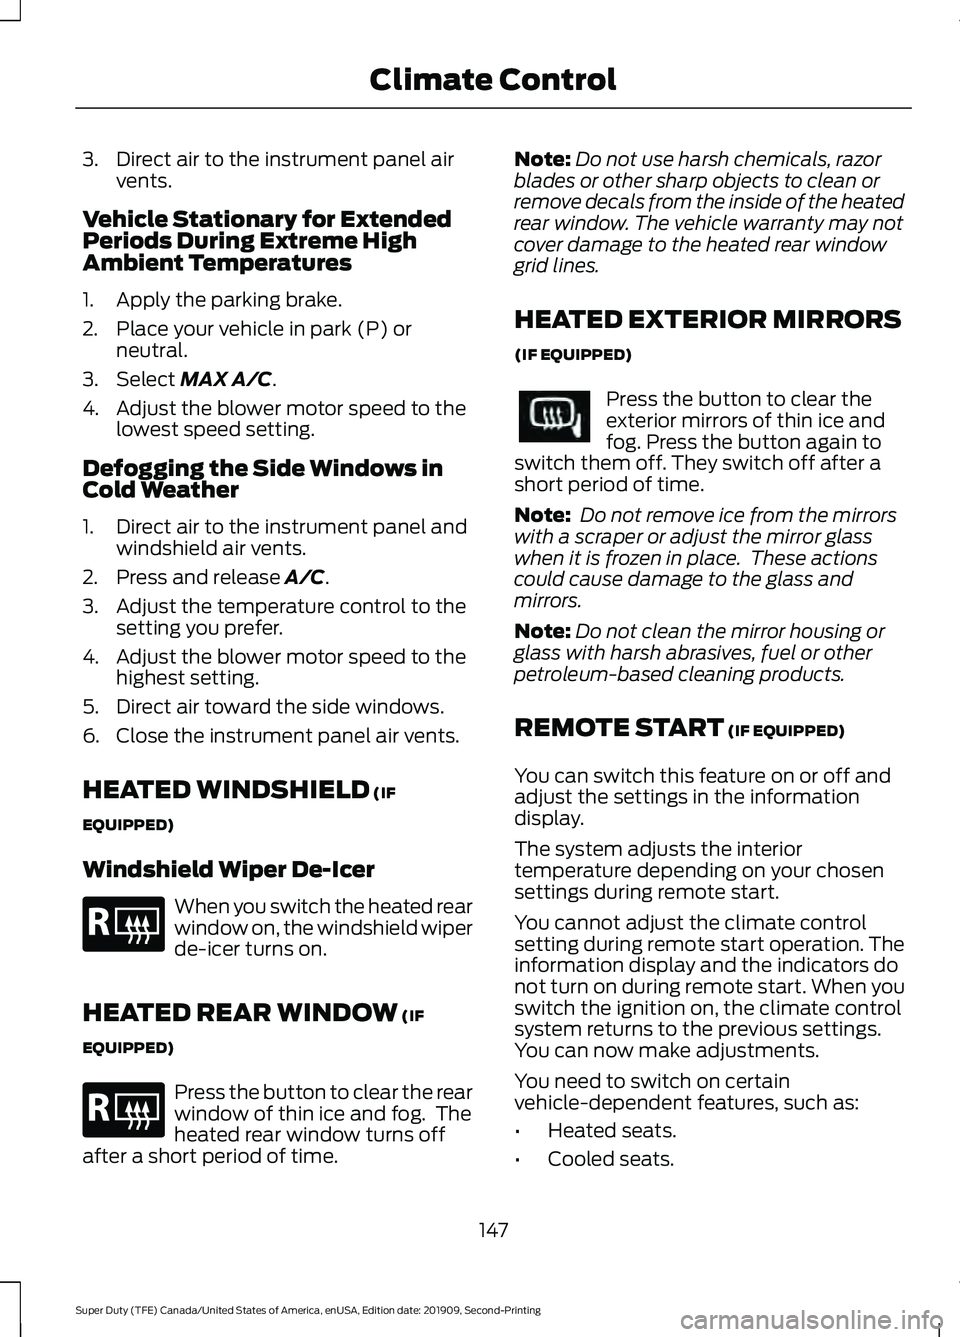
3. Direct air to the instrument panel air
vents.
Vehicle Stationary for Extended
Periods During Extreme High
Ambient Temperatures
1. Apply the parking brake.
2. Place your vehicle in park (P) or neutral.
3. Select MAX A/C.
4. Adjust the blower motor speed to the lowest speed setting.
Defogging the Side Windows in
Cold Weather
1. Direct air to the instrument panel and windshield air vents.
2. Press and release
A/C.
3. Adjust the temperature control to the setting you prefer.
4. Adjust the blower motor speed to the highest setting.
5. Direct air toward the side windows.
6. Close the instrument panel air vents.
HEATED WINDSHIELD
(IF
EQUIPPED)
Windshield Wiper De-Icer When you switch the heated rear
window on, the windshield wiper
de-icer turns on.
HEATED REAR WINDOW
(IF
EQUIPPED) Press the button to clear the rear
window of thin ice and fog. The
heated rear window turns off
after a short period of time. Note:
Do not use harsh chemicals, razor
blades or other sharp objects to clean or
remove decals from the inside of the heated
rear window. The vehicle warranty may not
cover damage to the heated rear window
grid lines.
HEATED EXTERIOR MIRRORS
(IF EQUIPPED) Press the button to clear the
exterior mirrors of thin ice and
fog. Press the button again to
switch them off. They switch off after a
short period of time.
Note: Do not remove ice from the mirrors
with a scraper or adjust the mirror glass
when it is frozen in place. These actions
could cause damage to the glass and
mirrors.
Note: Do not clean the mirror housing or
glass with harsh abrasives, fuel or other
petroleum-based cleaning products.
REMOTE START
(IF EQUIPPED)
You can switch this feature on or off and
adjust the settings in the information
display.
The system adjusts the interior
temperature depending on your chosen
settings during remote start.
You cannot adjust the climate control
setting during remote start operation. The
information display and the indicators do
not turn on during remote start. When you
switch the ignition on, the climate control
system returns to the previous settings.
You can now make adjustments.
You need to switch on certain
vehicle-dependent features, such as:
• Heated seats.
• Cooled seats.
147
Super Duty (TFE) Canada/United States of America, enUSA, Edition date: 201909, Second-Printing Climate ControlE184884 E184884
Page 155 of 633
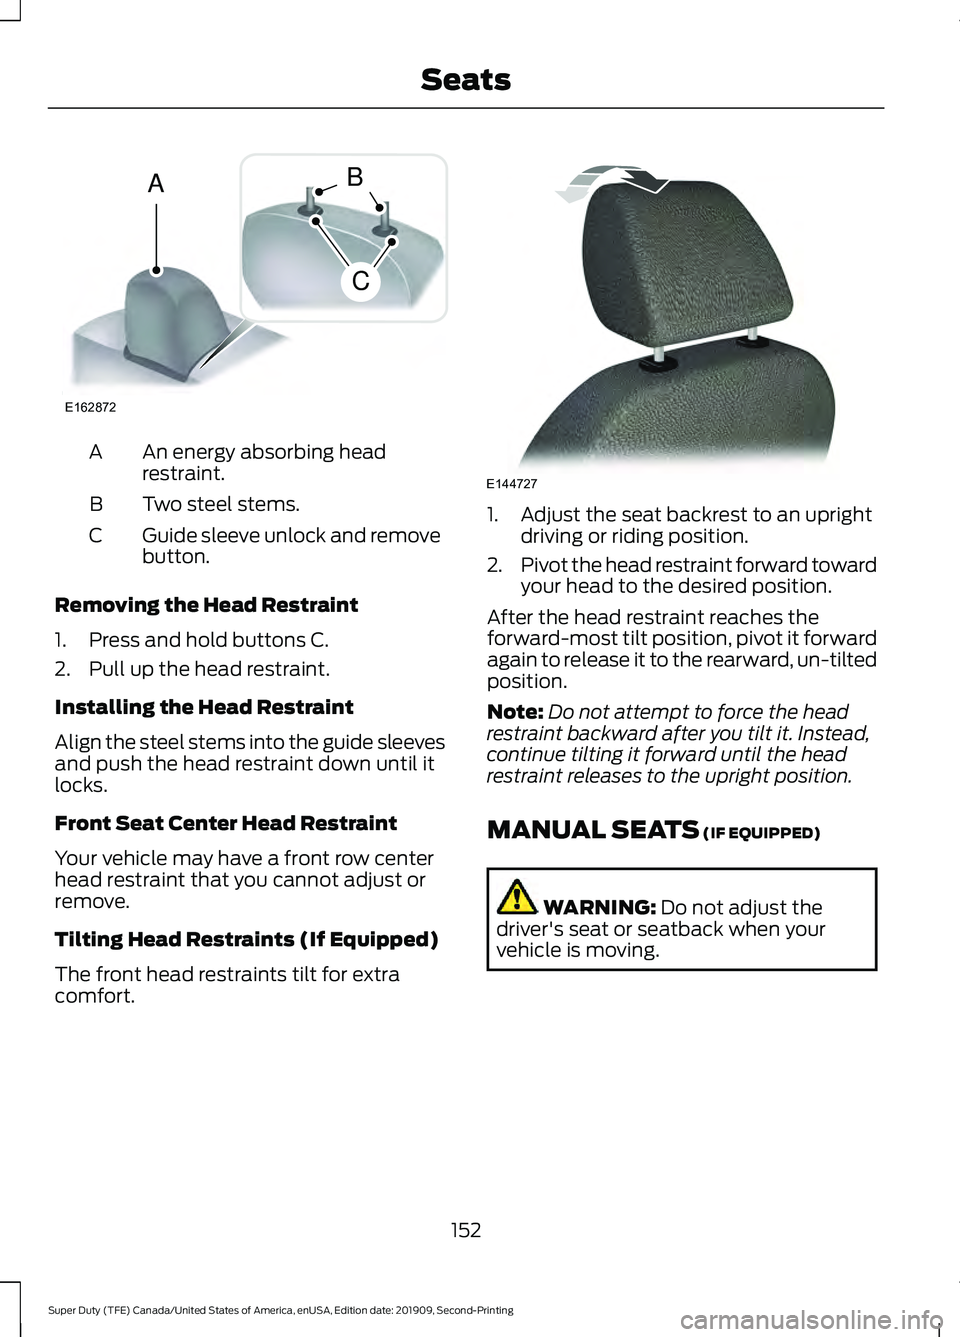
An energy absorbing head
restraint.
A
Two steel stems.
B
Guide sleeve unlock and remove
button.
C
Removing the Head Restraint
1. Press and hold buttons C.
2. Pull up the head restraint.
Installing the Head Restraint
Align the steel stems into the guide sleeves
and push the head restraint down until it
locks.
Front Seat Center Head Restraint
Your vehicle may have a front row center
head restraint that you cannot adjust or
remove.
Tilting Head Restraints (If Equipped)
The front head restraints tilt for extra
comfort. 1. Adjust the seat backrest to an upright
driving or riding position.
2. Pivot the head restraint forward toward
your head to the desired position.
After the head restraint reaches the
forward-most tilt position, pivot it forward
again to release it to the rearward, un-tilted
position.
Note: Do not attempt to force the head
restraint backward after you tilt it. Instead,
continue tilting it forward until the head
restraint releases to the upright position.
MANUAL SEATS (IF EQUIPPED) WARNING:
Do not adjust the
driver's seat or seatback when your
vehicle is moving.
152
Super Duty (TFE) Canada/United States of America, enUSA, Edition date: 201909, Second-Printing SeatsE162872
A
C
B E144727
Page 174 of 633
CENTER CONSOLE (IF EQUIPPED)
Stow items in the cup holder carefully as
items may become loose during hard
braking, acceleration or crashes, including
hot drinks which may spill.
Available console features include: Storage compartment.
A
Front storage compartment with
USB ports.
B
Sliding cup holder.
C
Center storage compartment
with auxiliary power point.
D
Rear cup holders.
E
AC power point.
F
Heated rear seats.
G
Auxiliary power point.
H
USB charging ports.
I OVERHEAD CONSOLE (IF
EQUIPPED) Press near the rear edge of the door to
open it.
UNDER SEAT STORAGE
(IF
EQUIPPED)
Front Under Seat Storage
Compartment - Vehicles Without
Locking Storage Lift the latch to open the lid and access to
the storage compartment under the center
seat cushion.
171
Super Duty (TFE) Canada/United States of America, enUSA, Edition date: 201909, Second-Printing Storage CompartmentsE250516 E224959 E306120
Page 176 of 633
2.
Lift the front and side panels to expand
and lock them in place. 3. Lock the panels in an open position. 4. To collapse, release the lever, push
down to the stowed position and fold
in the side and front panels.
Note: Make sure the storage divider is not
locked into place when collapsing. Push the
button to release the divider door and swing
it to the stowed position on the front wall.
173
Super Duty (TFE) Canada/United States of America, enUSA, Edition date: 201909, Second-Printing Storage CompartmentsE235008 E235009