2020 FORD F250 SUPER DUTY torque
[x] Cancel search: torquePage 387 of 633

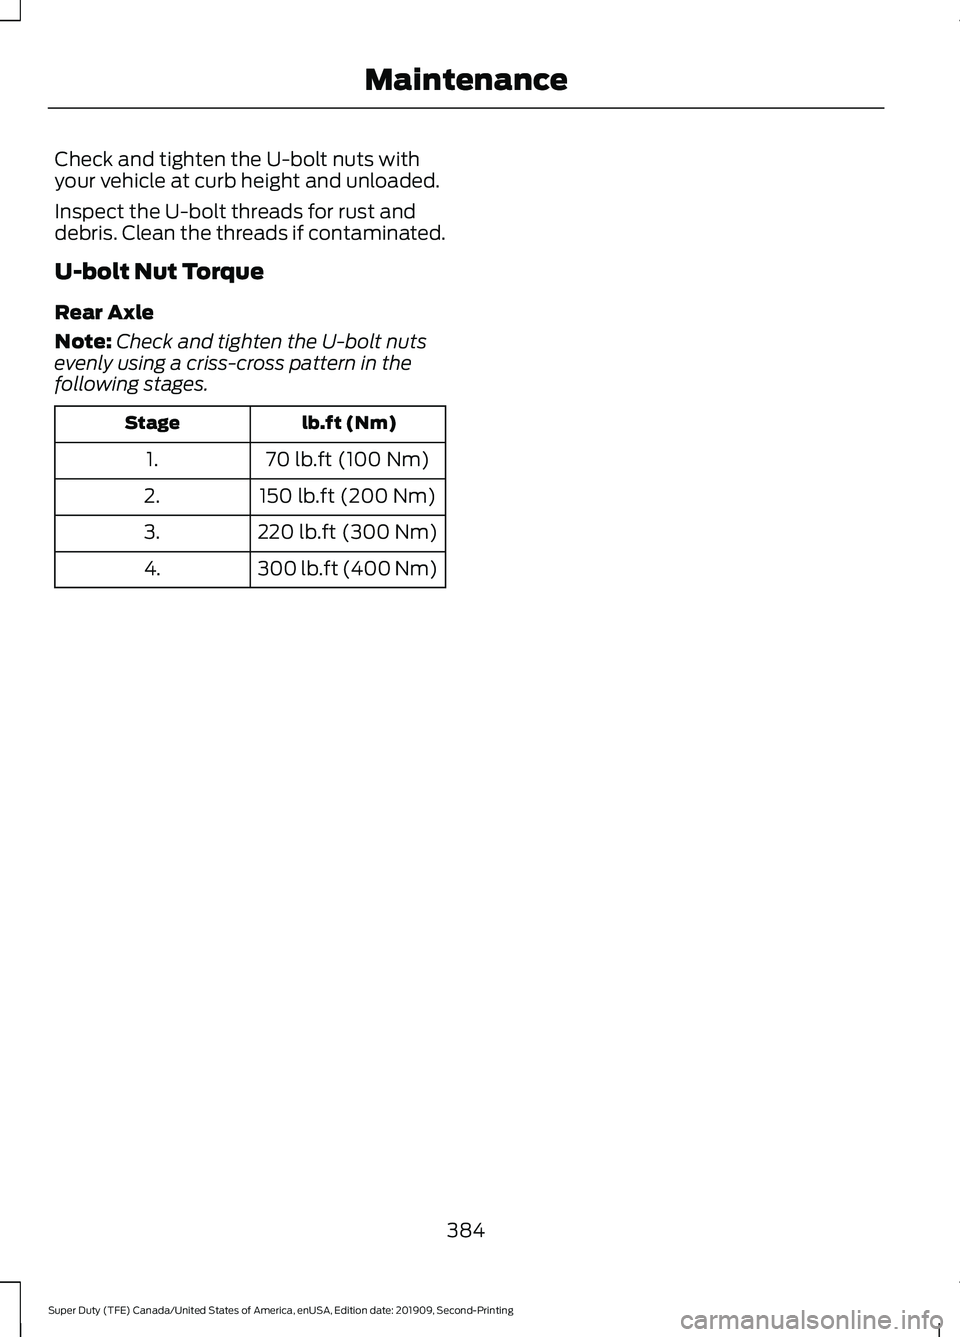
Check and tighten the U-bolt nuts with
your vehicle at curb height and unloaded.
Inspect the U-bolt threads for rust and
debris. Clean the threads if contaminated.
U-bolt Nut Torque
Rear Axle
Note:
Check and tighten the U-bolt nuts
evenly using a criss-cross pattern in the
following stages. lb.ft (Nm)
Stage
70 lb.ft (100 Nm)
1.
150 lb.ft (200 Nm)
2.
220 lb.ft (300 Nm)
3.
300 lb.ft (400 Nm)
4.
384
Super Duty (TFE) Canada/United States of America, enUSA, Edition date: 201909, Second-Printing Maintenance
Page 432 of 633

Remove the lug nuts with the lug wrench,
replace the flat tire with the spare, making
sure the valve stem of the spare is facing
outward when replacing a front wheel. For
the rear wheel position on vehicles with
single rear wheel fitments, install the spare
with the valve stem facing outward. For
vehicles with dual rear wheels, the valve
stem of the spare must face outward when
replacing an inner wheel, but must face
inward when replacing an outboard wheel.
Reinstall the lug nuts until the wheel is
snug against the hub. Do not fully tighten
the lug nuts until the wheel has been
lowered.
Lower the vehicle completely by turning
the jack handle counterclockwise until the
vehicle is completely lowered.
Note:
For F-350 Dual Rear Wheel, F-450
and F-550 Vehicles, insert the notched end
of the jack handle to the release valve, open
the release valve slightly by turning the
handle counterclockwise. Stop turning the
release valve when vehicle start to lower.
Make sure to close the valve when you
completely lower your vehicle.
F-350 Dual Rear Wheel, F-450 and
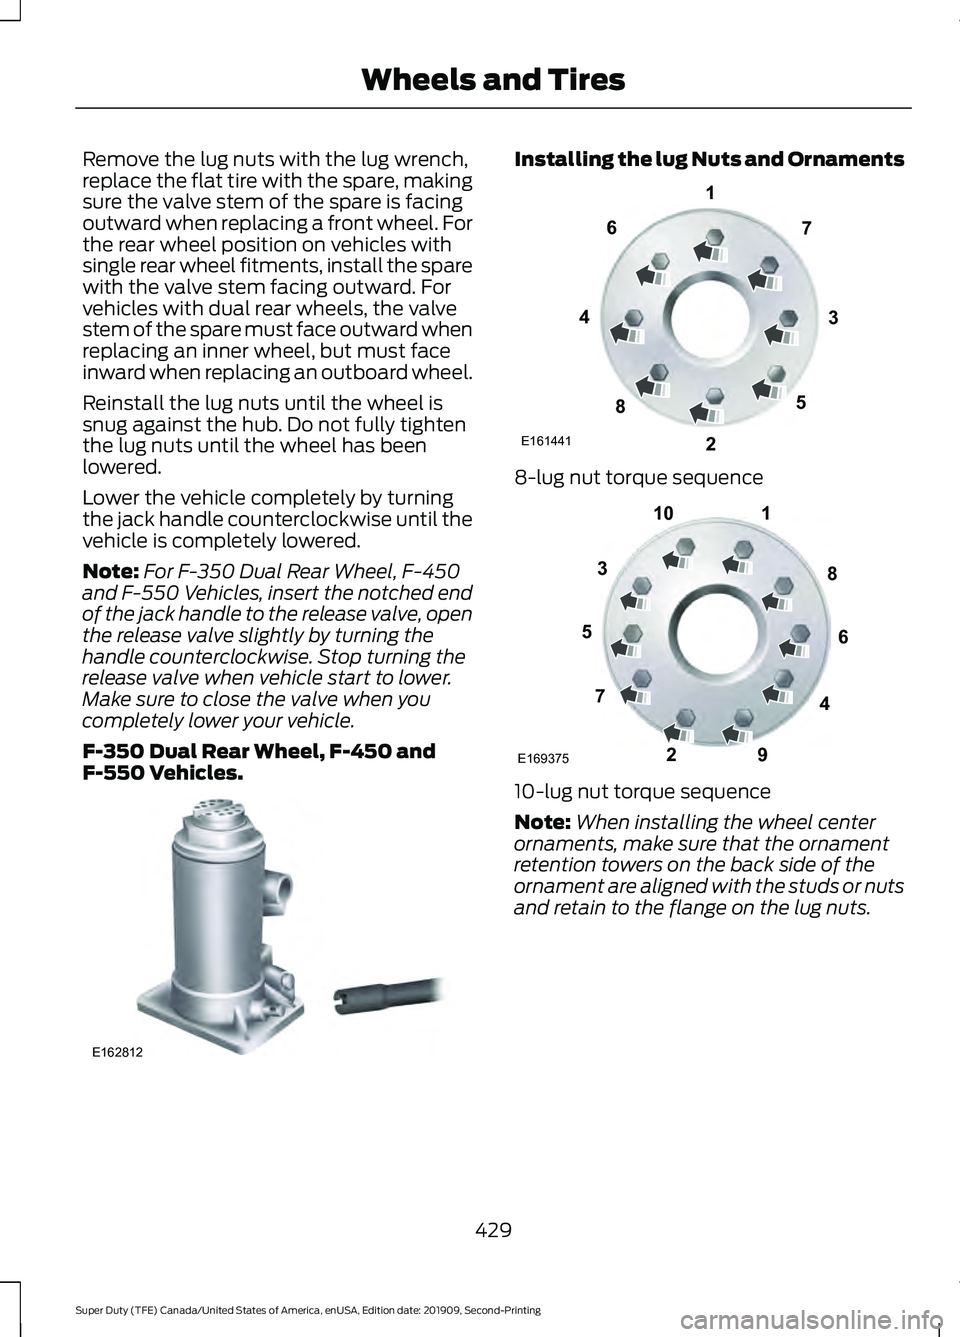
F-550 Vehicles. Installing the lug Nuts and Ornaments
8-lug nut torque sequence
10-lug nut torque sequence
Note:
When installing the wheel center
ornaments, make sure that the ornament
retention towers on the back side of the
ornament are aligned with the studs or nuts
and retain to the flange on the lug nuts.
429
Super Duty (TFE) Canada/United States of America, enUSA, Edition date: 201909, Second-Printing Wheels and TiresE162812 E161441
13
4
27
6
5
8 1
2
3
4
5
6
7 8
9
10
E169375
Page 434 of 633

2. Slide the wheel partially under the
vehicle and install the retainer through
the wheel center. If equipped, you may
have to remove the wheel center cap
prior to pushing the retainer through
the center of the wheel. To remove the
center cap, press it off with the lug
wrench tip from the inner side of the
wheel. Pull on the cable to align the
components at the end of the cable. 3.
Turn the lug wrench clockwise until the
tire is raised to its stowed position
underneath the vehicle. The wrench
will become harder to turn and the
spare tire winch will ratchet or slip
when the tire is raised to maximum
tightness. You will hear a clicking sound
from the winch indicating that the tire
is properly stowed. Check that the tire
lies flat against the frame and is
properly tightened.
4. Carefully place all tools back in the tool
kit bag.
5. Reinstall the tool kit bag and tighten the wing nut.
6. Properly reinstall the jack into the bracket and tighten the wing nut.
TECHNICAL SPECIFICATIONS
Wheel Lug Nut Torque Specifications WARNING: When you install a wheel, always remove any corrosion, dirt or foreign
materials present on the mounting surfaces of the wheel or the surface of the wheel
hub, brake drum or brake disc that contacts the wheel. Make sure to secure any fasteners
that attach the rotor to the hub so they do not interfere with the mounting surfaces of
the wheel. Installing wheels without correct metal-to-metal contact at the wheel
mounting surfaces can cause the wheel nuts to loosen and the wheel to come off while
your vehicle is in motion, resulting in loss of vehicle control, personal injury or death. lb.ft (Nm)
Bolt size
150 lb.ft (204 Nm)
M14 x 1.5
* Torque specifications are for nut and bolt threads free of dirt and rust. Use only Ford
recommended replacement fasteners.
On vehicles equipped with single rear wheels, retighten the lug nuts to the specified torque
at 100 miles (160 kilometers) after any wheel disturbance (such as tire rotation, changing
a flat tire, wheel removal).
On vehicles equipped with dual rear wheels, retighten the wheel lug nuts to the specified
torque at 100 miles (160 kilometers), and again at 500 miles (800 kilometers) of new
vehicle operation and after any wheel disturbance (such as tire rotation, changing a flat
tire, wheel removal).
It is important to follow the proper wheel mounting and lug nut torque procedures.
431
Super Duty (TFE) Canada/United States of America, enUSA, Edition date: 201909, Second-Printing Wheels and Tires
Page 630 of 633

Snow Plowing................................................316
Engine temperature while plowing..............318
Installing the Snowplow.................................. 316
Operating the Vehicle with the Snowplow Attached............................................................ 317
Snowplowing with your Airbag Equipped Vehicle................................................................ 317
Transmission operation while plowing.............................................................. 318
Spare Wheel See: Changing a Road Wheel........................ 422
Special Notices.................................................17 New Vehicle Limited Warranty......................... 17
Notice to Owners of Pickup Trucks and Utility Type Vehicles......................................... 17
On Board Diagnostics Data Link Connector............................................................ 17
Special Instructions.............................................. 17
Using Your Vehicle as an Ambulance............18
Using Your Vehicle With a Snowplow...........18
Special Operating Conditions Scheduled Maintenance..............................................566
Diesel Engine...................................................... 569
Exceptions............................................................ 574
Gasoline Engine................................................. 566
Speed Control See: Cruise Control............................................. 241
Spot Lamps
......................................................92
Spring U-Bolt Check - F-600.................383 U-bolt Nut Torque............................................. 384
Stability Control
............................................227
Principle of Operation....................................... 227
Starter Switch See: Ignition Switch............................................ 174
Starting a Diesel Engine - 6.7L Diesel...............................................................177
Automatic Engine Shutdown......................... 179
Cold Weather Operation.................................. 179
Cold Weather Starting...................................... 179
Diesel Engine Fast Start Glow Plug System............................................................... 178
Vehicles with an Ignition Key.......................... 178
Vehicles with Keyless Start............................. 178
Starting a Gasoline Engine - 6.2L/ 7.3L...................................................................175
Automatic Engine Shutdown......................... 176
Cold Weather Starting (Flexible Fuel Vehicles Only).................................................. 177Failure to Start.....................................................
176
Guarding Against Exhaust Fumes.................177
Important Ventilating Information................177
Stopping the Engine When Your Vehicle is Moving................................................................ 176
Stopping the Engine When Your Vehicle is Stationary......................................................... 176
Vehicles with an Ignition Key.......................... 175
Vehicles with Keyless Start............................. 176
Starting and Stopping the Engine..........174 General Information........................................... 174
Steering............................................................261 Adaptive Learning............................................. 262
Adaptive Steering.............................................. 262
Electronic Torque Overlay Steering.............261
Hydraulic Power Steering................................ 261
Steering Wheel...............................................82
Storage Compartments
..............................171
Sunroof See: Moonroof..................................................... 102
Sun Visors
........................................................102
Illuminated Vanity Mirror................................. 102
Supplementary Restraints System.........45 Principle of Operation........................................ 45
Switching Automatic High Beam Control On and Off
.....................................................95
Activating the Automatic High Beam
Control................................................................ 95
Switching Cruise Control On and Off....................................................................241
Switching Cruise Control Off.......................... 241
Switching Cruise Control On.......................... 241
Switching Off the Engine - 6.7L Diesel..............................................................182
Switching Rear Occupant Alert System On and Off - Vehicles With: SYNC
3
........................................................................\
161
Switching Rear Occupant Alert System On and Off - Vehicles With: SYNC.......161
Switching Trail Control On and Off..................................................................230
Symbols Glossary
...........................................10
SYNC™ 3........................................................505
General Information......................................... 505
SYNC™ 3 Troubleshooting......................537 Additional Information and
Assistance....................................................... 549
Apps....................................................................... 544
627
Super Duty (TFE) Canada/United States of America, enUSA, Edition date: 201909, Second-Printing Index