2020 FORD F250 SUPER DUTY check oil
[x] Cancel search: check oilPage 198 of 633
•
Incorrect fuel for climatic conditions.
• Incorrect engine oil viscosity for
climactic conditions.
Note: Some vehicles have a lifetime fuel
filter that is integrated with the fuel tank.
Regular maintenance or replacement is not
needed.
Note: If these checks do not help you
correct the concern, have your vehicle
checked as soon as possible.
Noise Emissions Warranty,
Prohibited Tampering Acts and
Maintenance
On January 1, 1978, Federal regulation
became effective governing the noise
emission on trucks over 10,000 lb
(4,536 kg) Gross Vehicle Weight Rating
(GVWR). The preceding statements
concerning prohibited tampering acts and
maintenance, and the noise warranty
found in the Warranty Guide, are
applicable to complete chassis cabs over
10,000 lb (4,536 kg)
GVWR.
CATALYTIC CONVERTER WARNING:
Do not park, idle or
drive your vehicle on dry grass or other
dry ground cover. The emission system
heats up the engine compartment and
exhaust system, creating the risk of fire. WARNING:
The normal operating
temperature of the exhaust system is
very high. Never work around or attempt
to repair any part of the exhaust system
until it has cooled. Use special care when
working around the catalytic converter.
The catalytic converter heats up to a very
high temperature after only a short
period of engine operation and stays hot
after the engine is switched off. WARNING:
Exhaust leaks may
result in entry of harmful and potentially
lethal fumes into the passenger
compartment. If you smell exhaust
fumes inside your vehicle, have your
vehicle inspected immediately. Do not
drive if you smell exhaust fumes. WARNING: Do not allow people or
animals in truck beds that have
modifications, such as bed covers or
slide-in campers, when the engine is
running. Exhaust fumes are toxic. Failure
to follow this instruction could result in
personal injury or death.
Your vehicle has various emission control
components and a catalytic converter that
enables it to comply with applicable
exhaust emission standards.
To make sure that the catalytic converter
and other emission control components
continue to work properly:
• Do not crank the engine for more than
10 seconds at a time.
• Do not run the engine with a spark plug
lead disconnected.
• Do not push-start or tow-start your
vehicle. Use booster cables. See Jump
Starting the Vehicle
(page 322).
• Use only the specified fuel listed.
• Do not switch the ignition off when your
vehicle is moving.
• Avoid running out of fuel.
• Have the items listed in scheduled
maintenance information performed
according to the specified schedule.
Note: Your vehicle warranty does not cover
resulting component damage.
The scheduled maintenance items listed
in scheduled maintenance information are
essential to the life and performance of
your vehicle and to its emissions system.
195
Super Duty (TFE) Canada/United States of America, enUSA, Edition date: 201909, Second-Printing Engine Emission Control
Page 318 of 633
•
Inspect exhaust system for damage or
looseness.
• Inspect undercarriage fasteners. If any
are loose or damaged, tighten or
replace ensuring that the proper torque
specification is used.
• Inspect the tires for any cuts in the
tread or sidewall area. Also inspect the
sidewall for any bulge indicating
damage to the tire.
• Inspect the wheels for dents, cracks,
or other damage.
• Refit the front license plate if removed
previously.
BREAKING-IN
You need to break in new tires for
approximately 300 mi (480 km). During
this time, your vehicle may exhibit some
unusual driving characteristics.
Avoid driving too fast during the first
1,000 mi (1,600 km)
. Vary your speed
frequently and change up through the
gears early. Do not labor the engine.
Drive your new vehicle at least
1,000 mi
(1,600 km) before towing a trailer. Make
sure you use the specified engine oil. See
Capacities and Specifications
(page
441).
Do not add friction modifier compounds
or special break-in oils during the first few
thousand miles (kilometers) of operation.
These additives may prevent piston ring
seating.
DRIVING THROUGH WATER WARNING:
Do not drive through
flowing or deep water as you may lose
control of your vehicle. Note:
Engine damage can occur if water
enters the air filter.
For Vehicles without Tremor Off-
Road Package
Note: Driving through standing water can
cause vehicle damage.
Note: Drive through water in an emergency
only and not as part of normal driving.
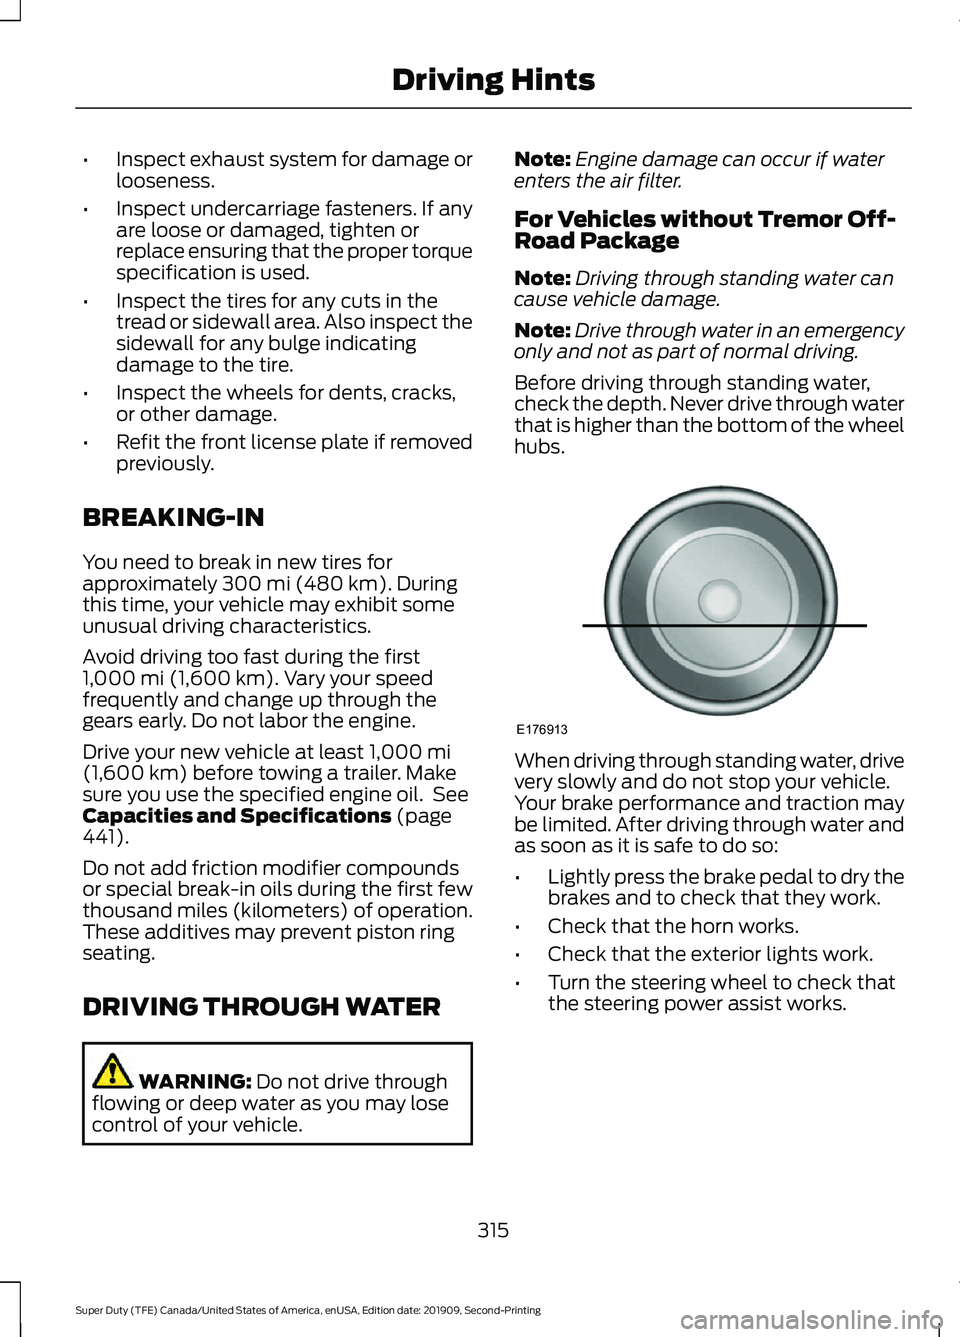
Before driving through standing water,
check the depth. Never drive through water
that is higher than the bottom of the wheel
hubs. When driving through standing water, drive
very slowly and do not stop your vehicle.
Your brake performance and traction may
be limited. After driving through water and
as soon as it is safe to do so:
•
Lightly press the brake pedal to dry the
brakes and to check that they work.
• Check that the horn works.
• Check that the exterior lights work.
• Turn the steering wheel to check that
the steering power assist works.
315
Super Duty (TFE) Canada/United States of America, enUSA, Edition date: 201909, Second-Printing Driving HintsE176913
Page 347 of 633
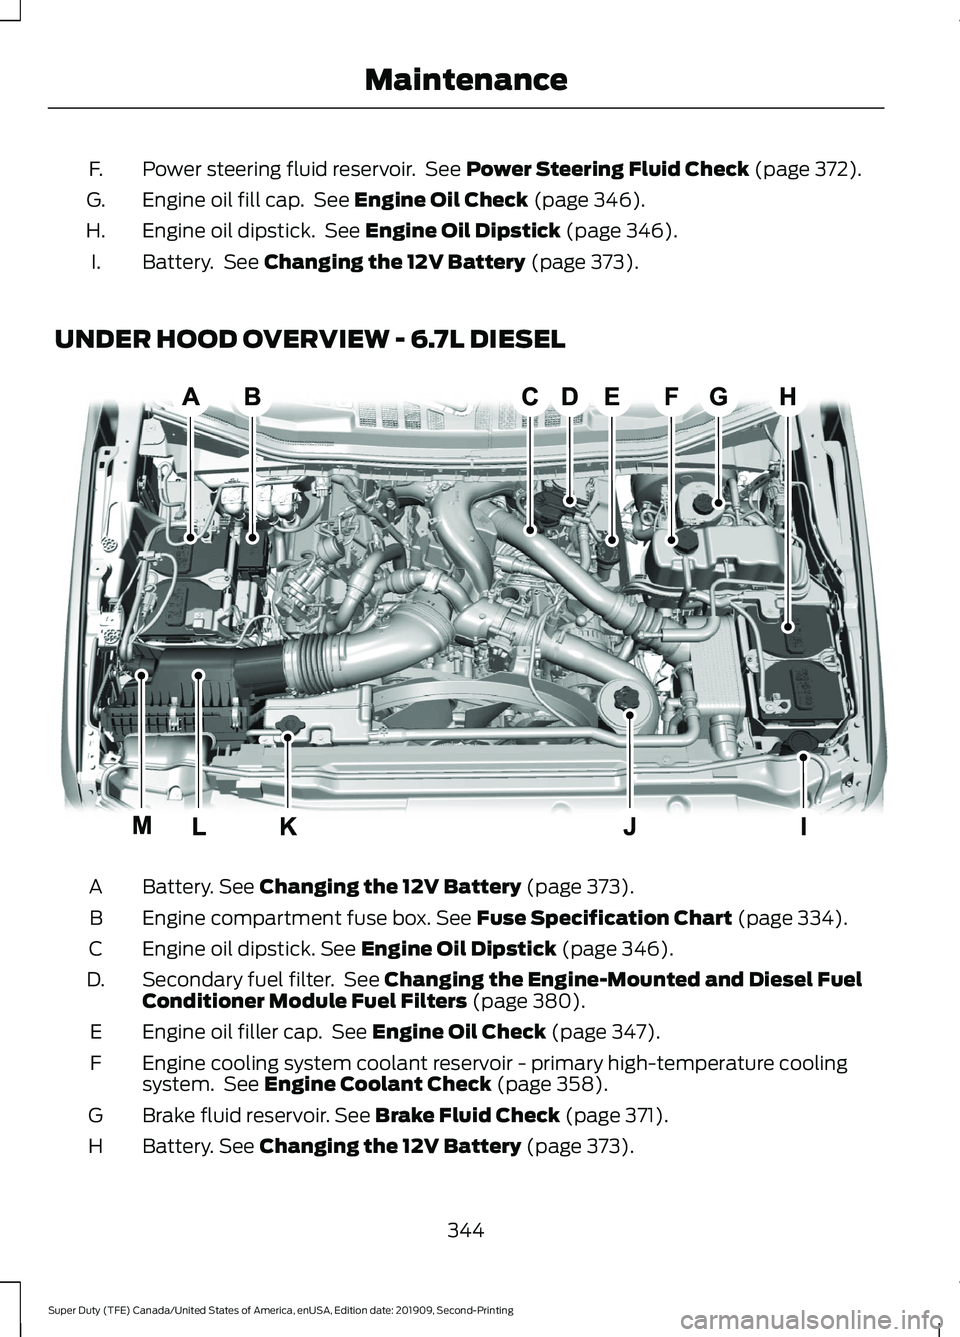
Power steering fluid reservoir. See Power Steering Fluid Check (page 372).
F.
Engine oil fill cap. See
Engine Oil Check (page 346).
G.
Engine oil dipstick. See
Engine Oil Dipstick (page 346).
H.
Battery. See
Changing the 12V Battery (page 373).
I.
UNDER HOOD OVERVIEW - 6.7L DIESEL Battery.
See Changing the 12V Battery (page 373).
A
Engine compartment fuse box.
See Fuse Specification Chart (page 334).
B
Engine oil dipstick.
See Engine Oil Dipstick (page 346).
C
Secondary fuel filter. See
Changing the Engine-Mounted and Diesel Fuel
Conditioner Module Fuel Filters (page 380).
D.
Engine oil filler cap. See
Engine Oil Check (page 347).
E
Engine cooling system coolant reservoir - primary high-temperature cooling
system. See
Engine Coolant Check (page 358).
F
Brake fluid reservoir.
See Brake Fluid Check (page 371).
G
Battery.
See Changing the 12V Battery (page 373).
H
344
Super Duty (TFE) Canada/United States of America, enUSA, Edition date: 201909, Second-Printing MaintenanceE310091
Page 348 of 633
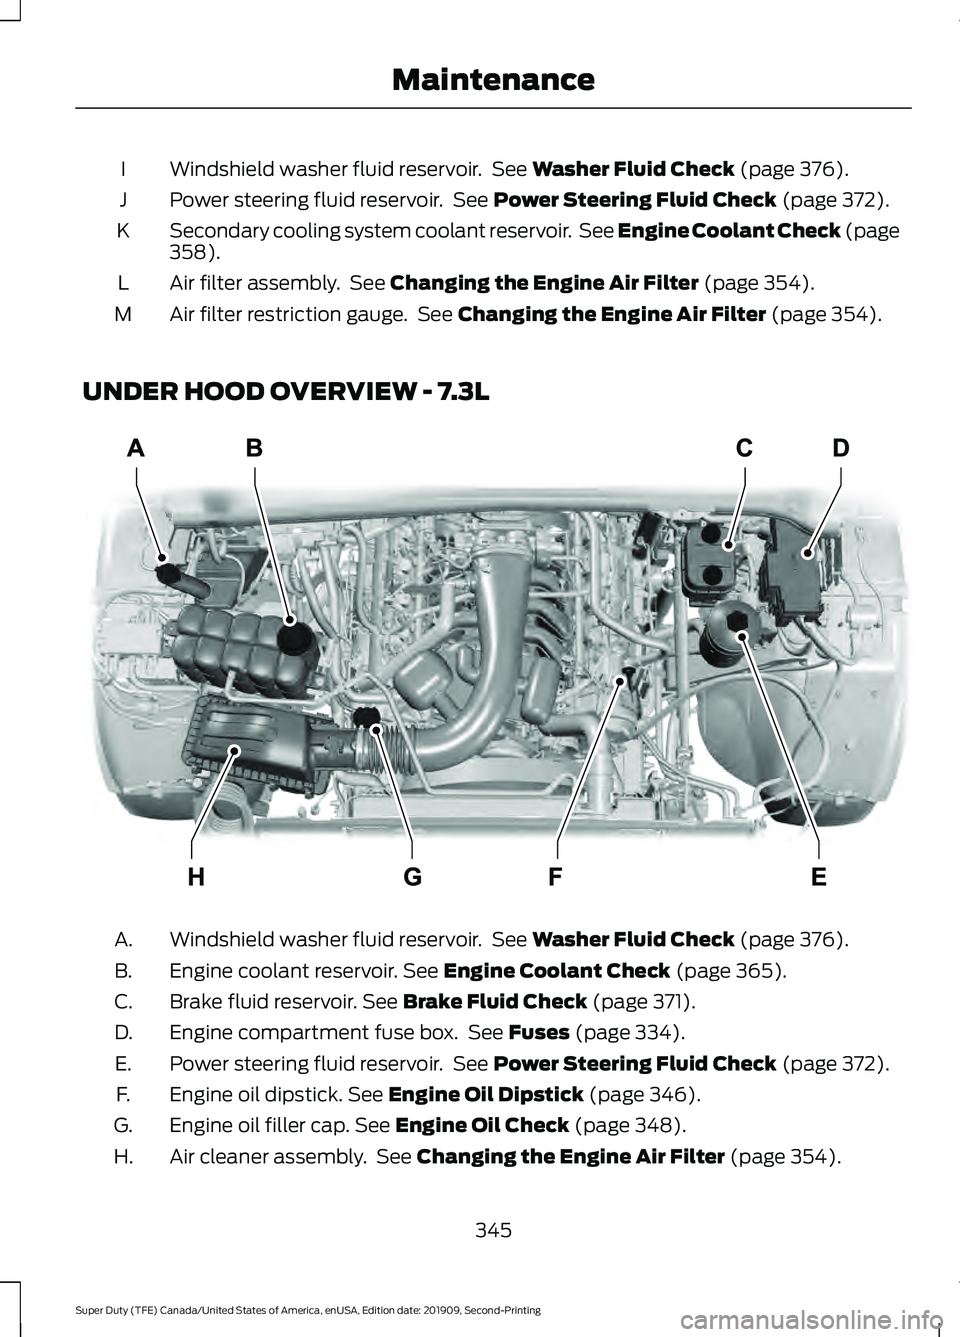
Windshield washer fluid reservoir. See Washer Fluid Check (page 376).
I
Power steering fluid reservoir. See
Power Steering Fluid Check (page 372).
J
Secondary cooling system coolant reservoir. See Engine Coolant Check
(page
358).
K
Air filter assembly. See
Changing the Engine Air Filter (page 354).
L
Air filter restriction gauge. See
Changing the Engine Air Filter (page 354).
M
UNDER HOOD OVERVIEW - 7.3L Windshield washer fluid reservoir. See
Washer Fluid Check (page 376).
A.
Engine coolant reservoir.
See Engine Coolant Check (page 365).
B.
Brake fluid reservoir.
See Brake Fluid Check (page 371).
C.
Engine compartment fuse box. See
Fuses (page 334).
D.
Power steering fluid reservoir. See
Power Steering Fluid Check (page 372).
E.
Engine oil dipstick.
See Engine Oil Dipstick (page 346).
F.
Engine oil filler cap.
See Engine Oil Check (page 348).
G.
Air cleaner assembly. See
Changing the Engine Air Filter (page 354).
H.
345
Super Duty (TFE) Canada/United States of America, enUSA, Edition date: 201909, Second-Printing MaintenanceE314803
Page 349 of 633
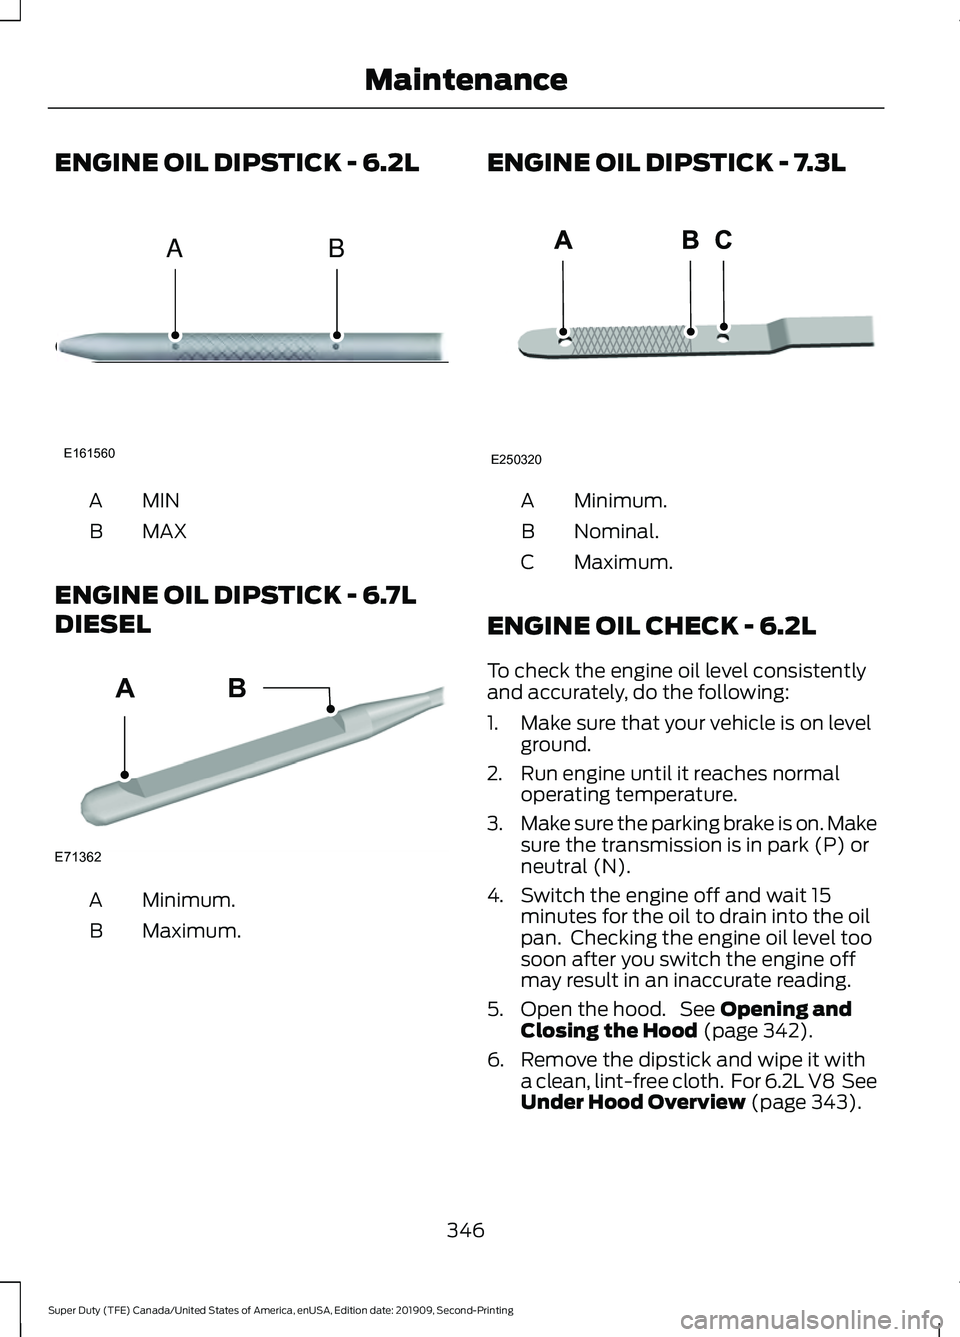
ENGINE OIL DIPSTICK - 6.2L
MINA
MAX
B
ENGINE OIL DIPSTICK - 6.7L
DIESEL Minimum.
A
Maximum.
B ENGINE OIL DIPSTICK - 7.3L Minimum.
A
Nominal.
B
Maximum.
C
ENGINE OIL CHECK - 6.2L
To check the engine oil level consistently
and accurately, do the following:
1. Make sure that your vehicle is on level ground.
2. Run engine until it reaches normal operating temperature.
3. Make sure the parking brake is on. Make
sure the transmission is in park (P) or
neutral (N).
4. Switch the engine off and wait 15 minutes for the oil to drain into the oil
pan. Checking the engine oil level too
soon after you switch the engine off
may result in an inaccurate reading.
5. Open the hood. See Opening and
Closing the Hood (page 342).
6. Remove the dipstick and wipe it with a clean, lint-free cloth. For 6.2L V8 See
Under Hood Overview
(page 343).
346
Super Duty (TFE) Canada/United States of America, enUSA, Edition date: 201909, Second-Printing MaintenanceE161560
AB E71362
AB E250320
Page 350 of 633
7. Replace the dipstick and remove it
again to check the oil level. See
Engine Oil Dipstick (page 346).
8. Make sure that the oil level is between
the maximum and minimum marks. If
the oil level is at the minimum mark,
add oil immediately. See
Capacities
and Specifications (page 433).
9. If the oil level is correct, replace the dipstick and make sure it is fully seated.
Note: Do not remove the dipstick when the
engine is running.
Note: If the oil level is between the
maximum and minimum marks, the oil level
is acceptable. Do not add oil.
Note: The oil consumption of new engines
reaches its normal level after approximately
3,000 mi (5,000 km)
.
Adding Engine Oil WARNING: Do not remove the filler
cap when the engine is running.
Do not use supplemental engine oil
additives because they are unnecessary
and could lead to engine damage that may
not be covered by the vehicle Warranty. Only use oils certified for gasoline engines
by the American Petroleum Institute (API).
An oil with this trademark symbol
conforms to the current engine and
emission system protection standards and
fuel economy requirements of the
International Lubricants Specification
Advisory Committee (ILSAC).
To top up the engine oil level do the
following:
1. Clean the area surrounding the engine
oil filler cap before you remove it.
2. Remove the engine oil filler cap. For 6.2L V8
See Under Hood Overview
(page 343).
3. Only add engine oil that meets our specifications. See
Capacities and
Specifications (page 433).
4. Recheck the oil level.
5. If the oil level is correct, replace the dipstick and make sure it is fully seated.
6. Replace the engine oil filler cap. Turn it clockwise until you feel a strong
resistance.
Note: Do not add oil further than the
maximum mark. Oil levels above the
maximum mark may cause engine damage.
Note: Make sure you install the oil filler cap
correctly.
Note: Soak up any spillage with an
absorbent cloth immediately.
ENGINE OIL CHECK - 6.7L
DIESEL
To check the engine oil level consistently
and accurately, do the following:
1. Make sure the parking brake is on. Make
sure the transmission is in park (P) or
neutral (N).
2. Run engine until it reaches normal operating temperature.
347
Super Duty (TFE) Canada/United States of America, enUSA, Edition date: 201909, Second-Printing MaintenanceE142732
Page 351 of 633

3. Make sure that your vehicle is on level
ground.
4. Switch the engine off and wait 15 minutes for the oil to drain into the oil
pan. Checking the engine oil level too
soon after you switch the engine off
may result in an inaccurate reading.
5. Open the hood. See Opening and
Closing the Hood (page 342).
6. Remove the dipstick and wipe it with a clean, lint-free cloth. See
Under
Hood Overview (page 344).
7. Replace the dipstick and remove it again to check the oil level. See
Engine Oil Dipstick
(page 346).
8. Make sure that the oil level is between
the maximum and minimum marks. If
the oil level is at the minimum mark,
add oil immediately. See
Capacities
and Specifications (page 450).
9. If the oil level is correct, replace the dipstick and make sure it is fully seated.
Note: Do not remove the dipstick when the
engine is running.
Note: If the oil level is between the
maximum and minimum marks, the oil level
is acceptable. Do not add oil.
Note: The oil consumption of new engines
reaches its normal level after approximately
3,000 mi (5,000 km)
.
Adding Engine Oil WARNING: Do not remove the filler
cap when the engine is running.
Do not use supplemental engine oil
additives because they are unnecessary
and could lead to engine damage that may
not be covered by the vehicle Warranty.
To top up the engine oil level do the
following: 1. Clean the area surrounding the engine
oil filler cap before you remove it.
2. Remove the engine oil filler cap. See Under Hood Overview
(page 344).
Turn it counterclockwise and remove
it.
3. Add engine oil of the proper viscosity and grade that meets Ford
specifications. See
Capacities and
Specifications (page 450). You may
have to use a funnel to pour the engine
oil into the opening.
4. Recheck the oil level.
5. If the oil level is correct, replace the dipstick and make sure it is fully seated.
6. Replace the engine oil filler cap. Turn it clockwise until you feel a strong
resistance.
Note: Do not add oil further than the
maximum mark. Oil levels above the
maximum mark may cause engine damage.
Note: Make sure you install the oil filler cap
correctly.
Note: Soak up any spillage with an
absorbent cloth immediately.
Engine lubrication for severe
service operation
The following conditions define severe
operation for which engine operation with
SAE 5W-40 oil which meets Ford
specification, WSS-M2C171-F1, is
recommended. Oil and oil filter change
intervals will be determined by the
Intelligent Oil Life Monitor™ as noted
previously.
ENGINE OIL CHECK - 7.3L
To check the engine oil level consistently
and accurately, do the following:
348
Super Duty (TFE) Canada/United States of America, enUSA, Edition date: 201909, Second-Printing Maintenance
Page 352 of 633
1.
Make sure the parking brake is on. Make
sure the transmission is in park (P) or
neutral (N).
2. Run the engine until it reaches normal operating temperature.
3. Make sure that your vehicle is on level ground.
4. Switch the engine off and wait 15 minutes for the oil to drain into the oil
pan. Checking the engine oil level too
soon after you switch the engine off
may result in an inaccurate reading.
5. Open the hood. See Maintenance
(page 342).
6. Remove the dipstick and wipe it with a clean, lint-free cloth. See
Maintenance
(page 342).
7. Replace the dipstick and remove it again to check the oil level. See
Maintenance
(page 342).
8. Make sure that the oil level is between
the maximum and minimum marks. If
the oil level is at the minimum mark,
add oil immediately. See
Capacities
and Specifications (page 433).
9. If the oil level is correct, replace the dipstick and make sure it is fully seated.
Note: Do not remove the dipstick when the
engine is running.
Note: If the oil level is between the
maximum and minimum marks, the oil level
is acceptable. Do not add oil.
Note: The oil consumption of new engines
reaches its normal level after approximately
3,000 mi (5,000 km)
.
Adding Engine Oil WARNING: Do not remove the filler
cap when the engine is running. Do not use supplemental engine oil
additives because they are unnecessary
and could lead to engine damage that may
not be covered by the vehicle Warranty.
Only use oils certified for gasoline engines
by the American Petroleum Institute (API).
An oil with this trademark symbol
conforms to the current engine and
emission system protection standards and
fuel economy requirements of the
International Lubricants Specification
Advisory Committee (ILSAC).
To top up the engine oil level do the
following:
1. Clean the area surrounding the engine
oil filler cap before you remove it.
2. Remove the engine oil filler cap.
3. Add engine oil that meets the correct specification.
4. Recheck the oil level.
5. If the oil level is correct, replace the dipstick and make sure it is fully seated.
6. Replace the engine oil filler cap. Turn it clockwise until you feel a strong
resistance.
Note: Do not add oil further than the
maximum mark. Oil levels above the
maximum mark may cause engine damage.
Note: Make sure you install the oil filler cap
correctly.
349
Super Duty (TFE) Canada/United States of America, enUSA, Edition date: 201909, Second-Printing MaintenanceE142732