2020 FORD F250 SUPER DUTY change wheel
[x] Cancel search: change wheelPage 15 of 633
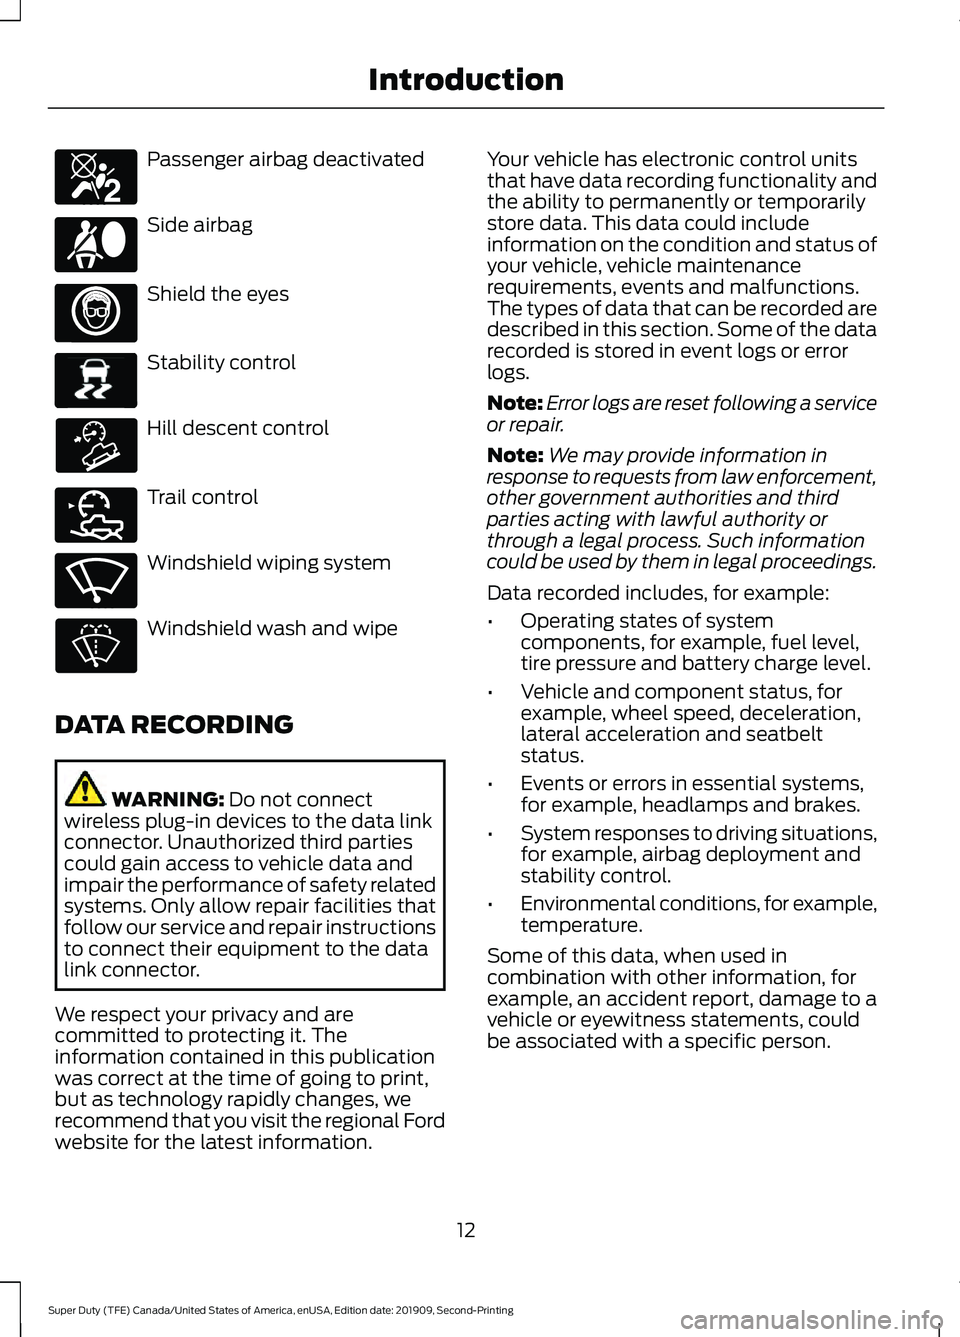
Passenger airbag deactivated
Side airbag
Shield the eyes
Stability control
Hill descent control
Trail control
Windshield wiping system
Windshield wash and wipe
DATA RECORDING WARNING: Do not connect
wireless plug-in devices to the data link
connector. Unauthorized third parties
could gain access to vehicle data and
impair the performance of safety related
systems. Only allow repair facilities that
follow our service and repair instructions
to connect their equipment to the data
link connector.
We respect your privacy and are
committed to protecting it. The
information contained in this publication
was correct at the time of going to print,
but as technology rapidly changes, we
recommend that you visit the regional Ford
website for the latest information. Your vehicle has electronic control units
that have data recording functionality and
the ability to permanently or temporarily
store data. This data could include
information on the condition and status of
your vehicle, vehicle maintenance
requirements, events and malfunctions.
The types of data that can be recorded are
described in this section. Some of the data
recorded is stored in event logs or error
logs.
Note:
Error logs are reset following a service
or repair.
Note: We may provide information in
response to requests from law enforcement,
other government authorities and third
parties acting with lawful authority or
through a legal process. Such information
could be used by them in legal proceedings.
Data recorded includes, for example:
• Operating states of system
components, for example, fuel level,
tire pressure and battery charge level.
• Vehicle and component status, for
example, wheel speed, deceleration,
lateral acceleration and seatbelt
status.
• Events or errors in essential systems,
for example, headlamps and brakes.
• System responses to driving situations,
for example, airbag deployment and
stability control.
• Environmental conditions, for example,
temperature.
Some of this data, when used in
combination with other information, for
example, an accident report, damage to a
vehicle or eyewitness statements, could
be associated with a specific person.
12
Super Duty (TFE) Canada/United States of America, enUSA, Edition date: 201909, Second-Printing IntroductionE270850 E167012 E138639 E163957 E272858 E270969
Page 110 of 633
WARNING LAMPS AND
INDICATORS
The following warning lamps and
indicators alert you to a vehicle condition
that may become serious. Some lamps
illuminate when you start your vehicle to
make sure they work. If any lamps remain
on after starting your vehicle, refer to the
respective system warning lamp for further
information.
Note:
Some warning indicators appear in
the information display and operate the
same as a warning lamp but do not
illuminate when you start your vehicle.
Adaptive Cruise Control (If Equipped) The speed control system
indicator light changes color to
indicate what mode the system
is in. See Using Adaptive Cruise Control
(page
242).
On (white light): Illuminates when the
adaptive cruise control system is turned
on. Turns off when the speed control
system is turned off.
Engaged (green light): Illuminates when
the adaptive cruise control system is
engaged. Turns off when the speed control
system is disengaged.
Adaptive Steering
(If Equipped) The adaptive steering system
indicator illuminates if the
system detects a fault during the
continuous diagnostic checks. Adaptive Steering Initialization (yellow,
flashing): The adaptive steering system
has detected a difference between
steering wheel angle and the desired road
wheel angle. The steering wheel adjusts
itself to correct this difference. This
adjustment is part of normal system
operation.
Adaptive Steering Off (yellow, solid): The
adaptive steering system is off. It is
possible that the steering wheel may not
be straight when the vehicle is driving
straight ahead. If this message persists,
see an authorized dealer.
Adaptive Steering Loss (red, solid): The
adaptive steering system integrity cannot
be verified. Do not drive the vehicle and
contact an authorized dealer immediately.
See
Steering (page 261).
Anti-Lock Braking System It illuminates momentarily when
you switch on the ignition to
confirm that the lamp is
functional. If it does not illuminate when
you switch on the ignition or begins to flash
at anytime, have the system checked as
soon as possible.
If it illuminates when you are driving, this
indicates a malfunction. You will continue
to have the normal braking system
(without ABS) unless the brake system
warning lamp is also illuminated. Have the
system checked as soon as possible.
Automatic High Beam
(If Equipped) Illuminates when this feature is
on. See
What Is Automatic
High Beam Control (page 95).
107
Super Duty (TFE) Canada/United States of America, enUSA, Edition date: 201909, Second-Printing Instrument ClusterE144524 E223375
Page 120 of 633
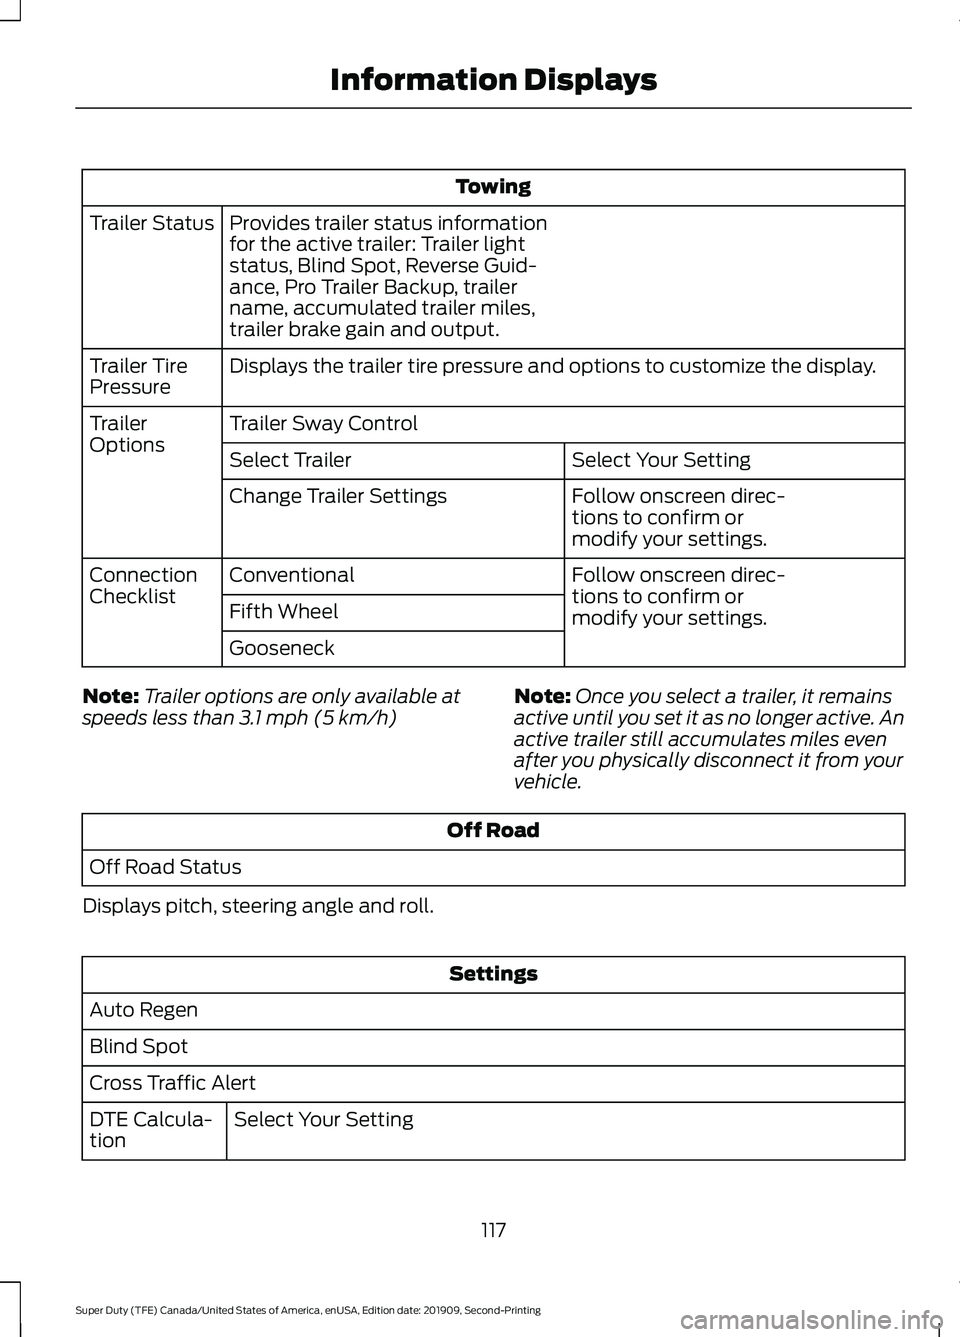
Towing
Provides trailer status information
for the active trailer: Trailer light
status, Blind Spot, Reverse Guid-
ance, Pro Trailer Backup, trailer
name, accumulated trailer miles,
trailer brake gain and output.
Trailer Status
Displays the trailer tire pressure and options to customize the display.
Trailer Tire
Pressure
Trailer Sway Control
Trailer
Options
Select Your Setting
Select Trailer
Follow onscreen direc-
tions to confirm or
modify your settings.
Change Trailer Settings
Follow onscreen direc-
tions to confirm or
modify your settings.
Conventional
Connection
Checklist
Fifth Wheel
Gooseneck
Note: Trailer options are only available at
speeds less than 3.1 mph (5 km/h) Note:
Once you select a trailer, it remains
active until you set it as no longer active. An
active trailer still accumulates miles even
after you physically disconnect it from your
vehicle. Off Road
Off Road Status
Displays pitch, steering angle and roll. Settings
Auto Regen
Blind Spot
Cross Traffic Alert Select Your Setting
DTE Calcula-
tion
117
Super Duty (TFE) Canada/United States of America, enUSA, Edition date: 201909, Second-Printing Information Displays
Page 124 of 633
Note:
Once you select a trailer, it remains active until you set it as no longer active. An active
trailer still accumulates miles even after you physically disconnect it from your vehicle. Towing
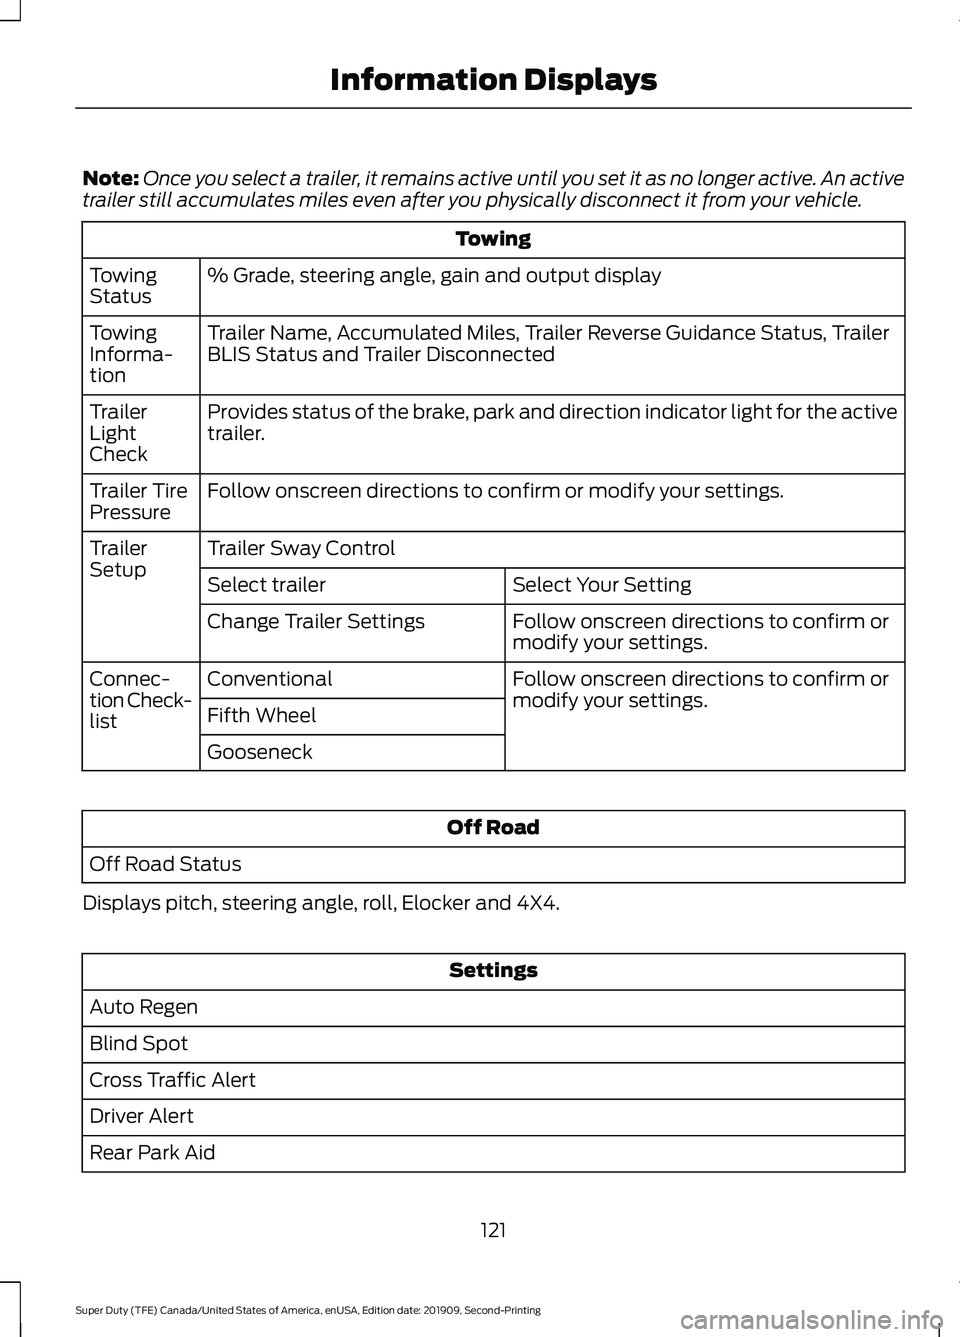
% Grade, steering angle, gain and output display
Towing
Status
Trailer Name, Accumulated Miles, Trailer Reverse Guidance Status, Trailer
BLIS Status and Trailer Disconnected
Towing
Informa-
tion
Provides status of the brake, park and direction indicator light for the active
trailer.
Trailer
Light
Check
Follow onscreen directions to confirm or modify your settings.
Trailer Tire
Pressure
Trailer Sway Control
Trailer
Setup
Select Your Setting
Select trailer
Follow onscreen directions to confirm or
modify your settings.
Change Trailer Settings
Follow onscreen directions to confirm or
modify your settings.
Conventional
Connec-
tion Check-
list Fifth Wheel
Gooseneck Off Road
Off Road Status
Displays pitch, steering angle, roll, Elocker and 4X4. Settings
Auto Regen
Blind Spot
Cross Traffic Alert
Driver Alert
Rear Park Aid
121
Super Duty (TFE) Canada/United States of America, enUSA, Edition date: 201909, Second-Printing Information Displays
Page 136 of 633
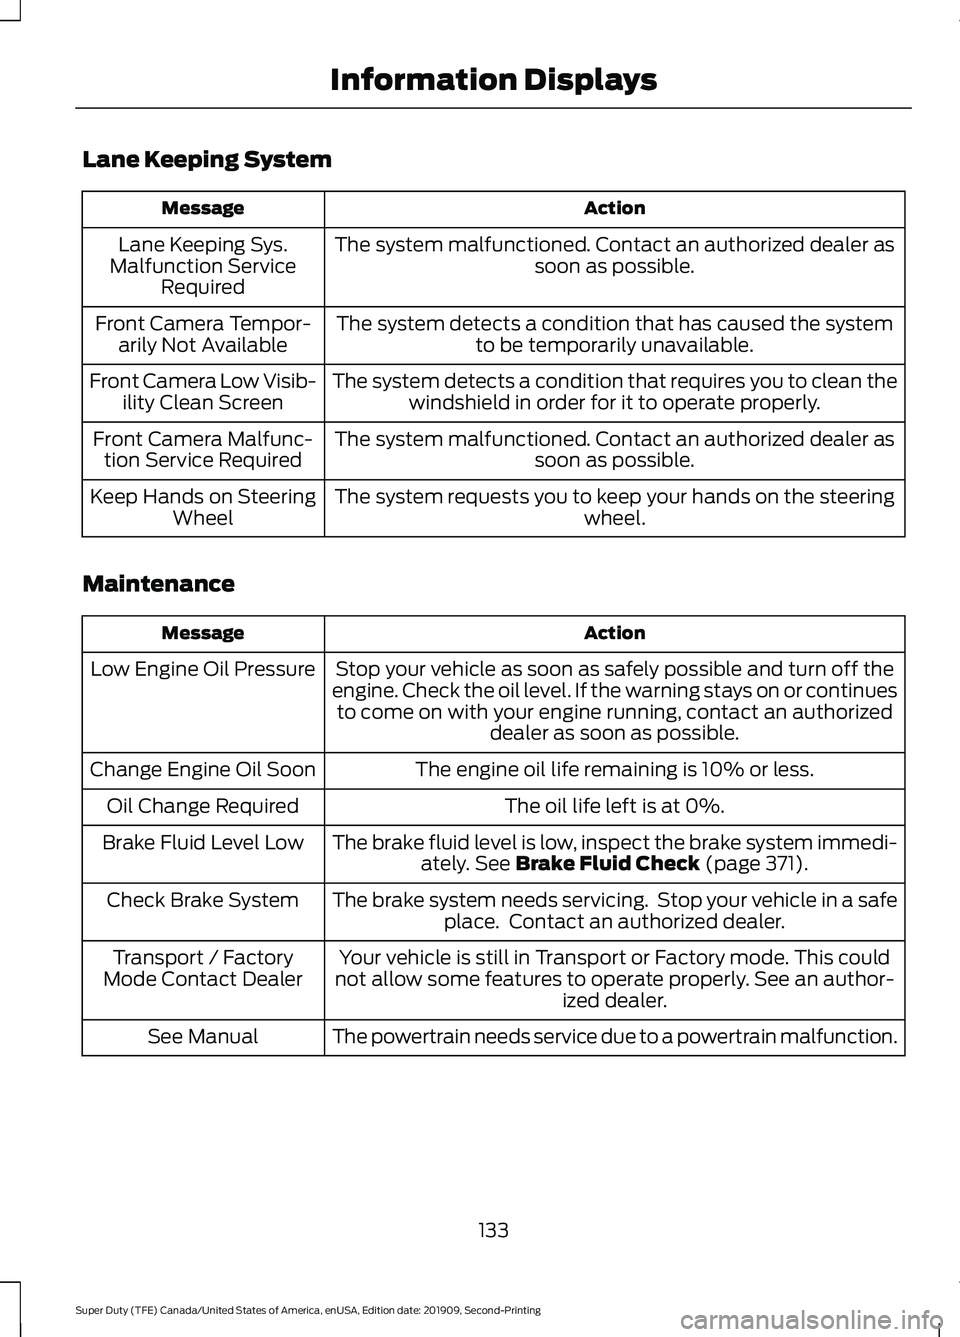
Lane Keeping System
Action
Message
The system malfunctioned. Contact an authorized dealer as soon as possible.
Lane Keeping Sys.
Malfunction Service Required
The system detects a condition that has caused the systemto be temporarily unavailable.
Front Camera Tempor-
arily Not Available
The system detects a condition that requires you to clean thewindshield in order for it to operate properly.
Front Camera Low Visib-
ility Clean Screen
The system malfunctioned. Contact an authorized dealer assoon as possible.
Front Camera Malfunc-
tion Service Required
The system requests you to keep your hands on the steering wheel.
Keep Hands on Steering
Wheel
Maintenance Action
Message
Stop your vehicle as soon as safely possible and turn off the
engine. Check the oil level. If the warning stays on or continues to come on with your engine running, contact an authorized dealer as soon as possible.
Low Engine Oil Pressure
The engine oil life remaining is 10% or less.
Change Engine Oil Soon
The oil life left is at 0%.
Oil Change Required
The brake fluid level is low, inspect the brake system immedi-ately. See Brake Fluid Check (page 371).
Brake Fluid Level Low
The brake system needs servicing. Stop your vehicle in a safeplace. Contact an authorized dealer.
Check Brake System
Your vehicle is still in Transport or Factory mode. This could
not allow some features to operate properly. See an author- ized dealer.
Transport / Factory
Mode Contact Dealer
The powertrain needs service due to a powertrain malfunction.
See Manual
133
Super Duty (TFE) Canada/United States of America, enUSA, Edition date: 201909, Second-Printing Information Displays
Page 144 of 633
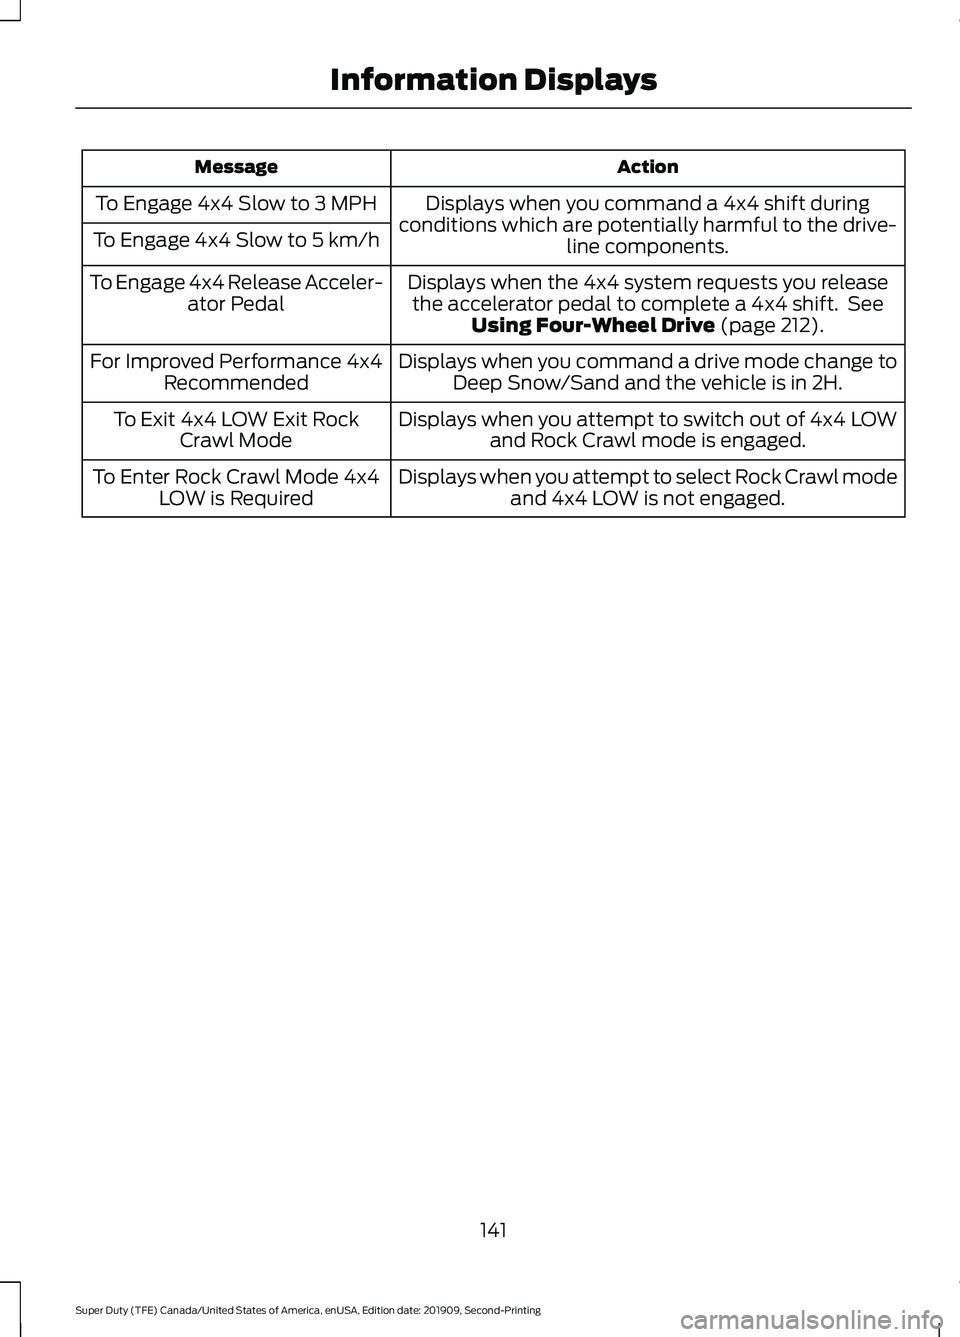
Action
Message
Displays when you command a 4x4 shift during
conditions which are potentially harmful to the drive- line components.
To Engage 4x4 Slow to 3 MPH
To Engage 4x4 Slow to 5 km/h
Displays when the 4x4 system requests you releasethe accelerator pedal to complete a 4x4 shift. See Using Four-Wheel Drive (page 212).
To Engage 4x4 Release Acceler-
ator Pedal
Displays when you command a drive mode change toDeep Snow/Sand and the vehicle is in 2H.
For Improved Performance 4x4
Recommended
Displays when you attempt to switch out of 4x4 LOWand Rock Crawl mode is engaged.
To Exit 4x4 LOW Exit Rock
Crawl Mode
Displays when you attempt to select Rock Crawl modeand 4x4 LOW is not engaged.
To Enter Rock Crawl Mode 4x4
LOW is Required
141
Super Duty (TFE) Canada/United States of America, enUSA, Edition date: 201909, Second-Printing Information Displays
Page 208 of 633
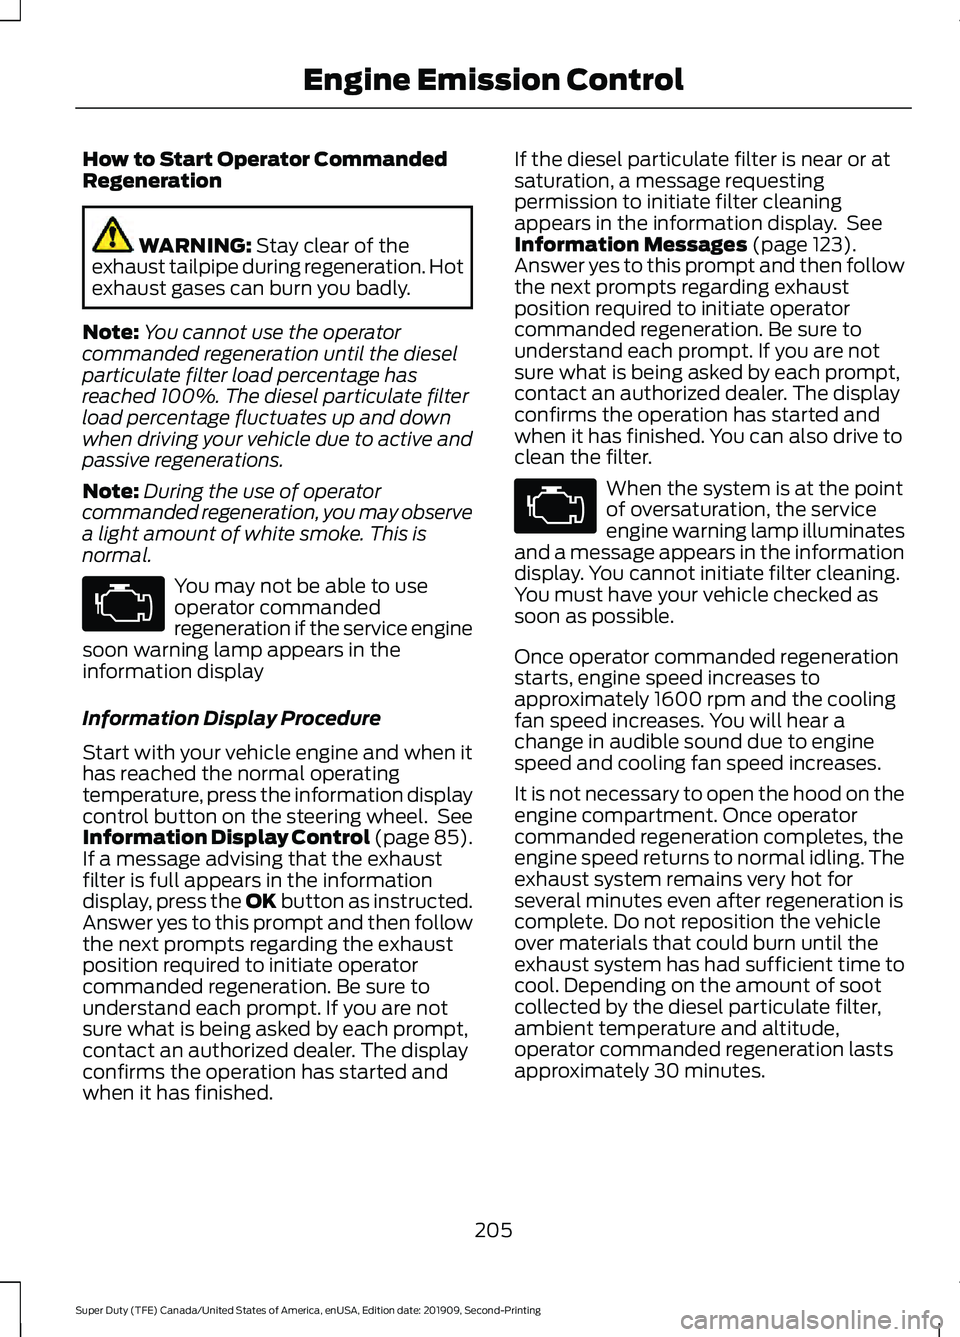
How to Start Operator Commanded
Regeneration
WARNING: Stay clear of the
exhaust tailpipe during regeneration. Hot
exhaust gases can burn you badly.
Note: You cannot use the operator
commanded regeneration until the diesel
particulate filter load percentage has
reached 100%. The diesel particulate filter
load percentage fluctuates up and down
when driving your vehicle due to active and
passive regenerations.
Note: During the use of operator
commanded regeneration, you may observe
a light amount of white smoke. This is
normal. You may not be able to use
operator commanded
regeneration if the service engine
soon warning lamp appears in the
information display
Information Display Procedure
Start with your vehicle engine and when it
has reached the normal operating
temperature, press the information display
control button on the steering wheel. See
Information Display Control (page 85).
If a message advising that the exhaust
filter is full appears in the information
display, press the OK button as instructed.
Answer yes to this prompt and then follow
the next prompts regarding the exhaust
position required to initiate operator
commanded regeneration. Be sure to
understand each prompt. If you are not
sure what is being asked by each prompt,
contact an authorized dealer. The display
confirms the operation has started and
when it has finished. If the diesel particulate filter is near or at
saturation, a message requesting
permission to initiate filter cleaning
appears in the information display. See
Information Messages (page 123).
Answer yes to this prompt and then follow
the next prompts regarding exhaust
position required to initiate operator
commanded regeneration. Be sure to
understand each prompt. If you are not
sure what is being asked by each prompt,
contact an authorized dealer. The display
confirms the operation has started and
when it has finished. You can also drive to
clean the filter. When the system is at the point
of oversaturation, the service
engine warning lamp illuminates
and a message appears in the information
display. You cannot initiate filter cleaning.
You must have your vehicle checked as
soon as possible.
Once operator commanded regeneration
starts, engine speed increases to
approximately 1600 rpm and the cooling
fan speed increases. You will hear a
change in audible sound due to engine
speed and cooling fan speed increases.
It is not necessary to open the hood on the
engine compartment. Once operator
commanded regeneration completes, the
engine speed returns to normal idling. The
exhaust system remains very hot for
several minutes even after regeneration is
complete. Do not reposition the vehicle
over materials that could burn until the
exhaust system has had sufficient time to
cool. Depending on the amount of soot
collected by the diesel particulate filter,
ambient temperature and altitude,
operator commanded regeneration lasts
approximately 30 minutes.
205
Super Duty (TFE) Canada/United States of America, enUSA, Edition date: 201909, Second-Printing Engine Emission Control
Page 210 of 633
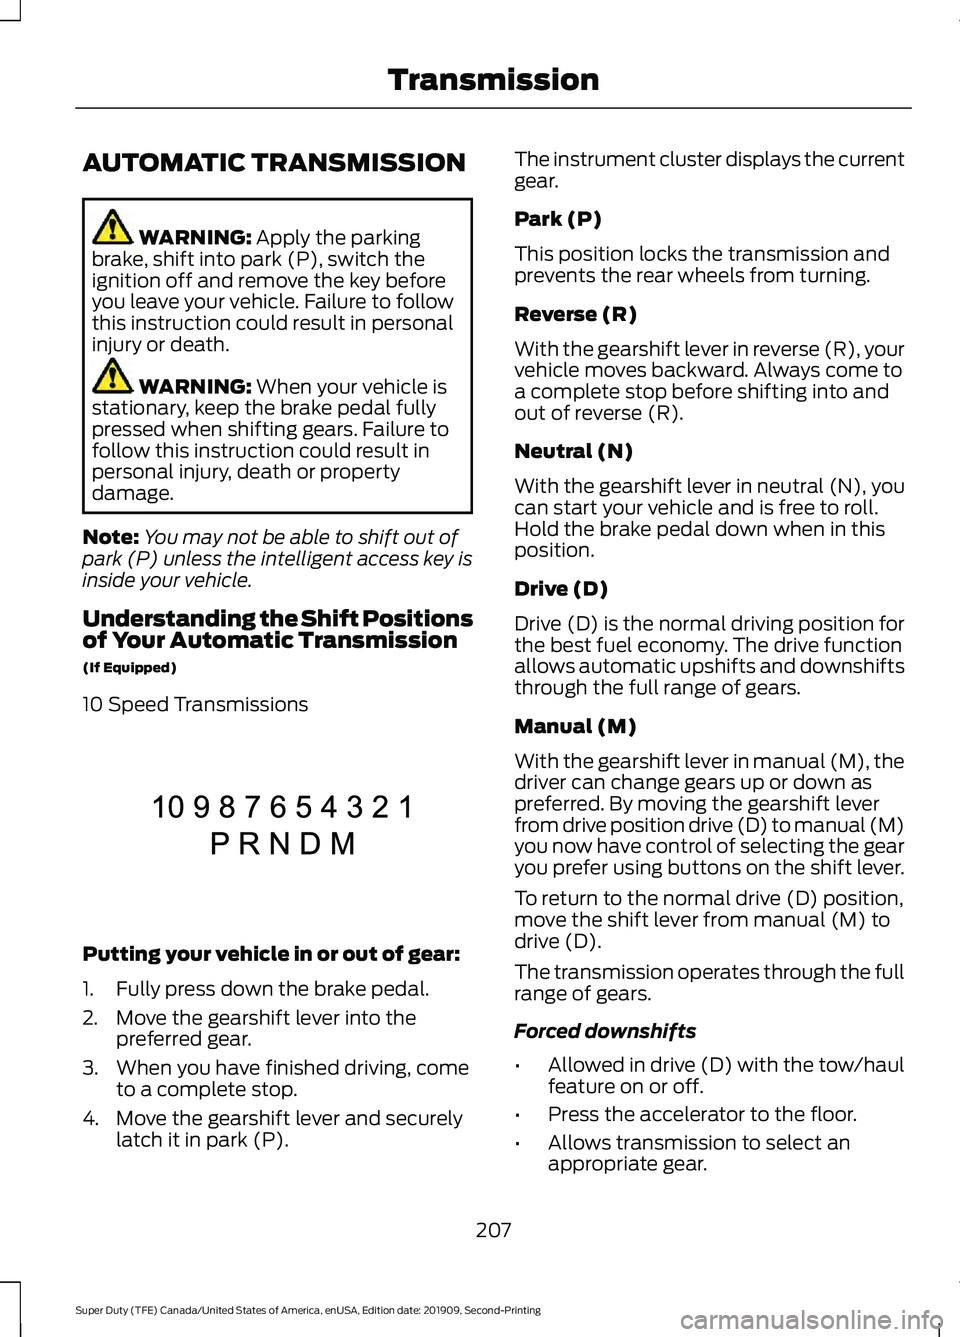
AUTOMATIC TRANSMISSION
WARNING: Apply the parking
brake, shift into park (P), switch the
ignition off and remove the key before
you leave your vehicle. Failure to follow
this instruction could result in personal
injury or death. WARNING:
When your vehicle is
stationary, keep the brake pedal fully
pressed when shifting gears. Failure to
follow this instruction could result in
personal injury, death or property
damage.
Note: You may not be able to shift out of
park (P) unless the intelligent access key is
inside your vehicle.
Understanding the Shift Positions
of Your Automatic Transmission
(If Equipped)
10 Speed Transmissions Putting your vehicle in or out of gear:
1. Fully press down the brake pedal.
2. Move the gearshift lever into the
preferred gear.
3. When you have finished driving, come to a complete stop.
4. Move the gearshift lever and securely latch it in park (P). The instrument cluster displays the current
gear.
Park (P)
This position locks the transmission and
prevents the rear wheels from turning.
Reverse (R)
With the gearshift lever in reverse (R), your
vehicle moves backward. Always come to
a complete stop before shifting into and
out of reverse (R).
Neutral (N)
With the gearshift lever in neutral (N), you
can start your vehicle and is free to roll.
Hold the brake pedal down when in this
position.
Drive (D)
Drive (D) is the normal driving position for
the best fuel economy. The drive function
allows automatic upshifts and downshifts
through the full range of gears.
Manual (M)
With the gearshift lever in manual (M), the
driver can change gears up or down as
preferred. By moving the gearshift lever
from drive position drive (D) to manual (M)
you now have control of selecting the gear
you prefer using buttons on the shift lever.
To return to the normal drive (D) position,
move the shift lever from manual (M) to
drive (D).
The transmission operates through the full
range of gears.
Forced downshifts
•
Allowed in drive (D) with the tow/haul
feature on or off.
• Press the accelerator to the floor.
• Allows transmission to select an
appropriate gear.
207
Super Duty (TFE) Canada/United States of America, enUSA, Edition date: 201909, Second-Printing TransmissionE308145