2020 FORD F-250 remove seats
[x] Cancel search: remove seatsPage 152 of 631

An energy absorbing head
restraint.
A
Two steel stems.
B
Guide sleeve unlock and remove
button.
C
Removing the Head Restraint
1. Press and hold buttons C.
2. Pull up the head restraint.
Installing the Head Restraint
Align the steel stems into the guide sleeves
and push the head restraint down until it
locks.
Front Seat Center Head Restraint
Your vehicle may have a front row center
head restraint that you cannot adjust or
remove.
Tilting Head Restraints (If Equipped)
The front head restraints tilt for extra
comfort. 1. Adjust the seat backrest to an upright
driving or riding position.
2. Pivot the head restraint forward toward
your head to the desired position.
After the head restraint reaches the
forward-most tilt position, pivot it forward
again to release it to the rearward, un-tilted
position.
Note: Do not attempt to force the head
restraint backward after you tilt it. Instead,
continue tilting it forward until the head
restraint releases to the upright position.
MANUAL SEATS (IF EQUIPPED) WARNING:
Do not adjust the
driver's seat or seatback when your
vehicle is moving.
149
Super Duty (TFE), enUSA, Edition date: 201909, Third-Printing- SeatsE162872
A
C
B E144727
Page 157 of 631
3. Within ten seconds, press the lock
button on the remote control you are
linking. The instrument panel indicates
a successful link.
To unlink a remote control, follow the
same procedure – except in step 3, press
the unlock button on the remote control.
Note: If more than one linked remote
control or intelligent access key is in range,
the memory function moves to the settings
of the first key to initiate a memory recall.
Easy Entry and Exit Feature (If
Equipped)
If you enable the easy entry and exit
feature, it moves the driver seat rearward
up to
2 in (5 cm) when you put the
transmission in park (P) and remove the
key from the ignition.
The driver seat returns to the previous
position when you put the key in the
ignition.
You can enable or disable this feature
through the information display. See
Information Displays
(page 109).
REAR SEATS
(IF EQUIPPED)
Folding Up the Rear Seat Cushion
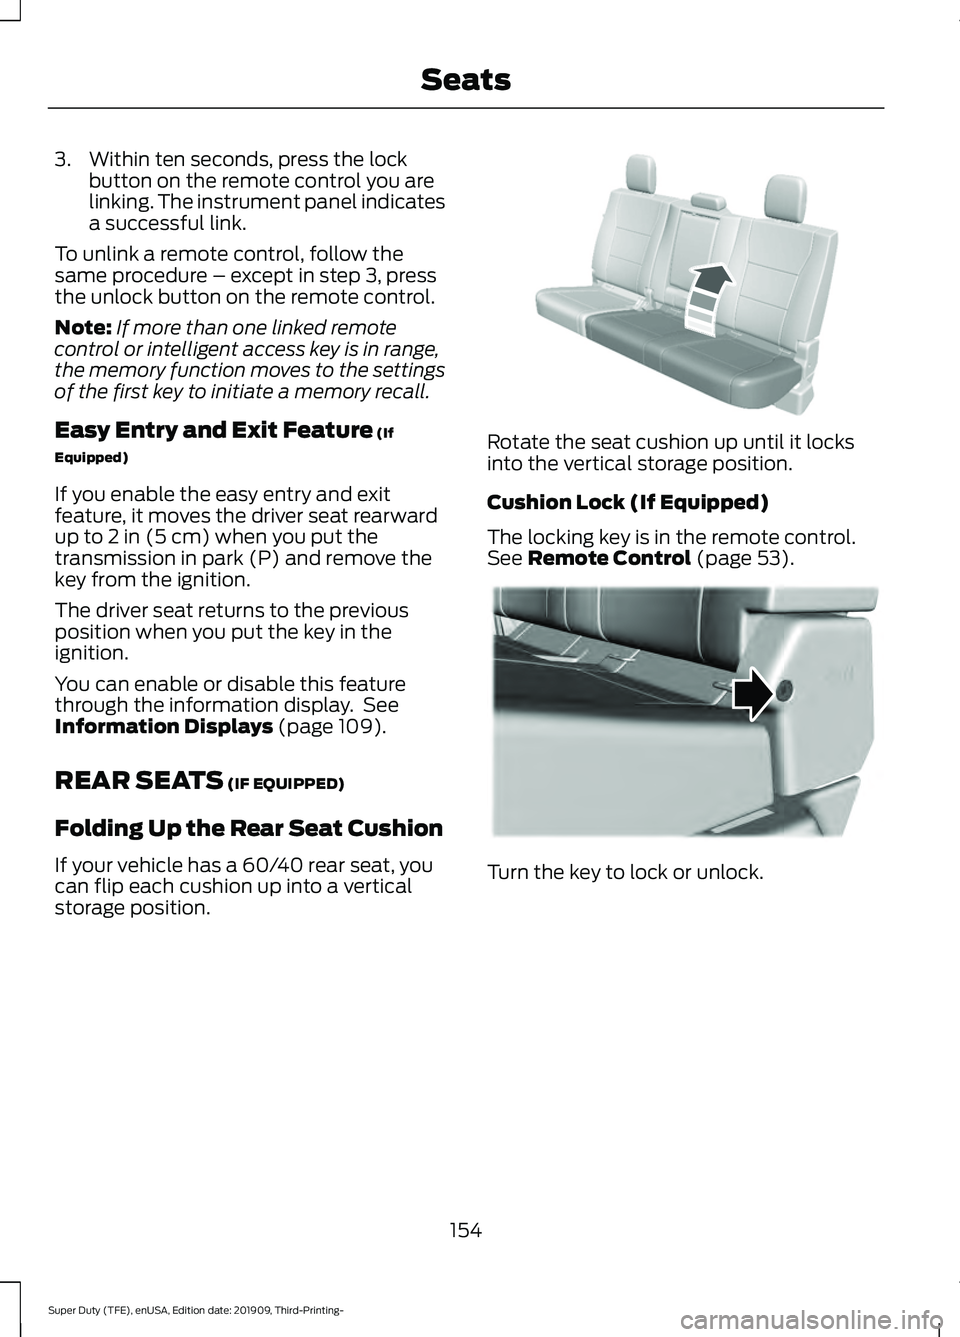
If your vehicle has a 60/40 rear seat, you
can flip each cushion up into a vertical
storage position. Rotate the seat cushion up until it locks
into the vertical storage position.
Cushion Lock (If Equipped)
The locking key is in the remote control.
See
Remote Control (page 53).
Turn the key to lock or unlock.
154
Super Duty (TFE), enUSA, Edition date: 201909, Third-Printing- SeatsE310192 E310192 E224956
Page 158 of 631
Returning the Seat to the Seating
Position
WARNING: Check under the seat
cushion to make sure no cargo or objects
are under the seat cushion before
returning the seat cushion to its original
position, and that the seat cushion locks
into place. Failure to do so may prevent
the seat from operating properly in the
event of a crash, which could increase
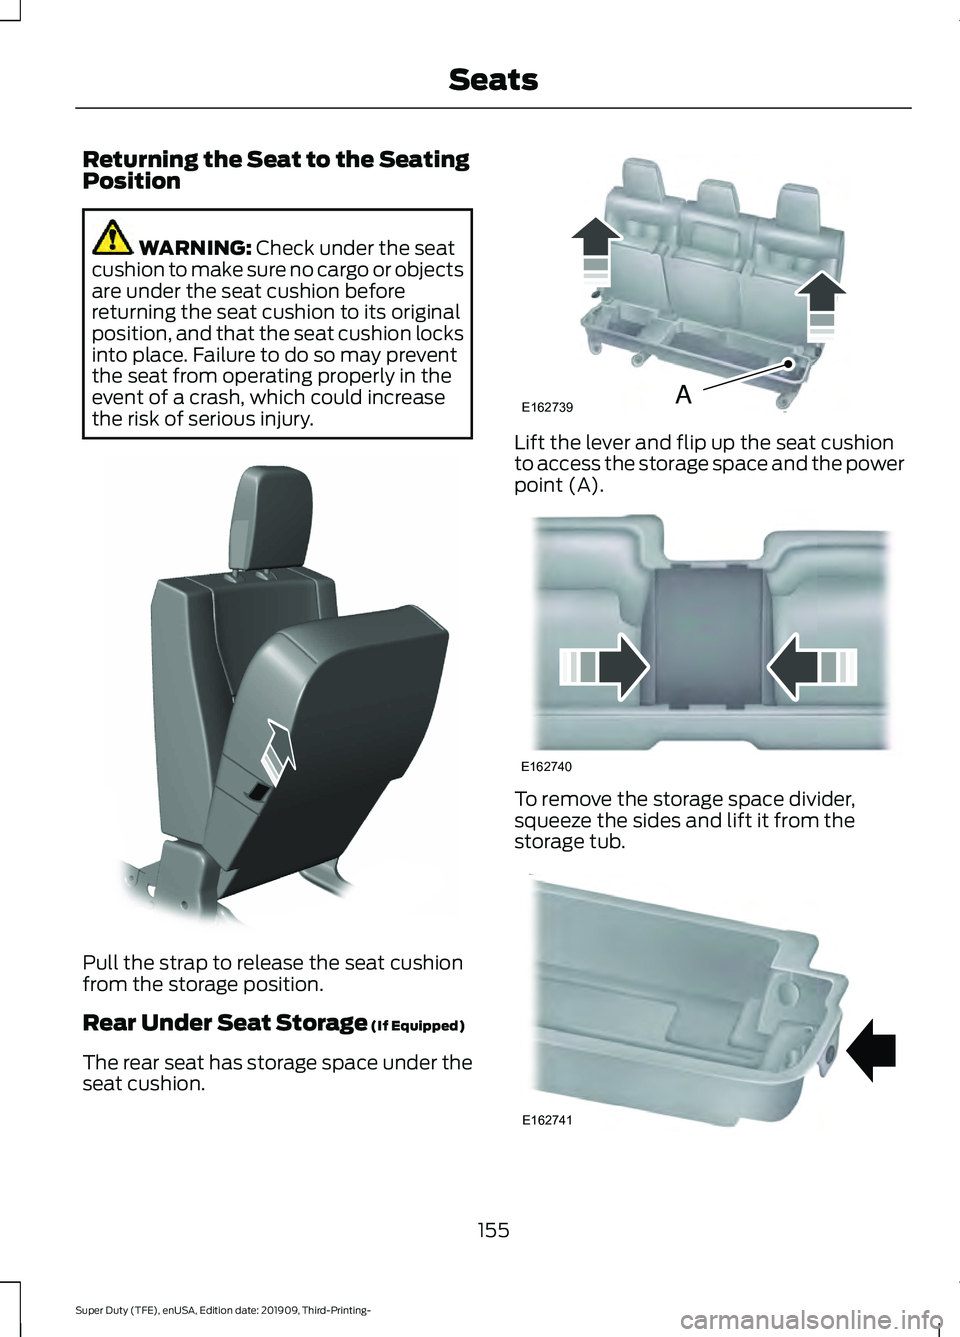
the risk of serious injury. Pull the strap to release the seat cushion
from the storage position.
Rear Under Seat Storage
(If Equipped)
The rear seat has storage space under the
seat cushion. Lift the lever and flip up the seat cushion
to access the storage space and the power
point (A).
To remove the storage space divider,
squeeze the sides and lift it from the
storage tub.
155
Super Duty (TFE), enUSA, Edition date: 201909, Third-Printing- SeatsE308139 E162739A E162740 E162741
Page 196 of 631
Only use diesel exhaust fluid that is
certified by the American Petroleum
Institute (API). Non-certified diesel exhaust
fluid use can cause damage not covered
by the vehicle Warranty.
Note:
Do not put diesel exhaust fluid in the
fuel tank. This can cause damage not
covered by the vehicle Warranty.
You can purchase diesel exhaust fluid at
an authorized dealer, most highway truck
stops or you can contact roadside
assistance for help in finding a retailer that
sells diesel exhaust fluid. In addition, there
is a government website to help you find
the nearest location to purchase diesel
exhaust fluid:
http://www.discoverdef.com.
Filling the Diesel Exhaust Fluid Tank
Using a Fuel Station Pump
Filling the diesel exhaust fluid tank using
a nozzle is similar to fuel fill. The nozzle
shuts off automatically when the tank is
full. Do not continue to fill the tank as this
could cause spilling or overflow, potentially
damaging the tank.
Filling the Diesel Exhaust Fluid Tank
Using a Container
The following procedure applies to
Motorcraft diesel exhaust fluid or similar
fluid containers. Always follow the
manufacturer's instructions.
1. Remove the diesel exhaust fluid container cap. Place the spout on to
the container and tighten it until you
feel a strong resistance.
2. Remove the diesel exhaust fluid tank filler cap.
3. Insert the spout in to the filler neck until
the seal on the spout seats on to the
filler neck. Pour the fluid in to the tank.
When the tank is full the fluid stops
flowing automatically. 4. Return the container to the vertical
position slightly below the diesel
exhaust fluid filler neck. Allow any fluid
remaining in the spout to drain back in
to the container.
5. Remove the spout from the diesel exhaust fluid filler neck. Replace the
diesel exhaust fluid tank cap.
6. Remove the spout from the diesel exhaust fluid container and replace the
cap.
Note: If there is diesel exhaust fluid left in
the container retain it for later use. The
spout is re-useable. Wash the spout with
clean water prior to storage. Do not use the
diesel exhaust fluid spout with any other
fluid.
Filling the Diesel Exhaust Fluid Tank in
Cold Climates
Diesel exhaust fluid may freeze if the
ambient temperature is below 12°F (-11°C).
Your vehicle has a preheating system
which allows diesel exhaust fluid to
operate below 12°F (-11°C). If you do not
use your vehicle for an extended period
when the ambient temperature is below
12°F (-11°C)
, the fluid in the tank may
freeze. If the tank is overfilled and the fluid
freezes it may damage the tank. This is not
covered by the vehicle warranty.
Diesel Exhaust Fluid Warning
Messages and Vehicle Operations WARNING:
Diesel exhaust fluid
must be refilled when low or replaced
when contaminated or your vehicle
speed becomes limited to
50 mph
(80 km/h). In these conditions, drive with
caution and refill diesel exhaust fluid
immediately. If the diesel exhaust fluid
becomes empty or contaminated and
fluid is not replaced, your vehicle
193
Super Duty (TFE), enUSA, Edition date: 201909, Third-Printing- Engine Emission Control
Page 387 of 631
WARNING: On vehicles equipped
with seat-mounted airbags, do not use
chemical solvents or strong detergents.
Such products could contaminate the
side airbag system and affect
performance of the side airbag in a crash.
For fabric, carpets, cloth seats and seats
equipped with side airbags:
• Remove dust and loose dirt with a
vacuum cleaner.
• Remove light stains and soil with
Motorcraft Professional Strength
Carpet & Upholstery Cleaner.
• If grease or tar is present on the
material, spot-clean the area first with
Motorcraft Spot and Stain Remover. In
Canada, use Motorcraft Multi-Purpose
Cleaner. •
If a ring forms on the fabric after spot
cleaning, clean the entire area
immediately (but do not oversaturate)
or the ring will set.
• Do not use household cleaning
products or glass cleaners, which can
stain and discolor the fabric and affect
the flame retardant abilities of the seat
materials.
Note: Cashmere and microfiber cloth fabric
is made of polyester microfiber with
micro-porous polyurethane. Using
commercially available fabric cleaners can
cause permanent damage.
Note: Do not use commercially available
leather and vinyl cleaning products on
cashmere or microfiber cloth fabric.
Note: Your vehicle may have cashmere or
microfiber cloth fabric on the seats,
headliner, floor mats and door panels.
Depending on the type of stain, use water,
lemon juice or pure ethyl alcohol when
cleaning. For cleaning microfiber cloth,
refer to the following chart: Cleaning Procedure
Type of Stain
Use lukewarm water and rinse by dabbing
with clean water.
Fruit juice, jam, jelly, syrup or ketchup.
Use cold water and rinse by dabbing with
clean water. Avoid warm water because it
makes these substances coagulate.
Blood, egg, excrement or urine.
Use lukewarm water. If the color remains,
treat with lemon juice and then rinse.
Liquor, alcoholic beverages, wine, beer, cola
and tea.
Use lukewarm water and rinse by dabbing
with clean water.
Indelible pencil, cocoa, chocolate, pastry
with cream or chocolate, ice cream or
mustard.
Use lemon juice, wipe with lukewarm water
and rinse by dabbing with clean water.
Vinegar, hair gel, tomato sauce or coffee
with sugar.
Use ethyl alcohol, then dab with water.
Dye transfer and all other stains.
384
Super Duty (TFE), enUSA, Edition date: 201909, Third-Printing- Vehicle Care
Page 388 of 631
CLEANING THE INSTRUMENT
PANEL AND INSTRUMENT
CLUSTER LENS
WARNING: Do not use chemical
solvents or strong detergents when
cleaning the steering wheel or
instrument panel to avoid contamination
of the airbag system.
Note: Follow the same procedure as
cleaning leather seats for cleaning leather
instrument panels and leather interior trim
surfaces. See
Cleaning Leather Seats
(page 385).
Clean the instrument panel and cluster
lens with a clean, damp and soft cloth,
then use a clean, dry and soft cloth to dry
these areas.
• Avoid cleaners or polishes that increase
the gloss of the upper portion of the
instrument panel. The dull finish in this
area helps protect you from
undesirable windshield reflection.
• Do not use any household cleaning
products or glass cleaners as these
may damage the finish of the
instrument panel, interior trim and
cluster lens.
• Wash or wipe your hands clean if you
have been in contact with certain
products such as insect repellent and
suntan lotion to avoid possible damage
to the interior painted surfaces.
• Do not allow air fresheners and hand
sanitizers to spill onto interior surfaces.
If a spill occurs, wipe off immediately.
Your warranty may not cover these
damages.
If a staining liquid like coffee or juice has
been spilled on the instrument panel or on
interior trim surfaces: 1. Wipe up spilled liquid using a clean,
soft cloth as quickly as possible.
2. Use Motorcraft Premium Leather and Vinyl Cleaner or a commercially
available leather cleaning product for
automotive interiors. Test any cleaner
or stain remover on an inconspicuous
area.
3. Alternatively, wipe the surface with a clean, soft cloth and a mild soap and
water solution. Dry the area with a
clean, soft cloth.
4. If necessary, apply more soap and water solution or cleaning product to
a clean, soft cloth and press it onto the
soiled area. Allow this to set at room
temperature for 30 minutes.
5. Remove the soaked cloth, then with a clean, damp cloth, use a rubbing
motion for 60 seconds on the soiled
area.
6. Dry the area with a clean, soft cloth.
CLEANING LEATHER SEATS
(IF
EQUIPPED)
Without King Ranch Edition
Note: Follow the same procedure as
cleaning leather seats for cleaning leather
instrument panels and leather interior trim
surfaces.
For routine cleaning, wipe the surface with
a soft, damp cloth and a mild soap and
water solution. Dry the area with a clean,
soft cloth.
For cleaning and removing spots and stains
such as dye transfer, use Motorcraft
Premium Leather and Vinyl Cleaner or a
commercially available leather cleaning
product for automotive interiors.
Note: Test any cleaner or stain remover on
an inconspicuous area.
385
Super Duty (TFE), enUSA, Edition date: 201909, Third-Printing- Vehicle Care