2020 FORD EXPLORER towing
[x] Cancel search: towingPage 207 of 555
Note:
This feature may not work properly
if the door ajar switch is malfunctioning. If
your door ajar indicator does not illuminate
when you open the driver door, or the
indicator illuminates with the driver door
closed, or Transmission not in Park cluster
message still displays when the shifter has
already selected reverse (R), neutral (N), or
drive (D) and driver door remains closed,
see your authorized dealer.
Stay in Neutral Mode
Note: Stay in neutral mode is a temporary
vehicle state that works with the engine
being in the running or OFF state. Once in
this mode, sufficient battery voltage must
be maintained or your vehicle returns to park
if the feature is left active for extended time
when engine is OFF.
Failure to follow this instruction could
result in vehicle damage not covered by
the vehicle Warranty.
Note: When entering an automatic car
wash, always enter the Stay in Neutral
Mode. Stay in Neutral Mode must be
enabled, if you are exiting the vehicle before
the car wash.
Extended usage of Stay in Neutral mode
may result in a battery voltage reduction
to level where the vehicle may no longer
start.
Do not tow your vehicle in this mode.
With the transmission selector in Stay in
Neutral Mode, you can start your vehicle
and it is free to roll.
To enter Stay in Neutral mode, do the
following:
1. Bring your vehicle to a complete stop.
2. Shift into neutral (N).
3. Press the manual (M) or low (L) button
within five seconds after shifting to
neutral (N). Note:
Stay in Neutral Mode confirmation
message appears in the information display
when your vehicle has entered Stay in
Neutral mode and the neutral (N) button
on the transmission selector slowly blinks.
To exit Stay in Neutral mode, press the
brake pedal and shift to park (P) or start
the engine and apply brakes to shift to
another driving range, for example drive
(D) or reverse (R).
Tow Mode (If Equipped) To activate tow mode, use the
drive mode switch on the center
console.
See Selecting a Drive
Mode (page 279).
The indicator light illuminates and a
message displays in the instrument cluster
when the system becomes active. Select
a different mode to turn the system off.
The Tow Mode Feature:
• Moves upshifts to higher engine speeds
to reduce the frequency of
transmission shifting.
• Provides engine braking in all forward
gears, which slows your vehicle and
assist you in controlling your vehicle
when descending a grade.
• Depending on driving conditions and
load conditions, it may downshift the
transmission, slow your vehicle and
control your vehicle speed when
descending a hill, without pressing the
accelerator pedal. The amount of
downshift braking provided varies
based upon the amount you press the
brake pedal.
The tow mode feature improves
transmission operation when towing a
trailer or a heavy load. All transmission
gear ranges are available when using tow
mode.
204
Explorer (CTW) Canada/United States of America, enUSA, Edition date: 201902, Third-Printing- TransmissionE161509
Page 208 of 555
SelectShift Automatic
™
Transmission (If Equipped)
Your vehicle has a SelectShift Automatic
transmission, which gives you the ability
to change gears up or down, without a
clutch, as preferred.
To prevent the engine from running at too
low an RPM, which may cause it to stall,
SelectShift still automatically makes some
downshifts if it has determined that you
have not downshifted in time. Although
SelectShift makes some downshifts for
you, it still allows you to downshift at any
time if SelectShift determines that
damage to the engine from over-revving
does not occur.
Note: Engine damage may occur if you
maintain excessive engine revving without
shifting.
Note: Vehicles may have either steering
wheel controls or gearshift lever controls.
SelectShift could upshift if the engine
reaches its RPM limit. It may also be
upshifted by pressing the + button on the
steering wheel or shift lever control.
Pull the + paddle on the steering wheel
or push the + button on the gearshift
lever to activate SelectShift.
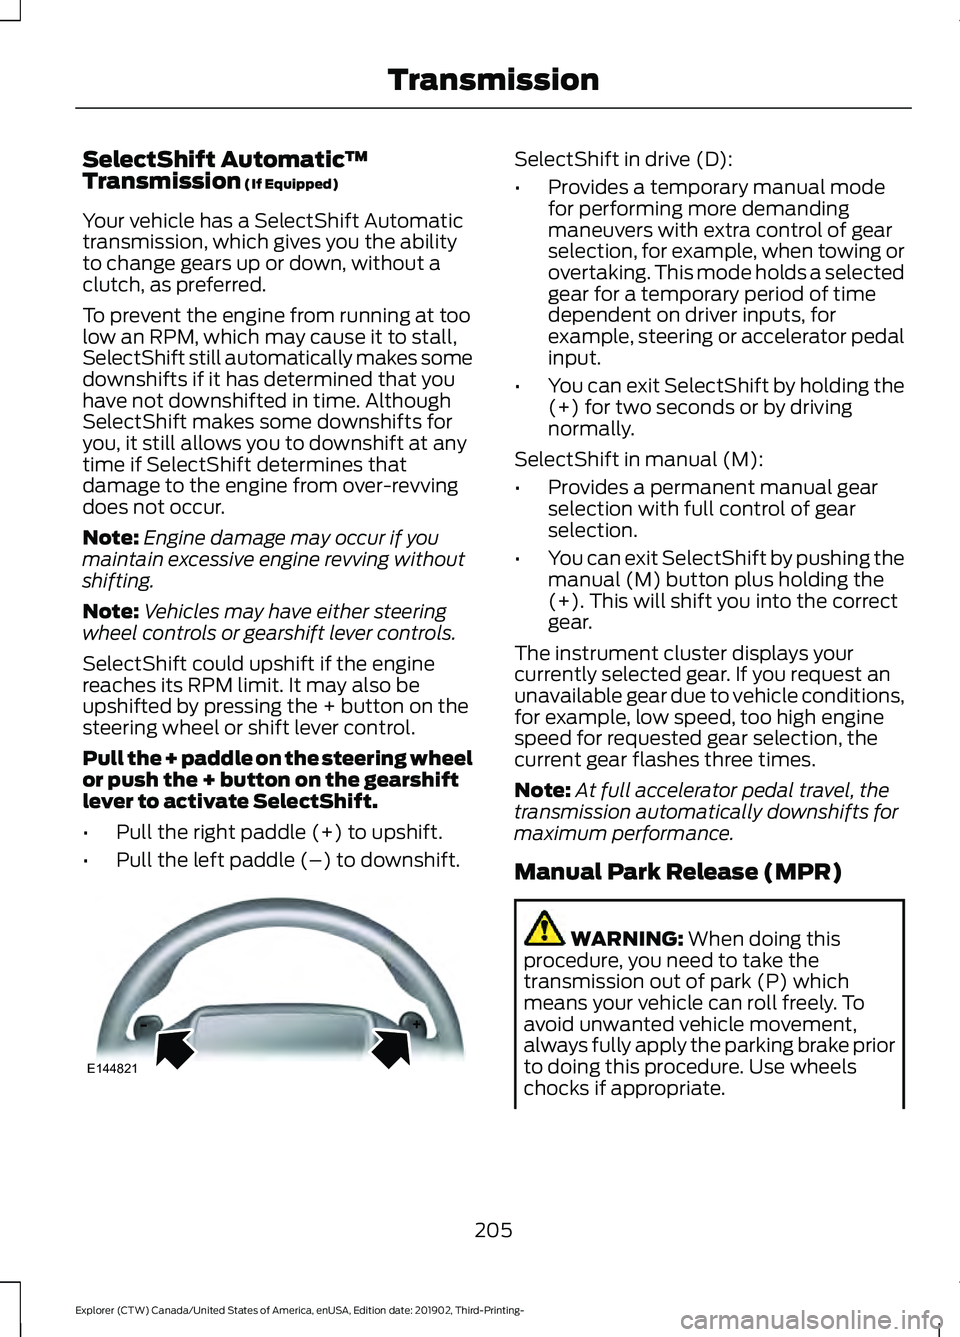
• Pull the right paddle (+) to upshift.
• Pull the left paddle (–) to downshift. SelectShift in drive (D):
•
Provides a temporary manual mode
for performing more demanding
maneuvers with extra control of gear
selection, for example, when towing or
overtaking. This mode holds a selected
gear for a temporary period of time
dependent on driver inputs, for
example, steering or accelerator pedal
input.
• You can exit SelectShift by holding the
(+) for two seconds or by driving
normally.
SelectShift in manual (M):
• Provides a permanent manual gear
selection with full control of gear
selection.
• You can exit SelectShift by pushing the
manual (M) button plus holding the
(+). This will shift you into the correct
gear.
The instrument cluster displays your
currently selected gear. If you request an
unavailable gear due to vehicle conditions,
for example, low speed, too high engine
speed for requested gear selection, the
current gear flashes three times.
Note: At full accelerator pedal travel, the
transmission automatically downshifts for
maximum performance.
Manual Park Release (MPR) WARNING:
When doing this
procedure, you need to take the
transmission out of park (P) which
means your vehicle can roll freely. To
avoid unwanted vehicle movement,
always fully apply the parking brake prior
to doing this procedure. Use wheels
chocks if appropriate.
205
Explorer (CTW) Canada/United States of America, enUSA, Edition date: 201902, Third-Printing- TransmissionE144821
Page 209 of 555
WARNING: If the parking brake is
fully released, but the brake warning
lamp remains illuminated, the brakes
may not be working properly. Have your
vehicle checked as soon as possible. WARNING:
Do not drive your
vehicle until you verify that the
stoplamps are working.
Use the manual park release to move your
transmission from the park (P) position in
the event of an electrical malfunction or
emergency.
Activating the Manual Park Release
Cable 1.
Apply the parking brake. See Electric
Parking Brake
(page 215).
Note: If the vehicle battery is dead, for
example, no electrical power is available,
you require an external power to apply the
parking brake.
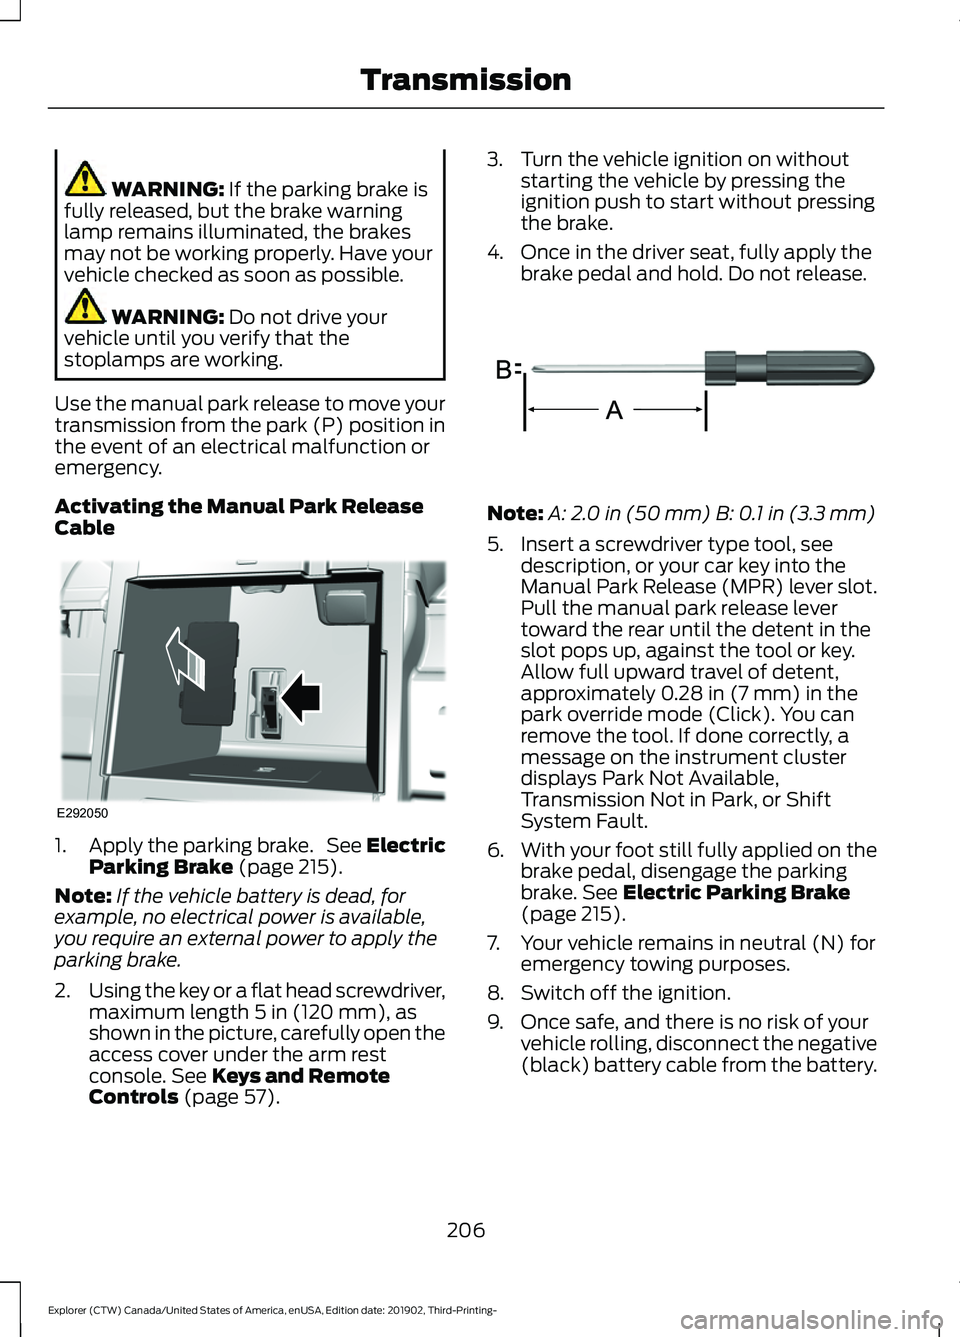
2. Using the key or a flat head screwdriver,
maximum length
5 in (120 mm), as
shown in the picture, carefully open the
access cover under the arm rest
console.
See Keys and Remote
Controls (page 57). 3. Turn the vehicle ignition on without
starting the vehicle by pressing the
ignition push to start without pressing
the brake.
4. Once in the driver seat, fully apply the brake pedal and hold. Do not release. Note:
A:
2.0 in (50 mm) B: 0.1 in (3.3 mm)
5. Insert a screwdriver type tool, see description, or your car key into the
Manual Park Release (MPR) lever slot.
Pull the manual park release lever
toward the rear until the detent in the
slot pops up, against the tool or key.
Allow full upward travel of detent,
approximately
0.28 in (7 mm) in the
park override mode (Click). You can
remove the tool. If done correctly, a
message on the instrument cluster
displays Park Not Available,
Transmission Not in Park, or Shift
System Fault.
6. With your foot still fully applied on the
brake pedal, disengage the parking
brake.
See Electric Parking Brake
(page 215).
7. Your vehicle remains in neutral (N) for emergency towing purposes.
8. Switch off the ignition.
9. Once safe, and there is no risk of your vehicle rolling, disconnect the negative
(black) battery cable from the battery.
206
Explorer (CTW) Canada/United States of America, enUSA, Edition date: 201902, Third-Printing- TransmissionE292050 E317360
Page 219 of 555

If it continues to flash or does not
illuminate, the system has malfunctioned.
Have your vehicle checked as soon as
possible.
Note:
You can apply the electric parking
brake when the ignition is off.
Note: The electric parking brake could
automatically apply when you shift into park
(P). See Transmission (page 202).
Applying the Electric Parking Brake in
an Emergency
Note: Do not apply the electric parking
brake when your vehicle is moving, except
in an emergency. If you repeatedly use the
electric parking brake to slow or stop your
vehicle, you could cause damage to the
brake system.
You can use the electric parking brake to
slow or stop your vehicle in an emergency. Pull the switch upward and hold
it.
The red warning lamp
illuminates, a tone sounds and
the stoplamps turn on.
The electric parking brake continues to
slow your vehicle down unless you release
the switch.
Manually Releasing the Electric
Parking Brake
Switch the ignition on.
Press and hold the brake pedal.
Push the switch downward.
The red warning lamp turns off. If it remains illuminated or flashes, the
system has malfunctioned. Have your
vehicle checked as soon as possible.
Pulling Away on a Hill When Towing a
Trailer
Press and hold the brake pedal.
Pull the switch upward and hold
it.
Shift into gear.
Press the accelerator pedal until engine
has developed sufficient torque to prevent
your vehicle from rolling down the hill. Release the switch and pull
away in a normal manner.
Automatically Releasing the
Electric Parking Brake
Close the driver door.
Shift into gear.
Press the accelerator pedal and pull away
in a normal manner. The red warning lamp turns off.
If it remains illuminated or flashes, the
electric parking brake has not released.
Manually release the parking brake.
216
Explorer (CTW) Canada/United States of America, enUSA, Edition date: 201902, Third-Printing- BrakesE267156 E270480 E267156 E270480 E267156 E267156 E270480
Page 221 of 555

Vehicles with Automatic Transmission
You cannot turn the system on or off.
When you switch the ignition on, the
system automatically turns on.
AUTO HOLD
WARNING: The system does not
replace the parking brake. When you
leave your vehicle, always apply the
parking brake. WARNING:
You must remain in
your vehicle when the system turns on.
At all times, you are responsible for
controlling your vehicle, supervising the
system and intervening, if required.
Failure to take care may result in the loss
of control of your vehicle, serious
personal injury or death. WARNING:
The system turns off if
there is a malfunction or if you
excessively rev the engine.
The system is designed to apply the brakes
to hold your vehicle at a standstill after you
stop your vehicle and release the brake
pedal. This could be beneficial in certain
situations, for example when waiting on a
hill or in traffic.
Switching Auto Hold On and Off Press the button on the center
console. The button illuminates
when you switch the system on.
Note: You can only switch the system on
after you close the driver door, fasten your
seatbelt and start the engine.
Note: The system remembers the last
setting when you start your vehicle. Make sure you switch the system off before
towing with your vehicle or before using an
automatic car wash.
Using Auto Hold
1. Use the brakes to bring your vehicle to
a complete stop. The auto hold active
indicator illuminates in the information
display.
2. Release the brake pedal. The system holds your vehicle at a standstill. The
auto hold active indicator remains
illuminated in the information display.
Note: The system only activates if you
apply enough brake pressure. If your vehicle
is on a steep slope, you might need to press
the brake pedal harder before the system
activates.
Note: Under certain conditions, the system
could apply the electric parking brake. The
brake system warning lamp illuminates. The
electric parking brake releases when you
press the accelerator pedal. See Electric
Parking Brake (page 215).
Note: If auto-start-stop turns off the
engine, auto hold remains active.
Note: The system deactivates if you shift
into reverse (R) and press the brake pedal.
3. Pull away in the normal manner. The system releases the brakes and the
auto hold active indicator turns off.
Auto Hold Indicator
The auto hold indicator illuminates in the
information display when the system is on
and is either active or unavailable. Illuminates when the system is
active. Your vehicle remains
stationary after you release the
brake pedal.
218
Explorer (CTW) Canada/United States of America, enUSA, Edition date: 201902, Third-Printing- BrakesE297843 E197933
Page 242 of 555
WARNING: Use caution when
turning camera features on or off when
the transmission is not in park (P). Make
sure your vehicle is not moving.
Note: Some vehicles may not come
equipped with guidelines.
The rear view camera system provides a
video image of the area behind your
vehicle.
During operation, lines appear in the
display which represent your vehicle ’s path
and proximity to objects behind your
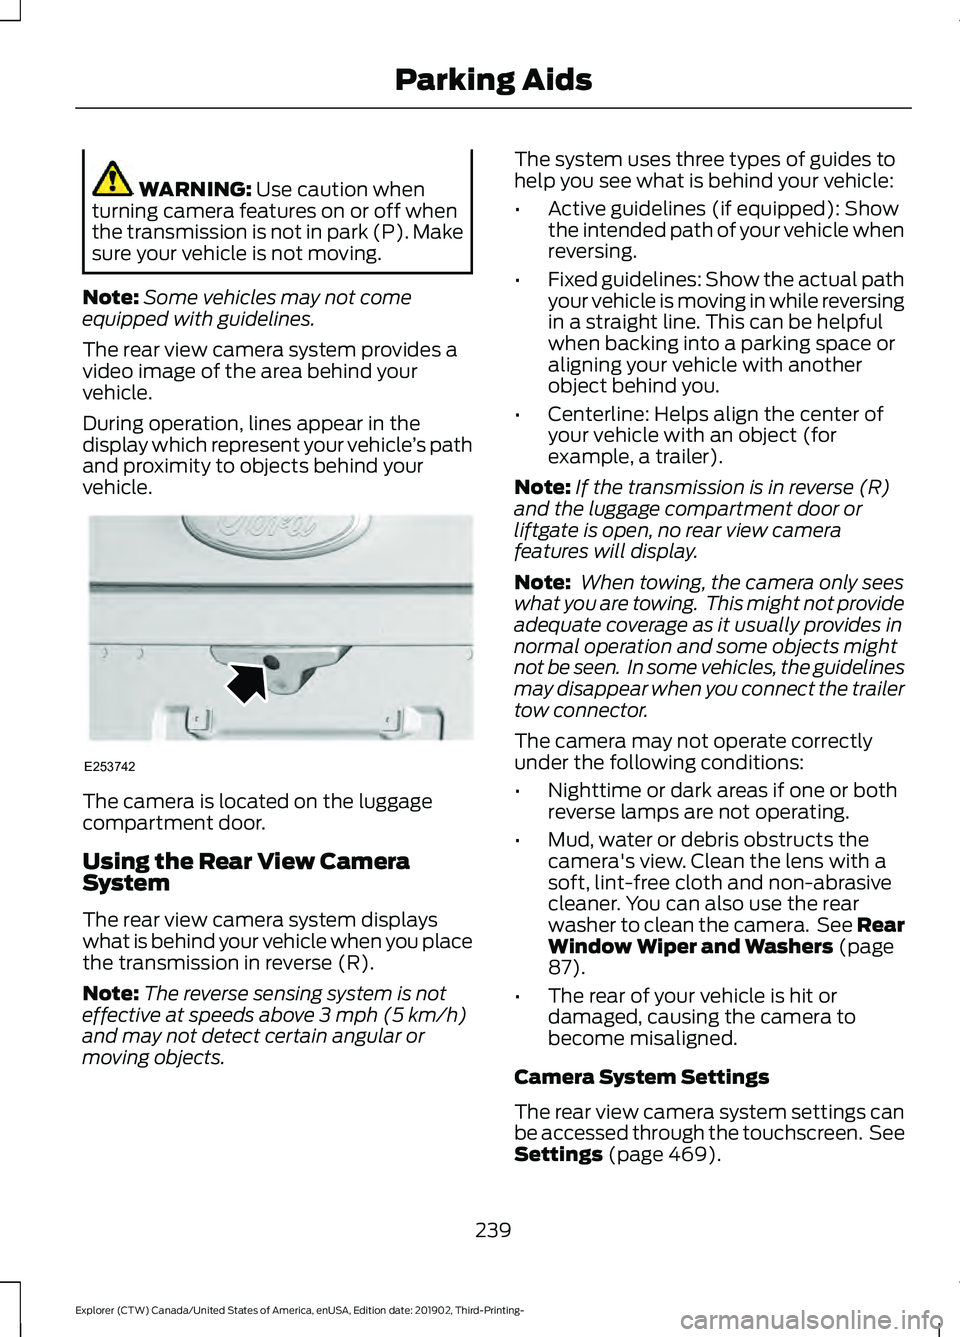
vehicle. The camera is located on the luggage
compartment door.
Using the Rear View Camera
System
The rear view camera system displays
what is behind your vehicle when you place
the transmission in reverse (R).
Note:
The reverse sensing system is not
effective at speeds above
3 mph (5 km/h)
and may not detect certain angular or
moving objects. The system uses three types of guides to
help you see what is behind your vehicle:
•
Active guidelines (if equipped): Show
the intended path of your vehicle when
reversing.
• Fixed guidelines: Show the actual path
your vehicle is moving in while reversing
in a straight line. This can be helpful
when backing into a parking space or
aligning your vehicle with another
object behind you.
• Centerline: Helps align the center of
your vehicle with an object (for
example, a trailer).
Note: If the transmission is in reverse (R)
and the luggage compartment door or
liftgate is open, no rear view camera
features will display.
Note: When towing, the camera only sees
what you are towing. This might not provide
adequate coverage as it usually provides in
normal operation and some objects might
not be seen. In some vehicles, the guidelines
may disappear when you connect the trailer
tow connector.
The camera may not operate correctly
under the following conditions:
• Nighttime or dark areas if one or both
reverse lamps are not operating.
• Mud, water or debris obstructs the
camera's view. Clean the lens with a
soft, lint-free cloth and non-abrasive
cleaner. You can also use the rear
washer to clean the camera. See Rear
Window Wiper and Washers
(page
87).
• The rear of your vehicle is hit or
damaged, causing the camera to
become misaligned.
Camera System Settings
The rear view camera system settings can
be accessed through the touchscreen. See
Settings
(page 469).
239
Explorer (CTW) Canada/United States of America, enUSA, Edition date: 201902, Third-Printing- Parking AidsE253742
Page 249 of 555

HOW DOES ADAPTIVE CRUISE
CONTROL WITH STOP AND GO
WORK
Adaptive cruise control with stop and go
uses radar and camera sensors to adjust
the speed of your vehicle to maintain a set
gap from the vehicle in front of you in the
same lane while following it to a complete
stop. You can also engage the system to
follow a vehicle in front of you and adjust
set speed while stopped.
WHAT IS ADAPTIVE CRUISE
CONTROL WITH LANE
CENTERING
Adaptive cruise control with lane centering
uses radar and camera sensors to help
keep your vehicle in the lane by applying
continuous assistance steering torque
input toward the lane center on highways.
Note:
The adaptive cruise control gap
setting operates normally.
WHAT IS INTELLIGENT
ADAPTIVE CRUISE CONTROL
Intelligent adaptive cruise control
combines speed sign recognition with
adaptive cruise control to adjust the cruise
set speed to the speed limit detected by
the speed sign recognition system. For
example, if the speed sign recognition
system detects a 50 mph (80 km/h)
speed limit, the cruise set speed is updated
to
50 mph (80 km/h).
Note: The adaptive cruise control gap
setting operates normally. ADAPTIVE CRUISE CONTROL
PRECAUTIONS - VEHICLES
WITH: ADAPTIVE CRUISE
CONTROL WITH LANE
CENTERING
Adaptive cruise control precautions apply
to lane centering unless stated otherwise
or contradicted by a lane centering
precaution. See Adaptive Cruise Control
Precautions
(page 246).
WARNING:
Do not use the system
when towing a trailer. Failure to follow
this instruction could result in the loss of
control of your vehicle, personal injury or
death. WARNING:
Do not use the system
if any changes or modifications to the
steering wheel have been made. Any
changes or modifications to the steering
wheel could affect the functionality or
performance of the system. Failure to
follow this instruction could result in the
loss of control of your vehicle, personal
injury or death.
ADAPTIVE CRUISE CONTROL
PRECAUTIONS - VEHICLES
WITH: ADAPTIVE CRUISE
CONTROL WITH STOP AND GO WARNING: You are responsible for
controlling your vehicle at all times. The
system is designed to be an aid and does
not relieve you of your responsibility to
drive with due care and attention. Failure
to follow this instruction could result in
the loss of control of your vehicle,
personal injury or death.
246
Explorer (CTW) Canada/United States of America, enUSA, Edition date: 201902, Third-Printing- Adaptive Cruise Control
(If Equipped)
Page 250 of 555
WARNING: Pay close attention to
changing road conditions such as
entering or leaving a highway, on roads
with intersections or roundabouts, roads
without visible lanes of travel, roads that
are winding, slippery, unpaved, or steep
slopes. WARNING:
The system does not
control speed in low traction conditions
or extremely steep slopes. The system
is designed to be an aid and does not
relieve you of your responsibility to drive
with due care and attention. Failure to
follow this instruction could result in
personal injury. WARNING:
The system is not a
crash warning or avoidance system. WARNING:
Do not use the system
when towing a trailer that has
aftermarket electronic trailer brake
controls. Failure to follow this instruction
could result in the loss of control of your
vehicle, personal injury or death. WARNING:
Do not use tire sizes
other than those recommended because
this can affect the normal operation of
the system. Failure to do so may result
in a loss of vehicle control, which could
result in serious injury. WARNING:
Do not use the system
with a snow plow blade installed. WARNING:
Do not use the system
in poor visibility, for example fog, heavy
rain, spray or snow. When Following a Vehicle WARNING:
When following a
vehicle that is braking, your vehicle does
not always decelerate quickly enough to
avoid a crash without driver intervention.
Apply the brakes when necessary. Failure
to follow this instruction could result in
personal injury or death.
Hilly Condition Usage
You should select a lower gear when the
system is active in situations such as
prolonged downhill driving on steep
grades, for example in mountainous areas.
The system needs additional engine
braking in these situations to reduce the
load on the vehicle ’s regular brake system
to prevent it from overheating.
Note: An audible alarm sounds and the
system shuts down if it applies brakes for
an extended period of time. This allows the
brakes to cool. The system functions
normally again after the brakes cool.
ADAPTIVE CRUISE CONTROL
LIMITATIONS - VEHICLES
WITH: ADAPTIVE CRUISE
CONTROL WITH LANE
CENTERING
Adaptive cruise control limitations apply
to lane centering unless stated otherwise
or contradicted by a lane centering
limitation. See Adaptive Cruise Control
Limitations
(page 248).
The system may not correctly operate in
any of the following conditions:
• Your vehicle is not centered in the lane.
• The lane is too narrow or wide.
247
Explorer (CTW) Canada/United States of America, enUSA, Edition date: 201902, Third-Printing- Adaptive Cruise Control
(If Equipped)