2020 FORD EXPLORER remove seats
[x] Cancel search: remove seatsPage 145 of 555
HEATED REAR WINDOW
Press the button to clear the rear
window of thin ice and fog. The
heated rear window turns off
after a short period of time.
Note: Do not use harsh chemicals, razor
blades or other sharp objects to clean or
remove decals from the inside of the heated
rear window. The vehicle warranty may not
cover damage to the heated rear window
grid lines.
HEATED EXTERIOR MIRRORS
(IF EQUIPPED)
When you switch the heated rear window
on, the heated exterior mirrors turn on.
Note: Do not remove ice from the mirrors
with a scraper or adjust the mirror glass
when it is frozen in place.
Note: Do not clean the mirror housing or
glass with harsh abrasives, fuel or other
petroleum-based cleaning products. The
vehicle warranty may not cover damage
caused to the mirror housing or glass.
REMOTE START (IF EQUIPPED)
The climate control system adjusts the
interior temperature during remote start.
You can switch this feature on or off and
adjust the settings using the touchscreen.
See
Settings (page 469).
You cannot adjust the climate control
setting during remote start operation.
Switch the ignition on to make
adjustments. Based on your remote start settings, the
following vehicle-dependent features may
or may not remain on after remote starting
your vehicle:
•
Climate controlled seats.
• Heated steering wheel.
• Heated mirrors.
• Heated rear window.
• Windshield wiper de-icer.
Note: For dual zone climate controlled
seats, the passenger seat setting defaults
to match the driver seat during remote start.
Automatic Settings
If
Auto is on, the system sets the interior
temperature to 72°F (22°C) and heats or
cools the vehicle interior as required to
achieve comfort.
Note: In cold weather, the heated rear
window and heated mirrors turn on.
Last Settings
If
Last Settings is on, the system uses the
settings last selected before you turned
off the vehicle.
Heated and Cooled Features
In Auto mode, certain heated features may
switch on during cold weather, and cooled
features during hot weather.
142
Explorer (CTW) Canada/United States of America, enUSA, Edition date: 201902, Third-Printing- Climate ControlE184884
Page 149 of 555
Second Row Outermost Seat Head
Restraints
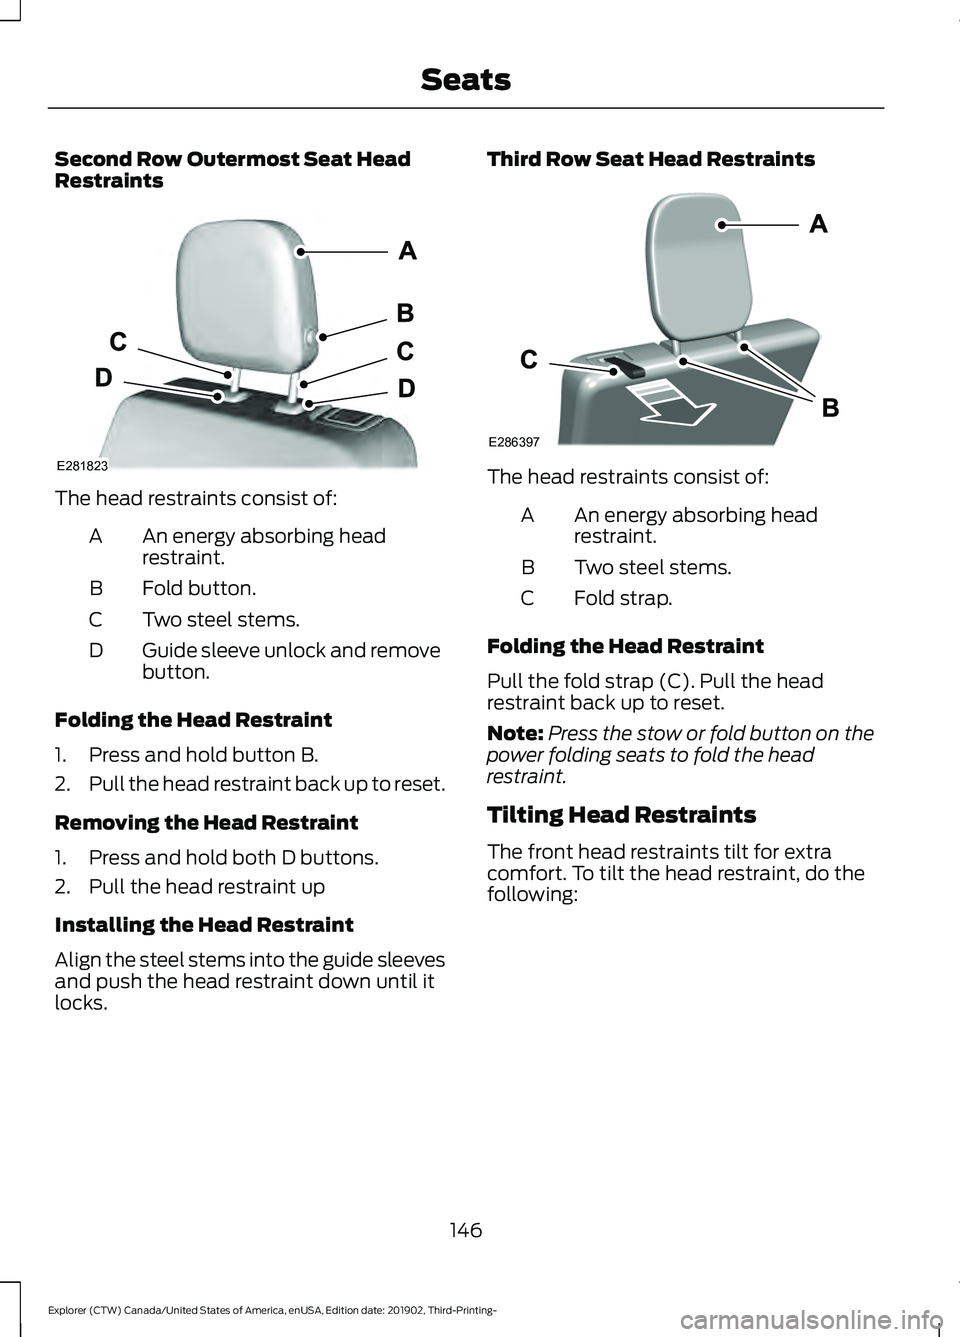
The head restraints consist of:
An energy absorbing head
restraint.
A
Fold button.
B
Two steel stems.
C
Guide sleeve unlock and remove
button.
D
Folding the Head Restraint
1. Press and hold button B.
2. Pull the head restraint back up to reset.
Removing the Head Restraint
1. Press and hold both D buttons.
2. Pull the head restraint up
Installing the Head Restraint
Align the steel stems into the guide sleeves
and push the head restraint down until it
locks. Third Row Seat Head Restraints
The head restraints consist of:
An energy absorbing head
restraint.
A
Two steel stems.
B
Fold strap.
C
Folding the Head Restraint
Pull the fold strap (C). Pull the head
restraint back up to reset.
Note: Press the stow or fold button on the
power folding seats to fold the head
restraint.
Tilting Head Restraints
The front head restraints tilt for extra
comfort. To tilt the head restraint, do the
following:
146
Explorer (CTW) Canada/United States of America, enUSA, Edition date: 201902, Third-Printing- SeatsE281823 E286397
Page 158 of 555

1. Pull the strap on the back of the
second row seat. This moves the seat
forward.
2. To return the seat to the seating position, push the seat backrest and
move the track rearward. Make sure
the seat backrest locks in the upright
position.
Folding the Third Row Manual Seat
1. Remove all objects from the seat. 2. Fold the head restraints by pulling the
head restraint release strap. 3. From the rear of the vehicle, fold the
seat backrest by pulling and holding
the strap while pushing the seat
backrest forward. Release the strap
once the seat backrest starts rotating
forward.
Note: Do not use the seat anchors as cargo
tie downs.
Note: Make sure that the area under the
seat is free of objects before stowing it.
Unfolding the Third Row Manual Seat WARNING: Do not place cargo or
any objects behind the seat backrest
before returning it to the original position.
Pull on the seat backrest to make sure
that it has fully latched after returning
the seat backrest to its original position.
An unlatched seat may become
dangerous if you stop suddenly or have
a crash.
Note: Make sure that there are no objects
such as books, purses or briefcases on the
load floor before unstowing the seat. Failure
to remove all objects from the top of the
load floor prior to unstowing it may cause
damage to the seat.
Note: Make sure the area under the load
floor is free of objects before unstowing it. 155
Explorer (CTW) Canada/United States of America, enUSA, Edition date: 201902, Third-Printing- SeatsE291067 E286398 E286399
Page 164 of 555
REAR OCCUPANT ALERT
SYSTEM INDICATORS
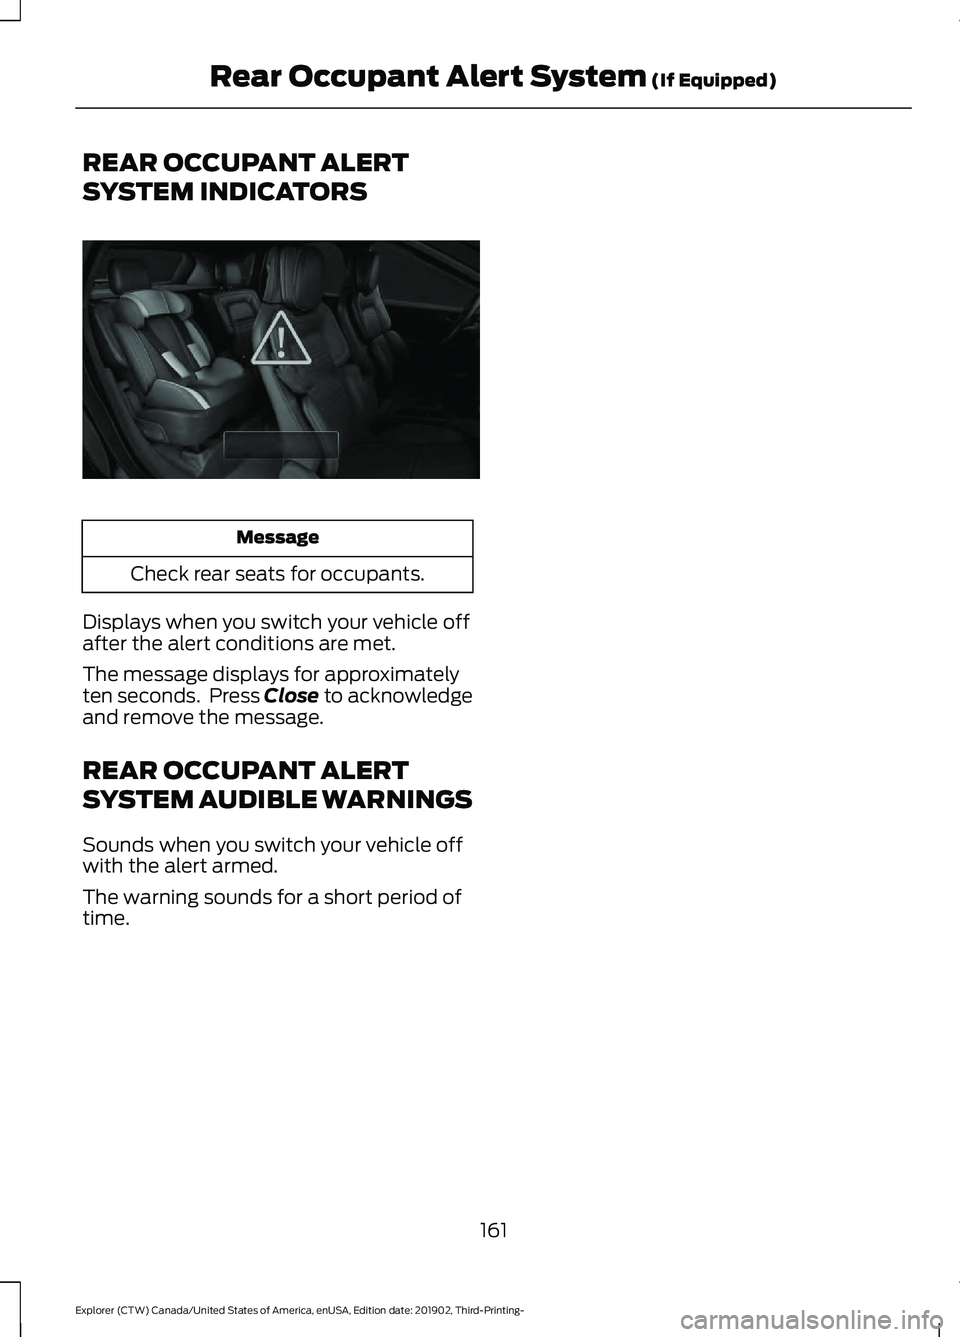
Message
Check rear seats for occupants.
Displays when you switch your vehicle off
after the alert conditions are met.
The message displays for approximately
ten seconds. Press Close to acknowledge
and remove the message.
REAR OCCUPANT ALERT
SYSTEM AUDIBLE WARNINGS
Sounds when you switch your vehicle off
with the alert armed.
The warning sounds for a short period of
time.
161
Explorer (CTW) Canada/United States of America, enUSA, Edition date: 201902, Third-Printing- Rear Occupant Alert System (If Equipped)E325002
Page 342 of 555
Note:
If you only disconnect the negative
battery cable terminal, make sure it is
isolated or placed away from the battery
terminal to avoid unintended connection or
arcing.
If you replace the battery make sure it
matches the electrical requirements of
your vehicle.
If you disconnect or replace the battery
and your vehicle has an automatic
transmission, it must relearn its adaptive
strategy. Because of this, the transmission
may shift firmly when first driven. This is
normal operation while the transmission
fully updates its operation to optimum
shift feel.
Battery Management System (If
Equipped)
The battery management system monitors
battery conditions and takes actions to
extend battery life. If excessive battery
drain is detected, the system temporarily
disables some electrical systems to
protect the battery.
Systems included are:
• Heated rear window.
• Heated seats.
• Climate control.
• Heated steering wheel.
• Audio unit.
• Navigation system.
A message may appear in the information
displays to alert you that battery
protection actions are active. These
messages are only for notification that an
action is taking place, and not intended to
indicate an electrical problem or that the
battery requires replacement. After battery replacement, or in some
cases after charging the battery with an
external charger, the battery management
system requires eight hours of vehicle sleep
time to relearn the battery state of charge.
During this time your vehicle must remain
fully locked with the ignition switched off.
Note:
Prior to relearning the battery state
of charge, the battery management system
may temporarily disable some electrical
systems.
Electrical Accessory Installation
To make sure the battery management
system works correctly, do not connect an
electrical device ground connection
directly to the battery negative post. This
can cause inaccurate measurements of
the battery condition and potential
incorrect system operation.
Note: If you add electrical accessories or
components to the vehicle, it may adversely
affect battery performance and durability.
This may also affect the performance of
other electrical systems in the vehicle.
Remove and Reinstall the Battery
To disconnect or remove the battery, do
the following:
1. Apply the parking brake and switch the
ignition off.
2. Switch all electrical equipment off, for
example lights and radio.
3. Wait a minimum of two minutes before
disconnecting the battery.
Note: The engine management system has
a power hold function and remains powered
for a period of time after you switch the
ignition off. This is to allow diagnostic and
adaptive tables to be stored. Disconnecting
the battery without waiting can cause
damage not covered by the vehicle
Warranty.
339
Explorer (CTW) Canada/United States of America, enUSA, Edition date: 201902, Third-Printing- Maintenance
Page 351 of 555
To clean the windshield and wiper blades:
•
Clean the windshield with a
non-abrasive glass cleaner. When
cleaning the interior of the windshield,
avoid getting any glass cleaner on the
instrument panel or door panels. Wipe
any glass cleaner off these surfaces
immediately.
• For windshields contaminated with
tree sap, chemicals, wax or bugs, clean
the entire windshield using steel wool
(no greater than 0000 grade) in a
circular motion and rinse with water.
• Clean the wiper blades with isopropyl
rubbing alcohol or windshield washer
concentrate.
Note: Do not use razor blades or other
sharp objects to clean or remove decals
from the inside of the heated rear window.
The vehicle warranty does not cover
damage caused to the heated rear window
grid lines.
CLEANING THE INTERIOR WARNING: Do not use cleaning
solvents, bleach or dye on the vehicle's
seatbelts, as these actions may weaken
the belt webbing. WARNING:
On vehicles equipped
with seat-mounted airbags, do not use
chemical solvents or strong detergents.
Such products could contaminate the
side airbag system and affect
performance of the side airbag in a crash.
For fabric, carpets, cloth seats and seats
equipped with side airbags:
• Remove dust and loose dirt with a
vacuum cleaner.
• Remove light stains and soil with
Motorcraft Professional Strength
Carpet & Upholstery Cleaner. •
If grease or tar is present on the
material, spot-clean the area first with
Motorcraft Spot and Stain Remover. In
Canada, use Motorcraft Multi-Purpose
Cleaner.
• If a ring forms on the fabric after spot
cleaning, clean the entire area
immediately (but do not oversaturate)
or the ring will set.
• Do not use household cleaning
products or glass cleaners, which can
stain and discolor the fabric and affect
the flame retardant abilities of the seat
materials.
Mirrors
Do not clean the housing or glass of any
mirror with harsh abrasives, fuel or other
petroleum or ammonia-based cleaning
products.
CLEANING THE INSTRUMENT
PANEL AND INSTRUMENT
CLUSTER LENS WARNING:
Do not use chemical
solvents or strong detergents when
cleaning the steering wheel or
instrument panel to avoid contamination
of the airbag system.
Note: Follow the same procedure as
cleaning leather seats for cleaning leather
instrument panels and leather interior trim
surfaces. See
Cleaning Leather Seats
(page 349).
Clean the instrument panel and cluster
lens with a clean, damp and soft cloth,
then use a clean, dry and soft cloth to dry
these areas.
348
Explorer (CTW) Canada/United States of America, enUSA, Edition date: 201902, Third-Printing- Vehicle Care
Page 352 of 555
•
Avoid cleaners or polishes that increase
the gloss of the upper portion of the
instrument panel. The dull finish in this
area helps protect you from
undesirable windshield reflection.
• Do not use any household cleaning
products or glass cleaners as these
may damage the finish of the
instrument panel, interior trim and
cluster lens.
• Wash or wipe your hands clean if you
have been in contact with certain
products such as insect repellent and
suntan lotion to avoid possible damage
to the interior painted surfaces.
• Do not allow air fresheners and hand
sanitizers to spill onto interior surfaces.
If a spill occurs, wipe off immediately.
Your warranty may not cover these
damages.
If a staining liquid like coffee or juice has
been spilled on the instrument panel or on
interior trim surfaces:
1. Wipe up spilled liquid using a clean, soft cloth as quickly as possible.
2. Use Motorcraft Premium Leather and Vinyl Cleaner or a commercially
available leather cleaning product for
automotive interiors. Test any cleaner
or stain remover on an inconspicuous
area.
3. Alternatively, wipe the surface with a clean, soft cloth and a mild soap and
water solution. Dry the area with a
clean, soft cloth.
4. If necessary, apply more soap and water solution or cleaning product to
a clean, soft cloth and press it onto the
soiled area. Allow this to set at room
temperature for 30 minutes.
5. Remove the soaked cloth, then with a clean, damp cloth, use a rubbing
motion for 60 seconds on the soiled
area. 6. Dry the area with a clean, soft cloth.
CLEANING LEATHER SEATS
Note:
Follow the same procedure as
cleaning leather seats for cleaning leather
instrument panels and leather interior trim
surfaces.
For routine cleaning, wipe the surface with
a soft, damp cloth and a mild soap and
water solution. Dry the area with a clean,
soft cloth.
For cleaning and removing stains such as
dye transfer, use Motorcraft Premium
Leather and Vinyl Cleaner or a
commercially available leather cleaning
product for automotive interiors.
Note: Test any cleaner or stain remover on
an inconspicuous area.
You should:
• Remove dust and loose dirt with a
vacuum cleaner.
• Clean and treat spills and stains as
soon as possible.
Do not use the following products as these
may damage the leather:
• Oil and petroleum or silicone-based
leather conditioners.
• Household cleaners.
• Alcohol solutions.
• Solvents or cleaners intended
specifically for rubber, vinyl and
plastics.
349
Explorer (CTW) Canada/United States of America, enUSA, Edition date: 201902, Third-Printing- Vehicle Care
Page 543 of 555

Changing a Bulb...........................................343
LED Lamps........................................................... 343
License Plate Lamp.......................................... 344
Rear Direction Indicator and Reversing Lamp................................................................. 343
Changing a Fuse............................................321
Fuses........................................................................\
321
Changing a Road Wheel
............................376
Dissimilar Spare Wheel and Tire Assembly
Information...................................................... 376
Tire Change Procedure..................................... 377
Changing the 12V Battery.........................338 Battery Management System....................... 339
Remove and Reinstall the Battery..............339
Changing the Engine Air Filter - 2.3L EcoBoost™.................................................329
Changing the Engine Air Filter - 3.0L................................................................330
Changing the Engine Air Filter - 3.3L..................................................................331
Changing the Front Wiper Blades.........342
Changing the Rear Wiper Blades...........342
Changing the Vehicle Wi-Fi Hotspot Name or Password
..................................429
Checking MyKey System Status..............66 MyKey Distance.................................................... 66
Number of Admin Keys...................................... 67
Number of MyKeys............................................... 67
Checking the Wiper Blades......................342
Child Restraint and Seatbelt Maintenance.................................................43
Child Restraint Positioning.........................35
Child Safety......................................................23 General Information............................................ 23
Child Safety Locks.........................................36 Left-Hand Side...................................................... 37
Right-Hand Side................................................... 37
Cleaning Leather Seats
.............................349
Cleaning Products.......................................345 Materials............................................................... 345
Cleaning the Engine
....................................347
Cleaning the Exterior..................................346 Cleaning the Headlamps................................ 346
Exterior Chrome Parts..................................... 346
Exterior Plastic Parts........................................ 346
Stripes or Graphics........................................... 346
Underbody............................................................ 347
Under Hood.......................................................... 347Cleaning the Instrument Panel and
Instrument Cluster Lens........................348
Cleaning the Interior...................................348 Mirrors.................................................................... 348
Cleaning the Wheels..................................350
Cleaning the Windows and Wiper Blades............................................................347
Clearing All MyKeys.......................................66
Climate............................................................456 Accessing Rear Climate Controls................458
Accessing the Climate Control Menu........456
Directing the Airflow........................................ 456
Rear Climate Control Lock Indicator..........458
Setting the Blower Motor Speed.................456
Setting the Temperature................................ 456
Switching Auto Mode On and Off...............456
Switching Dual Zone Mode On and Off....................................................................... 457
Switching Maximum Air Conditioning On and Off.............................................................. 457
Switching Maximum Defrost On and Off....................................................................... 457
Switching Rear Auto Mode On and Off...................................................................... 458
Switching Recirculated Air On and Off...................................................................... 458
Switching the Air Conditioning On and Off...................................................................... 456
Switching the Climate Controlled Seats On and Off.............................................................. 457
Switching the Climate Control On and Off....................................................................... 457
Switching the Heated Exterior Mirrors On and Off.............................................................. 457
Switching the Heated Rear Window On and Off....................................................................... 457
Switching the Heated Seats On and Off....................................................................... 457
Switching the Heated Steering Wheel On and Off.............................................................. 457
Switching the Heated Windshield On and Off....................................................................... 457
Switching the Rear Climate Controlled Seats On and Off.......................................... 458
Switching the Rear Heated Seats On and Off...................................................................... 458
Switching the Rear Ventilated Seats On and Off............................................................. 458
540
Explorer (CTW) Canada/United States of America, enUSA, Edition date: 201902, Third-Printing- Index