2020 FORD EXPEDITION sport mode
[x] Cancel search: sport modePage 27 of 542

5. To put the retractor in the automatic
locking mode, grasp the shoulder
portion of the belt and pull downward
until you pull all of the belt out.
Note: The automatic locking mode is
available on the front passenger and rear
seats.
6. Allow the belt to retract to remove slack. The belt will click as it retracts
to indicate it is in the automatic locking
mode.
7. Try to pull the belt out of the retractor to make sure the retractor is in the
automatic locking mode (you should
not be able to pull more belt out). If the
retractor is not locked, unbuckle the
belt and repeat Steps 5 and 6. 8.
Remove remaining slack from the belt.
Force the seat down with extra weight,
for example, by pressing down or
kneeling on the child restraint while
pulling up on the shoulder belt in order
to force slack from the belt. This is
necessary to remove the remaining
slack that exists once the extra weight
of the child is added to the child
restraint. It also helps to achieve the
proper snugness of the child restraint
to your vehicle. Sometimes, a slight
lean toward the buckle provides extra
help to remove remaining slack from
the belt.
9. Attach the tether strap (if the child restraint is equipped). 10. Before placing the child in the seat,
forcibly move the seat forward and
back to make sure the seat is securely
held in place. To check this, grab the
seat at the belt path and attempt to
move it side to side and forward and
back. There should be no more than
1 in (2.5 cm) of movement for proper
installation.
We recommend checking with a NHTSA
Certified Child Passenger Safety
Technician to make certain the child
restraint is properly installed. In Canada,
check with Transport Canada for referral
to a Child Car Seat Clinic.
24
Expedition (TB8) Canada/United States of America, enUSA, Edition date: 201907, Third-Printing- Child SafetyE142875 E142533 E142534
Page 86 of 542

2. Insert the first programmed key in the
backup slot.
3. Press the push button ignition switch.
4. Wait five seconds and then press the push button ignition switch again.
5. Remove the intelligent access key.
6. Within 10 seconds, place a second programmed intelligent access key in
the backup slot and press the push
button ignition switch.
7. Wait five seconds and then press the push button ignition switch again.
8. Remove the intelligent access key.
9. Wait five seconds, then place the unprogrammed intelligent access key
in the backup slot and press the push
button ignition switch.
10. Once complete, the information cluster displays a message
confirming the key has been
programmed. The direction indicators
flash and the horn sounds.
Programming is now complete. Check that
the remote control functions operate and
your vehicle starts with the new intelligent
access key.
If programming was unsuccessful, wait 10
seconds and repeat steps 1 through 7. If it
still does not work, take your vehicle to an
authorized dealer.
ANTI-THEFT ALARM
The active anti-theft system is designed
to warn you in the event of unauthorized
vehicle entry and is also designed to help
prevent unwanted towing of your vehicle.
You can choose what is monitored by
arming the system in different ways. See
Information Displays (page 114).
The direction indicators flash and the horn
sounds if the system triggers while the
alarm is armed. Take all remote controls to an authorized
dealer if there is any potential alarm
problem with your vehicle.
Using the System
You can select two levels of alarm security.
You can change the level of security when
the ignition is switched off through the
information display with the two options
below:
Perimeter Only (If Equipped)
Perimeter only monitors the following:
•
Doors.
• Hood.
• Liftgate.
All Sensors (If Equipped)
All sensors monitors the following:
• Doors.
• Hood.
• Liftgate.
• Movement inside your vehicle.
• Change in vehicle inclination, for
example, unwanted towing.
Note: Do not choose all sensors monitor
mode when the vehicle is in transport or if
movement within the vehicle is likely to
occur.
Note: For correct operation of the interior
motion detection system, make sure you
close all the windows prior to arming the
system. This helps prevent accidental alarm
activation due to external influences.
Additionally, the interior motion sensing
system does not arm if any door is ajar.
83
Expedition (TB8) Canada/United States of America, enUSA, Edition date: 201907, Third-Printing- Security
Page 128 of 542

Action
Message
The status of the AdvanceTrac sport mode after you switched it on.
AdvanceTrac SPORT
MODE
The status of the traction control system after you switchedit off. See Using Traction Control (page 213).
Traction Control Off
The status of the traction control system after you switchedit on. See
Using Traction Control (page 213).
Traction Control On
Airbag Action
Message
Displays when the system detects a malfunction due to a blocked sensor.
Occupant Sensor
BLOCKED Remove
Objects Near Passenger Seat
Alarm and Security Action
Message
Alarm triggered due to unauthorized entry. See
Anti-Theft
Alarm (page 83).
Vehicle Alarm To Stop
Alarm, Start Vehicle.
Automatic Engine Shutdown Action
Message
The engine is getting ready to shut off.
Engine Shuts Off In
{seconds to shut off:#0} Seconds
The engine has shut off to help increase fuel economy.
Engine Shut Off For Fuel
Economy
The engine is getting ready to shut off. You can press
OK on
the left steering wheel button to override the shut down.
Engine Shuts Off in
{seconds to shut off:#0} Seconds Press Ok to Override
125
Expedition (TB8) Canada/United States of America, enUSA, Edition date: 201907, Third-Printing- Information Displays
Page 134 of 542
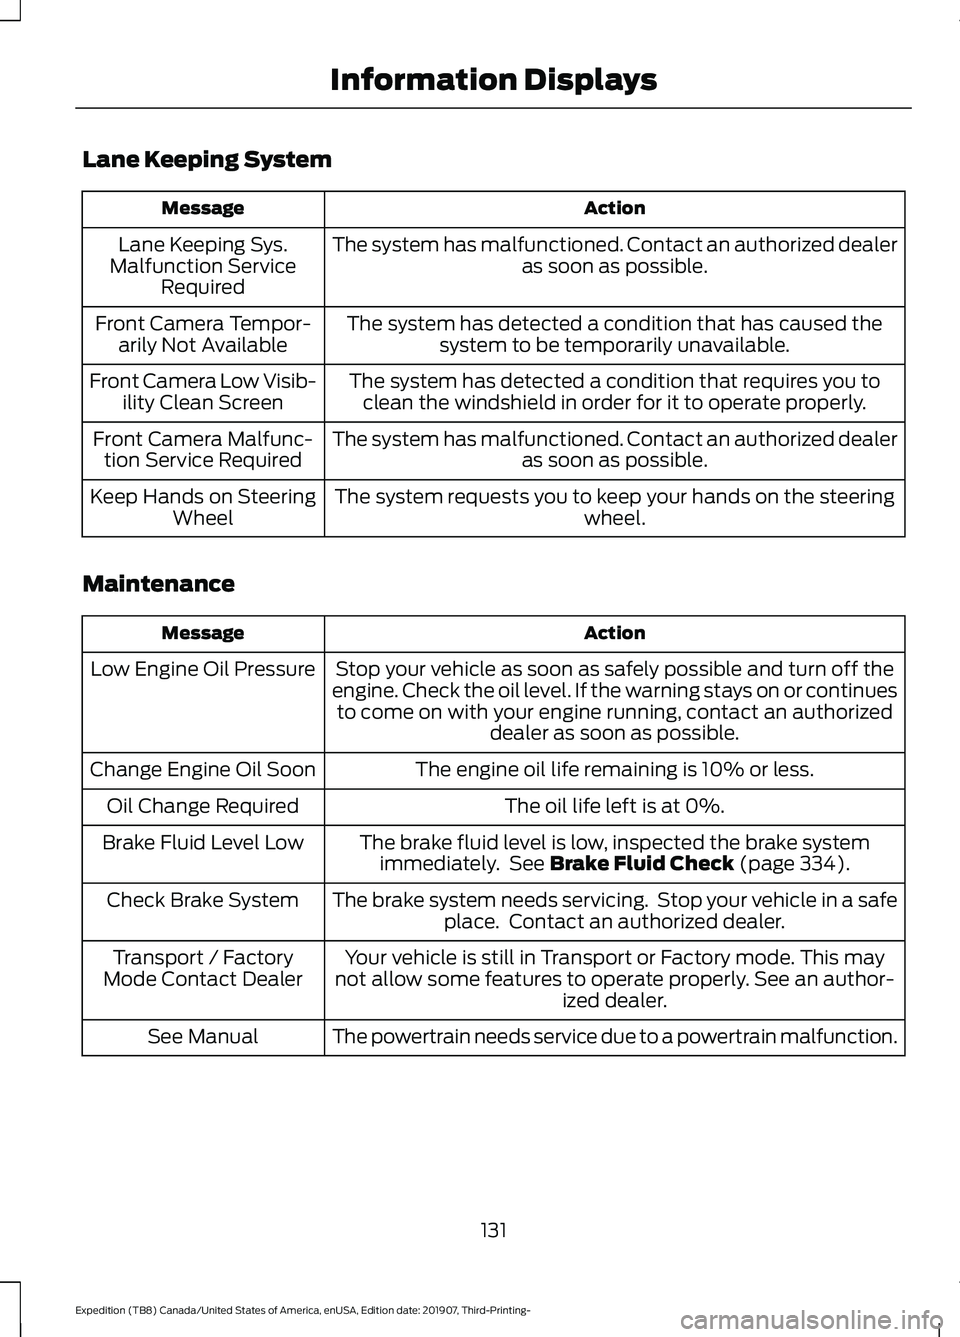
Lane Keeping System
Action
Message
The system has malfunctioned. Contact an authorized dealer as soon as possible.
Lane Keeping Sys.
Malfunction Service Required
The system has detected a condition that has caused thesystem to be temporarily unavailable.
Front Camera Tempor-
arily Not Available
The system has detected a condition that requires you toclean the windshield in order for it to operate properly.
Front Camera Low Visib-
ility Clean Screen
The system has malfunctioned. Contact an authorized dealeras soon as possible.
Front Camera Malfunc-
tion Service Required
The system requests you to keep your hands on the steering wheel.
Keep Hands on Steering
Wheel
Maintenance Action
Message
Stop your vehicle as soon as safely possible and turn off the
engine. Check the oil level. If the warning stays on or continues to come on with your engine running, contact an authorized dealer as soon as possible.
Low Engine Oil Pressure
The engine oil life remaining is 10% or less.
Change Engine Oil Soon
The oil life left is at 0%.
Oil Change Required
The brake fluid level is low, inspected the brake systemimmediately. See Brake Fluid Check (page 334).
Brake Fluid Level Low
The brake system needs servicing. Stop your vehicle in a safeplace. Contact an authorized dealer.
Check Brake System
Your vehicle is still in Transport or Factory mode. This may
not allow some features to operate properly. See an author- ized dealer.
Transport / Factory
Mode Contact Dealer
The powertrain needs service due to a powertrain malfunction.
See Manual
131
Expedition (TB8) Canada/United States of America, enUSA, Edition date: 201907, Third-Printing- Information Displays
Page 174 of 542
This device complies with Industry Canada
licence-exempt RSS standard(s).
Operation is subject to:
•
This device may not cause interference.
• This device must accept any
interference, including interference that
may cause undesired operation of the
device.
Note: Devices without built-in Qi wireless
charging receivers require an additional Qi
receiver or sleeve.
Note: For compatible devices with built-in
Qi wireless charging capability, the charging
performance may be affected if your device
is in a case. It may be necessary to remove
the case to wirelessly charge your device.
The system supports one Qi wireless
charging compatible device on the
charging area.
Keep the charging area clean and remove
foreign objects prior to charging a device.
Do not place items with a magnetic strip,
for example passports, parking tickets or
credit cards, near the charging area when
charging a device. Damage may occur to
the magnetic strip. Do not place metal objects, for example
remote controls, coins and candy
wrappers, on or near the charging area
when charging a device. Metal objects may
heat up and degrade the charging
performance.
Note:
The device controls the rate of
charge, or charging power. During charging,
the device and the charger may heat up, this
is normal. If the battery gets hotter than
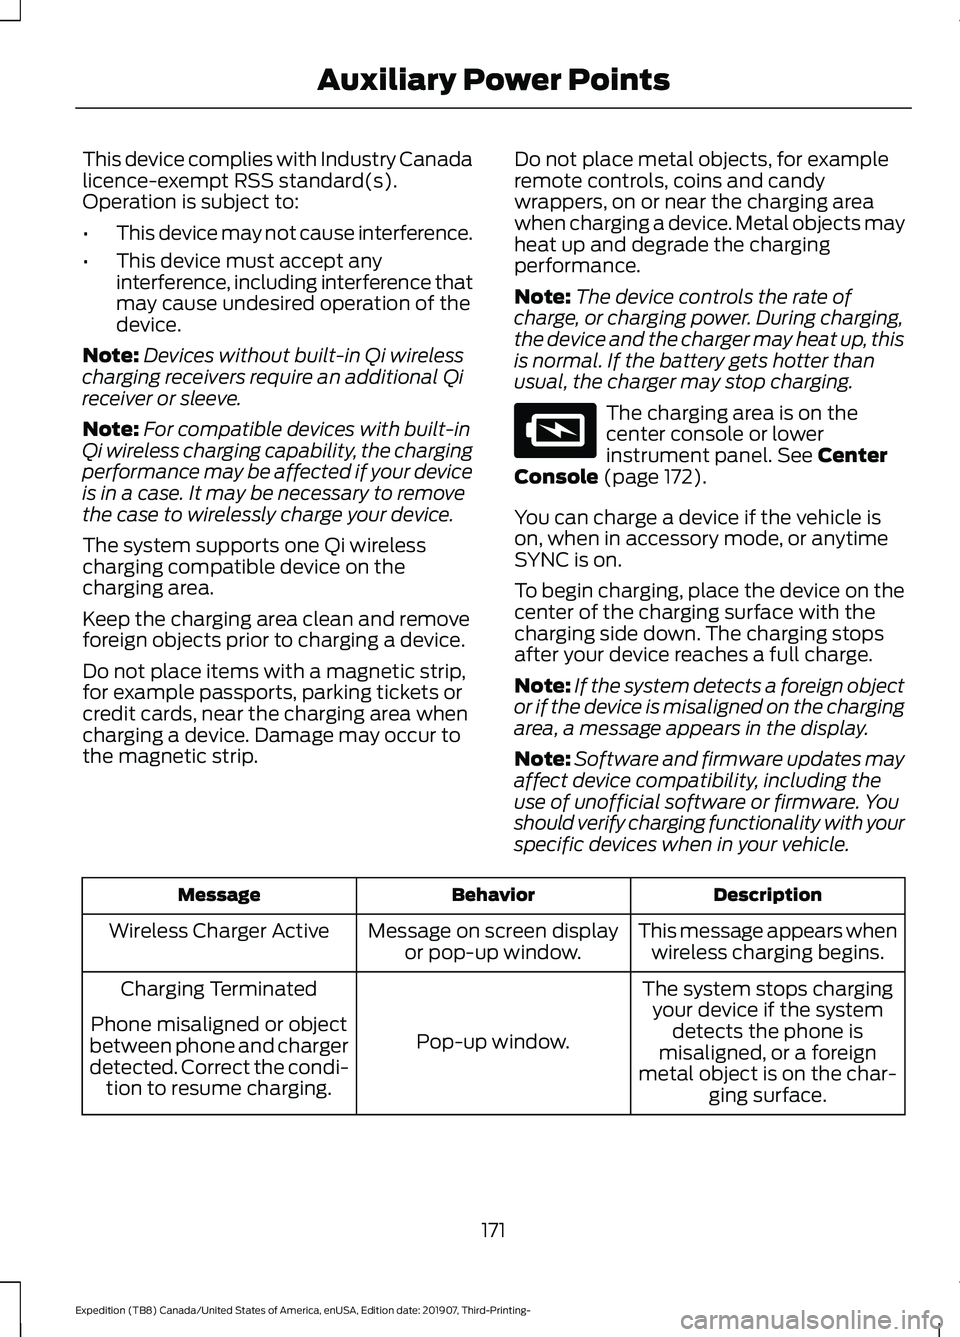
usual, the charger may stop charging. The charging area is on the
center console or lower
instrument panel. See Center
Console (page 172).
You can charge a device if the vehicle is
on, when in accessory mode, or anytime
SYNC is on.
To begin charging, place the device on the
center of the charging surface with the
charging side down. The charging stops
after your device reaches a full charge.
Note: If the system detects a foreign object
or if the device is misaligned on the charging
area, a message appears in the display.
Note: Software and firmware updates may
affect device compatibility, including the
use of unofficial software or firmware. You
should verify charging functionality with your
specific devices when in your vehicle. Description
Behavior
Message
This message appears whenwireless charging begins.
Message on screen display
or pop-up window.
Wireless Charger Active
The system stops chargingyour device if the system detects the phone is
misaligned, or a foreign
metal object is on the char- ging surface.
Pop-up window.
Charging Terminated
Phone misaligned or object
between phone and charger
detected. Correct the condi- tion to resume charging.
171
Expedition (TB8) Canada/United States of America, enUSA, Edition date: 201907, Third-Printing- Auxiliary Power PointsE297549
Page 183 of 542
•
Hill descent control is not active.
• You have not selected Tow haul, Sport,
Sand or Mud/Rut modes.
Note: Note when in Sport mode it can be
enabled by pressing the Auto-Start-Stop
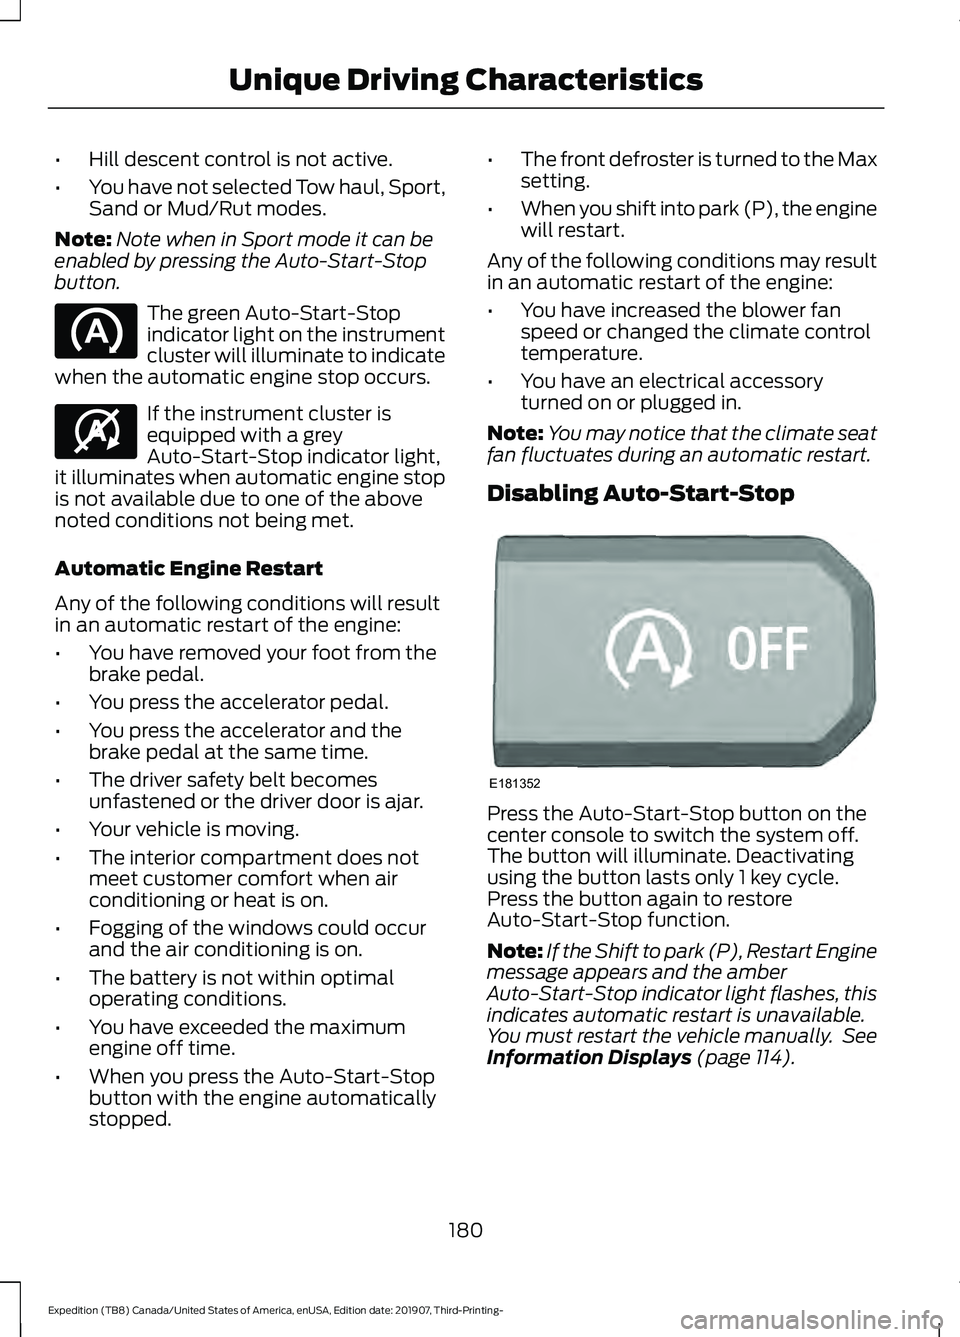
button. The green Auto-Start-Stop
indicator light on the instrument
cluster will illuminate to indicate
when the automatic engine stop occurs. If the instrument cluster is
equipped with a grey
Auto-Start-Stop indicator light,
it illuminates when automatic engine stop
is not available due to one of the above
noted conditions not being met.
Automatic Engine Restart
Any of the following conditions will result
in an automatic restart of the engine:
• You have removed your foot from the
brake pedal.
• You press the accelerator pedal.
• You press the accelerator and the
brake pedal at the same time.
• The driver safety belt becomes
unfastened or the driver door is ajar.
• Your vehicle is moving.
• The interior compartment does not
meet customer comfort when air
conditioning or heat is on.
• Fogging of the windows could occur
and the air conditioning is on.
• The battery is not within optimal
operating conditions.
• You have exceeded the maximum
engine off time.
• When you press the Auto-Start-Stop
button with the engine automatically
stopped. •
The front defroster is turned to the Max
setting.
• When you shift into park (P), the engine
will restart.
Any of the following conditions may result
in an automatic restart of the engine:
• You have increased the blower fan
speed or changed the climate control
temperature.
• You have an electrical accessory
turned on or plugged in.
Note: You may notice that the climate seat
fan fluctuates during an automatic restart.
Disabling Auto-Start-Stop Press the Auto-Start-Stop button on the
center console to switch the system off.
The button will illuminate. Deactivating
using the button lasts only 1 key cycle.
Press the button again to restore
Auto-Start-Stop function.
Note:
If the Shift to park (P), Restart Engine
message appears and the amber
Auto-Start-Stop indicator light flashes, this
indicates automatic restart is unavailable.
You must restart the vehicle manually. See
Information Displays (page 114).
180
Expedition (TB8) Canada/United States of America, enUSA, Edition date: 201907, Third-Printing- Unique Driving Characteristics E146361 E181352
Page 266 of 542
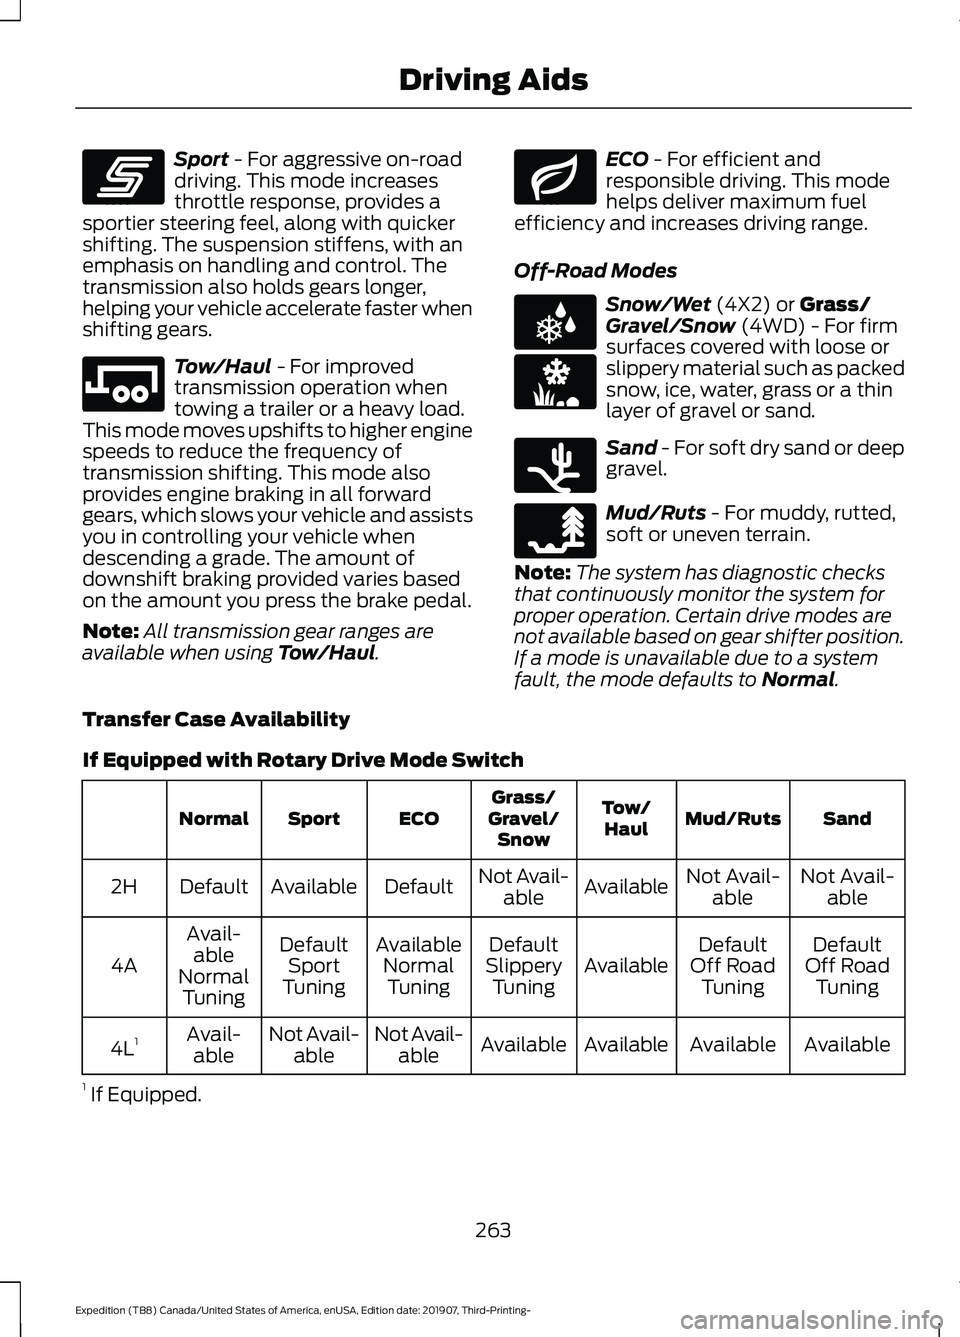
Sport - For aggressive on-road
driving. This mode increases
throttle response, provides a
sportier steering feel, along with quicker
shifting. The suspension stiffens, with an
emphasis on handling and control. The
transmission also holds gears longer,
helping your vehicle accelerate faster when
shifting gears. Tow/Haul
- For improved
transmission operation when
towing a trailer or a heavy load.
This mode moves upshifts to higher engine
speeds to reduce the frequency of
transmission shifting. This mode also
provides engine braking in all forward
gears, which slows your vehicle and assists
you in controlling your vehicle when
descending a grade. The amount of
downshift braking provided varies based
on the amount you press the brake pedal.
Note: All transmission gear ranges are
available when using
Tow/Haul. ECO
- For efficient and
responsible driving. This mode
helps deliver maximum fuel
efficiency and increases driving range.
Off-Road Modes Snow/Wet
(4X2) or Grass/
Gravel/Snow (4WD) - For firm
surfaces covered with loose or
slippery material such as packed
snow, ice, water, grass or a thin
layer of gravel or sand. Sand
- For soft dry sand or deep
gravel. Mud/Ruts
- For muddy, rutted,
soft or uneven terrain.
Note: The system has diagnostic checks
that continuously monitor the system for
proper operation. Certain drive modes are
not available based on gear shifter position.
If a mode is unavailable due to a system
fault, the mode defaults to
Normal.
Transfer Case Availability
If Equipped with Rotary Drive Mode Switch Sand
Mud/Ruts
Tow/
Haul
Grass/
Gravel/ Snow
ECO
Sport
Normal
Not Avail-able
Not Avail-
able
Available
Not Avail-
able
Default
Available
Default
2H
Default
Off Road Tuning
Default
Off Road Tuning
Available
Default
Slippery Tuning
Available
NormalTuning
Default
Sport
Tuning
Avail-
able
Normal Tuning
4A
Available
Available
Available
Available
Not Avail-
able
Not Avail-
able
Avail-
able
4L 1
1 If Equipped.
263
Expedition (TB8) Canada/United States of America, enUSA, Edition date: 201907, Third-Printing- Driving AidsE246593 E246592 E246597 E225312 E246594 E246596 E246595
Page 267 of 542
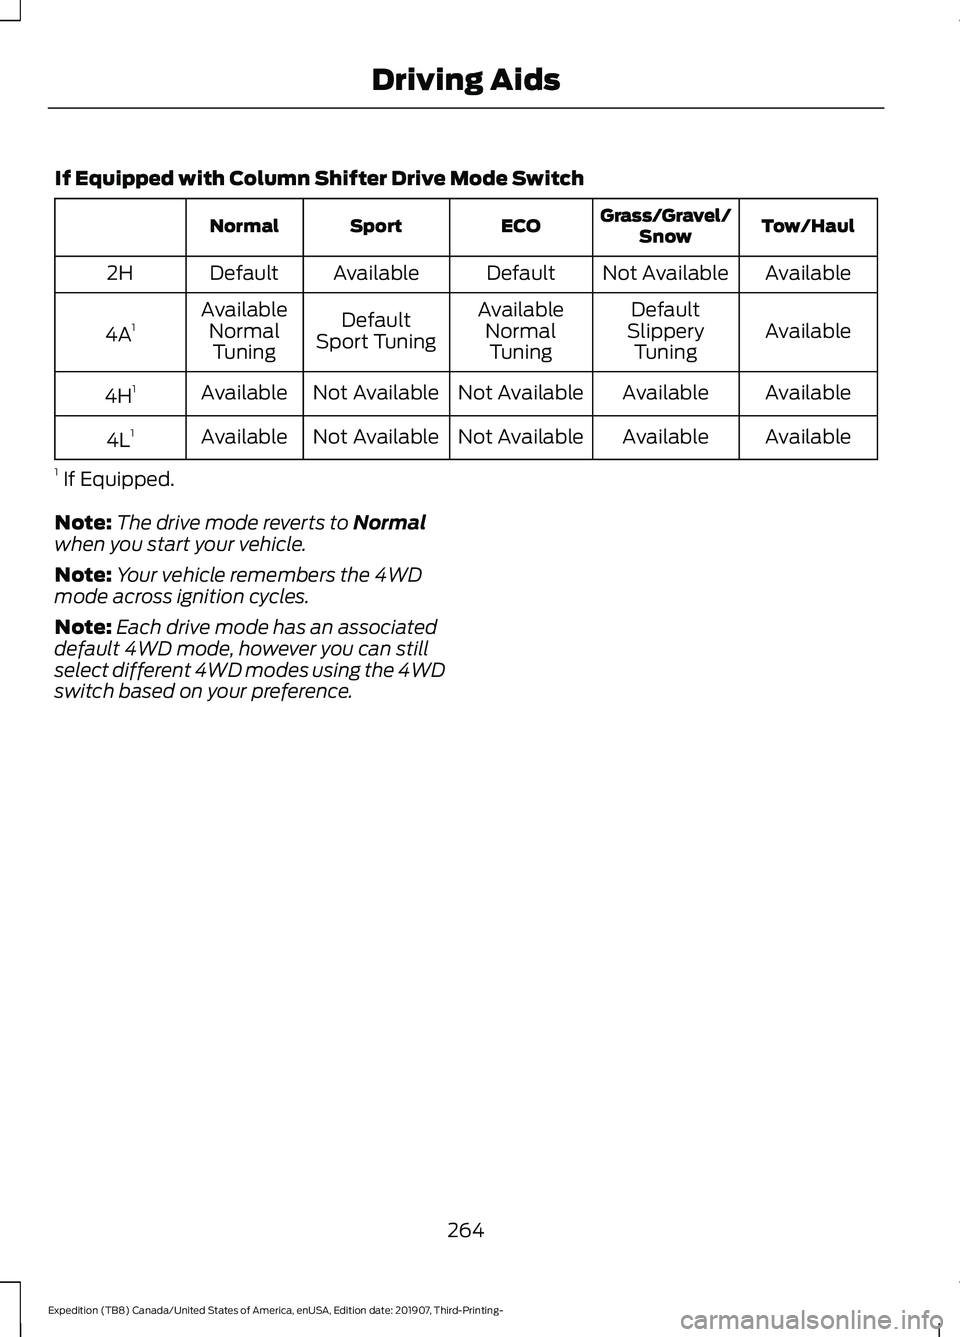
If Equipped with Column Shifter Drive Mode Switch
Tow/Haul
Grass/Gravel/
Snow
ECO
Sport
Normal
Available
Not Available
Default
Available
Default
2H
Available
Default
Available
Default
Available
4A 1
Slippery
Tuning
Normal
Tuning
Sport Tuning
Normal
Tuning
Available
Available
Not Available
Not Available
Available
4H 1
Available
Available
Not Available
Not Available
Available
4L 1
1 If Equipped.
Note: The drive mode reverts to Normal
when you start your vehicle.
Note: Your vehicle remembers the 4WD
mode across ignition cycles.
Note: Each drive mode has an associated
default 4WD mode, however you can still
select different 4WD modes using the 4WD
switch based on your preference.
264
Expedition (TB8) Canada/United States of America, enUSA, Edition date: 201907, Third-Printing- Driving Aids