2020 FORD EXPEDITION heating
[x] Cancel search: heatingPage 93 of 542

Press the button to switch the
heated steering wheel on and
off.
Note: You can use the heated steering
wheel only when the engine is running.
Note: The system uses a sensor and is
designed to control the temperature of the
steering wheel and to prevent it from
overheating.
Note: In warm temperatures, the steering
wheel quickly reaches its maximum
temperature and the system reduces the
current to the heating element. This could
cause you to think that the system has
stopped working but it has not. This is
normal.
HORN 90
Expedition (TB8) Canada/United States of America, enUSA, Edition date: 201907, Third-Printing- Steering Wheel E270945
Page 114 of 542
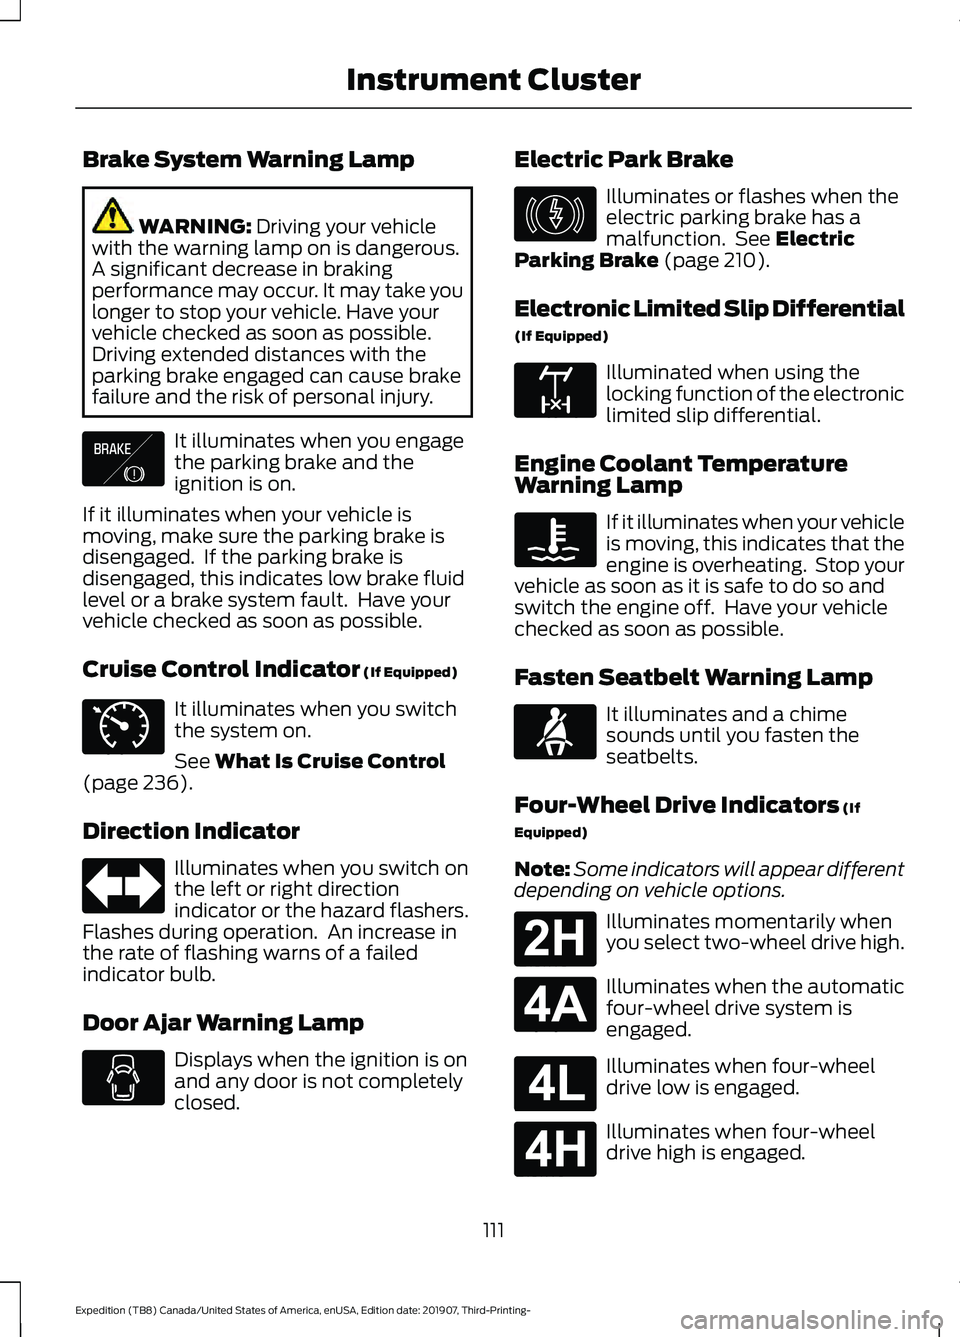
Brake System Warning Lamp
WARNING: Driving your vehicle
with the warning lamp on is dangerous.
A significant decrease in braking
performance may occur. It may take you
longer to stop your vehicle. Have your
vehicle checked as soon as possible.
Driving extended distances with the
parking brake engaged can cause brake
failure and the risk of personal injury. It illuminates when you engage
the parking brake and the
ignition is on.
If it illuminates when your vehicle is
moving, make sure the parking brake is
disengaged. If the parking brake is
disengaged, this indicates low brake fluid
level or a brake system fault. Have your
vehicle checked as soon as possible.
Cruise Control Indicator
(If Equipped) It illuminates when you switch
the system on.
See
What Is Cruise Control
(page 236).
Direction Indicator Illuminates when you switch on
the left or right direction
indicator or the hazard flashers.
Flashes during operation. An increase in
the rate of flashing warns of a failed
indicator bulb.
Door Ajar Warning Lamp Displays when the ignition is on
and any door is not completely
closed. Electric Park Brake Illuminates or flashes when the
electric parking brake has a
malfunction. See
Electric
Parking Brake (page 210).
Electronic Limited Slip Differential
(If Equipped) Illuminated when using the
locking function of the electronic
limited slip differential.
Engine Coolant Temperature
Warning Lamp If it illuminates when your vehicle
is moving, this indicates that the
engine is overheating. Stop your
vehicle as soon as it is safe to do so and
switch the engine off. Have your vehicle
checked as soon as possible.
Fasten Seatbelt Warning Lamp It illuminates and a chime
sounds until you fasten the
seatbelts.
Four-Wheel Drive Indicators
(If
Equipped)
Note: Some indicators will appear different
depending on vehicle options. Illuminates momentarily when
you select two-wheel drive high.
Illuminates when the automatic
four-wheel drive system is
engaged.
Illuminates when four-wheel
drive low is engaged.
Illuminates when four-wheel
drive high is engaged.
111
Expedition (TB8) Canada/United States of America, enUSA, Edition date: 201907, Third-Printing- Instrument ClusterE138644 E71340 E146190 E163170 E71880 E181778 E181781 E181780 E181779
Page 131 of 542
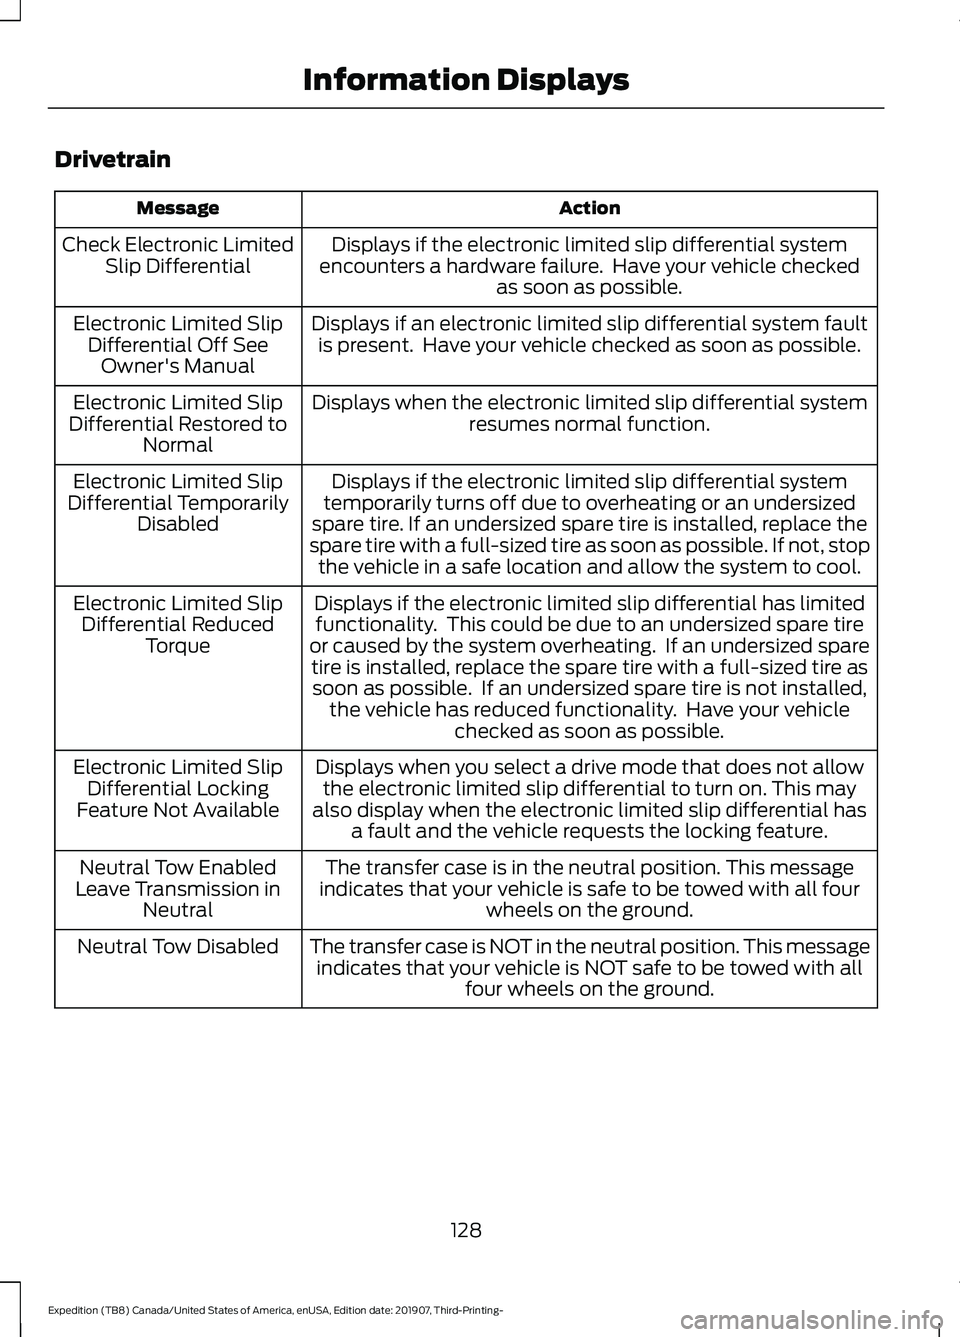
Drivetrain
Action
Message
Displays if the electronic limited slip differential system
encounters a hardware failure. Have your vehicle checked as soon as possible.
Check Electronic Limited
Slip Differential
Displays if an electronic limited slip differential system faultis present. Have your vehicle checked as soon as possible.
Electronic Limited Slip
Differential Off SeeOwner's Manual
Displays when the electronic limited slip differential systemresumes normal function.
Electronic Limited Slip
Differential Restored to Normal
Displays if the electronic limited slip differential system
temporarily turns off due to overheating or an undersized
spare tire. If an undersized spare tire is installed, replace the
spare tire with a full-sized tire as soon as possible. If not, stop the vehicle in a safe location and allow the system to cool.
Electronic Limited Slip
Differential Temporarily Disabled
Displays if the electronic limited slip differential has limitedfunctionality. This could be due to an undersized spare tire
or caused by the system overheating. If an undersized spare tire is installed, replace the spare tire with a full-sized tire assoon as possible. If an undersized spare tire is not installed, the vehicle has reduced functionality. Have your vehicle checked as soon as possible.
Electronic Limited Slip
Differential Reduced Torque
Displays when you select a drive mode that does not allowthe electronic limited slip differential to turn on. This may
also display when the electronic limited slip differential has a fault and the vehicle requests the locking feature.
Electronic Limited Slip
Differential Locking
Feature Not Available
The transfer case is in the neutral position. This message
indicates that your vehicle is safe to be towed with all four wheels on the ground.
Neutral Tow Enabled
Leave Transmission in Neutral
The transfer case is NOT in the neutral position. This messageindicates that your vehicle is NOT safe to be towed with all four wheels on the ground.
Neutral Tow Disabled
128
Expedition (TB8) Canada/United States of America, enUSA, Edition date: 201907, Third-Printing- Information Displays
Page 147 of 542
Note:
For the system to function efficiently,
the instrument panel and side air vents
should be fully open.
Note: If you select AUTO during cold
outside temperatures, the system directs
air flow to the windshield and side window
air vents. In addition, the blower motor may
run at a slower speed until the engine warms
up.
Note: If you select
AUTO during hot
temperatures and the inside of the vehicle
is hot, the system uses recirculated air to
maximize interior cooling. Blower motor
speed may also reduce until the air cools.
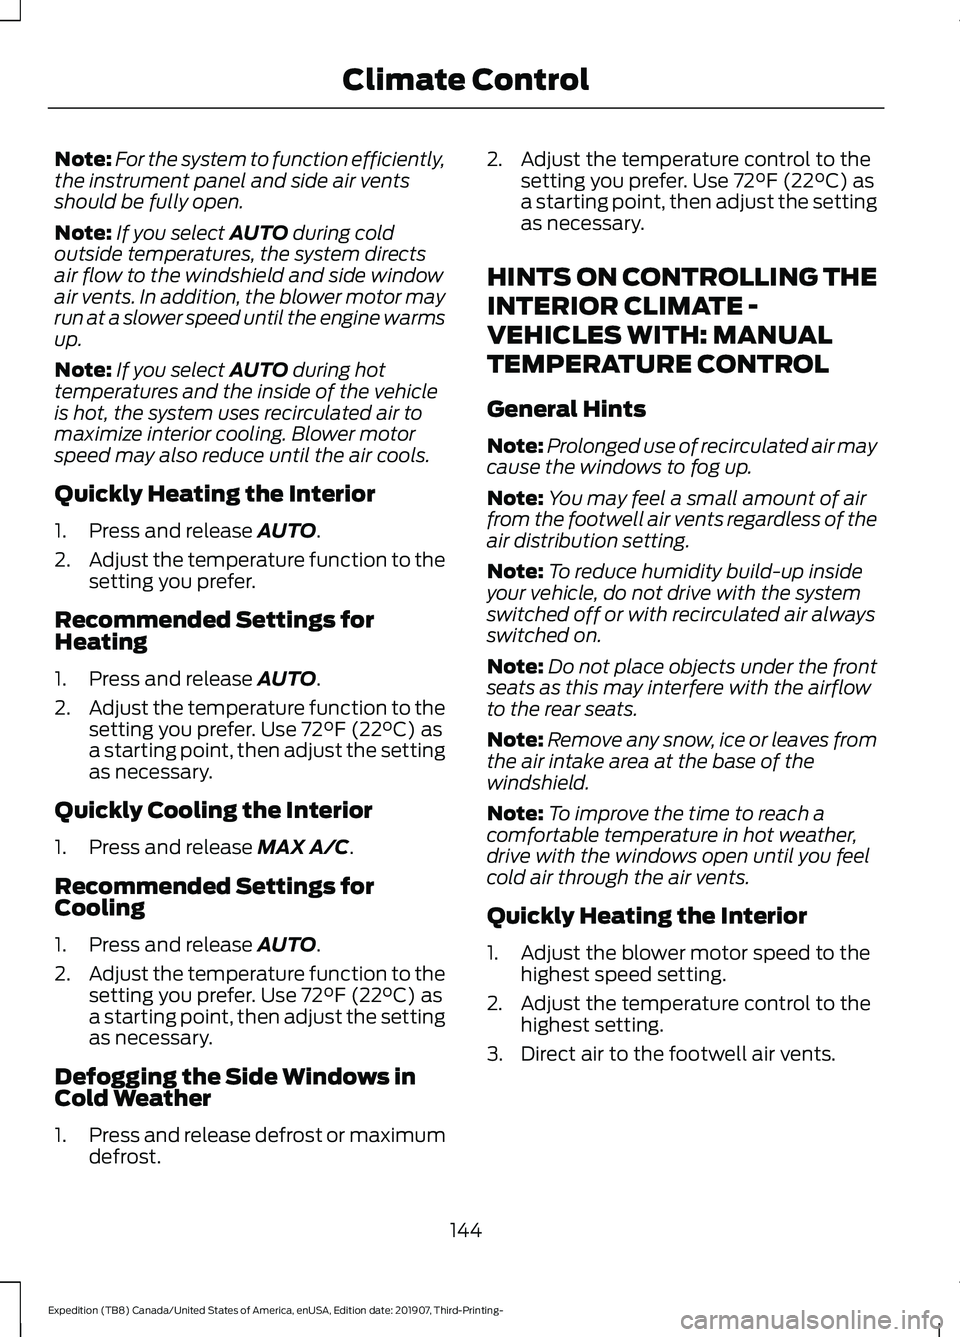
Quickly Heating the Interior
1. Press and release
AUTO.
2. Adjust the temperature function to the
setting you prefer.
Recommended Settings for
Heating
1. Press and release
AUTO.
2. Adjust the temperature function to the
setting you prefer. Use
72°F (22°C) as
a starting point, then adjust the setting
as necessary.
Quickly Cooling the Interior
1. Press and release
MAX A/C.
Recommended Settings for
Cooling
1. Press and release
AUTO.
2. Adjust the temperature function to the
setting you prefer. Use
72°F (22°C) as
a starting point, then adjust the setting
as necessary.
Defogging the Side Windows in
Cold Weather
1. Press and release defrost or maximum
defrost. 2. Adjust the temperature control to the
setting you prefer. Use
72°F (22°C) as
a starting point, then adjust the setting
as necessary.
HINTS ON CONTROLLING THE
INTERIOR CLIMATE -
VEHICLES WITH: MANUAL
TEMPERATURE CONTROL
General Hints
Note: Prolonged use of recirculated air may
cause the windows to fog up.
Note: You may feel a small amount of air
from the footwell air vents regardless of the
air distribution setting.
Note: To reduce humidity build-up inside
your vehicle, do not drive with the system
switched off or with recirculated air always
switched on.
Note: Do not place objects under the front
seats as this may interfere with the airflow
to the rear seats.
Note: Remove any snow, ice or leaves from
the air intake area at the base of the
windshield.
Note: To improve the time to reach a
comfortable temperature in hot weather,
drive with the windows open until you feel
cold air through the air vents.
Quickly Heating the Interior
1. Adjust the blower motor speed to the highest speed setting.
2. Adjust the temperature control to the highest setting.
3. Direct air to the footwell air vents.
144
Expedition (TB8) Canada/United States of America, enUSA, Edition date: 201907, Third-Printing- Climate Control
Page 148 of 542
Recommended Settings for
Heating
1. Adjust the blower motor speed to the
center setting.
2. Adjust the temperature control to the midway point of the hot settings.
3. Direct air to the footwell air vents.
Quickly Cooling the Interior
1. Select MAX A/C.
2. Drive with the windows open for a short
period of time.
Recommended Settings for
Cooling
1. Adjust the blower motor speed to the center setting.
2. Adjust the temperature control to the midway point of the cold settings.
3. Direct air to the instrument panel air vents.
Vehicle Stationary for Extended
Periods During Extreme High
Ambient Temperatures
1. Apply the parking brake.
2. Place your vehicle in park (P) or neutral.
3. Select
MAX A/C.
4. Adjust the blower motor speed to the lowest speed setting.
Defogging the Side Windows in
Cold Weather
1. Direct air to the instrument panel and windshield air vents.
2. Press and release
A/C.
3. Adjust the temperature control to the setting you prefer.
4. Adjust the blower motor speed to the highest setting. 5. Direct air toward the side windows.
6. Close the instrument panel air vents.
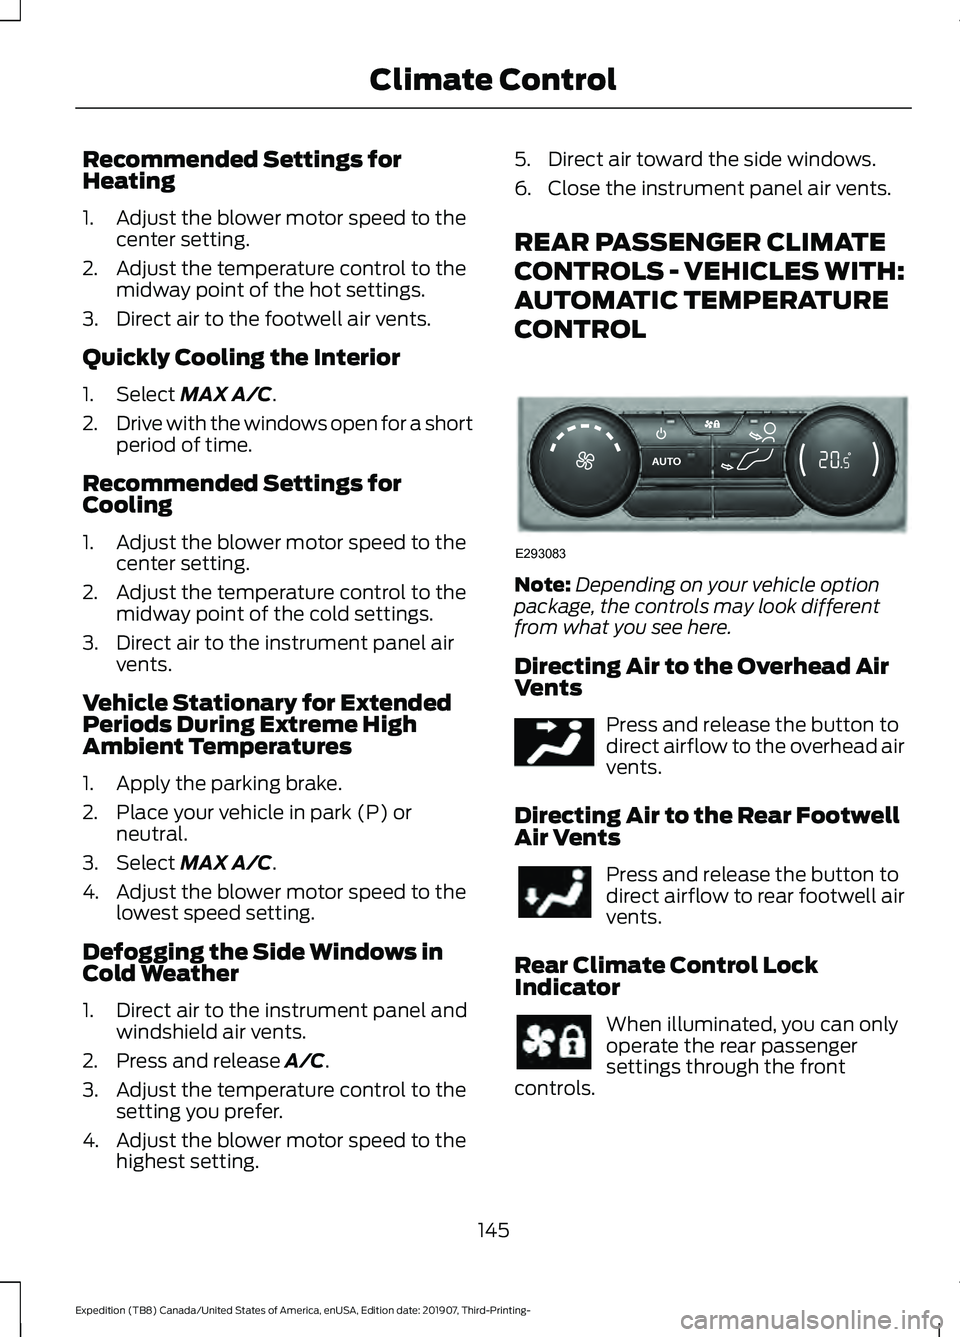
REAR PASSENGER CLIMATE
CONTROLS - VEHICLES WITH:
AUTOMATIC TEMPERATURE
CONTROL
Note:
Depending on your vehicle option
package, the controls may look different
from what you see here.
Directing Air to the Overhead Air
Vents Press and release the button to
direct airflow to the overhead air
vents.
Directing Air to the Rear Footwell
Air Vents Press and release the button to
direct airflow to rear footwell air
vents.
Rear Climate Control Lock
Indicator When illuminated, you can only
operate the rear passenger
settings through the front
controls.
145
Expedition (TB8) Canada/United States of America, enUSA, Edition date: 201907, Third-Printing- Climate ControlE293083 E244097
Page 170 of 542
3.
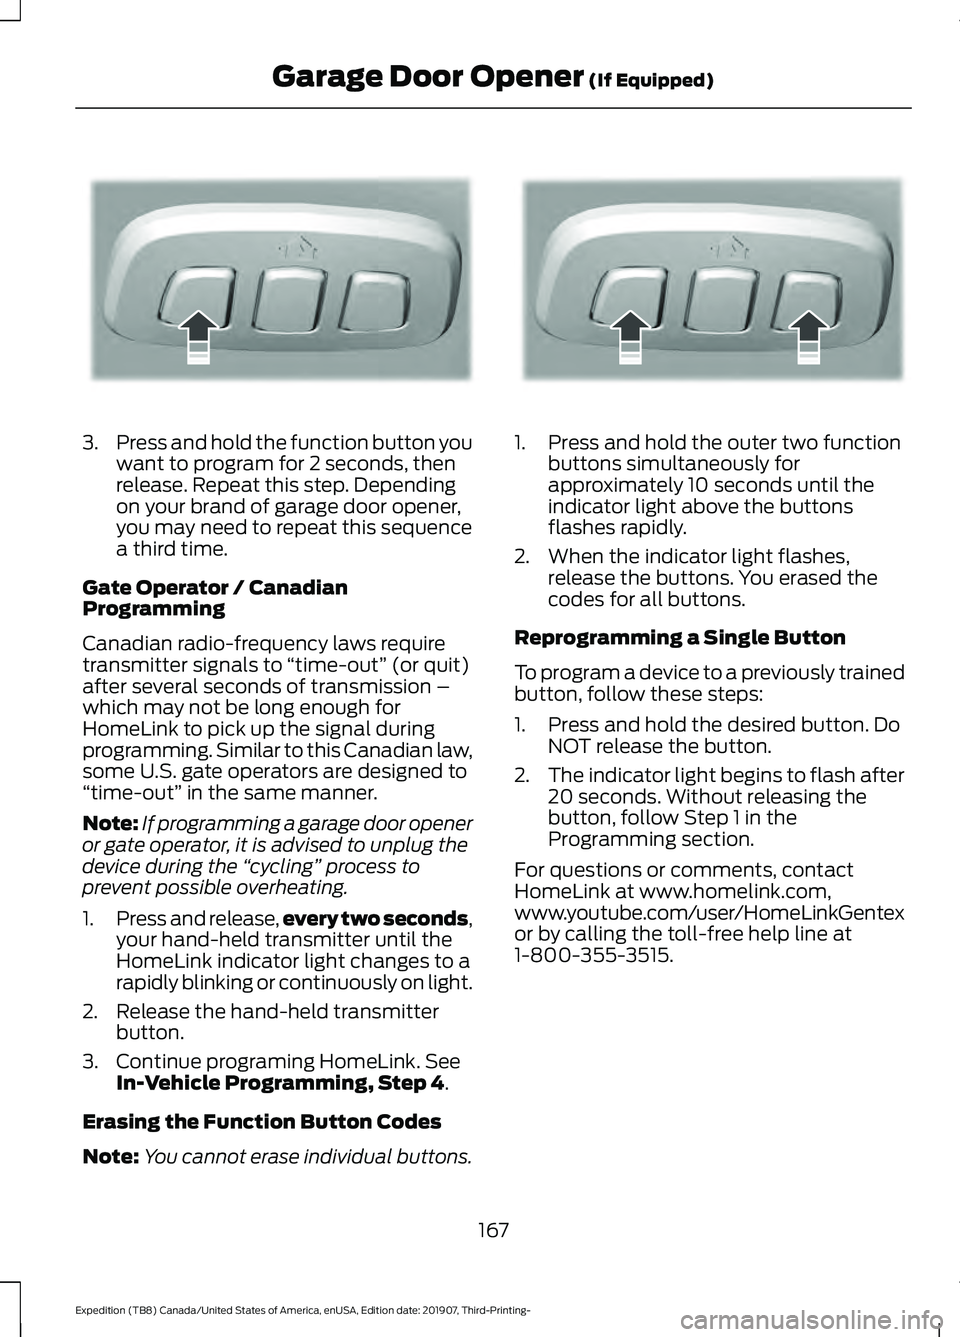
Press and hold the function button you
want to program for 2 seconds, then
release. Repeat this step. Depending
on your brand of garage door opener,
you may need to repeat this sequence
a third time.
Gate Operator / Canadian
Programming
Canadian radio-frequency laws require
transmitter signals to “time-out” (or quit)
after several seconds of transmission –
which may not be long enough for
HomeLink to pick up the signal during
programming. Similar to this Canadian law,
some U.S. gate operators are designed to
“time-out” in the same manner.
Note: If programming a garage door opener
or gate operator, it is advised to unplug the
device during the “cycling” process to
prevent possible overheating.
1. Press and release, every two seconds,
your hand-held transmitter until the
HomeLink indicator light changes to a
rapidly blinking or continuously on light.
2. Release the hand-held transmitter button.
3. Continue programing HomeLink. See In-Vehicle Programming, Step 4.
Erasing the Function Button Codes
Note: You cannot erase individual buttons. 1. Press and hold the outer two function
buttons simultaneously for
approximately 10 seconds until the
indicator light above the buttons
flashes rapidly.
2. When the indicator light flashes, release the buttons. You erased the
codes for all buttons.
Reprogramming a Single Button
To program a device to a previously trained
button, follow these steps:
1. Press and hold the desired button. Do NOT release the button.
2. The indicator light begins to flash after
20 seconds. Without releasing the
button, follow Step 1 in the
Programming section.
For questions or comments, contact
HomeLink at www.homelink.com,
www.youtube.com/user/HomeLinkGentex
or by calling the toll-free help line at
1-800-355-3515.
167
Expedition (TB8) Canada/United States of America, enUSA, Edition date: 201907, Third-Printing- Garage Door Opener
(If Equipped)E188212 E188213
Page 208 of 542
Note:
Driving through deep water may
damage the transmission. If the front or rear
axle is submerged in water, the axle
lubricant and power transfer unit lubricant
should be checked and changed if
necessary.
Driving on Hilly or Sloping Terrain
Although natural obstacles may make it
necessary to travel diagonally up or down
a hill or steep incline, you should always
try to drive straight up or straight down.
Note: Avoid turning on steep slopes or
hills. A danger lies in losing traction, slipping
sideways and possible vehicle roll over.
Whenever driving on a hill, determine
beforehand the route you want to use. Do
not drive over the crest of a hill without
seeing what conditions are on the other
side. Do not drive in reverse over a hill
without the aid of an observer.
When climbing a steep slope or hill, start
in a lower gear rather than downshifting to
a lower gear from a higher gear once the
ascent has started. This reduces strain on
the engine and the possibility of stalling.
If your vehicle stalls, do not try to turn
around because this could cause vehicle
roll over. It is better to reverse back to a
safe location.
Apply just enough power to the wheels to
climb the hill. Too much power can cause
the tires to slip, spin or lose traction,
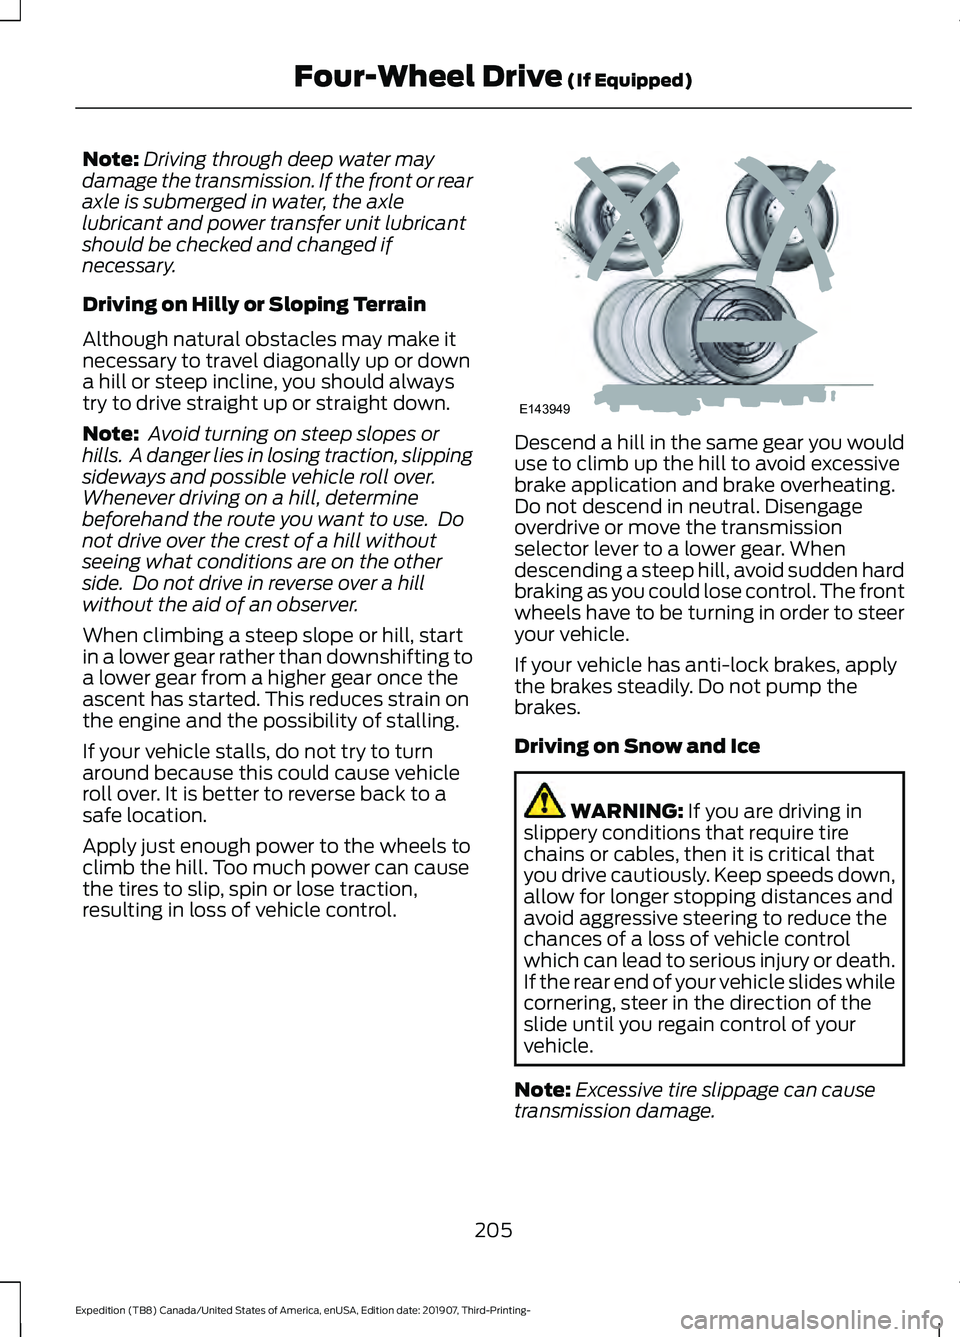
resulting in loss of vehicle control. Descend a hill in the same gear you would
use to climb up the hill to avoid excessive
brake application and brake overheating.
Do not descend in neutral. Disengage
overdrive or move the transmission
selector lever to a lower gear. When
descending a steep hill, avoid sudden hard
braking as you could lose control. The front
wheels have to be turning in order to steer
your vehicle.
If your vehicle has anti-lock brakes, apply
the brakes steadily. Do not pump the
brakes.
Driving on Snow and Ice
WARNING: If you are driving in
slippery conditions that require tire
chains or cables, then it is critical that
you drive cautiously. Keep speeds down,
allow for longer stopping distances and
avoid aggressive steering to reduce the
chances of a loss of vehicle control
which can lead to serious injury or death.
If the rear end of your vehicle slides while
cornering, steer in the direction of the
slide until you regain control of your
vehicle.
Note: Excessive tire slippage can cause
transmission damage.
205
Expedition (TB8) Canada/United States of America, enUSA, Edition date: 201907, Third-Printing- Four-Wheel Drive
(If Equipped)E143949
Page 244 of 542

Park Brake Application
Automatic parking brake application and
cancellation occurs if:
•
You unbuckle the seatbelt and open
the door after you stop the vehicle.
• You hold the vehicle at a stop
continuously for more than three
minutes.
Hilly Condition Usage
You should select a lower gear when the
system is active in situations such as
prolonged downhill driving on steep
grades, for example in mountainous areas.
The system needs additional engine
braking in these situations to reduce the
load on the vehicle ’s regular brake system
to prevent it from overheating.
Note: An audible alarm sounds and the
system shuts down if it applies brakes for
an extended period of time. This allows the
brakes to cool. The system functions
normally again after the brakes cool.
Switching Adaptive Cruise Control
Off Press and release the button
when the system is in standby
mode or switch the ignition off.
Note: You erase the set speed when you
switch the system off.
Detection Issues WARNING: On rare occasions,
detection issues can occur due to the
road infrastructures, for example bridges,
tunnels and safety barriers. In these
cases, the system may brake late or
unexpectedly. At all times, you are
responsible for controlling your vehicle,
supervising the system and intervening,
if required. WARNING:
If the system
malfunctions, have your vehicle checked
as soon as possible.
The radar sensor has a limited field of view.
It may not detect vehicles at all or detect
a vehicle later than expected in some
situations. The lead vehicle graphic does
not illuminate if the system does not
detect a vehicle in front of you. 241
Expedition (TB8) Canada/United States of America, enUSA, Edition date: 201907, Third-Printing- Cruise ControlE265297 E71621