2020 FORD EXPEDITION display
[x] Cancel search: displayPage 373 of 542

Changing Tires With a Tire
Pressure Monitoring System
Note:
Each road tire is equipped with a tire
pressure sensor located inside the wheel
and tire assembly cavity. The pressure
sensor is attached to the valve stem. The
pressure sensor is covered by the tire and is
not visible unless the tire is removed. Take
care when changing the tire to avoid
damaging the sensor.
You should always have your tires serviced
by an authorized dealer.
Check the tire pressure periodically (at
least monthly) using an accurate tire
gauge. See When Inflating Your Tires in
this chapter.
Understanding Your Tire Pressure
Monitoring System The tire pressure monitoring system
measures pressure in your road tires and
sends the tire pressure readings to your
vehicle. You can view the tire pressure
readings through the information display.
See
General Information (page 114). The
low tire pressure warning light will turn on
if the tire pressure is significantly low. Once
the light is illuminated, your tires are
under-inflated and need to be inflated to
the manufacturer ’s recommended tire
pressure. Even if the light turns on and a
short time later turns off, your tire pressure
still needs to be checked.
When Your Temporary Spare Tire is
Installed
When one of your road tires needs to be
replaced with the temporary spare, the
system will continue to identify an issue to
remind you that the damaged road wheel
and tire assembly needs to be repaired and
put back on your vehicle.
To restore the full function of the tire
pressure monitoring system, have the
damaged road wheel and tire assembly
repaired and remounted on your vehicle.
When You Believe Your System is Not
Operating Properly
The main function of the tire pressure
monitoring system is to warn you when
your tires need air. It can also warn you in
the event the system is no longer capable
of functioning as intended. See the
following chart for information concerning
your tire pressure monitoring system:
370
Expedition (TB8) Canada/United States of America, enUSA, Edition date: 201907, Third-Printing- Wheels and TiresE142549 E250820
Page 374 of 542
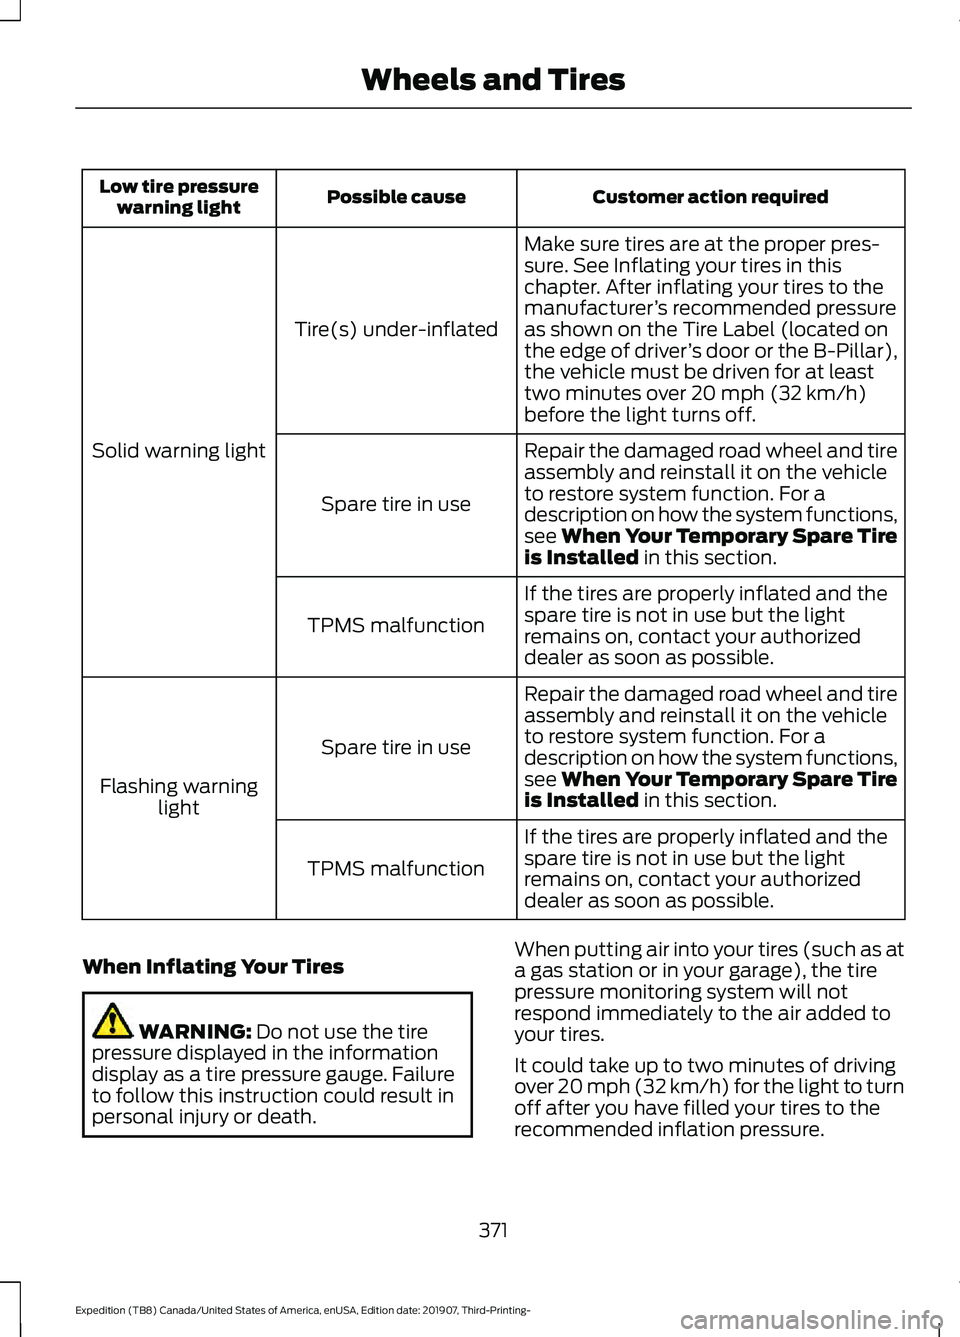
Customer action required
Possible cause
Low tire pressure
warning light
Make sure tires are at the proper pres-
sure. See Inflating your tires in this
chapter. After inflating your tires to the
manufacturer’s recommended pressure
as shown on the Tire Label (located on
the edge of driver ’s door or the B-Pillar),
the vehicle must be driven for at least
two minutes over 20 mph (32 km/h)
before the light turns off.
Tire(s) under-inflated
Solid warning light Repair the damaged road wheel and tire
assembly and reinstall it on the vehicle
to restore system function. For a
description on how the system functions,
see When Your Temporary Spare Tire
is Installed
in this section.
Spare tire in use
If the tires are properly inflated and the
spare tire is not in use but the light
remains on, contact your authorized
dealer as soon as possible.
TPMS malfunction
Repair the damaged road wheel and tire
assembly and reinstall it on the vehicle
to restore system function. For a
description on how the system functions,
see When Your Temporary Spare Tire
is Installed
in this section.
Spare tire in use
Flashing warning light
If the tires are properly inflated and the
spare tire is not in use but the light
remains on, contact your authorized
dealer as soon as possible.
TPMS malfunction
When Inflating Your Tires WARNING:
Do not use the tire
pressure displayed in the information
display as a tire pressure gauge. Failure
to follow this instruction could result in
personal injury or death. When putting air into your tires (such as at
a gas station or in your garage), the tire
pressure monitoring system will not
respond immediately to the air added to
your tires.
It could take up to two minutes of driving
over 20 mph (32 km/h) for the light to turn
off after you have filled your tires to the
recommended inflation pressure.
371
Expedition (TB8) Canada/United States of America, enUSA, Edition date: 201907, Third-Printing- Wheels and Tires
Page 389 of 542
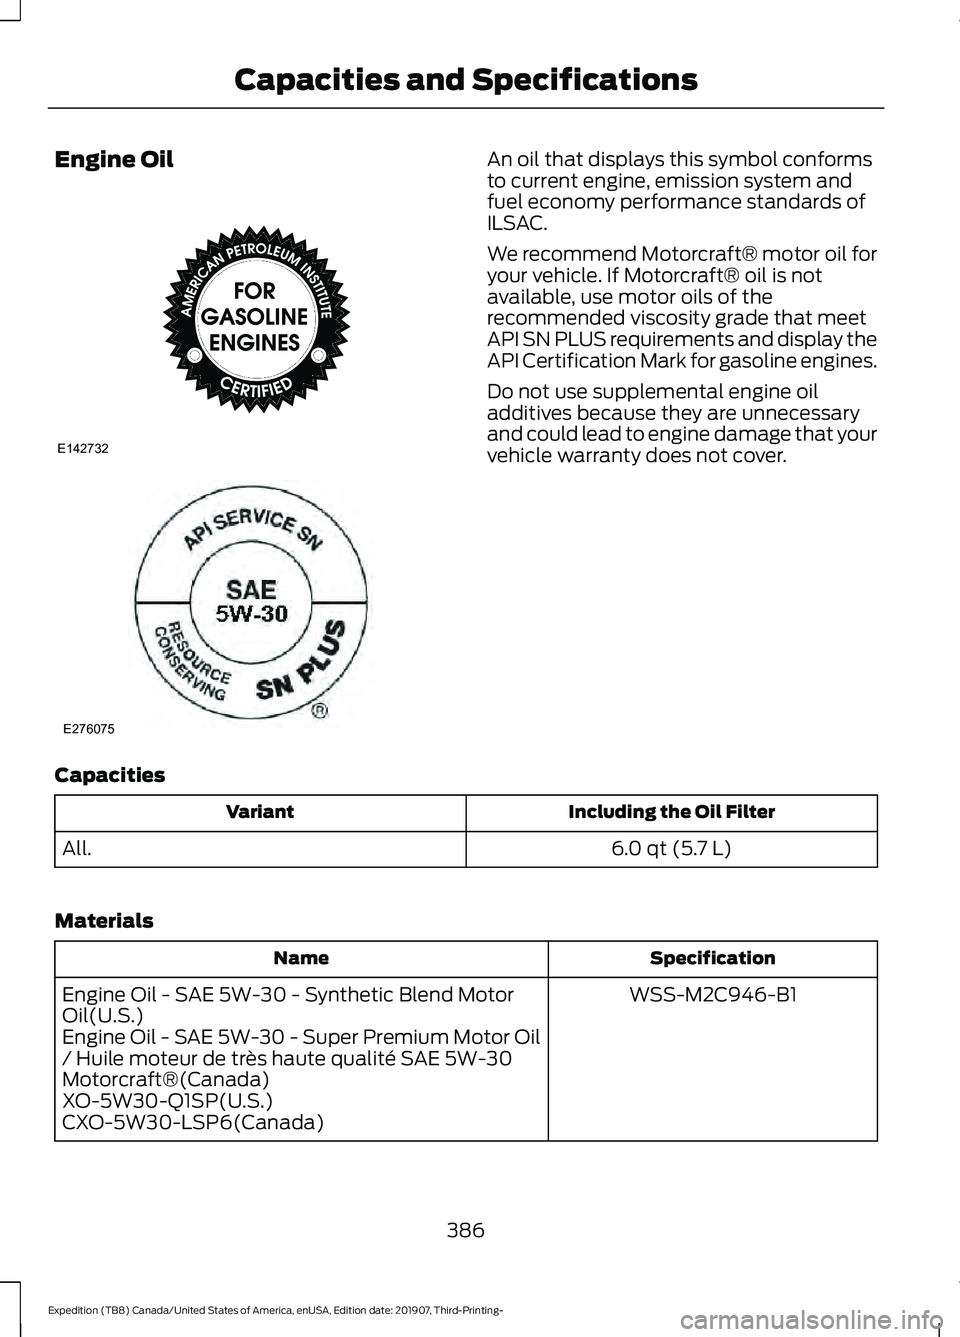
Engine Oil An oil that displays this symbol conforms
to current engine, emission system and
fuel economy performance standards of
ILSAC.
We recommend Motorcraft® motor oil for
your vehicle. If Motorcraft® oil is not
available, use motor oils of the
recommended viscosity grade that meet
API SN PLUS requirements and display the
API Certification Mark for gasoline engines.
Do not use supplemental engine oil
additives because they are unnecessary
and could lead to engine damage that your
vehicle warranty does not cover.
Capacities Including the Oil Filter
Variant
6.0 qt (5.7 L)
All.
Materials Specification
Name
WSS-M2C946-B1
Engine Oil - SAE 5W-30 - Synthetic Blend Motor
Oil(U.S.)
Engine Oil - SAE 5W-30 - Super Premium Motor Oil
/ Huile moteur de très haute qualité SAE 5W-30
Motorcraft®(Canada)
XO-5W30-Q1SP(U.S.)
CXO-5W30-LSP6(Canada)
386
Expedition (TB8) Canada/United States of America, enUSA, Edition date: 201907, Third-Printing- Capacities and SpecificationsE142732 E276075
Page 401 of 542
GENERAL INFORMATION
WARNING: Driving while distracted
can result in loss of vehicle control, crash
and injury. We strongly recommend that
you use extreme caution when using any
device that may take your focus off the
road. Your primary responsibility is the
safe operation of your vehicle. We
recommend against the use of any hand-held device while driving and
encourage the use of voice-operated
systems when possible. Make sure you
are aware of all applicable local laws
that may affect the use of electronic
devices while driving.
Radio Frequencies and Reception
Factors
Note: Listening to loud audio for long
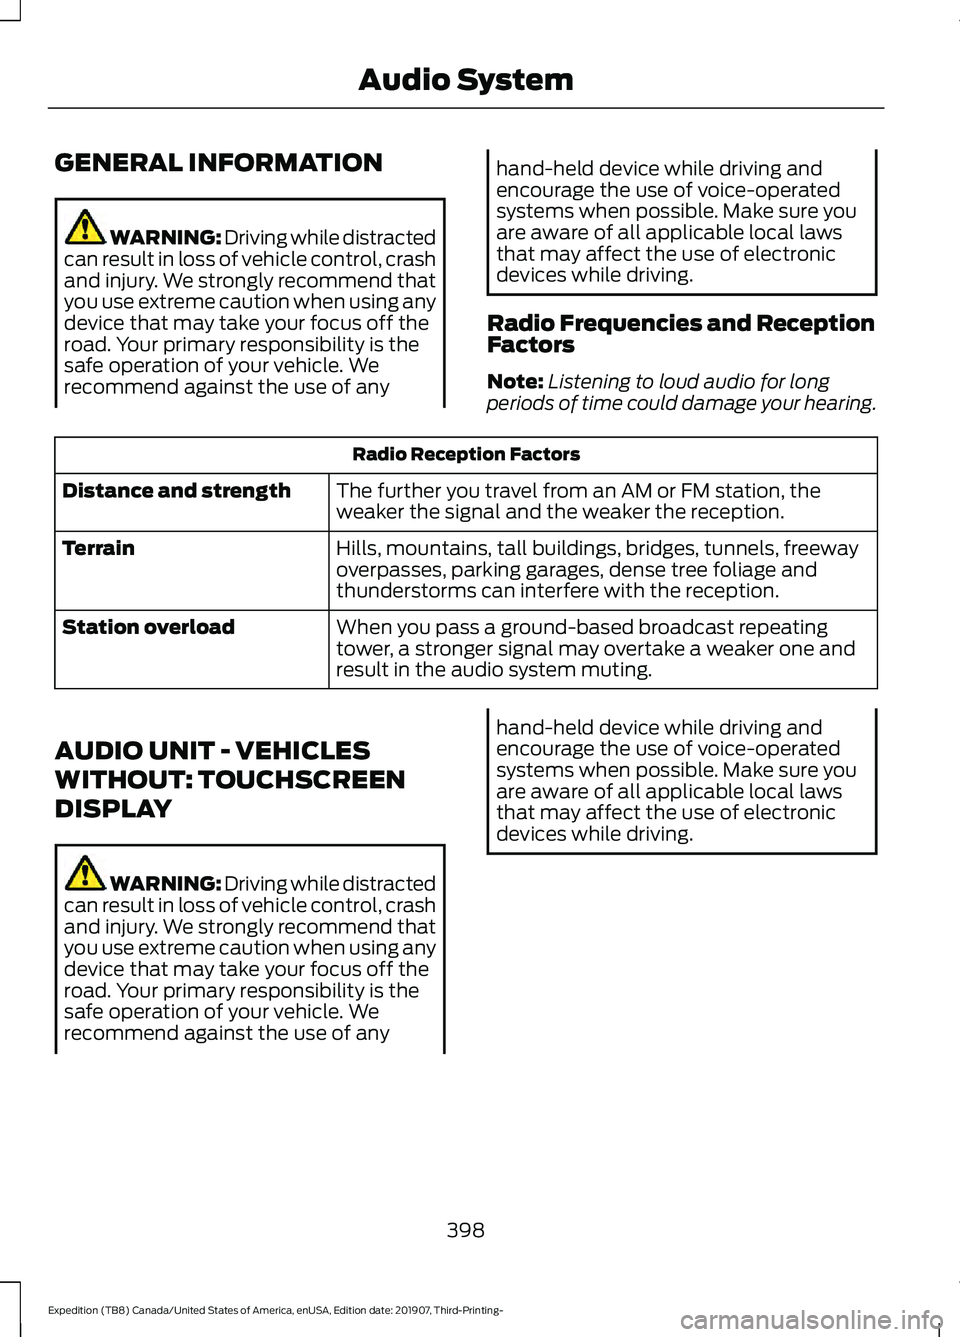
periods of time could damage your hearing. Radio Reception Factors
The further you travel from an AM or FM station, the
weaker the signal and the weaker the reception.
Distance and strength
Hills, mountains, tall buildings, bridges, tunnels, freeway
overpasses, parking garages, dense tree foliage and
thunderstorms can interfere with the reception.
Terrain
When you pass a ground-based broadcast repeating
tower, a stronger signal may overtake a weaker one and
result in the audio system muting.
Station overload
AUDIO UNIT - VEHICLES
WITHOUT: TOUCHSCREEN
DISPLAY WARNING: Driving while distracted
can result in loss of vehicle control, crash
and injury. We strongly recommend that
you use extreme caution when using any
device that may take your focus off the
road. Your primary responsibility is the
safe operation of your vehicle. We
recommend against the use of any hand-held device while driving and
encourage the use of voice-operated
systems when possible. Make sure you
are aware of all applicable local laws
that may affect the use of electronic
devices while driving.
398
Expedition (TB8) Canada/United States of America, enUSA, Edition date: 201907, Third-Printing- Audio System
Page 403 of 542
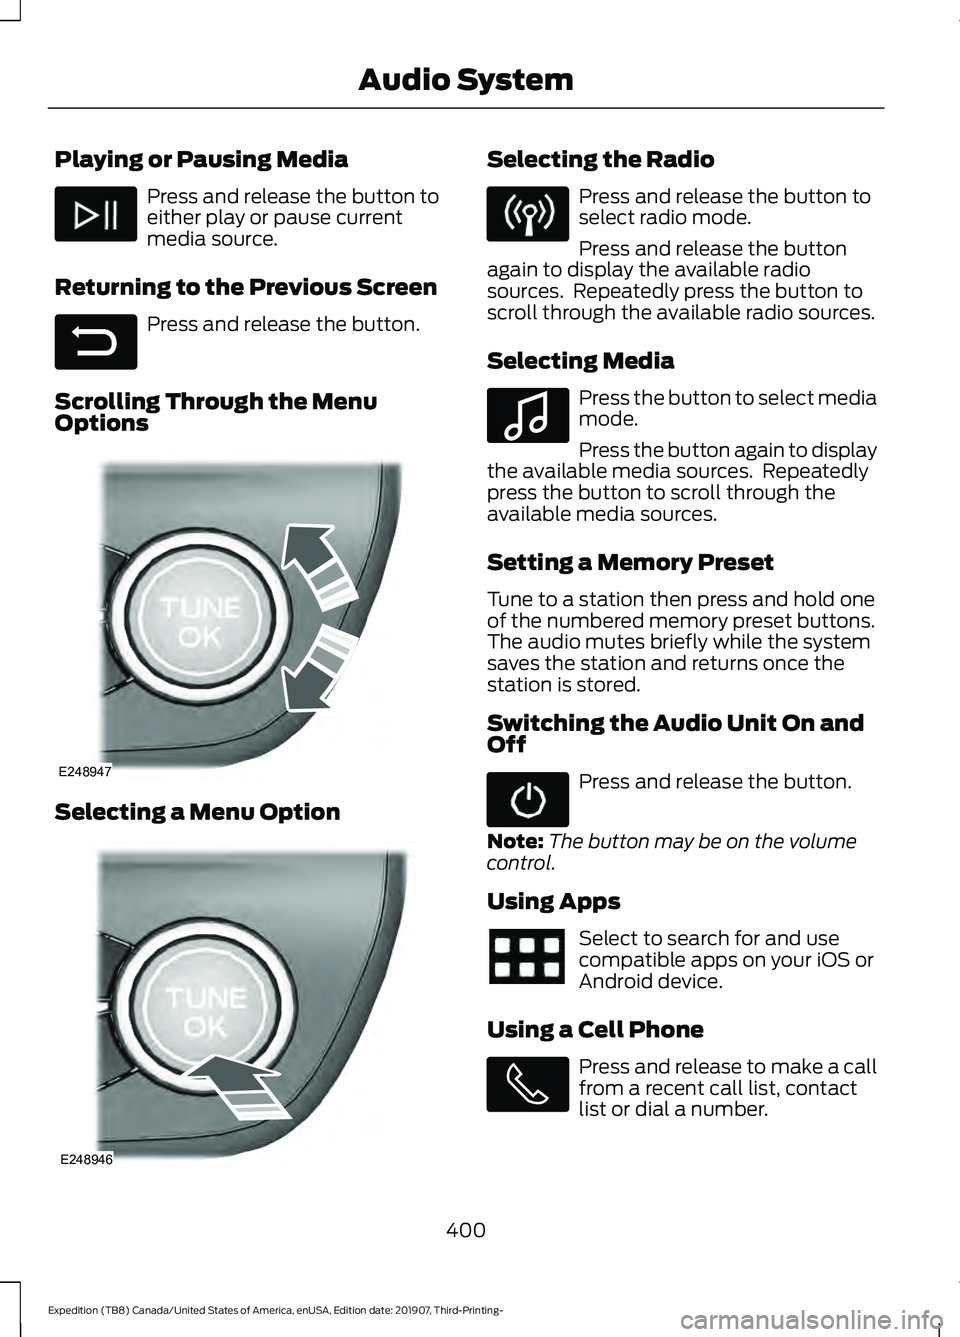
Playing or Pausing Media
Press and release the button to
either play or pause current
media source.
Returning to the Previous Screen Press and release the button.
Scrolling Through the Menu
Options Selecting a Menu Option Selecting the Radio
Press and release the button to
select radio mode.
Press and release the button
again to display the available radio
sources. Repeatedly press the button to
scroll through the available radio sources.
Selecting Media Press the button to select media
mode.
Press the button again to display
the available media sources. Repeatedly
press the button to scroll through the
available media sources.
Setting a Memory Preset
Tune to a station then press and hold one
of the numbered memory preset buttons.
The audio mutes briefly while the system
saves the station and returns once the
station is stored.
Switching the Audio Unit On and
Off Press and release the button.
Note: The button may be on the volume
control.
Using Apps Select to search for and use
compatible apps on your iOS or
Android device.
Using a Cell Phone Press and release to make a call
from a recent call list, contact
list or dial a number.
400
Expedition (TB8) Canada/United States of America, enUSA, Edition date: 201907, Third-Printing- Audio System E281480 E248947 E248946 E100027
Page 404 of 542

Using Seek, Fast Forward and
Reverse
In radio mode, select a frequency band and
press and release either button. The
system stops at the first station it finds in
that direction.
In satellite radio mode, press and release
to select the next or previous satellite radio
station. If you select a specific category,
such as jazz, rock or news, press to find the
next or previous station in that category.
AUDIO UNIT - VEHICLES WITH:
TOUCHSCREEN DISPLAY
WARNING: Driving while distracted
can result in loss of vehicle control, crash
and injury. We strongly recommend that
you use extreme caution when using any
device that may take your focus off the
road. Your primary responsibility is the
safe operation of your vehicle. We
recommend against the use of any
hand-held device while driving and
encourage the use of voice-operated
systems when possible. Make sure you
are aware of all applicable local laws
that may affect the use of electronic
devices while driving. Note:
Depending on your vehicle option
package, the controls may look different
from what you see here.
Note: Some features, such as satellite
radio, may not be available in your location.
Check with an authorized dealer.
Note: The touchscreen system controls
most of the audio features.
Accessing the Sound Settings Press and release the button to
access settings.
Adjusting the Volume Turn to adjust the volume.
401
Expedition (TB8) Canada/United States of America, enUSA, Edition date: 201907, Third-Printing- Audio System E293086 E280315 E265373
Page 405 of 542
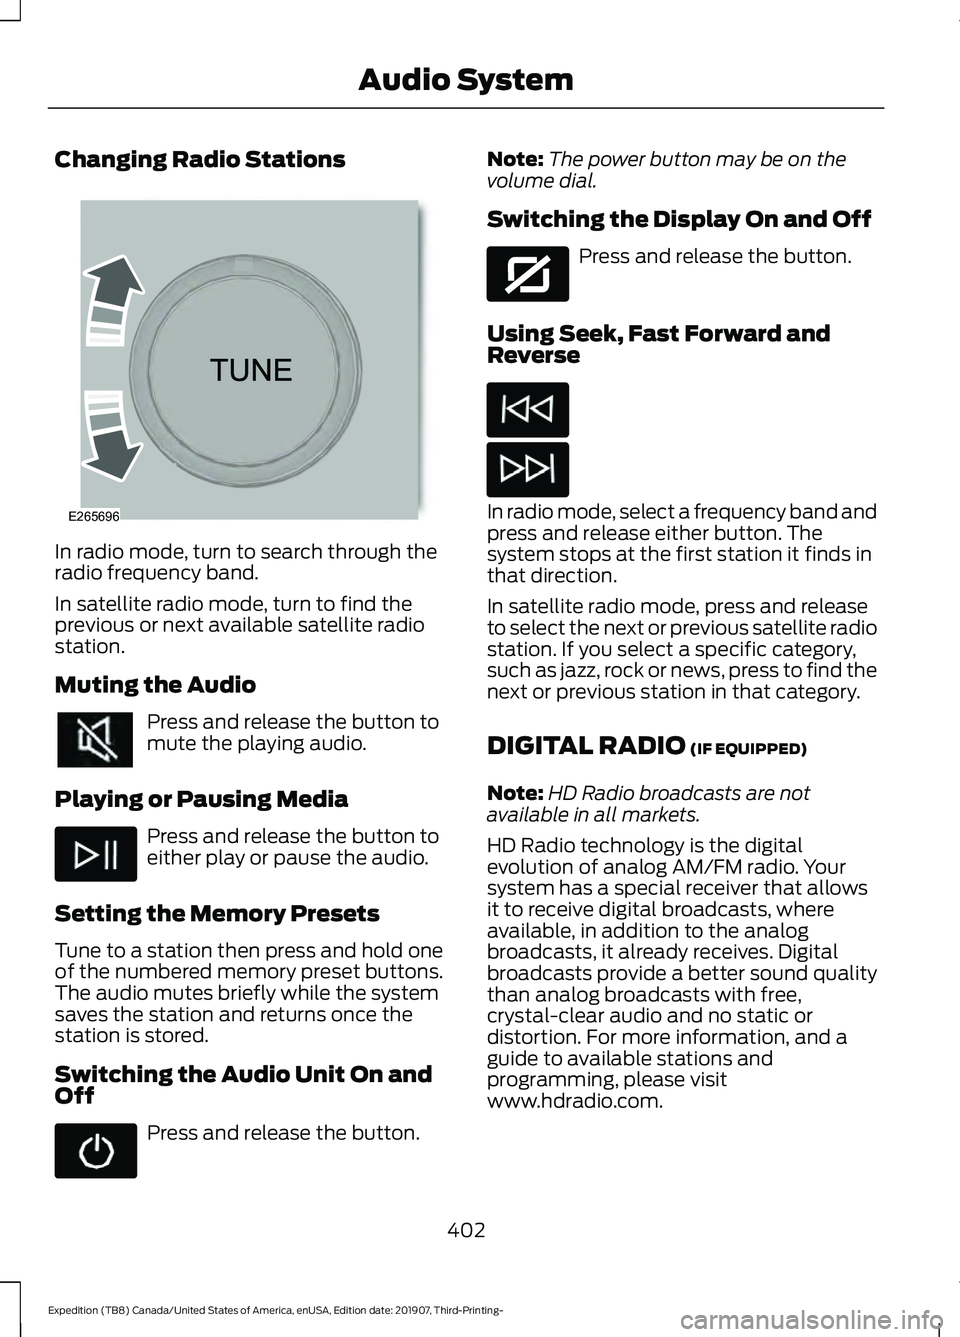
Changing Radio Stations
In radio mode, turn to search through the
radio frequency band.
In satellite radio mode, turn to find the
previous or next available satellite radio
station.
Muting the Audio
Press and release the button to
mute the playing audio.
Playing or Pausing Media Press and release the button to
either play or pause the audio.
Setting the Memory Presets
Tune to a station then press and hold one
of the numbered memory preset buttons.
The audio mutes briefly while the system
saves the station and returns once the
station is stored.
Switching the Audio Unit On and
Off Press and release the button. Note:
The power button may be on the
volume dial.
Switching the Display On and Off Press and release the button.
Using Seek, Fast Forward and
Reverse In radio mode, select a frequency band and
press and release either button. The
system stops at the first station it finds in
that direction.
In satellite radio mode, press and release
to select the next or previous satellite radio
station. If you select a specific category,
such as jazz, rock or news, press to find the
next or previous station in that category.
DIGITAL RADIO (IF EQUIPPED)
Note: HD Radio broadcasts are not
available in all markets.
HD Radio technology is the digital
evolution of analog AM/FM radio. Your
system has a special receiver that allows
it to receive digital broadcasts, where
available, in addition to the analog
broadcasts, it already receives. Digital
broadcasts provide a better sound quality
than analog broadcasts with free,
crystal-clear audio and no static or
distortion. For more information, and a
guide to available stations and
programming, please visit
www.hdradio.com.
402
Expedition (TB8) Canada/United States of America, enUSA, Edition date: 201907, Third-Printing- Audio SystemE265696 E272035
Page 408 of 542
SATELLITE RADIO (IF EQUIPPED)
SiriusXM® Satellite Radio broadcasts a
variety of music, news, sports, weather,
traffic and entertainment satellite radio
channels. For more information and a
complete list of SiriusXM satellite radio channels, visit www.siriusxm.com in the
United States, www.siriusxm.ca in Canada,
or call SiriusXM at 1-888-539-7474.
Note:
This receiver includes the eCos
real-time operating system. eCos is
published under the eCos License.
Satellite Radio Reception Factors Potential satellite radio reception issues
For optimal reception performance, keep the antenna
clear of snow and ice build-up and keep luggage and other
material as far away from the antenna as possible.
Antenna obstructions
Hills, mountains, tall buildings, bridges, tunnels, freeway
overpasses, parking garages, dense tree foliage and
thunderstorms can interfere with your reception.
Terrain
When you pass a ground-based broadcast-repeating
tower, a stronger signal may overtake a weaker one and
the audio system may mute.
Station overload
Your display may show ACQUIRING . . . to indicate the
interference and the audio system may mute.
Satellite radio signal interfer-
ence
SiriusXM Satellite Radio Service
Note: SiriusXM reserves the unrestricted
right to change, rearrange, add or delete
programming including canceling, moving
or adding particular channels, and its prices,
at any time, with or without notice to you.
Ford Motor Company shall not be
responsible for any such programming
changes. 405
Expedition (TB8) Canada/United States of America, enUSA, Edition date: 201907, Third-Printing- Audio SystemE208625