Page 334 of 553

CHANGING A BULB
Replacing Headlamp Bulbs
WARNING: Make sure the bulbs
have cooled down before removing
them. Failure to follow this warning could
result in serious personal injury.
Note: Handle a halogen headlamp bulb
carefully and keep out of children ’s reach.
Grasp the bulb by only its plastic base and
do not touch the glass. The oil from your
hand could cause the bulb to break the next
time you operate the headlamps.
Note: If you accidentally touch the bulb,
clean it with rubbing alcohol before using it.
Headlamp Park/Turn lamp
A
High beam headlamp
B
Low beam headlamp
C High beam headlamp
1. Remove service cap.
2. Remove the bulb from the headlamp
assembly by turning it
counterclockwise, then pull it straight
out.
3. Disconnect the electrical connector.
4. To install, reverse the removal procedure.
Low beam headlamp 1. Remove service cap.
2. Disconnect the electrical connector.
3. Remove the bulb from the headlamp
assembly by turning it
counterclockwise, then pull it straight
out.
331
Escape (CTC) Canada/United States of America, Vehicles Built From: 17-06-2019, enUSA, Edition date: 201906, Third-Printing- MaintenanceE307881 E307882 E307883
Page 335 of 553

4. To install, reverse the removal
procedure.
Park/Turn lamp 1. Remove service cap, if applicable.
2. Remove bulb from the headlamp
assembly by turning it
counterclockwise, then pull it straight
out.
3. Disconnect the electrical connector.
4. To install, reverse the removal procedure.
LED Bulbs (If Equipped)
LED lamps are not serviceable items. See
an authorized dealer if they fail.
Replacing Fog Lamp Bulbs
1. If you are replacing the driver side bulb,
turn the steering wheel all the way to
the right. If you are replacing the
passenger side bulb, turn the steering
wheel all the way to the left. 2. Remove the six lower splash shield
push pins and pull the splash shield
back. 3. Disconnect the bulb electrical
connector.
4. To remove the bulb from the headlamp
assembly, turn it counterclockwise,
then pull it straight out.
5. To install, perform these steps in reverse order.
332
Escape (CTC) Canada/United States of America, Vehicles Built From: 17-06-2019, enUSA, Edition date: 201906, Third-Printing- MaintenanceE307884 E311716 E311715
Page 336 of 553

Replacing Direction Indicator
Bulbs
Direction Indicator
A
Side marker
B 1. Make sure the headlamp control is in
the off position and open the liftgate.
2. Remove the bolt cover using a standard flat tip screwdriver.
3. Remove the bolt from the lamp assembly.
4. Gently pull the lamp assembly away from the vehicle in an outboard
direction.
5. Disconnect the electrical connector. 6.
Remove the direction indicator bulb by
turning the lower bulb socket
counterclockwise. Gently pull the bulb
straight out of the socket.
7. To install, reverse the removal procedure.
Replacing Reverse Lamp Assembly
Bulbs 1. Remove the screws with a flathead
screwdriver and pull the lamp
assembly away from the vehicle.
2. Remove the bulb by turning the lower bulb socket counterclockwise. Gently
pull the bulb straight out of the socket.
3. To install, reverse the removal procedure.
Replacing License Plate Lamp
Bulbs
License plate lamps are LED and are not
serviceable. See an authorized dealer if
they fail.
333
Escape (CTC) Canada/United States of America, Vehicles Built From: 17-06-2019, enUSA, Edition date: 201906, Third-Printing- MaintenanceE307885 E307886 E307887
Page 337 of 553
Replacing High-Mount Brake Lamp
Bulbs
High-mount stop lamps are LED and are
not serviceable. See an authorized dealer
if they fail.
334
Escape (CTC) Canada/United States of America, Vehicles Built From: 17-06-2019, enUSA, Edition date: 201906, Third-Printing- Maintenance
Page 348 of 553

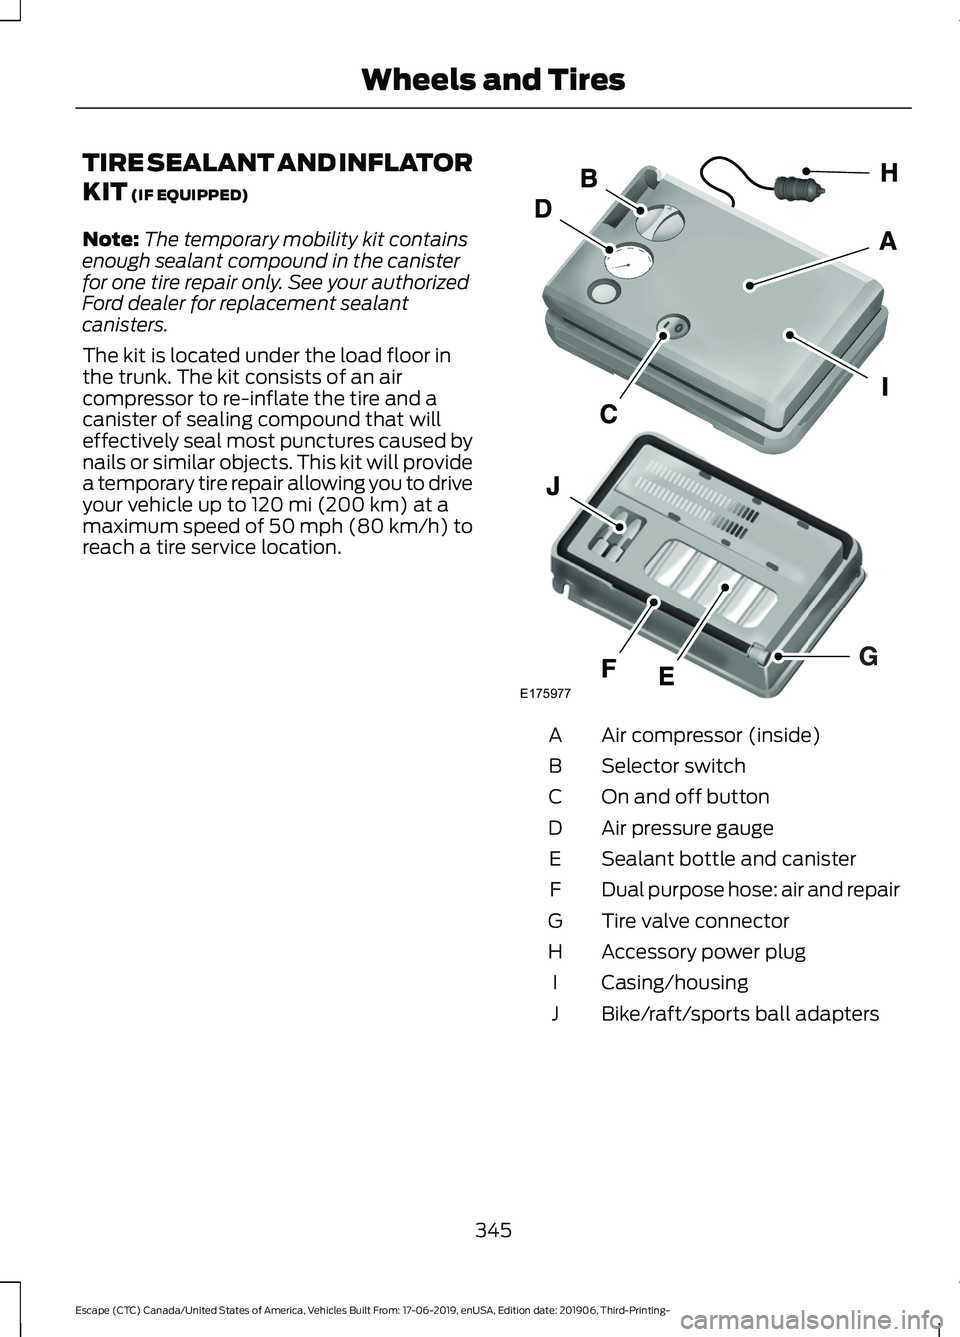
TIRE SEALANT AND INFLATOR
KIT (IF EQUIPPED)
Note: The temporary mobility kit contains
enough sealant compound in the canister
for one tire repair only. See your authorized
Ford dealer for replacement sealant
canisters.
The kit is located under the load floor in
the trunk. The kit consists of an air
compressor to re-inflate the tire and a
canister of sealing compound that will
effectively seal most punctures caused by
nails or similar objects. This kit will provide
a temporary tire repair allowing you to drive
your vehicle up to
120 mi (200 km) at a
maximum speed of 50 mph (80 km/h) to
reach a tire service location. Air compressor (inside)
A
Selector switch
B
On and off button
C
Air pressure gauge
D
Sealant bottle and canister
E
Dual purpose hose: air and repair
F
Tire valve connector
G
Accessory power plug
H
Casing/housing
I
Bike/raft/sports ball adapters
J
345
Escape (CTC) Canada/United States of America, Vehicles Built From: 17-06-2019, enUSA, Edition date: 201906, Third-Printing- Wheels and TiresE175977
Page 355 of 553

U.S. Department of
Transportation Tire quality
grades: The U.S. Department of
Transportation requires us to give
you the following information
about tire grades exactly as the
government has written it.
Treadwear
The treadwear grade is a
comparative rating based on the
wear rate of the tire when tested
under controlled conditions on a
specified government test course.
For example, a tire graded 150
would wear 1½ times as well on
the government course as a tire
graded 100. The relative
performance of tires depends
upon the actual conditions of their
use, however, and may depart
significantly from the norm due to
variations in driving habits, service
practices, and differences in road
characteristics and climate.
Traction AA A B C WARNING:
The traction
grade assigned to this tire is
based on straight-ahead braking
traction tests, and does not
include acceleration, cornering,
hydroplaning or peak traction
characteristics. The traction grades, from highest
to lowest are AA, A, B, and C. The
grades represent the tire
’s ability
to stop on wet pavement as
measured under controlled
conditions on specified
government test surfaces of
asphalt and concrete. A tire
marked C may have poor traction
performance.
Temperature A B C WARNING:
The
temperature grade for this tire is
established for a tire that is
properly inflated and not
overloaded. Excessive speed,
underinflation, or excessive
loading, either separately or in
combination, can cause heat
buildup and possible tire failure.
The temperature grades are A
(the highest), B and C,
representing the tire ’s resistance
to the generation of heat and its
ability to dissipate heat when
tested under controlled conditions
on a specified indoor laboratory
test wheel. Sustained high
temperature can cause the
material of the tire to degenerate
and reduce tire life, and excessive
temperature can lead to sudden
tire failure. The grade C
corresponds to a level of
performance which all passenger
car tires must meet under the
352
Escape (CTC) Canada/United States of America, Vehicles Built From: 17-06-2019, enUSA, Edition date: 201906, Third-Printing- Wheels and Tires
Page 357 of 553

Information Contained on the
Tire Sidewall
Both United States and Canada
Federal regulations require tire
manufacturers to place
standardized information on the
sidewall of all tires. This
information identifies and
describes the fundamental
characteristics of the tire and also
provides a U.S. DOT Tire
Identification Number for safety
standard certification and in case
of a recall.
Information on P Type Tires
P215/65R15 95H is an example of
a tire size, load index and speed
rating. The definitions of these
items are listed below. (Note that
the tire size, load index and speed
rating for your vehicle may be
different from this example.) A.
P: Indicates a tire, designated
by the Tire and Rim Association,
that may be used for service on
cars, sport utility vehicles,
minivans and light trucks. Note:
If
your tire size does not begin with
a letter this may mean it is
designated by either the European
Tire and Rim Technical
Organization or the Japan Tire
Manufacturing Association.
B. 215:
Indicates the nominal
width of the tire in millimeters
from sidewall edge to sidewall
edge. In general, the larger the
number, the wider the tire.
C. 65:
Indicates the aspect ratio
which gives the tire's ratio of
height to width.
D. R:
Indicates a radial type tire.
E. 15:
Indicates the wheel or rim
diameter in inches. If you change
your wheel size, you will have to
purchase new tires to match the
new wheel diameter.
F. 95:
Indicates the tire's load
index. It is an index that relates to
how much weight a tire can carry.
You may find this information in
your owner ’s manual. If not,
contact a local tire dealer.
Note: You may not find this
information on all tires because it
is not required by federal law.
354
Escape (CTC) Canada/United States of America, Vehicles Built From: 17-06-2019, enUSA, Edition date: 201906, Third-Printing- Wheels and TiresH
I
J
KL
M
A
B
CDEFG
E142543
Page 360 of 553

The tire suppliers may have
additional markings, notes or
warnings such as standard load
or radial tubeless.
Additional Information
Contained on the Tire Sidewall
for LT Type Tires
Note:
Tire Quality Grades do not
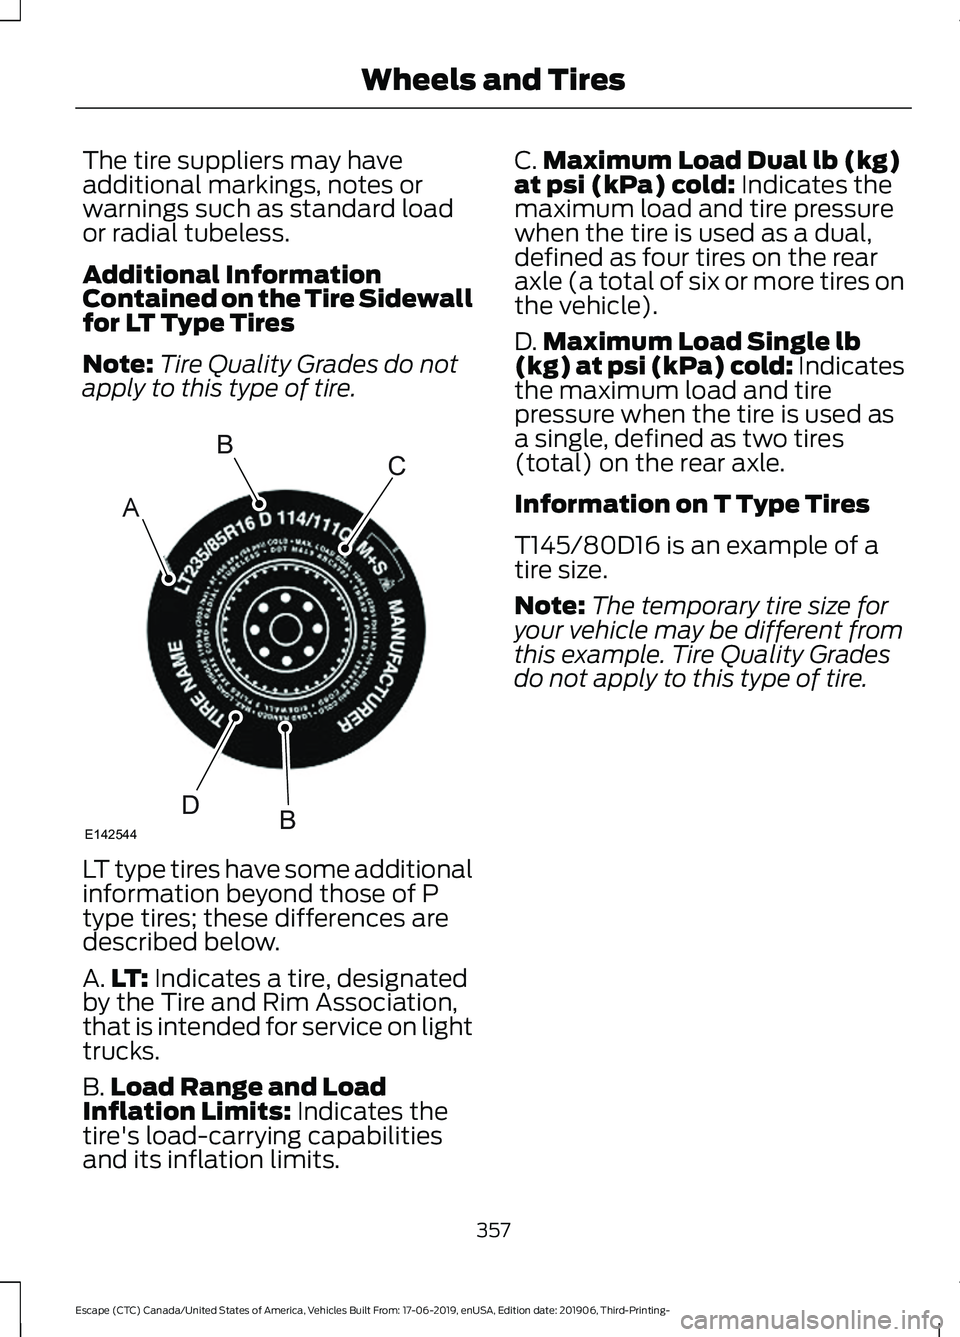
apply to this type of tire. LT type tires have some additional
information beyond those of P
type tires; these differences are
described below.
A.
LT: Indicates a tire, designated
by the Tire and Rim Association,
that is intended for service on light
trucks.
B. Load Range and Load
Inflation Limits:
Indicates the
tire's load-carrying capabilities
and its inflation limits. C.
Maximum Load Dual lb (kg)
at psi (kPa) cold:
Indicates the
maximum load and tire pressure
when the tire is used as a dual,
defined as four tires on the rear
axle (a total of six or more tires on
the vehicle).
D. Maximum Load Single lb
(kg) at psi (kPa) cold:
Indicates
the maximum load and tire
pressure when the tire is used as
a single, defined as two tires
(total) on the rear axle.
Information on T Type Tires
T145/80D16 is an example of a
tire size.
Note: The temporary tire size for
your vehicle may be different from
this example. Tire Quality Grades
do not apply to this type of tire.
357
Escape (CTC) Canada/United States of America, Vehicles Built From: 17-06-2019, enUSA, Edition date: 201906, Third-Printing- Wheels and TiresA
BC
BDE142544