2020 FORD ESCAPE lift gate
[x] Cancel search: lift gatePage 4 of 553

Introduction
About This Manual
..........................................9
Symbols Glossary ............................................
9
Data Recording .................................................
11
Perchlorate .......................................................
15
Ford Credit ........................................................
15
Replacement Parts Recommendation ........................................................................\
...
16
Special Notices ...............................................
16
Mobile Communications Equipment ........................................................................\
....
17
Export Unique Options ................................
18
Environment
Protecting the Environment .......................
19
At a Glance
Instrument Panel ..........................................
20
Child Safety
General Information .....................................
22
Installing Child Restraints ..........................
24
Booster Seats .................................................
29
Child Restraint Positioning .........................
31
Child Safety Locks .........................................
33
Seatbelts
Principle of Operation .................................
35
Fastening the Seatbelts .............................
36
Seatbelt Height Adjustment .....................
38
Seatbelt Warning Lamp and Indicator Chime ............................................................
39
Seatbelt Reminder .......................................
39
Child Restraint and Seatbelt Maintenance ................................................
41
Seatbelt Extensions ......................................
41
Personal Safety System ™
Personal Safety System ™.........................
43 Supplementary Restraints
System
Principle of Operation .................................
44
Driver and Passenger Airbags ..................
45
Front Passenger Sensing System ...........
46
Side Airbags ....................................................
48
Driver Knee Airbag ........................................
49
Safety Canopy ™...........................................
49
Crash Sensors and Airbag Indicator ........
51
Airbag Disposal ..............................................
52
Pedestrian Protection
Pedestrian Alert System .............................
53
Keys and Remote Controls
General Information on Radio Frequencies .................................................
54
Remote Control .............................................
54
Replacing a Lost Key or Remote Control ........................................................................\
..
60
MyKey ™
Principle of Operation ..................................
61
Creating a MyKey ...........................................
62
Clearing All MyKeys ......................................
63
Checking MyKey System Status ..............
63
Using MyKey With Remote Start Systems ........................................................
64
MyKey – Troubleshooting ..........................
64
Doors and Locks
Locking and Unlocking ...............................
66
Keyless Entry ..................................................
69
Liftgate
Manual Liftgate ...............................................
71
Power Liftgate .................................................
72
Security
Passive Anti-Theft System ........................
76
1
Escape (CTC) Canada/United States of America, Vehicles Built From: 17-06-2019, enUSA, Edition date: 201906, Third-Printing- Table of Contents
Page 69 of 553

LOCKING AND UNLOCKING
You can use the power door lock control
or the remote control to lock and unlock
your vehicle.
Note:
Always take your keys and lock all
doors when leaving your vehicle.
Power Door Locks
The power door lock control is on the driver
and front passenger door panels. Unlock.
A
Lock.
B
Remote Control
Unlocking the Doors (Two-Stage
Unlock) Press the button to unlock the
driver door.
Press the button again within
three seconds to unlock all doors. The
direction indicators flash.
With the ignition off, press and hold both
the lock and unlock buttons on the remote
control for three seconds to change
between driver door or all door unlock
mode. The direction indicators flash twice
to indicate a change to the unlocking
mode. Driver door mode only unlocks the driver door when you press the unlock
button once. All door mode unlocks all
doors when you press the unlock button
once. The unlocking mode applies to the
remote control, keyless entry keypad and
intelligent access.
To change these settings, use the
touchscreen to select the following:
1. Select Settings. See Settings (page
468).
2. Select
Vehicle.
3. Select
Locks.
Locking the Doors Press the button to lock all
doors. The direction indicators
flash.
Press the button again within three
seconds to confirm that all the doors are
closed. The doors lock again, the horn will
sound and the direction indicators will
flash if all the doors and the luggage
compartment are closed.
Mislock
If any door or the liftgate is open, or if the
hood is open on vehicles with an anti-theft
alarm or remote start, the horn will sound
twice and the direction indicators will not
flash. You can switch this feature on or off
from the vehicle tile in SYNC 3. See
Settings
(page 468).
Opening the Power Liftgate Press the button twice within
three seconds.
Locking and Unlocking the Doors
with the Key Blade
(If Equipped)
If the central locking function does not
operate, lock the doors using the key blade
in the door handle lock cylinder.
66
Escape (CTC) Canada/United States of America, Vehicles Built From: 17-06-2019, enUSA, Edition date: 201906, Third-Printing- Doors and LocksE210170 E138629 E138623 E306276
Page 71 of 553
At the Liftgate
Press the button located in the top of the
liftgate pull cup handle to unlatch the
liftgate, and then pull on the outside
handle.
Smart Unlocks for Integrated
Keyhead Transmitter (If Equipped)
This helps to prevent you from locking
yourself out of your vehicle if the key is still
in the ignition.
When you open one of the front doors and
lock your vehicle with the power door lock
control, all the doors will lock then unlock
and the horn will sound twice if the key is
still in the ignition.
You can still lock your vehicle with the key
in the ignition by:
• Pressing the lock button on the
transmitter even if the doors are not
closed.
If both front doors are closed, you can lock
your vehicle by any method, regardless of
whether the key is in the ignition or not.
Smart Unlocks for Intelligent
Access Keys
(If Equipped)
This feature helps to prevent you from
locking your intelligent access key inside
your vehicle ’s passenger compartment or
rear cargo area. When you electronically
lock your vehicle with any door open, the
transmission is in park (P) and the ignition
is off, the system searches for an intelligent
access key inside your vehicle after you
close the last door. If the system finds a
key, all of the doors will immediately
unlock and the horn will sound twice,
indicating that a key is inside.
When you open one of the front doors and
lock your vehicle using the power door lock
control, all doors will lock then unlock if
the ignition is on. Autolock
(If Equipped)
Autolock locks all the doors when:
• All doors are closed.
• The ignition is on.
• You shift into any gear putting your
vehicle in motion.
• Your vehicle reaches a speed greater
than
12 mph (20 km/h).
Autolock repeats when:
• You open then close any door while the
ignition is on and your vehicle speed is
12 mph (20 km/h)
or lower.
• Your vehicle reaches a speed greater
than
12 mph (20 km/h).
Autounlock
Autounlock unlocks all the doors when:
• The ignition is on, all the doors are
closed, and your vehicle had been
moving at a speed greater than 12 mph
(20 km/h)
.
• Your vehicle comes to a stop and you
switch the ignition off or to the
accessory position.
• You open the driver door within 10
minutes of switching the ignition off or
to accessory.
Note: The doors do not autounlock if you
electronically lock your vehicle after you
switch the ignition off and before you open
the driver door.
Enabling or Disabling Autounlock
To enable or disable autounlock, use the
vehicle tile in SYNC 3. See Settings (page
468
).
Illuminated Entry
The interior lamps and some exterior
lamps illuminate when you unlock the
doors with the remote control.
68
Escape (CTC) Canada/United States of America, Vehicles Built From: 17-06-2019, enUSA, Edition date: 201906, Third-Printing- Doors and Locks
Page 74 of 553
MANUAL LIFTGATE
WARNING: It is extremely
dangerous to ride in a cargo area, inside
or outside of a vehicle. In a crash, people
riding in these areas are more likely to be
seriously injured or killed. Do not allow
people to ride in any area of your vehicle
that is not equipped with seats and
seatbelts. Make sure everyone in your
vehicle is in a seat and properly using a
seatbelt. Failure to follow this warning
could result in serious personal injury or
death. WARNING:
Make sure that you fully
close the liftgate to prevent exhaust
fumes from entering your vehicle. If you
are unable to fully close the liftgate,
open the air vents or the windows to
allow fresh air to enter your vehicle.
Failure to follow this instruction could
result in personal injury or death.
Note: Be careful when opening or closing
the liftgate in a garage or other enclosed
area to avoid damaging the liftgate.
Note: Do not hang anything, for example
a bike rack, from the glass or liftgate. This
could damage the liftgate and its
components.
Note: Do not leave the liftgate open while
driving. This could damage the liftgate and
its components. Opening with the Outside Control
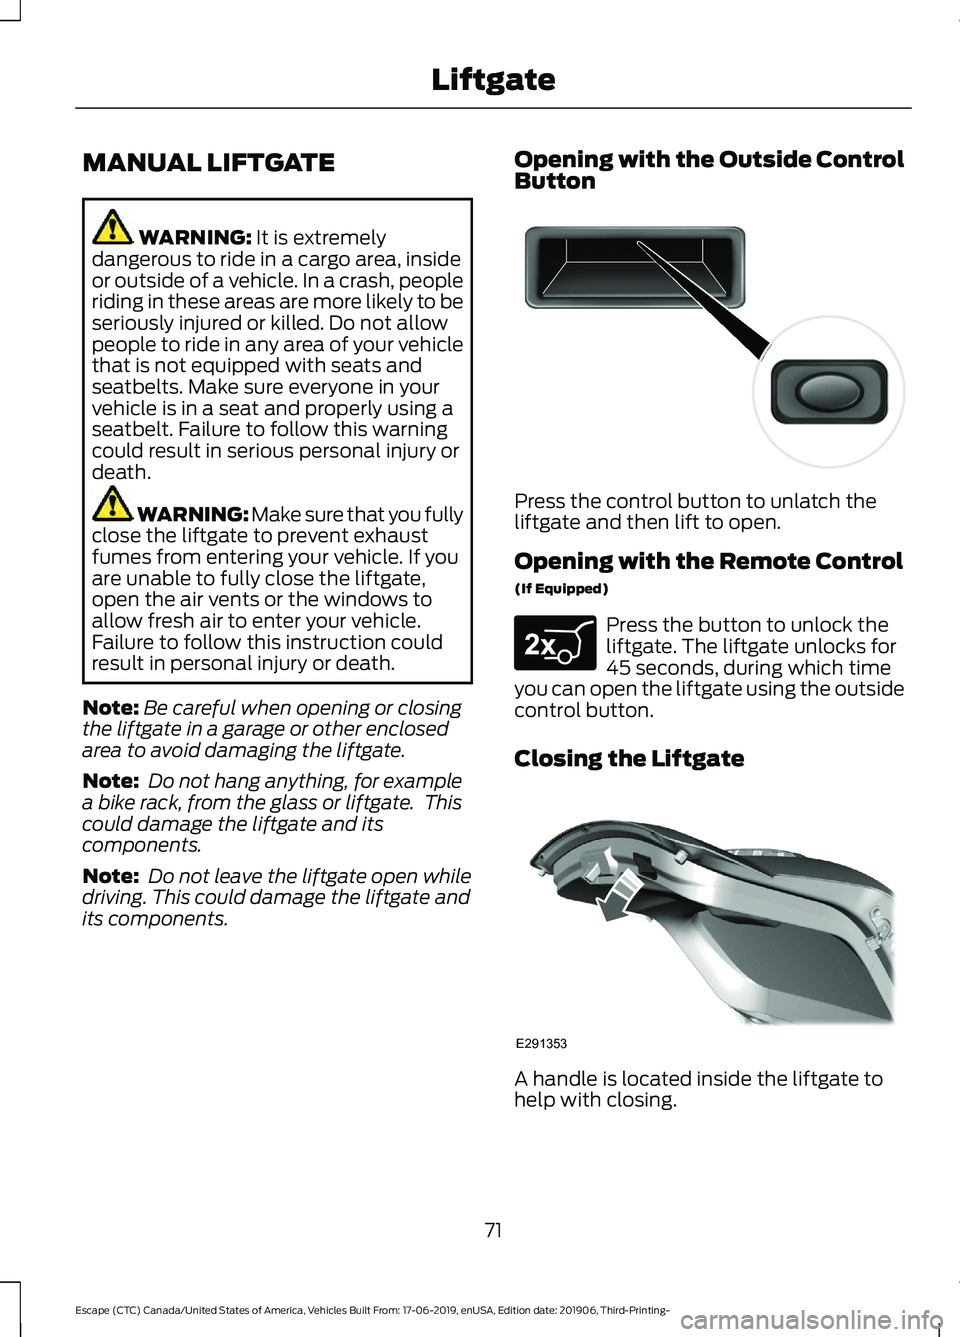
Button Press the control button to unlatch the
liftgate and then lift to open.
Opening with the Remote Control
(If Equipped)
Press the button to unlock the
liftgate. The liftgate unlocks for
45 seconds, during which time
you can open the liftgate using the outside
control button.
Closing the Liftgate A handle is located inside the liftgate to
help with closing.
71
Escape (CTC) Canada/United States of America, Vehicles Built From: 17-06-2019, enUSA, Edition date: 201906, Third-Printing- LiftgateE138632 E267940 E291353
Page 75 of 553
POWER LIFTGATE (IF EQUIPPED)
WARNING:
It is extremely
dangerous to ride in a cargo area, inside
or outside of a vehicle. In a crash, people
riding in these areas are more likely to be
seriously injured or killed. Do not allow
people to ride in any area of your vehicle
that is not equipped with seats and
seatbelts. Make sure everyone in your
vehicle is in a seat and properly using a
seatbelt. Failure to follow this warning
could result in serious personal injury or
death. WARNING:
Make sure that you fully
close the liftgate to prevent exhaust
fumes from entering your vehicle. If you
are unable to fully close the liftgate,
open the air vents or the windows to
allow fresh air to enter your vehicle.
Failure to follow this instruction could
result in personal injury or death. WARNING:
Make sure that you fully
close the liftgate to prevent passengers
and cargo from falling out. Failure to
follow this instruction could result in
personal injury or death. WARNING: Keep keys out of reach
of children. Do not allow children to
operate or play near an open or moving
power liftgate. You should supervise the
operation of the power liftgate at all
times.
Note: Make sure that you close the liftgate
before operating or moving your vehicle,
especially in an enclosure, like a garage or
a parking structure. This could damage the
liftgate and its components.
Note: Do not hang anything, for example
a bike rack, from the glass or liftgate. This
could damage the liftgate and its
components. The liftgate only operates with the
transmission in park (P).
If there is a problem with the open or close
request, a tone sounds for one of the
following reasons:
•
The ignition is on and the transmission
is not in park (P).
• The battery voltage is below the
minimum operating voltage.
• The liftgate is not fully closed and your
vehicle speed is at or above
3 mph
(5 km/h).
If the liftgate starts to close after it has
fully opened, this indicates there may be
excessive weight on the liftgate or a
possible strut failure. A repetitive tone
sounds and the liftgate closes under
control. If the liftgate continues to close
after opening, have the system checked
by an authorized dealer. Remove any
excessive weight from the liftgate.
Opening and Closing the Liftgate WARNING:
Make sure all persons
are clear of the power liftgate area
before using the power liftgate control.
Note: Make sure the area behind your
vehicle is free from obstruction and that
there is enough room for you to operate the
liftgate. Objects too close to your vehicle,
for example a wall, garage door or another
vehicle may come into contact with the
moving liftgate. This could damage the
liftgate and its components.
Note: Be careful when opening or closing
the liftgate in a garage or other enclosed
area to avoid damaging the liftgate.
Note: Do not leave the liftgate open when
you are driving. This could damage the
liftgate and its components.
72
Escape (CTC) Canada/United States of America, Vehicles Built From: 17-06-2019, enUSA, Edition date: 201906, Third-Printing- Liftgate
Page 76 of 553
Opening from the Instrument Panel
With the transmission in park
(P), press the button on the
instrument panel.
Opening with the Remote Control Press the button twice within
three seconds.
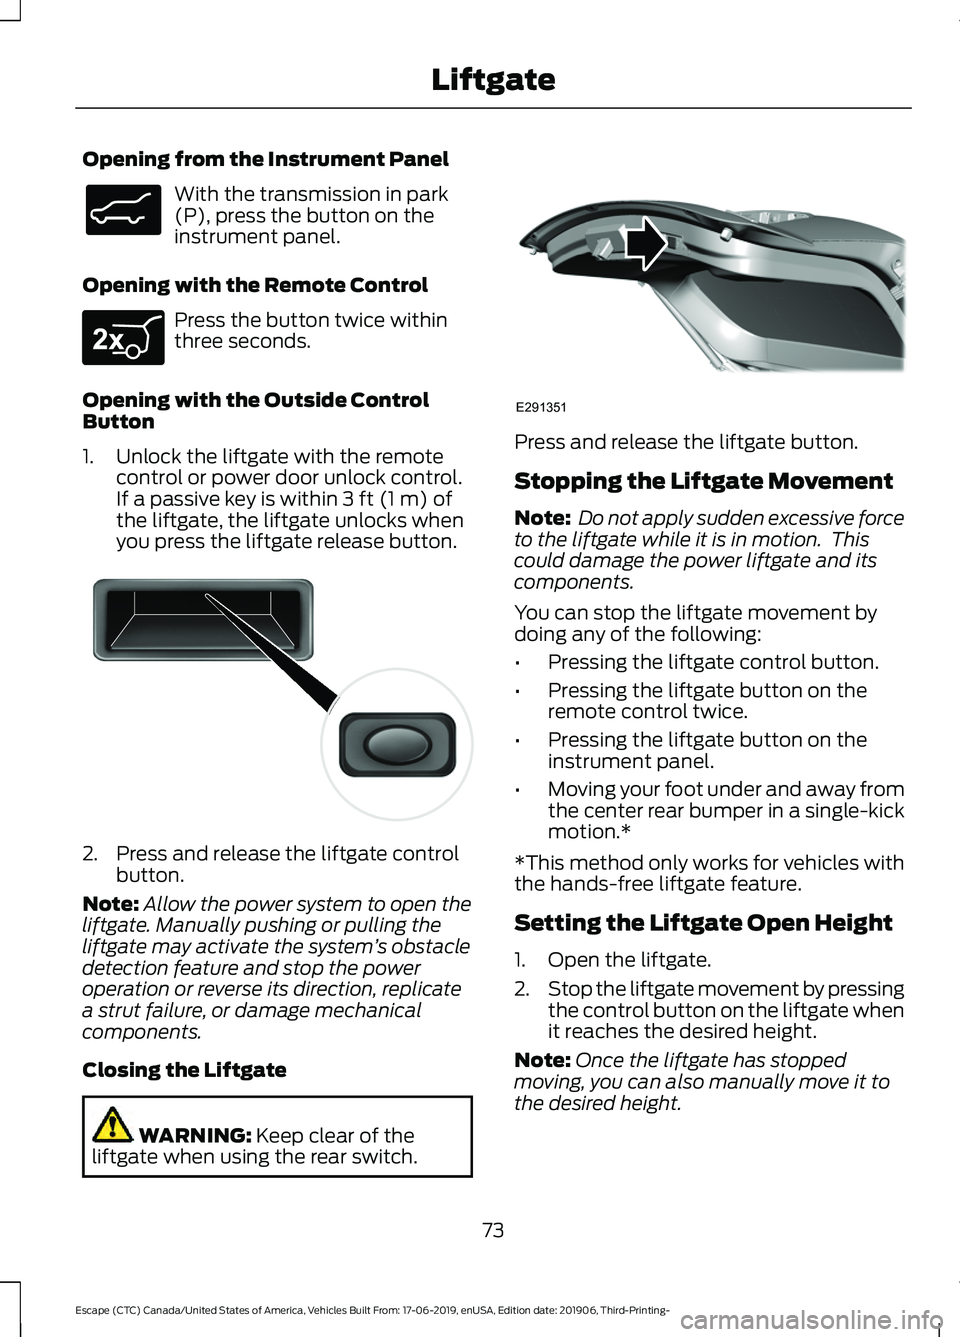
Opening with the Outside Control
Button
1. Unlock the liftgate with the remote control or power door unlock control.
If a passive key is within 3 ft (1 m) of
the liftgate, the liftgate unlocks when
you press the liftgate release button. 2. Press and release the liftgate control
button.
Note: Allow the power system to open the
liftgate. Manually pushing or pulling the
liftgate may activate the system ’s obstacle
detection feature and stop the power
operation or reverse its direction, replicate
a strut failure, or damage mechanical
components.
Closing the Liftgate WARNING:
Keep clear of the
liftgate when using the rear switch. Press and release the liftgate button.
Stopping the Liftgate Movement
Note:
Do not apply sudden excessive force
to the liftgate while it is in motion. This
could damage the power liftgate and its
components.
You can stop the liftgate movement by
doing any of the following:
• Pressing the liftgate control button.
• Pressing the liftgate button on the
remote control twice.
• Pressing the liftgate button on the
instrument panel.
• Moving your foot under and away from
the center rear bumper in a single-kick
motion.*
*This method only works for vehicles with
the hands-free liftgate feature.
Setting the Liftgate Open Height
1. Open the liftgate.
2. Stop the liftgate movement by pressing
the control button on the liftgate when
it reaches the desired height.
Note: Once the liftgate has stopped
moving, you can also manually move it to
the desired height.
73
Escape (CTC) Canada/United States of America, Vehicles Built From: 17-06-2019, enUSA, Edition date: 201906, Third-Printing- LiftgateE138633 E267940 E138632 E291351
Page 77 of 553
3. Press and hold the liftgate control
button on the liftgate until you hear a
tone, indicating programming is
complete.
Note: You can only use the liftgate control
button to program the height.
Note: You cannot program the height if the
liftgate position is too low.
The new open liftgate height is recalled
when the power liftgate is opened. To
change the programmed height, repeat the
above procedure. Once you open the
power liftgate, you can manually move it
to a different height.
Note: The system recalls the new
programmed height until you reprogram it,
even if you disconnect the battery.
When operating the power liftgate after
you have programmed a lower height than
fully open, you can fully open the liftgate
by manually pushing it upward to the
maximum open position.
Obstacle Detection
Note: Entering your vehicle while the
liftgate is closing can cause your vehicle to
bounce and activate obstacle detection. To
prevent this, let the power liftgate close
completely before you enter your vehicle.
Before driving off, check the instrument
cluster for a liftgate or door ajar message or
warning indicator. Failure to do this could
result in unintentionally leaving the liftgate
open while driving.
When Closing
The system stops when it detects an
obstacle. A tone sounds and the system
reverses to open. Once you remove the
obstacle, you can power close the liftgate. When Opening
The system stops when it detects an
obstacle and a tone sounds. Once you
remove the obstacle, you can continue to
operate the liftgate.
Switching the Power Liftgate On
or Off
You can switch the power liftgate on or off
through the vehicle settings on your
touchscreen.
When switched off, the liftgate only
unlatches and will not power open or close.
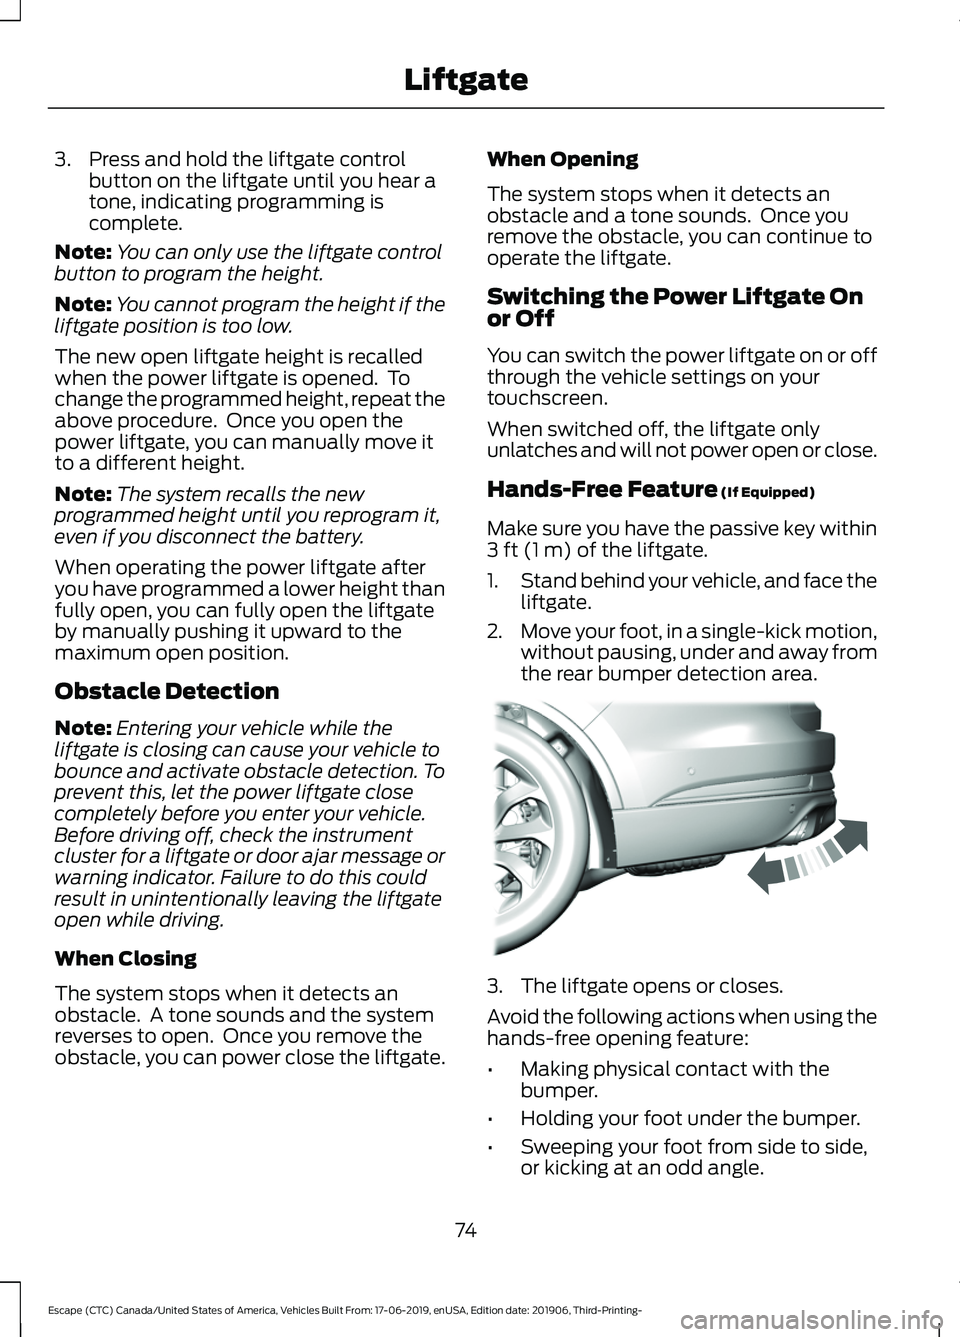
Hands-Free Feature (If Equipped)
Make sure you have the passive key within
3 ft (1 m)
of the liftgate.
1. Stand behind your vehicle, and face the
liftgate.
2. Move your foot, in a single-kick motion,
without pausing, under and away from
the rear bumper detection area. 3. The liftgate opens or closes.
Avoid the following actions when using the
hands-free opening feature:
•
Making physical contact with the
bumper.
• Holding your foot under the bumper.
• Sweeping your foot from side to side,
or kicking at an odd angle.
74
Escape (CTC) Canada/United States of America, Vehicles Built From: 17-06-2019, enUSA, Edition date: 201906, Third-Printing- LiftgateE300799
Page 78 of 553
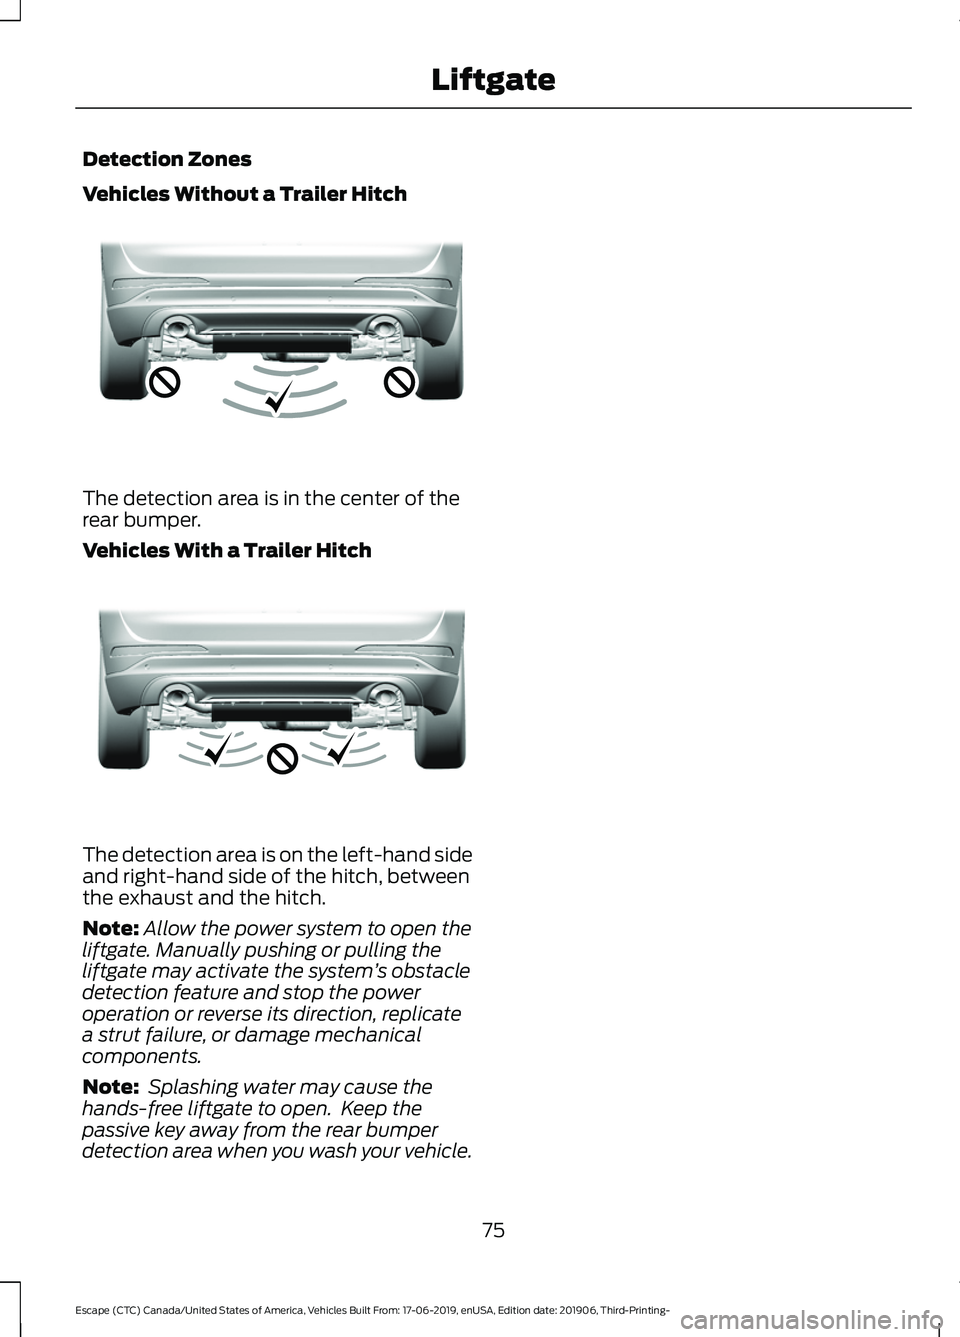
Detection Zones
Vehicles Without a Trailer Hitch
The detection area is in the center of the
rear bumper.
Vehicles With a Trailer Hitch
The detection area is on the left-hand side
and right-hand side of the hitch, between
the exhaust and the hitch.
Note:
Allow the power system to open the
liftgate. Manually pushing or pulling the
liftgate may activate the system ’s obstacle
detection feature and stop the power
operation or reverse its direction, replicate
a strut failure, or damage mechanical
components.
Note: Splashing water may cause the
hands-free liftgate to open. Keep the
passive key away from the rear bumper
detection area when you wash your vehicle.
75
Escape (CTC) Canada/United States of America, Vehicles Built From: 17-06-2019, enUSA, Edition date: 201906, Third-Printing- LiftgateE310717 E310718