Page 149 of 252

connect the other end of the cable
used for negative (–) to an engine earth
(a visible metal part of the engine or
gearbox/transmission of the vehicle
with flat battery) away from the battery
and the fuel injection system;
start the vehicle engine with the
auxiliary battery, let it run for a few
minutes at idling. Start the engine of the
vehicle with flat battery.
Cable disconnection
Once the engine is started, remove the
leads, reversing the order above.
If after a few attempts the engine does
not start, do not persist but contact a
Fiat Dealership.
If it is often necessary to perform a
jump starting, have the vehicle battery
and the recharging system checked by
a Fiat Dealership.
WARNING
145)Before opening the bonnet, make
sure that the engine is off and that the
ignition key is in the STOP position. Follow
the indications on the plate underneath the
bonnet. We recommend that you remove
the key from the ignition if other people
remain in the vehicle. The vehicle should
always be left after the key has been
removed or turned to the STOP position.
During refuelling, make sure that the engine
is off (and that the ignition key is in the
STOP position).
146)Do not get too close to the radiator
cooling fan: the electric fan may start;
danger of injury. Scarves, ties and other
loose clothing might be pulled by moving
parts.
147)Remove any metal objects (e.g. rings,
watches, bracelets), that might cause an
accidental electrical contact and cause
serious injury.
148)The batteries contain acid that can
burn skin or eyes. Batteries produce
hydrogen, which is easily flammable and
explosive. Therefore, keep away flames or
devices which may cause sparks.
IMPORTANT
56)Never use a fast battery-charger to
start the engine as this could damage the
electronic systems of your vehicle,
particularly the ignition and engine fuel
supply control units.57)Do not connect the cable to the
negative terminal (–) of the flat battery. The
following spark could lead to battery
explosion and cause serious harm. Only
use the specific earth point; do not use any
other exposed metallic part.
147
Page 150 of 252

FUEL CUT-OFF
SYSTEM
DESCRIPTION
Diesel and petrol versions
This intervenes in the case of an impact
causing:
the interruption of the fuel supply
with the engine consequently switching
off;
the automatic unlocking of the
doors;
turning on of the lights inside the
vehicle;
deactivation of climate control
system ventilation;
switching on of the hazard warning
lights (to deactivate the lights press the
button on the dashboard).
On some versions, the intervention of
the system is indicated by a message
shown on the display. In the same way,
a dedicated message on the display
warns the driver if system operation is
compromised.
IMPORTANT Carefully check the vehicle
for fuel leaks, for instance in the engine
compartment, under the vehicle or near
the tank area. After a collision, bring the
ignition device to STOP to prevent the
battery from running down.
LPG versions
(where provided)
On LPG versions, in addition to the
above, the fuel cut-off system stops
petrol supply immediately, closes the
LPG safety solenoid valve and stops
injection, consequently shutting off the
engine.
148
IN AN EMERGENCY
Page 152 of 252

AUTOMATIC
TRANSMISSION
Lever release
In the event of a fault, to move the gear
lever from P (Park), proceed as follows:
stop the engine;
engage the parking brake;
working carefully in the point
indicated by the arrow, remove the gear
lever gaiter 1 fig. 154 (also see
fig. 155 );
fully depress the brake pedal and
hold it down;
insert the screwdriver supplied
perpendicularly in hole 2 fig. 156 and
adjust the release lever;
place the gear lever in N (Neutral)
position;
refit the gear lever gaiter correctly;
start the engine.
Key removal
58)
The ignition key (for versions with key
without remote control) can be removed
only if the gear lever is in position P
(Park).
If the vehicle battery is flat and the
ignition key is engaged, the latter is
locked in position.
To remove the key manually, proceed
as follows:
stop the vehicle in safety conditions,
engage a gear and the parking brake;
using the provided key 1
fig. 157 (located in the casing
containing the on-board documents or
in the tool compartment in the boot),
undo the fixing screws 2 fig. 158 for the
lower cover 3;
15408106J0001EM
15508106J0002EM
15608106J0003EM
15708106J0004EM
150
IN AN EMERGENCY
Page 155 of 252
SERVICING AND CARE
Correct servicing permits the
performance of the vehicle to be
maintained over time, as well as limited
running costs and safeguarding the
efficiency of the safety systems.
This chapter explains how.SCHEDULED SERVICING.......154
ENGINE COMPARTMENT......165
BATTERY RECHARGING.......177
SERVICING PROCEDURES.....178
LIFTING THE VEHICLE.........180
WHEELS AND TYRES.........181
BRAKES..................182
BODY...................182
INTERIOR.................184
153
Page 166 of 252

REGULAR CHECKS
Every1,000km or before long trips
check and, if necessary, top up:
engine coolant level;
brake fluid level;
windscreen washer fluid level;
tyre inflation pressure and condition;
operation of lighting system
(headlights, direction indicators, hazard
warning lights, etc.);
operation of windscreen wash/wipe
system and positioning/wear of wiper
blades;
check and top up additive level for
AdBlue®
Diesel emissions (UREA) (for
versions/markets, where provided);
Every3,000km, check and top up if
required: engine oil level.
DEMANDING USE OF THE
CAR
If the car is used mainly under one of
the following conditions:
dusty roads;
short, repeated journeys (less than
7-8 Km) at sub-zero outdoor
temperatures;
engine often idling or driving long
distances at low speeds or long periods
of inactivity;the following checks must be carried
out more often than indicated in the
Scheduled Servicing Plan:
check front disc brake pad condition
and wear;
check cleanliness of bonnet and
luggage compartment locks,
cleanliness and lubrication of linkage;
visually inspect conditions of: engine,
gearbox, transmission, pipes and hoses
(exhaust/fuel system/brakes) and
rubber elements (gaiters/sleeves/
bushes, etc.);
check battery charge and battery
fluid level (electrolyte);
visually inspect conditions of the
accessory drive belts;
check and, if necessary, change
engine oil and replace oil filter;
check and, if necessary, replace
pollen filter;
check and, if necessary, replace air
cleaner.
Restore additive level forAdBlue®
Diesel emissions (UREA) (for
versions/markets, where applicable),
when the warning light comes on or the
message on the instrument panel
appears.
164
SERVICING AND CARE
Page 167 of 252
ENGINE COMPARTMENT
CHECKING LEVELS
153) 154)
59)
1.4 16V 95 HP E6 version
1. Brake fluid 2. Battery 3. Windscreen washer fluid 4. Engine coolant fluid 5. Engine oil dipstick 6. Engine oil cap/filler
16209026J0001EM
165
Page 168 of 252
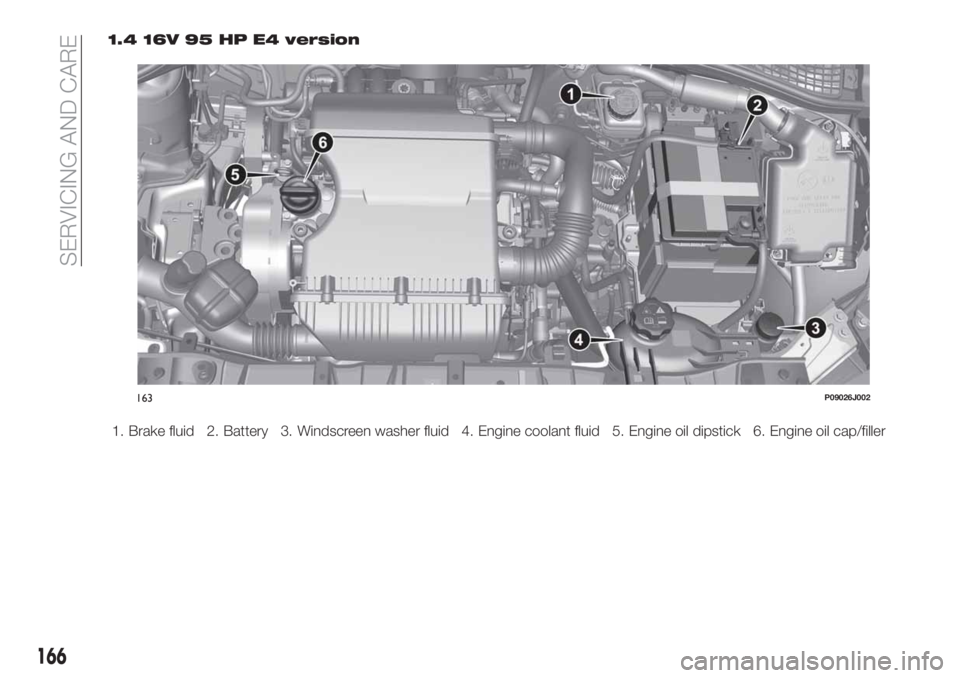
1.4 16V 95 HP E4 version
1. Brake fluid 2. Battery 3. Windscreen washer fluid 4. Engine coolant fluid 5. Engine oil dipstick 6. Engine oil cap/filler
163P09026J002
166
SERVICING AND CARE
Page 169 of 252
1.4 T-Jet 120 HP LPG E6(for versions/markets, where provided)
1. Brake fluid 2. Battery 3. Windscreen washer fluid 4. Engine coolant fluid 5. Engine oil dipstick 6. Engine oil cap/filler
164PGL000021
167